


How to Create a Portfolio Site on WordPress
Having a portfolio page on a website can be used for so many things. By definition, it is something used to hold materials such as papers, maps, drawings, photos, etc. A portfolio in finance terms refers to a group of investments. Or, people also think about a portfolio as a way to showcase their recent work. For example, graphic designers may use a portfolio to show off their logo, print, or website designs. A builder or an architect may use a portfolio to showcase their completed projects.
The key takeaway here is that a portfolio has many uses. It can be used to hold or group items of all types.
In this post, I’ll demonstrate how to create a portfolio site on WordPress.
Note: I recommend that you always do customizations like this in a child theme. Making customizations to a theme that you have downloaded from a third party (a theme that you didn’t develop yourself), means that you will not be able to take theme updates. If you do, the theme update will wipe out all of your customizations.
Let’s Get Started
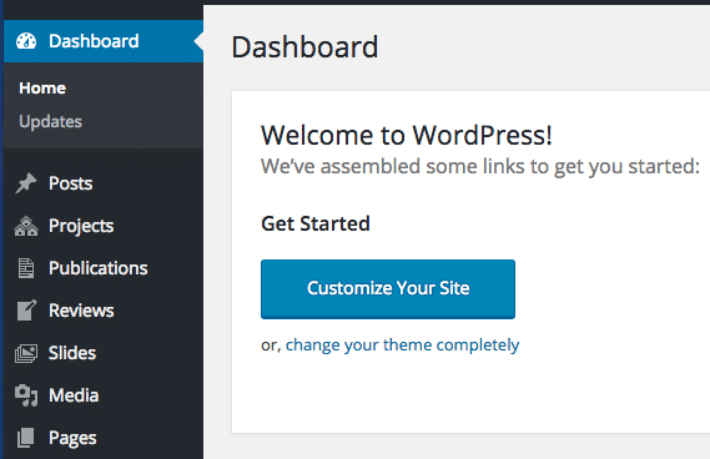
The first thing I’d recommend doing is creating a custom post type (CPT). This will help ensure there is a clear place to add and edit your portfolio items. For example, in the image below, you can see that I have a site where I have created a CPT for Projects, Publications, Reviews, and Slides. This just makes it super easy to keep my content organized.
Creating the Custom Post Type
To create a CPT, place the following code into your functions.php file. The following will create a CPT for ‘Projects,’ but that can be changed to anything. Simply change any reference to ‘Project’ and ‘Projects’ to whatever you’d like.
//Creating Custom Post types for Projects
function setup_projects_cpt(){
$labels = array(
'name' => _x('Projects', 'post type general name'),
'singular_name' => _x('Project', 'post type singular name'),
'add_new' => _x('Add New', 'Project'),
'add_new_item' => __('Add New Project'),
'edit_item' => __('Edit Project'),
'new_item' => __('New Project'),
'all_items' => __('All Projects'),
'view_item' => __('View Project'),
'search_items' => __('Search Projects'),
'not_found' => __('No Projects Found'),
'not_found_in_trash' => __('No Projects found in the trash'),
'parent_item_colon' => '',
'menu_name' => 'Projects'
);
$args = array(
'labels' => $labels,
'description' => 'My Projects',
'rewrite' => array('slug' => 'projects'),
'public' => true,
'menu_position' => 5,
'supports' => array('title', 'editor', 'thumbnail', 'excerpt', 'custom-fields'),
'has_archive' => true,
'taxonomies' => array(''),
'menu_icon' => 'dashicons-admin-multisite', //Find the appropriate dashicon here: https://developer.wordpress.org/resource/dashicons/
);
register_post_type('projects', $args);
}
add_action('init', 'setup_projects_cpt');

//The following snippet is used to enable categories for the projects CPT.
function projects_taxonomy() {
register_taxonomy(
'project_categories', //The name of the taxonomy. Name should be in slug form (no spaces and all lowercase. no caps).
'projects', //post type name
array(
'hierarchical' => true,
'label' => 'Project Categories', //Label Displayed in the Admin when creating a new project
'query_var' => true,
'rewrite' => array(
'slug' => 'projects', // This controls the base slug that will display before each term
'with_front' => false // Don't display the category base before
)
)
);
}
add_action( 'init', 'projects_taxonomy');
Now that we have a CPT, go to your admin dashboard and add a few sample projects that you can use to test it with. Make sure you give it a title, an excerpt, and add a featured image.
Once you have added a few sample entries, you will want to display them on the front end of your site. The next step is to create the page that you will use to display your projects. If you didn’t need any customizations, you could copy everything from your theme’s archive.php and paste it into a new file called archive-projects.php (archive-{post_type}.php). Then this new page’s url would simply be http://yoursitedomain.com/projects/.
However, because I generally have some additional needs for my page, I prefer to create a custom template such as projects-page.php. If you choose to go this route, you will need to create a page in your wp-admin and assign your page to this new template using the ‘Page Attributes’.
In this new template, make sure to add the following to the top:
<?php

/* Template Name: Projects Portfolio */

get_header(); ?>
Make sure the template also contains the get_footer code at the bottom of the page:
<?php get_footer(); ?>Once you have the basic foundation of your template in place, you will need to create the desired layout and then add the code that queries your CPT. Make sure you add the following between the get_header(); ?> and get_Footer(); ?>:
<?php
/* Query the post */
$args = array( 'post_type' => 'projects', 'posts_per_page' => -1 );//this will return ALL of the posts from the projects CPT. You can also change this to a specific number such as 'posts_per_page' => 10...
$loop = new WP_Query( $args ); //In this line we are telling WP to query the 'projects' CPT
while ( $loop->have_posts() ) : $loop->the_post(); //In this line we are saying keep looping through the 'projects' CPT until all are returned
?>
Note: In the query above you have started a while-loop. In the code snippet below, we will end the while-loop.
At this point, you have queried the CPT and now you need to display it on your website. While still working within the projects-page.php, add the following code just after the query code above:
<?php echo '<div class="project">';?>
<a href="<?php print get_permalink($post->ID) ?>"><?php echo the_post_thumbnail(); ?></a> <!-- This returns the featured image with it linked to the page that it was added to-->
<h4><?php print get_the_title(); ?></h4>
<?php print get_the_excerpt(); ?><br />
<a href="<?php print get_permalink($post->ID) ?>">Details</a><!-- This wraps the ‘Details’ link with the same url that the featured image gets wrapped in. -->
</div> <!-- End individual project col -->

<?php endwhile; ?><!-- End of the while loop -->
In the snippet above, you will notice the addition of HTML tags. These tags control the layout of the page. It is important to include these within the while loop so that each project that is returned gets the exact same HTML structure as well as CSS classes. The query above will return a <div> container with the class of “project”. Within each div container, there will be a ‘Featured Image’ returned as a thumbnail, the ‘title’ styled as an H4, the project’s excerpt, and then a ‘Details’ link for each project found in the ‘Projects’ CPT.
Note: Because we are using a CPT, you will also need to add theme support for the post thumbnail. You may even need to define the thumbnail dimensions prior to using this code example. This would be done in your functions.php file.
add_theme_support( 'post-thumbnails', array( 'projects' ) ); // adds thumbnail support for the Projects CPTA quick note: Your HTML and CSS classes will need to be adjusted accordingly to match your website design. In my example, I am using Bootstrap to create my layout and I have created classes such as project and page-wrap, which contain additional styling.
For Example, col-sm-6 col-md-3 creates a two-column layout on small screens and a four-column layout on medium and large screens. If I weren’t using Bootstrap, I would’ve had to add some container widths to the project class. I would likely need a float:left to get all the projects to align nicely in columns.
When finished, your projects-page.php should look something like this:
<?php
/* Template Name: Projects Portfolio */

get_header();

?>
<!-- ============ CONTENT START ============ -->
<div class="container>
<div class="row">
<div id="content-projects" class="page-wrap">
<div class="col-sm-12 content-wrapper">
<?php while ( have_posts() ) : the_post(); ?> <!--queries the projects-page.php-->
<?php the_content() ?> <!--Grabs any content added to the Editor-->
<?php endwhile; // end of the loop. ?>
</div><!-- End intro/descriptive copy column-->
</div> <!-- End intro/descriptive copy container-->
</div>

<div id="projects" class="row">
<!-- Start projects Loop -->
<?php
/*
Query the post
*/
$args = array( 'post_type' => 'projects', 'posts_per_page' => -1 );
$loop = new WP_Query( $args );
while ( $loop->have_posts() ) : $loop->the_post();

<?php echo '<div class="project col-sm-6 col-md-3">';?>
<a href="<?php print get_permalink($post->ID) ?>">
<?php echo the_post_thumbnail(); ?></a>
<h4><?php print get_the_title(); ?></h4>
<?php print get_the_excerpt(); ?><br />
<a class="btn btn-default" href="<?php print get_permalink($post->ID) ?>">Details</a>
</div> <!-- End individual project col -->
<?php endwhile; ?>
</div><!-- End Projects Row -->
</div><!-- End Container -->
<!-- ============ CONTENT END ============ -->

<?php get_footer(); ?>
Creating Your Project Details Page
Now that we have a portfolio page, we will need to ensure that we have a page to take our users to when they click on the thumbnail or the ‘Details’ link.
For this, we will need to create a new template in our theme called single-projects.php. Using ‘single’ and the CPT’s slug ‘projects,’ WordPress knows to use this template for all of the project’s CPTs.
single-{post_type}.phpJust like we did for the projects-page.php, we will need to add the following:
<?php

/* This is the template for displaying Single Project details */

get_header(); ?>
And at the bottom:
<?php get_footer(); ?>If you don’t have an idea of what you want this page to look like yet, you may want to copy all the code from your theme’s single.php and paste it into this new file.
So that’s it! Just like that you have a portfolio. Let us see what you’ve built in the comments!