


How to Create a WordPress Child Theme
Usually, it is next to impossible to find the perfect theme; there are always some modifications that need to be done. So, why not just take a nice WordPress default theme, like Twenty Fifteen, and make it your own so it looks and functions just the way you want? Creating a child theme will save you lots of time and headaches down the road (trust me).
I can speak from firsthand experience. I “inherited” a WordPress site where the developer had just hacked apart the parent theme, and I still remember how frustrating it was that I could not actually update the theme in fear of it overriding customizations that gave the site its functionality. I didn’t know what was original code and what was custom, so there it sat, with no possibility for updates.
The story does have a happy ending, though. I was newer to WordPress at the time, so it did teach me early on that altering a parent theme was not a good idea. When the site was finally redesigned, the first item of business was to take the customizations and put them in a child theme.
A child theme allows you to work in a separate place without your work being overwritten by a future parent theme update. Technically speaking, when you create a child theme, you create a separate set of files that you can use to customize the theme without affecting the original parent theme. If you make changes to a parent theme’s files, those changes are going to be overwritten when you next update the theme. This is a big deal because updates can include feature modifications, bug fixes, and important security measures. It’s crucial to keep the parent theme up to date and use a child theme for any customizations.
Child Theme Basics
Child themes are separate themes that you create that rely on a parent theme for it’s basic functionality. When you use a child theme, WordPress knows to reference it and look for any functionality that is included. This is great because it allows you to modify only the parts of the parents theme that you need to change, making this a very efficient way to add customizations to your WordPress site.
To dig a little deeper, here’s how child themes work on a file-level. WordPress checks to see if a needed file is included in the child theme. If it is included, that child theme file is loaded. If there is not one in the child theme, the file in the parent theme is loaded. The only exception to this is the functions.php file, in which both the parent and child versions are loaded. Typically, there is crucial information in the functions.php file. If WordPress only loaded the child theme version (unless you copied everything over), the site wouldn’t work right. Thankfully, WordPress loads both files, so you don’t have to worry about copying the entire functions.php file into your child theme.
Remember, you can always turn off your child theme and fall back on the original if needed. It is a one-way street though; you cannot turn off the parent and rely on the child theme.
If you’re adding customizations to a WordPress theme, it’s best to use a child theme. Ready to create your own? Now we’ll go through the process, step by step.
Creating a Child Theme
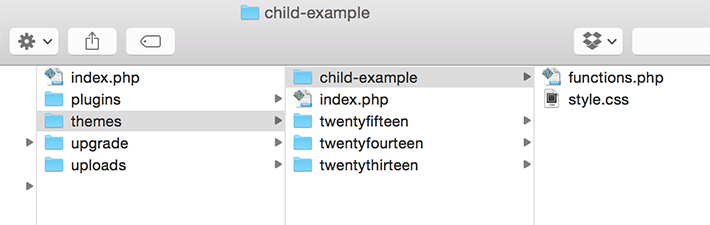
It’s not as complex as it might sound to create one. In fact, technically all you need are just two files:a style.css and a functions.php file. Most child themes have more than that, but technically speaking, those are the only required two.
To create a child theme, you need to have WordPress installed along with a parent theme that you’d like to use.
Create a Theme Directory
First, go to your theme directory and create a folder for your new theme. Give it a recognizable name. For this example, I will name my theme child-example so it is easy to find.
Make the Child Theme Stylesheet
The next, very crucial step is creating the child theme’s stylesheet. Create a style.css file. Keep in mind, it has to be named style.css for things to work right.
Next, you will need to include some information about your theme.
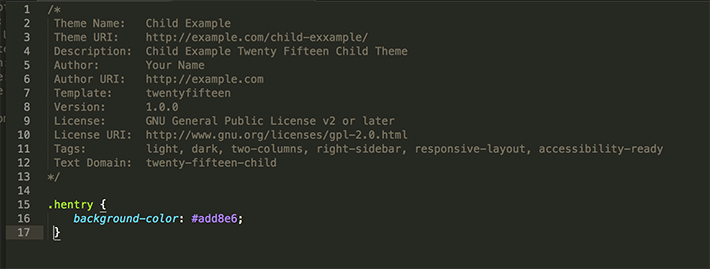
Copy and paste this into the style.css file:
/*
 Theme Name:   Child Example
 Theme URI:    http://example.com/child-exxample/
 Description:  Child Example Twenty Fifteen Child Theme
 Author:       Your Name
 Author URI:   http://example.com
 Template:     twentyfifteen
 Version:      1.0.0
 License:      GNU General Public License v2 or later
 License URI:  http://www.gnu.org/licenses/gpl-2.0.html
 Tags:         Tags: black, blue, gray, pink, purple, white, yellow, dark, light, two-columns, left-sidebar, fixed-layout, responsive-layout, accessibility-ready, custom-background, custom-colors, custom-header, custom-menu, editor-style, featured-images, microformats, post-formats, rtl-language-support, sticky-post, threaded-comments, translation-ready
 Text Domain:  twenty-fifteen-child
*/
This may look like a lot, but there are really only two that are necessary, which are Theme Name and Template. The Theme Name tells WordPress the name of the child theme. The Template tells WordPress which theme it should consider as the parent theme, which is very important.
Most of the others are pretty self-explanatory, but there are a couple that might need a little more clarification. The Text Domain and Tags could be a little confusing. The Text Domain is used for translating strings for internationalization purposes. This is unique for your theme and should be used whenever you use translation functions. There is a lot more information in the Codex and can be found in the topic of I18n for WordPress Developers. The Tags section is a list of tags that are WordPress theme specific. For this example, I looked at the Twenty Fifteen parent style.css, grabbed the tags from there, and put them in the child theme.
Utilize Parent Styles
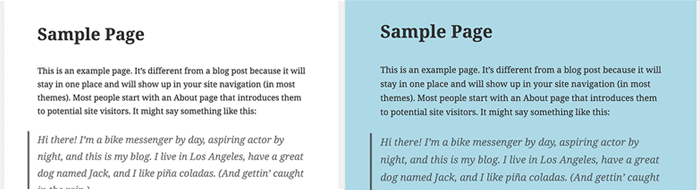
Remember how WordPress looks for the child theme files first? Right now, the child theme works, but it doesn’t look very polished because you have not done any styling yet. If you activate it and reload the page, it will look a little messy. It’ll probably look something like this:
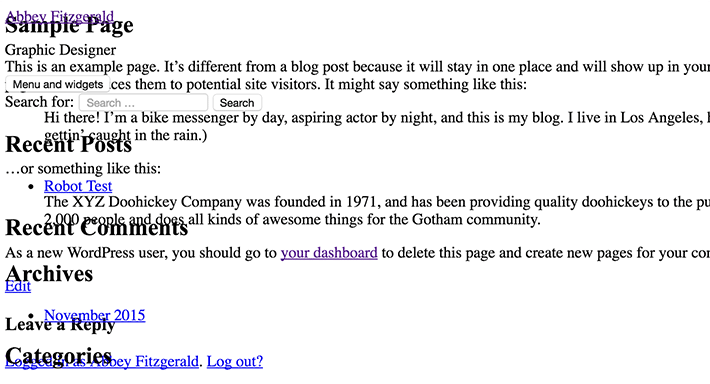
Let’s fix this so it falls back on the parent theme and there will be at least some styling applied. You will still use your child theme for your custom styling, but first, let’s get the parent styling to show.
To make sure you load the parent file’s stylesheet, we will need to enqueue it in the child theme. You will need a functions.php file in the child theme to put the following snippet in.
<?php

add_action( 'wp_enqueue_scripts', 'enqueue_parent_styles' );
function enqueue_parent_styles() {
    wp_enqueue_style( 'parent-style', get_template_directory_uri().'/style.css' );
}
Making a CSS Customization
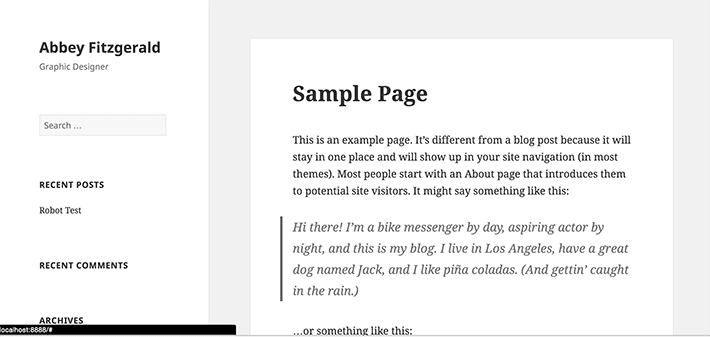
Now that the parent styles are showing, let’s change some of the CSS for your child theme customization. For this example, styling a background element for page content is a good way to see the child theme in action. It has been styled white in the parent theme CSS, but let’s change it to blue in your child theme. Remember, the parent styles are loaded first, and your customizations will be loaded after so those will be what we will see.
If you’re a Chrome user, the Developer Tools are very helpful to see styling and experiment in the browser. Go to View > Developer > View Source and select page elements. Styles will be shown on the right. I inspected the article which had a .hentry class that has a white background. I pasted a hex value to test it out first in the browser.

To make this change, open up the CSS file in the child theme and add the CSS information.
As you can see, style changes can easily be made in the child theme.
Modifying Your Child Theme’s Functionality
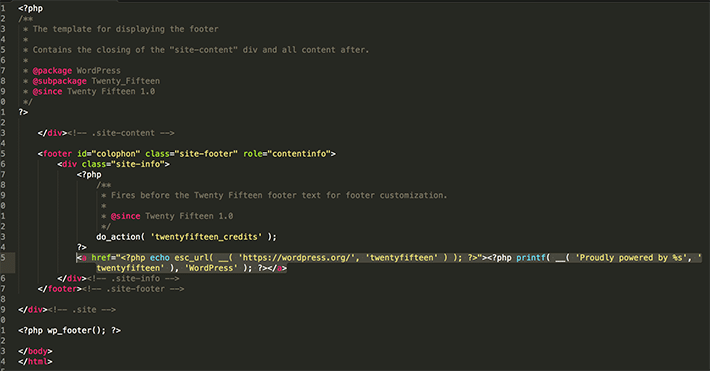
Adjusting the styling is pretty easy, but what about other things like the header, footer, sidebar, etc.? Let’s say there are some modifications to make in the footer. Copy and paste the footer from the parent theme into the child. The footer.php file can be opened in the text editor of your choice and modified. I’ve decided to remove the “Proudly powered by WordPress” line, so I deleted this from the file in my child theme. This is now the file that WordPress will load first, so that line of text will not show.
Creating a child theme is a good habit to get into when creating WordPress themes. With just a few simple steps, they are easy to create and maintain. Keeping customizations separate from parent themes is good for both organization purposes and keeping everything updated, which will save a lot of headache down the road.