


How to Create Custom Meta Boxes with CMB2
CMB2 has become a favorite plugin within the WordPress community and is used in many digital experience across the web. In this article, we’ll show you how to use it to create custom meta boxes.
First, What is CMB2?
CMB is an acronym for Custom Meta Boxes and per the description on the plugin page, “CMB2 is a meta box, custom fields, and forms library for WordPress that will blow your mind.” It was developed by Justin Sternberg of WebDevStudios and had been in the plugin repository for a little over two years. However, last February, the good folks over at the WordPress plugin repository recognized that they goofed and approved CMB2 as a plugin when they shouldn’t have.
See, plugins typically are able to do something right out of the box; they have some inherent functionality. CMB2 is actually a framework. As Sternberg once explained, “It’s a developer’s framework for easily building in forms and fields to your themes and plugins.” In fact, when you install CMB2, nothing will happen. You won’t get an admin page and there isn’t an admin user interface. To use CMB2 you have to be able to write code and add to your functions.php file. For that reason, it’s a bit of a ‘non-plugin’ plugin.
The good news is that the plugin approval team has agreed to leave it in the repository, so you can continue to download and update it from there. You can read all about the history here at Justin’s site.
How to Set up CMB2
In order to get started, you will need to find the example-functions.php file from the plugin directory and copy it into your theme. It can be copied directly into the theme’s root folder, but to keep your project nicely organized, we suggest copying it into a folder such as /lib/ or /includes/. If you already know how you would like to use CMB2, then you may want to go ahead and rename the file to something more appropriate. For example, if you wanted to use it to create custom fields for a testimonials page, you might name it testimonial-functions.php.
Next, you will will need to make sure that WordPress finds the new file by adding a require_once statement to your functions.php file. That’ll look something like this:
require_once( dirname(__FILE__) . '/lib/testimonial-functions.php');Now it is time to really dig in. Open the testimonial-functions.php file (or whatever you named it as). You will notice that not only has Justin created an example of just about every type of field possible, but he has also created functions for displaying the fields by homepage, category, post id, etc.
Note: This article is intended to introduce you to CMB2; it isn’t going to be a full tutorial on how to use every aspect of it, and because it is a framework and was developed to assist programmers, you should have a basic understanding of PHP and the inner workings of WordPress. If you are looking for a Custom Meta Box plugin that has an admin user interface, you might want to check out the Advanced Custom Fields plugin.
So, let’s get back to building some custom meta boxes for something simple such as a testimonial. First, determine the number and types of fields you will need. For the sake of keeping it simple, let’s say we need three fields. One for the actual testimonial, one for the name of the person giving the testimonial, and one for an image of the person.
Working in the testimonial-functions.php file, you will need to find the the section for registering and adding your new function. That code looks something like this.
add_action( 'cmb2_admin_init', 'yourprefix_register_demo_metabox' );Next, we suggest you rename your function to something relevant to your theme and project.
add_action( 'cmb2_admin_init', 'register_testimonial_metabox' );
/**
 * Hook in and add a testimonial metabox. Can only happen on the 'cmb2_admin_init' or 'cmb2_init' hook.
 */
function register_testimonial_metabox() {
I also suggest you rename the prefix.
// Start with an underscore to hide fields from custom fields list
$prefix = '_yourprefix_'; //note, you can use anything you'd like here, but you need to remember what you use, because you will be using it again later.
There are several different field types to choose from. We are going to use:
'type' => 'textarea_small' // for the author field
'type'    => 'wysiwyg' // for the testimonial in case we want to include html
'type' => 'file' // for the image of the project or author

$cmb_demo->add_field( array(
	'name' => __( 'Testimonial Author', 'cmb2' ),
	'desc' => __( 'Who is the testimonial from', 'cmb2' ),
	'id'   => $prefix . 'author', //Note, we renamed this to be more appropriate
	'type' => 'textarea_small',
	) );

$cmb_demo->add_field( array(
	'name'    => __( 'Testimonial', 'cmb2' ),
	'desc'    => __( 'add the testimonial here', 'cmb2' ),
	'id'      => $prefix . 'testimonial', //Note, we renamed this to be more appropriate
	'type'    => 'wysiwyg',
	'options' => array( 'textarea_rows' => 5, ),
	) );

	$cmb_demo->add_field( array(
	'name' => __( 'Author Image', 'cmb2' ),
	'desc' => __( 'Upload an image or enter a URL.', 'cmb2' ),
	'id'   => $prefix . 'image', //Note, we renamed this to be more appropriate
	'type' => 'file',
	) );
These three new fields need to be added to the new function, so that would look like the following:
add_action( 'cmb2_admin_init', 'register_testimonial_metabox' );
/**
 * Hook in and add a testimonial metabox. Can only happen on the 'cmb2_admin_init' or 'cmb2_init' hook.
 */
function register_testimonial_metabox() {

 // Start with an underscore to hide fields from custom fields list
    $prefix = '_yourprefix_'; //note, you can use anything you'd like here

/**
 * Start field groups here
 */

$cmb_demo->add_field( array(
	'name' => __( 'Testimonial Author', 'cmb2' ),
	'desc' => __( 'Who is the testimonial from', 'cmb2' ),
	'id'   => $prefix . 'author', //Note, we renamed this to be more appropriate
	'type' => 'textarea_small',
	) );

$cmb_demo->add_field( array(
	'name'    => __( 'Testimonial', 'cmb2' ),
	'desc'    => __( 'add the testimonial here', 'cmb2' ),
	'id'      => $prefix . 'testimonial', //Note, we renamed this to be more appropriate
	'type'    => 'wysiwyg',
	'options' => array( 'textarea_rows' => 5, ),
	) );

	$cmb_demo->add_field( array(
	'name' => __( 'Author Image', 'cmb2' ),
	'desc' => __( 'Upload an image or enter a URL.', 'cmb2' ),
	'id'   => $prefix . 'image', //Note, we renamed this to be more appropriate
	'type' => 'file',
	) );
}
And that’s it! Your final code should look like:
<?php
/**
 * Include and set up custom metaboxes and fields. (Make sure you copy this file outside the CMB2 directory)
 *
 * Be sure to replace all instances of 'yourprefix_' with your project's prefix.
 * http://nacin.com/2010/05/11/in-wordpress-prefix-everything/
 *
 * @category YourThemeOrPlugin
 * @package  Demo_CMB2
 * @license  http://www.opensource.org/licenses/gpl-license.php GPL v2.0 (or later)
 * @link     https://github.com/WebDevStudios/CMB2
 */

/**
 * Get the bootstrap! If using the plugin from wordpress.org, REMOVE THIS!
 */

if ( file_exists( dirname( __FILE__ ) . '/CMB2/init.php' ) ) {
	require_once dirname( __FILE__ ) . '/CMB2/init.php';
} elseif ( file_exists( dirname( __FILE__ ) . '/CMB2/init.php' ) ) {
	require_once dirname( __FILE__ ) . '/CMB2/init.php';
}

add_action( 'cmb2_admin_init', 'register_testimonial_metabox' );
/**
 * Hook in and add a testimonial metabox. Can only happen on the 'cmb2_admin_init' or 'cmb2_init' hook.
 */
function register_testimonial_metabox() {

 // Start with an underscore to hide fields from custom fields list
    $prefix = '_yourprefix_'; //note, you can use anything you'd like here

/**
 * Start field groups here
 */

// This first field group tells WordPress where to put the fields. In the example below, it is set to show up only on Post_ID=10

$cmb_demo = new_cmb2_box( array(
		'id'            => $prefix . 'metabox',
		'title'         => __( 'Homepage Custom Fields', 'cmb2' ),
		'object_types'  => array( 'page', ), // Post type
		'show_on'      => array( 'id' => array( 10, ) ), // Specific post IDs to display this metabox
		) );

$cmb_demo->add_field( array(
	'name' => __( 'Testimonial Author', 'cmb2' ),
	'desc' => __( 'Who is the testimonial from', 'cmb2' ),
	'id'   => $prefix . 'author', //Note, we renamed this to be more appropriate
	'type' => 'textarea_small',
	) );

$cmb_demo->add_field( array(
	'name'    => __( 'Testimonial', 'cmb2' ),
	'desc'    => __( 'add the testimonial here', 'cmb2' ),
	'id'      => $prefix . 'testimonial', //Note, we renamed this to be more appropriate
	'type'    => 'wysiwyg',
	'options' => array( 'textarea_rows' => 5, ),
	) );

	$cmb_demo->add_field( array(
	'name' => __( 'Author Image', 'cmb2' ),
	'desc' => __( 'Upload an image or enter a URL.', 'cmb2' ),
	'id'   => $prefix . 'image', //Note, we renamed this to be more appropriate
	'type' => 'file',
	) );
}
When complete, you should have a page that looks something like the following:
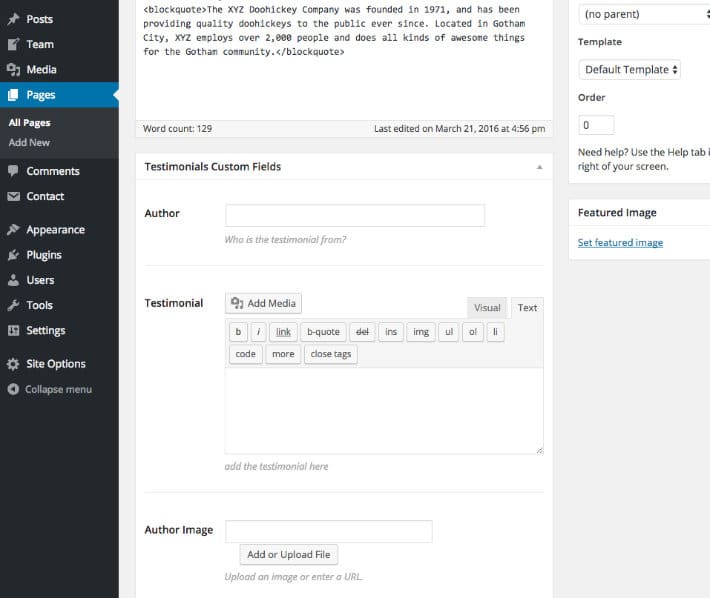
Using CMB2 is a great way to give your website exactly what you need, as the options really are endless. For example, CMB2 can be used to create a theme options page with meta boxes for logos, URLs to social media sites, or videos. In the case of building a website for a client, CMB2 is perfect for customizing the admin so that the client doesn’t have to format content to match your theme’s styles. And once the data is entered, you can display the content with all the styling already in place in your HTML and CSS.
Once you have mastered adding basic fields with CMB2, try adding the Repeatable Field Groups. With these, you will be able to add as many of any content types as you’d like, and then using a for-each loop, you can start creating slideshows or carousels.
CMB2 has allowed many developers to take their WordPress sites to the next level, and we hope that it will do the same for you.
For another easy way to elevate your sites, check out WP Engine for a world-class WordPress hosting experience!