
Design
3 ways to make animated GIF screenshots of design work for your portfolio

After your latest web design project is done, it’s time to show it off and add it to your portfolio. Your website visitors (and prospective clients!) will want to see your awesome work in action. Great imagery is key, and in the digital space, there will be times when you want to illustrate project functionality. Showing it off with animated screenshots may be the perfect solution.
I’m sure you’ve seen the cool, simple animated screenshots that show us how apps or websites work. GIFs of screen captures give the user a better idea of how certain tasks are performed while also showing what features are available. Video is certainly an option and definitely has an important place on the web. In-depth product videos or case studies definitely benefit from a video format. However, a simpler, more file-size conscious choice such as an animated screenshot GIF may be just what you’re looking for.
Why animated screenshots are important for your portfolio

Whether you pronounce it “GIF” or “JIF,” it’s important to remember that GIFs can be more than just funny cats and movie clips with a clever tagline. Animated GIFs of your projects should be eye-catching and carefully planned to show design functionality. Animating interface elements is both a functional and aesthetic purpose, so a GIF file shows this. How about demonstrating the menu and the options your work presents? How about showing how scroll works? Showing functionality helps the user clearly see how the app or website can help them.
Tools for making GIFs
There’s no better way to demonstrate your hard work than with one of the following tools for creating GIFs. The examples below will demonstrate how it looks when a user taps on an option, views more details, and then scrolls to see more content.
Note: There won’t be any visual design instructions in this tutorial; these tips assume the website or application design for your portfolio project is already done.
In the following sections, we’ll cover the following tools:
How to create animated GIF screenshots in Adobe Photoshop
In my opinion, Adobe Photoshop and Adobe After Effects are the best tools for the job. Both allow for a lot of control over the final product. I personally like Photoshop for making GIF screen captures (and most designers are very familiar with it), so that’s how the following example will be built. Let’s get started!
Showing scroll functionality
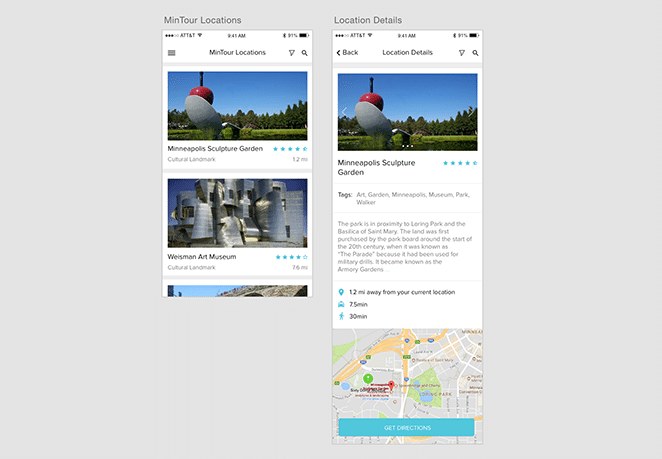
This design was done in Adobe XD but then exported to Photoshop with appropriately-named layers. The example has a layer called “MinTour Locations List” for the list page, “Sculpture Garden Listing” for the details page, and the part that is out of the initial scroll view is called “Sculpture Garden Listing Overflow.”
Part one
1. Timeline setup and location list

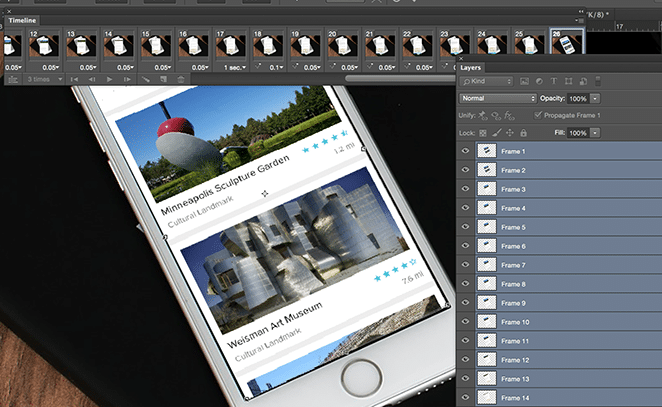
The Timeline feature is what we’ll use to create the different screens for the final product. Make sure the Timeline Panel is open by going to Window > Timeline.
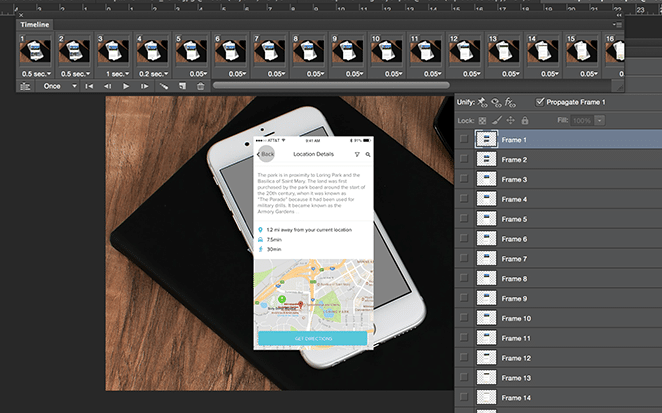
Here is the listing page; the user starts here, taps on a location, and will arrive at the details page, where they can scroll to see more details.
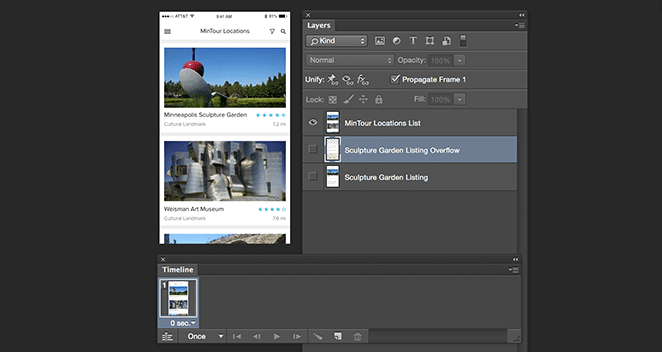
You’ll see there is already a first keyframe established. Make sure the correct layers are showing so the correct view is shown in the keyframe.
Optional: If you’d like to show where the user taps, sometimes this is shown with a dot. To do this, add an extra frame with the dot area.
2. Individual location details
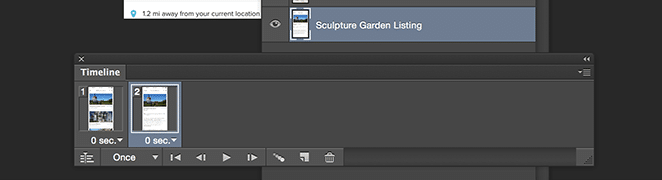
The ability to organize with layers is a huge advantage and will help you keep everything straight while you create your screen capture GIF. Go to the options in the Timeline panel and choose “New Frame.” The same thing here– make sure the correct layers are hidden/shown. For this one, I needed the individual listing to be shown, so the locations list layer is hidden.
3. Individual location details scroll content
The individual listing page for the Sculpture Garden has more content, so the scroll area should be shown to the user. This was on a separate layer, so I created a new frame to show this overflow content.
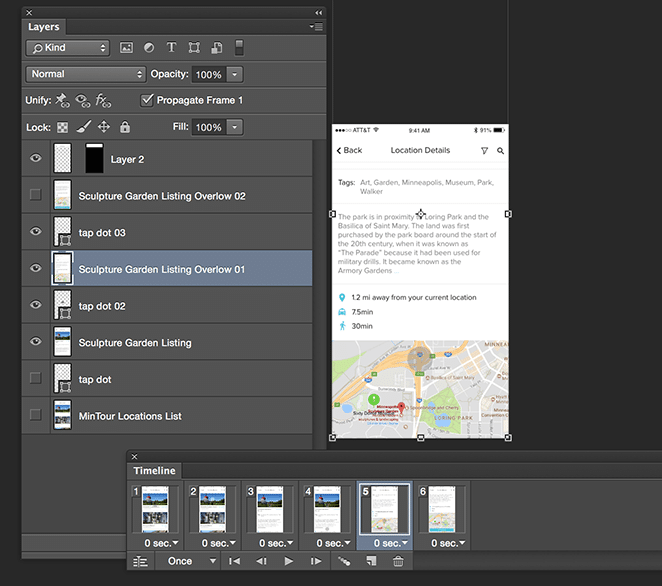
4. Choose durations
This may take some experimentation, but choosing the duration for each frame is important. You want the user to have enough time to see each frame, but also they should not have to wait too long before seeing the next one.
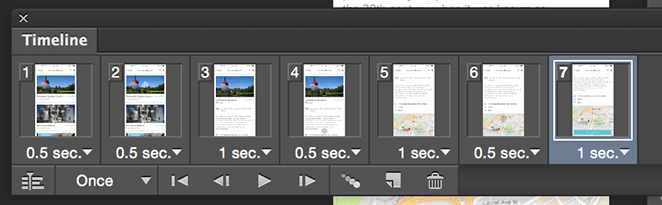
I put in values for each frame, totaling five seconds for the entire animation.
5. Preview
It’s good to take a look at what is going on so far. There is a play button in the bottom row of the Timeline panel. Try things out and see if there is anything that can be improved.
(Optional) tween control
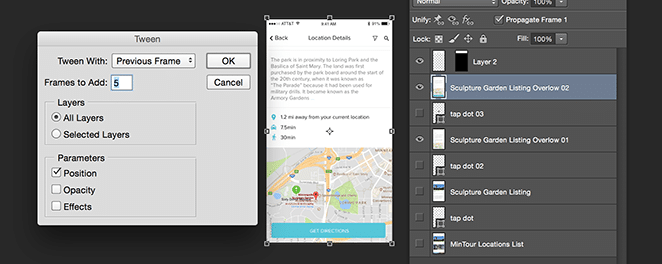
Things are ordered correctly, but they seem a little jumpy. Screenshot animations can be adjusted to make things appear a little smoother. From the Timeline options, there is a “Tween” option. To automatically make a smooth animation between the current and previous frame, there can be more frames automatically inserted.

From the listing to the list overflow, Tween was added to make it look like more of a scrolling action. Those new frames were set to have a very short duration of .05sec (scrolling in an app happens relatively fast).
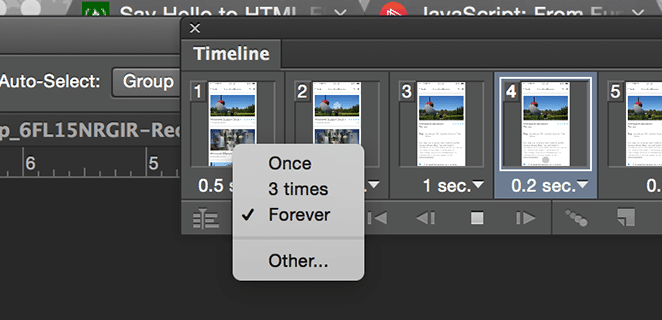
If you want this to keep looping in Photoshop, make sure that “Forever” is selected. If there is a set number of loops, that value can be entered.
6. Saving the screen capture GIF (screen flow only)
If you’re looking to include this as just an animated screen flow, saving will be the last step. At this time, the screenshot animation is created, it just has to be saved in the correct GIF format. You may be used to saving a static image, but saving a sequence of images is different. Go to File > Save for Web to save this GIF file.
Here you’ll see all the settings you’ll need for your GIF. Remember, you are limited to the number of colors, so we’ll get things looking their best before exporting. 256 is most likely the best option since websites and applications tend to have large range of color, but if your design allows for it, you can simplify (which keeps the file size down).
There are also some “Animation” settings in the lower-right corner; you can choose Looping if you want this to loop indefinitely. You can also loop a set number of times if you wish. Save it to the desired location, and it’s ready to go!
Part two: Layered screens featured on a device
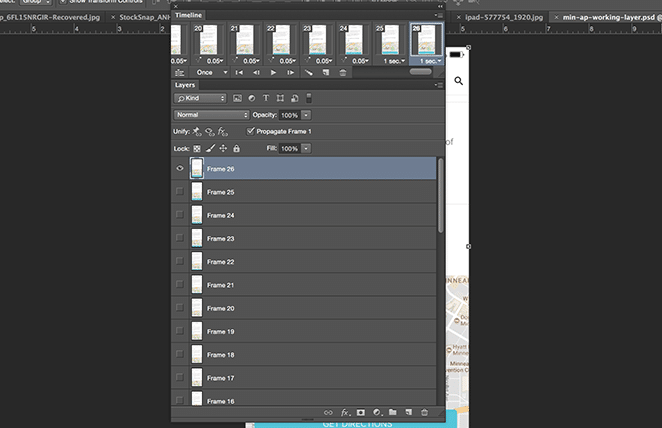
If you’ve decided to continue, some additional steps are needed to layer it so it looks more realistic on the phone. From the Timeline panel choose “Flatten Frames Into Layers.” Each frame will be converted into a flat layer, which ends up being 26 frames (so there are 26 layers).
Once that is saved, the phone image will need to be added to the file. To accommodate this, some resizing of the image size will have to be done.
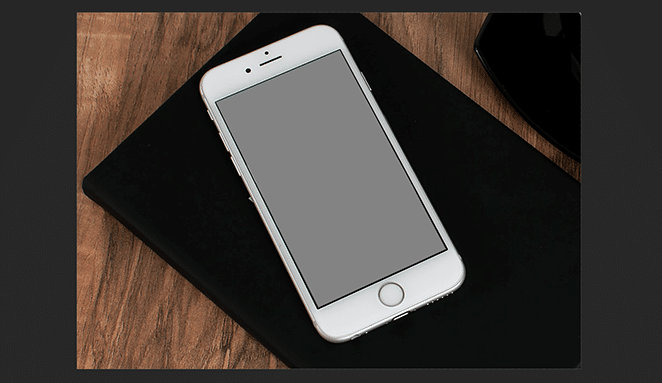
1. Adjust the canvas size for your animated screenshot
The background image is 1300 X 920, so the canvas size needs to be adjusted to fit that exactly. Go to Image > Canvas Size and put in the correct dimensions.
2. Get layers ready to be placed on the phone screen
Next, make a new layer for the background image so the animation can be layered on top. Here’s where “Select All” frame layers will come in handy.
3. Double check frames
This is a good time to make sure that the frames are still how you planned. If you play the animation from the Timeline panel, you will see the sequence animated.
4. Skew the screens
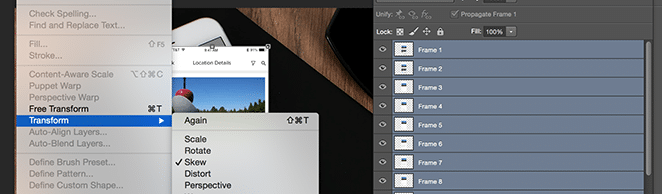
It’s important that all the screen layers are selected so they can all be skewed at once to stay uniform. Edit > Transform > Skew is where this is done.
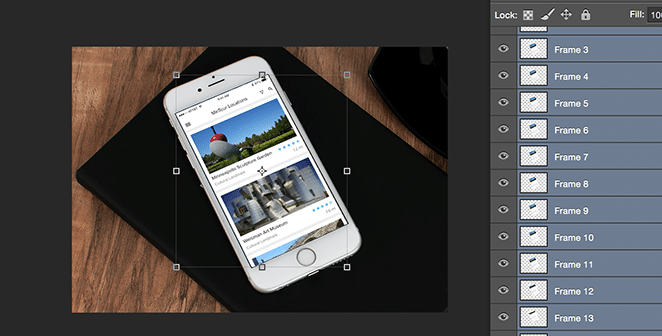
It will take a bit of experimenting, but adjust the corners so they line up with the bounds of the screen, giving it the illusion that the screen is illuminated with the animation.
5. Image adjustments and saving your GIF screen capture
Now is the time to do any adjustments. Color, contrast, or any other final touches should be done before saving. Saving the animation is the same as what was done in Part one, step 6.

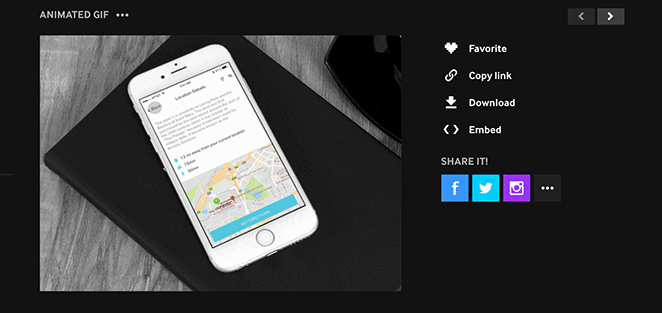
In this example, the background was desaturated and contrast was increased to make the animation really stand out. Now it appears to be on a real device!
Giphy
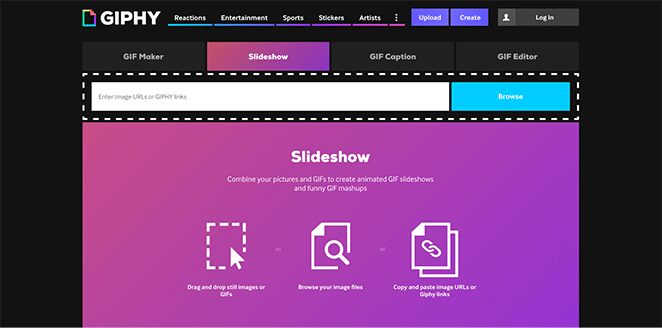
If Photoshop isn’t your preferred tool, there is a free and easy tool called Giphy. (In addition to professional use, you can make a lot of funny GIFs, too!)
If you choose “Slideshow,” this is a good option for creating an animation screenshot. To use this, you will have to have individual files of the screens saved. You will then drag and drop still images and the process will start.
Once the files upload, select “Create Slideshow.” When it’s done putting the images together, you can download the file. It’s as simple as that!
Recordit
This app is pretty simple; it records the action that takes place on your computer screen and uploads the recording to the Recordit.io website and creates a shareable link, with the option to download the GIF.
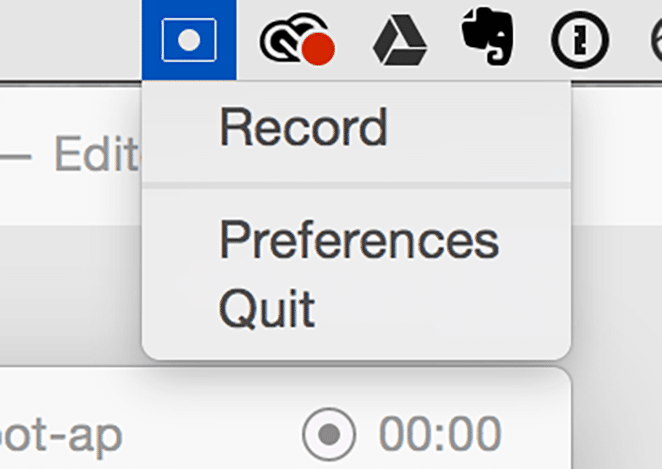
When Recordit has been installed on your computer, an icon appears in the taskbar. When selected, you can drag to and select the area of your screen you want to record. This was perfect when I went to preview mode in Adobe XD and was able to use a prototype for demonstration.

After you select the area that will be included, a record button appears. When you press “Record,” Recordit then records everything that happens on your screen, within the boundaries that you created. When you are done recording, simply choose “Stop.”
It will take a few seconds, but after the recording is stopped, there will be a pop-up with a link that takes you to the recording, which is hosted on the Recordit.io site.
Animated GIFs of screen captures are a great way to show user flow and how your design projects work. Video also has its place, but GIFs can be created very quickly and are easy to add to your online portfolio.
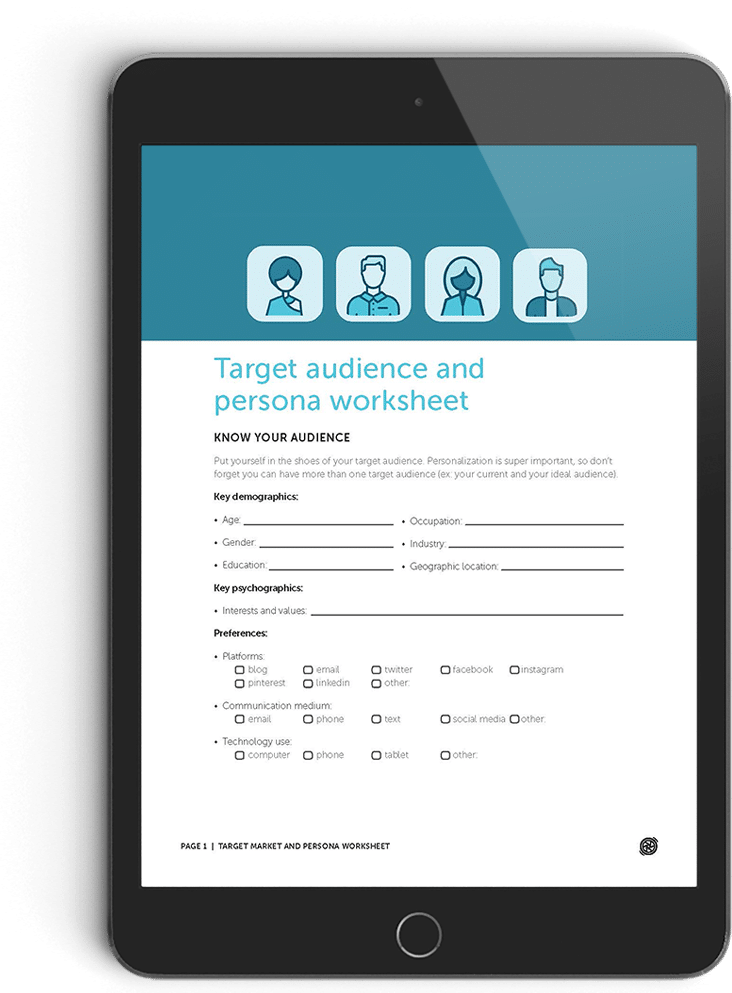
Free worksheet: Target audience and client persona
Looking for an actionable guide to help you keep your content relatable and engaging? This three-page interactive PDF will help you find your audience, audit your content, and create a game plan for growing your business.
If you liked this article, you might also enjoy these:


Comments ( 650 )
Mylesjah
July 2, 2025
ремонт фундамента
Mylesjah
July 2, 2025
ремонт фундамента
Mylesjah
July 2, 2025
подъем дома
Mylesjah
July 2, 2025
подъем дома
Mylesjah
July 2, 2025
подъем дома
PerryAutok
July 2, 2025
¡Saludos, apostadores talentosos !
Casino con bonos de bienvenida para ruleta y slots - п»їhttps://bono.sindepositoespana.guru/# casino regalo bienvenida
¡Que disfrutes de asombrosas botes sorprendentes!
Mylesjah
July 2, 2025
замена венцов
Mylesjah
July 2, 2025
подъем дома
Robertgaino
July 2, 2025
Нужно найти информацию о человеке ? Наш сервис предоставит детальный отчет мгновенно.
Используйте уникальные алгоритмы для поиска цифровых следов в соцсетях .
Узнайте контактные данные или интересы через автоматизированный скан с верификацией результатов.
глаз бога найти человека
Система функционирует с соблюдением GDPR, используя только общедоступную информацию.
Закажите расширенный отчет с геолокационными метками и списком связей.
Доверьтесь надежному помощнику для digital-расследований — результаты вас удивят !
Mylesjah
July 2, 2025
подъем дома
JasonMem
July 2, 2025
Нужно собрать данные о человеке ? Наш сервис поможет детальный отчет мгновенно.
Воспользуйтесь продвинутые инструменты для поиска цифровых следов в соцсетях .
Узнайте контактные данные или интересы через систему мониторинга с верификацией результатов.
глаз бога телеграмм канал
Система функционирует в рамках закона , обрабатывая открытые данные .
Закажите детализированную выжимку с геолокационными метками и графиками активности .
Попробуйте надежному помощнику для исследований — результаты вас удивят !
Mylesjah
July 2, 2025
подъем дома
Kevinlen
July 2, 2025
Нужно собрать информацию о пользователе? Этот бот поможет детальный отчет в режиме реального времени .
Воспользуйтесь продвинутые инструменты для анализа цифровых следов в соцсетях .
Узнайте контактные данные или интересы через систему мониторинга с гарантией точности .
глаз бога телеграмм сайт
Система функционирует с соблюдением GDPR, обрабатывая открытые данные .
Получите расширенный отчет с историей аккаунтов и графиками активности .
Попробуйте проверенному решению для исследований — результаты вас удивят !
Mylesjah
July 2, 2025
замена венцов
LarryHok
July 2, 2025
ремонт фундамента кемерово
LarryHok
July 1, 2025
ремонт фундамента новокузнецк
LarryHok
July 1, 2025
замена венцов новокузнецк
LarryHok
July 1, 2025
ремонт фундамента кемерово
LarryHok
July 1, 2025
ремонт фундамента новокузнецк
LarryHok
July 1, 2025
подъем домов кемерово
Michaelker
July 1, 2025
На данном сайте можно найти данные по запросу, в том числе полные анкеты.
Реестры охватывают людей разного возраста, статусов.
Данные агрегируются из открытых источников, что гарантирует точность.
Нахождение производится по имени, сделав работу удобным.
глаз бога бот ссылка
Также можно получить контакты и другая актуальные данные.
Все запросы проводятся с соблюдением норм права, обеспечивая защиту несанкционированного доступа.
Используйте этому сайту, в целях получения нужные сведения максимально быстро.
LarryHok
July 1, 2025
подъем домов кемерово
Marvintub
July 1, 2025
Подбирая семейного медика важно учитывать на квалификацию, стиль общения и удобные часы приема.
Убедитесь, что клиника расположена рядом и предоставляет полный спектр услуг .
Узнайте , принимает ли врач с вашей полисом, и какова загруженность расписания.
https://rentry.co/kqs7xthz
Обращайте внимание рекомендации знакомых, чтобы оценить отношение к клиентам.
Важно проверить сертификацию врача , аккредитацию клиники для уверенности в качестве лечения.
Оптимальный вариант — тот, где вас услышат ваши особенности здоровья, а процесс лечения будет комфортным .
LarryHok
July 1, 2025
подъем домов кемерово
Richardhoawl
July 1, 2025
Greetings, enthusiasts of clever wordplay !
Joke of the day for adults – stay updated - https://jokesforadults.guru/# funny jokes adult humor
May you enjoy incredible epic punchlines !
LarryHok
July 1, 2025
подъем домов новокузнецк
LarryHok
July 1, 2025
ремонт фундамента кемерово
LarryHok
June 30, 2025
ремонт фундамента новокузнецк
LarryHok
June 30, 2025
подъем домов кемерово
LarryHok
June 30, 2025
замена венцов кемерово
Michaelker
June 30, 2025
На данном сайте доступна сведения по запросу, в том числе исчерпывающие сведения.
Реестры охватывают персон любой возрастной категории, профессий.
Данные агрегируются по официальным записям, подтверждая надежность.
Поиск производится по контактным данным, сделав работу эффективным.
телеграм бот глаз бога проверка
Помимо этого можно получить контакты а также актуальные данные.
Все запросы выполняются в рамках законодательства, обеспечивая защиту несанкционированного доступа.
Обратитесь к данному ресурсу, для поиска искомые данные максимально быстро.
LarryHok
June 30, 2025
ремонт фундамента кемерово
LarryHok
June 30, 2025
замена венцов кемерово
LarryHok
June 30, 2025
ремонт фундамента новокузнецк
LarryHok
June 30, 2025
подъем домов кемерово
LarryHok
June 30, 2025
ремонт фундамента новокузнецк
Javierscump
June 30, 2025
¡Hola, buscadores de premios excepcionales!
Casino online sin licencia sin tarjetas requeridas - https://www.casinosonlinesinlicencia.es/ casinos no regulados
¡Que vivas increíbles instantes únicos !
Kevinlen
June 30, 2025
Нужно собрать информацию о человеке ? Этот бот предоставит полный профиль в режиме реального времени .
Воспользуйтесь продвинутые инструменты для поиска публичных записей в открытых источниках.
Узнайте место работы или интересы через автоматизированный скан с гарантией точности .
глаз бога телеграм канал
Бот работает в рамках закона , используя только общедоступную информацию.
Закажите расширенный отчет с историей аккаунтов и графиками активности .
Доверьтесь надежному помощнику для исследований — результаты вас удивят !
LarryHok
June 30, 2025
ремонт фундамента новокузнецк
LarryHok
June 30, 2025
ремонт фундамента кемерово
LarryHok
June 30, 2025
ремонт фундамента кемерово
LarryHok
June 30, 2025
подъем домов новокузнецк
DonteDah
June 29, 2025
¡Saludos, cazadores de recompensas excepcionales!
Casino online sin licencia sin control gubernamental - http://www.emausong.es/ casinos sin licencia espaГ±ola
¡Que disfrutes de increíbles instantes memorables !
LarryHok
June 29, 2025
замена венцов кемерово
LarryHok
June 29, 2025
замена венцов кемерово
LarryHok
June 29, 2025
подъем домов кемерово
LarryHok
June 29, 2025
ремонт фундамента новокузнецк
LarryHok
June 29, 2025
подъем домов новокузнецк
LarryHok
June 29, 2025
замена венцов кемерово
LarryHok
June 29, 2025
замена венцов новокузнецк
LarryHok
June 29, 2025
замена венцов новокузнецк
LarryHok
June 28, 2025
подъем домов новокузнецк
LarryHok
June 28, 2025
ремонт фундамента кемерово
LarryHok
June 28, 2025
ремонт фундамента новокузнецк
LarryHok
June 28, 2025
подъем домов новокузнецк
LarryHok
June 28, 2025
замена венцов новокузнецк
LarryHok
June 28, 2025
замена венцов новокузнецк
LarryHok
June 28, 2025
подъем домов кемерово
LarryHok
June 28, 2025
подъем домов кемерово
LarryHok
June 28, 2025
ремонт фундамента новокузнецк
LarryHok
June 28, 2025
подъем домов кемерово
LarryHok
June 28, 2025
подъем домов новокузнецк
LarryHok
June 28, 2025
подъем домов новокузнецк
LarryHok
June 27, 2025
ремонт фундамента новокузнецк
LarryHok
June 27, 2025
замена венцов кемерово
LarryHok
June 27, 2025
ремонт фундамента кемерово
LarryHok
June 27, 2025
ремонт фундамента кемерово
LarryHok
June 27, 2025
подъем домов новокузнецк
LarryHok
June 27, 2025
подъем домов кемерово
Barryheels
June 27, 2025
Этот бот поможет получить данные по заданному профилю.
Укажите никнейм в соцсетях, чтобы сформировать отчёт.
Система анализирует публичные данные и активность в сети .
глаз бога программа для поиска
Результаты формируются мгновенно с фильтрацией мусора.
Оптимален для проверки партнёров перед сотрудничеством .
Конфиденциальность и актуальность информации — наш приоритет .
LarryHok
June 27, 2025
замена венцов кемерово
PatrickSuedo
June 27, 2025
¡Saludos, cazadores de recompensas únicas!
Casino sin licencia EspaГ±a con alta reputaciГіn - http://audio-factory.es/ casino sin licencia espaГ±ola
¡Que disfrutes de asombrosas movidas excepcionales !
LarryHok
June 27, 2025
подъем домов новокузнецк
LarryHok
June 27, 2025
подъем домов новокузнецк
LarryHok
June 27, 2025
замена венцов кемерово
LarryHok
June 26, 2025
подъем домов новокузнецк
LarryHok
June 26, 2025
ремонт фундамента новокузнецк
LarryHok
June 26, 2025
подъем домов кемерово
LarryHok
June 26, 2025
замена венцов кемерово
LarryHok
June 26, 2025
подъем домов кемерово
LarryHok
June 26, 2025
ремонт фундамента кемерово
LarryHok
June 26, 2025
ремонт фундамента новокузнецк
LarryHok
June 26, 2025
замена венцов новокузнецк
LarryHok
June 26, 2025
замена венцов кемерово
LarryHok
June 26, 2025
подъем домов новокузнецк
LarryHok
June 26, 2025
ремонт фундамента кемерово
LarryHok
June 25, 2025
замена венцов кемерово
LarryHok
June 25, 2025
подъем домов кемерово
LarryHok
June 25, 2025
подъем домов кемерово
LarryHok
June 25, 2025
замена венцов новокузнецк
Pilar
June 25, 2025
https://lexie8479.wordpress.com/2025/06/16/2/
So, if your children are internet hosting a black
tie affair, ensure to wear a floor-length gown—preferably in a impartial
tone .
LarryHok
June 25, 2025
подъем домов новокузнецк
LarryHok
June 25, 2025
ремонт фундамента кемерово
LarryHok
June 25, 2025
замена венцов новокузнецк
DonteRal
June 25, 2025
¡Hola, seguidores del entretenimiento !
Casino sin licencia espaГ±ola que acepta Ethereum - п»їhttps://casinosinlicenciaespana.xyz/ casino online sin licencia espaГ±a
¡Que vivas increíbles victorias memorables !
LarryHok
June 25, 2025
замена венцов кемерово
LarryHok
June 25, 2025
замена венцов кемерово
LarryHok
June 25, 2025
замена венцов новокузнецк
LarryHok
June 24, 2025
замена венцов кемерово
LarryHok
June 24, 2025
замена венцов новокузнецк
LarryHok
June 24, 2025
подъем домов новокузнецк
LloydCralo
June 24, 2025
Нужно собрать данные о человеке ? Наш сервис предоставит полный профиль мгновенно.
Используйте уникальные алгоритмы для анализа публичных записей в соцсетях .
Узнайте контактные данные или активность через автоматизированный скан с гарантией точности .
глаз бога телеграмм канал
Бот работает с соблюдением GDPR, обрабатывая открытые данные .
Закажите детализированную выжимку с геолокационными метками и графиками активности .
Доверьтесь проверенному решению для digital-расследований — точность гарантирована!
LarryHok
June 24, 2025
замена венцов новокузнецк
LloydCralo
June 24, 2025
Хотите найти данные о пользователе? Этот бот предоставит детальный отчет мгновенно.
Воспользуйтесь уникальные алгоритмы для анализа публичных записей в открытых источниках.
Выясните контактные данные или интересы через автоматизированный скан с гарантией точности .
глаз бога программа для поиска людей бесплатно
Бот работает с соблюдением GDPR, используя только открытые данные .
Получите детализированную выжимку с геолокационными метками и графиками активности .
Попробуйте проверенному решению для исследований — результаты вас удивят !
LarryHok
June 24, 2025
подъем домов новокузнецк
Augustrip
June 24, 2025
Hello keepers of pristine spaces !
Best Air Purifier for Cigarette Smoke – Compact Units - http://bestairpurifierforcigarettesmoke.guru/# best air purifier for smoke
May you experience remarkable tranquil settings !
LarryHok
June 24, 2025
подъем домов кемерово
LarryHok
June 24, 2025
замена венцов новокузнецк
LarryHok
June 24, 2025
ремонт фундамента новокузнецк
LarryHok
June 24, 2025
ремонт фундамента новокузнецк
LarryHok
June 24, 2025
подъем домов новокузнецк
LarryHok
June 23, 2025
замена венцов новокузнецк
LarryHok
June 23, 2025
ремонт фундамента новокузнецк
LarryHok
June 23, 2025
замена венцов новокузнецк
LarryHok
June 23, 2025
подъем домов кемерово
LarryHok
June 23, 2025
замена венцов новокузнецк
LarryHok
June 23, 2025
замена венцов новокузнецк
LarryHok
June 23, 2025
подъем домов кемерово
WilliamBic
June 23, 2025
¡Saludos, aventureros de la emoción !
Mejores casinos online extranjeros con blackjack en vivo - https://www.casinoextranjerosdeespana.es/ п»їcasinos online extranjeros
¡Que experimentes maravillosas premios excepcionales !
LarryHok
June 23, 2025
замена венцов кемерово
Douglasruh
June 23, 2025
¡Hola, aventureros del desafío !
casino online fuera de EspaГ±a con pagos globales - https://casinosonlinefueradeespanol.xyz/# casinos fuera de espaГ±a
¡Que disfrutes de asombrosas éxitos sobresalientes !
LarryHok
June 23, 2025
подъем домов новокузнецк
LarryHok
June 23, 2025
подъем домов кемерово
LarryHok
June 23, 2025
ремонт фундамента новокузнецк
LarryHok
June 22, 2025
подъем домов кемерово
LarryHok
June 22, 2025
замена венцов новокузнецк
LarryHok
June 22, 2025
ремонт фундамента кемерово
LarryHok
June 22, 2025
подъем домов кемерово
LarryHok
June 22, 2025
ремонт фундамента кемерово
JamesSkila
June 22, 2025
¡Bienvenidos, aventureros de la fortuna !
Casino por fuera accesible desde cualquier dispositivo - https://casinofueraespanol.xyz/# п»їп»їcasino fuera de espaГ±a
¡Que vivas increíbles conquistas brillantes !
JamesDew
June 22, 2025
¡Hola, entusiastas de la fortuna !
Juegos premium en casinos extranjeros online - п»їhttps://casinosextranjerosdeespana.es/ п»їcasinos online extranjeros
¡Que vivas increíbles victorias memorables !
LarryHok
June 22, 2025
ремонт фундамента новокузнецк
LarryHok
June 22, 2025
замена венцов новокузнецк
LarryHok
June 22, 2025
ремонт фундамента новокузнецк
LarryHok
June 22, 2025
подъем домов кемерово
LarryHok
June 22, 2025
ремонт фундамента новокузнецк
LarryHok
June 22, 2025
подъем домов кемерово
LarryHok
June 21, 2025
подъем домов кемерово
LarryHok
June 21, 2025
ремонт фундамента новокузнецк
LarryHok
June 21, 2025
замена венцов новокузнецк
LarryHok
June 21, 2025
замена венцов новокузнецк
LarryHok
June 21, 2025
подъем домов кемерово
LarryHok
June 21, 2025
ремонт фундамента новокузнецк
LarryHok
June 21, 2025
подъем домов новокузнецк
Richardjah
June 21, 2025
¡Saludos, entusiastas del azar !
casinos fuera de EspaГ±a con jackpots millonarios - https://www.casinosonlinefueraespanol.xyz/# casino online fuera de espaГ±a
¡Que disfrutes de éxitos sobresalientes !
LarryHok
June 21, 2025
подъем домов новокузнецк
LarryHok
June 21, 2025
подъем домов новокузнецк
LarryHok
June 21, 2025
подъем домов кемерово
LarryHok
June 21, 2025
замена венцов кемерово
LarryHok
June 20, 2025
подъем домов новокузнецк
LarryHok
June 20, 2025
ремонт фундамента кемерово
LarryHok
June 20, 2025
ремонт фундамента кемерово
LarryHok
June 20, 2025
замена венцов новокузнецк
LarryHok
June 20, 2025
подъем домов новокузнецк
глаз бога найти по номеру
June 20, 2025
На данном сайте можно получить сервис "Глаз Бога", что собрать всю информацию по человеку из открытых источников.
Бот работает по фото, обрабатывая доступные данные в Рунете. С его помощью можно получить 5 бесплатных проверок и детальный анализ по запросу.
Инструмент проверен на август 2024 и охватывает фото и видео. Глаз Бога сможет найти профили в соцсетях и покажет результаты мгновенно.
как установить глаз бога в телеграм
Такой бот — выбор при поиске персон удаленно.
RonaldLak
June 20, 2025
Vous cherchez de divertissements interactifs? Ce site propose une sélection variée adaptés à chaque passionné.
Des puzzles aux défis multijoueurs , plongez des univers captivants directement depuis votre navigateur.
Découvrez les nouveautés comme le Takuzu ou des simulations immersives en solo .
Pour les compétiteurs , des jeux de football en 3D réaliste vous attendent.
https://qualiteonline.com/
Accédez gratuitement de mises à jour régulières et connectez-vous une communauté active .
Que vous préfériez la réflexion , ce site deviendra une référence incontournable.
LarryHok
June 20, 2025
замена венцов кемерово
LarryHok
June 20, 2025
ремонт фундамента новокузнецк
глаз бога бот тг
June 20, 2025
Прямо здесь доступен Telegram-бот "Глаз Бога", что найти данные о гражданине через открытые базы.
Сервис функционирует по ФИО, анализируя доступные данные в сети. Через бота доступны бесплатный поиск и глубокий сбор по запросу.
Инструмент проверен на 2025 год и включает аудио-материалы. Глаз Бога сможет проверить личность в соцсетях и отобразит информацию в режиме реального времени.
глаз бога ссылка
Это бот — идеальное решение при поиске персон онлайн.
LarryHok
June 20, 2025
замена венцов кемерово
LarryHok
June 20, 2025
ремонт фундамента новокузнецк
LarryHok
June 19, 2025
замена венцов новокузнецк
MarvinCiz
June 19, 2025
¡Hola, descubridores de oportunidades!
Casinoextranjero.es – juega desde tu mГіvil sin lГmites - https://casinoextranjero.es/# п»їcasinos online extranjeros
¡Que vivas recompensas fascinantes !
Davidcit
June 19, 2025
¡Bienvenidos, descubridores de riquezas !
Casino fuera de EspaГ±a con juegos instantГЎneos - https://www.casinoporfuera.guru/# casinos online fuera de espaГ±a
¡Que disfrutes de maravillosas triunfos legendarios !
глаз бога найти телефон
June 19, 2025
На данном сайте доступен Telegram-бот "Глаз Бога", позволяющий собрать данные о гражданине из открытых источников.
Сервис активно ищет по ФИО, обрабатывая доступные данные в сети. Через бота осуществляется пять пробивов и полный отчет по имени.
Сервис обновлен согласно последним данным и поддерживает аудио-материалы. Бот поможет узнать данные в соцсетях и отобразит информацию мгновенно.
глаз бога телеграмм официальный сайт
Такой бот — идеальное решение при поиске граждан удаленно.
глаз бога в телеграме
June 19, 2025
Здесь можно получить мессенджер-бот "Глаз Бога", позволяющий найти данные по человеку по публичным данным.
Инструмент активно ищет по фото, обрабатывая публичные материалы онлайн. С его помощью осуществляется 5 бесплатных проверок и детальный анализ по фото.
Сервис актуален на 2025 год и включает мультимедийные данные. Глаз Бога гарантирует проверить личность в соцсетях и предоставит результаты мгновенно.
глаз бога телеграмм официальный сайт
Данный бот — помощник в анализе персон онлайн.
Mariotum
June 18, 2025
¡Saludos, expertos en el azar !
casino online extranjero con bonos en criptos - https://www.casinosextranjero.es/ п»їcasinos online extranjeros
¡Que vivas increíbles victorias épicas !
Norbertsyday
June 18, 2025
¡Saludos, aficionados a los desafíos!
GuГa 2025 de casinoextranjerosenespana.es - п»їhttps://casinoextranjerosenespana.es/ casinos extranjeros
¡Que disfrutes de éxitos excepcionales !
brand promotion
June 18, 2025
One thing I'd prefer to discuss is that weightloss program fast can be performed by the appropriate diet and exercise. People's size not only affects the look, but also the general quality of life. Self-esteem, melancholy, health risks, and also physical abilities are afflicted in weight gain. It is possible to just make everything right whilst still having a gain. Should this happen, a medical problem may be the offender. While an excessive amount food rather than enough body exercise are usually responsible, common medical conditions and trusted prescriptions might greatly help to increase size. Many thanks for your post here.
https://www.magileads.com/en/digital-sponsorship-brand-promotion/
SteveSop
June 18, 2025
https://maps.app.goo.gl/gESym3wk6RSmtrp5A?g_st=atm
Richardzef
June 18, 2025
ремонт фундамента новокузнецк
Sterling
June 18, 2025
https://jekyll2.s3.us-west-002.backblazeb2.com/je-20250505-8/research/marketing-(207).html
So lengthy as you have obtained the soonlyweds' approval, there's absolutely
nothing incorrect with an allover sequin gown.
Richardzef
June 17, 2025
ремонт домов новокузнецк
Richardzef
June 17, 2025
ремонт фундамента новокузнецк
Richardzef
June 17, 2025
замена венцов новокузнецк
Williamchide
June 17, 2025
¡Hola, entusiastas de la suerte !
Casino por fuera que acepta jugadores de LATAM - п»їп»їhttps://casinoonlinefueradeespanol.xyz/ casinoonlinefueradeespanol
¡Que disfrutes de asombrosas tiradas afortunadas !
videonablyudeniemoskva.ru
June 17, 2025
Размещение видеокамер поможет безопасность помещения в режиме 24/7.
Современные технологии обеспечивают высокое качество изображения даже в ночных условиях.
Вы можете заказать множество решений систем, адаптированных для бизнеса и частных объектов.
установка камер видеонаблюдения в доме
Качественный монтаж и консультации специалистов делают процесс простым и надежным для каждого клиента.
Свяжитесь с нами, для получения оптимальное предложение для установки видеонаблюдения.
Richardzef
June 17, 2025
замена венцов новокузнецк
Richardzef
June 17, 2025
ремонт фундамента новокузнецк
Richardzef
June 17, 2025
замена венцов новокузнецк
Richardzef
June 17, 2025
подъем дома новокузнецк
RichardJer
June 17, 2025
¡Saludos, seguidores de la diversión !
Casinosextranjerosenespana.es – Elige tu bono ahora - https://casinosextranjerosenespana.es/ casino online extranjero
¡Que vivas increíbles instantes inolvidables !
Richardzef
June 17, 2025
замена венцов новокузнецк
Richardzef
June 16, 2025
ремонт домов новокузнецк
Richardzef
June 16, 2025
подъем дома новокузнецк
Richardzef
June 16, 2025
ремонт домов новокузнецк
Richardzef
June 16, 2025
замена венцов новокузнецк
Richardzef
June 16, 2025
ремонт домов новокузнецк
Richardzef
June 16, 2025
замена венцов новокузнецк
https://patek-philippe-nautilus.ru/
June 16, 2025
Коллекция Nautilus, созданная мастером дизайна Жеральдом Гентой, сочетает элегантность и прекрасное ремесленничество. Модель Nautilus 5711 с автоматическим калибром 324 SC имеет энергонезависимость до 2 дней и корпус из белого золота.
Восьмиугольный безель с округлыми гранями и циферблат с градиентом от синего к черному подчеркивают неповторимость модели. Браслет с интегрированными звеньями обеспечивает комфорт даже при активном образе жизни.
Часы оснащены индикацией числа в позиции 3 часа и антибликовым покрытием.
Для сложных модификаций доступны хронограф, вечный календарь и функция Travel Time.
patek-philippe-nautilus.ru
Например, модель 5712/1R-001 из красного золота 18K с механизмом на 265 деталей и запасом хода на двое суток.
Nautilus остается предметом коллекционирования, объединяя современные технологии и традиции швейцарского часового дела.
Richardzef
June 16, 2025
подъем дома новокузнецк
Richardzef
June 16, 2025
замена венцов новокузнецк
Richardzef
June 16, 2025
подъем дома новокузнецк
Richardzef
June 16, 2025
ремонт фундамента новокузнецк
Richardzef
June 15, 2025
замена венцов новокузнецк
Robertken
June 15, 2025
¡Hola, participantes del azar !
Casinos extranjeros ideales para sesiones anГіnimas - https://casinoextranjerosespana.es/# casino online extranjero
¡Que disfrutes de asombrosas premios extraordinarios !
Robertbroft
June 15, 2025
¡Saludos, estrategas del desafío !
Casinos no regulados: Juega con total privacidad - http://www.casinossinlicenciaenespana.es/ casino sin licencia espaГ±ola
¡Que vivas sesiones inolvidables !
Richardzef
June 15, 2025
ремонт домов новокузнецк
Richardzef
June 15, 2025
ремонт домов новокузнецк
Tyronehoxia
June 15, 2025
Данный портал собирает важные новости со всего мира.
Здесь вы легко найдёте аналитика, технологиях и других областях.
Контент пополняется в режиме реального времени, что позволяет всегда быть в курсе.
Простой интерфейс ускоряет поиск.
https://fashionsecret.ru
Каждая статья написаны грамотно.
Редакция придерживается честной подачи.
Читайте нас регулярно, чтобы быть на волне новостей.
Richardzef
June 15, 2025
подъем дома новокузнецк
Richardzef
June 15, 2025
подъем дома новокузнецк
Richardzef
June 15, 2025
ремонт домов новокузнецк
Richardzef
June 14, 2025
ремонт домов новокузнецк
Richardzef
June 14, 2025
подъем дома новокузнецк
GeorgeGah
June 14, 2025
¡Saludos, aficionados al mundo de las apuestas!
Accede a salas privadas en un casino sin licencia espaГ±ola con solo una invitaciГіn. Estas ГЎreas VIP ofrecen mejores premios. Y no necesitas historial de juego para entrar.
La interfaz estГЎ diseГ±ada para ser intuitiva incluso para los principiantes, con menГєs claros y navegaciГіn sencilla. Esto mejora la experiencia de usuario. casinos sin licencia
Casino online sin licencia EspaГ±a: juegos exclusivos y apuestas deportivas - п»їcasinos-sinlicenciaenespana.es
¡Que disfrutes de tiradas afortunadas !
Richardzef
June 14, 2025
замена венцов новокузнецк
DelbertemuMn
June 14, 2025
¡Bienvenidos, amantes de la emoción !
Me parece un tema fascinante. ВЎExcelente artГculo! casinoextranjeros.es
Explora juegos nuevos cada semana en casinoextranjeros.es - п»їhttps://casinoextranjeros.es/
Entrando en casinosextranjerosespana.es puedes acceder a bonos exclusivos que no se encuentran en otras webs. Estas ofertas estГЎn negociadas directamente con los operadores. Aprovecharlas puede marcar una gran diferencia en tus ganancias.
¡Que vivas asombrosas momentos únicos !
Richardzef
June 14, 2025
подъем дома новокузнецк
Richardzef
June 14, 2025
подъем дома новокузнецк
Richardzef
June 13, 2025
ремонт фундамента новокузнецк
Richardzef
June 13, 2025
подъем дома новокузнецк
Joshuadut
June 13, 2025
¡Hola, aficionados a las apuestas en línea!
Los casinos sin licencia en espana permiten jugar desde mГіviles, tablets y ordenadores sin restricciones. No necesitas instalar ninguna aplicaciГіn. Y la navegaciГіn es siempre fluida y rГЎpida.
Muchos jugadores se pasan a plataformas no reguladas por la libertad. mejorescasinosonlinesinlicencia te da acceso directo a todas. Juega cuando quieras.
Casinos sin registro y sin verificaciГіn de identidad - п»їmejorescasinosonlinesinlicencia.es
¡Que experimentes oportunidades excepcionales !
Richardzef
June 13, 2025
ремонт домов новокузнецк
Richardzef
June 13, 2025
ремонт домов новокузнецк
Richardzef
June 13, 2025
ремонт домов новокузнецк
Richardzef
June 13, 2025
замена венцов новокузнецк
Cordellautot
June 13, 2025
¡Saludos, buscadores de riqueza !
Algunos casinos online extranjeros tienen juegos exclusivos desarrollados por estudios independientes.
Explora los mejores casinos online extranjeros legales - п»їhttps://casinos-extranjeros.es/
Un casino online extranjero puede incluir logros ocultos que solo se desbloquean tras ciertas acciones. Esto aГ±ade misterio al juego. Siempre hay algo por descubrir.
¡Que disfrutes de increíbles oportunidades irrepetibles !
Richardzef
June 13, 2025
ремонт домов новокузнецк
Richardzef
June 13, 2025
подъем дома новокузнецк
Richardzef
June 12, 2025
ремонт фундамента новокузнецк
Richardzef
June 12, 2025
замена венцов новокузнецк
Richardzef
June 12, 2025
замена венцов новокузнецк
EddieSpork
June 12, 2025
The Audemars Piguet Royal Oak, redefined luxury watchmaking with its signature angular case and bold integration of sporty elegance.
Available in limited-edition sand gold to diamond-set variants, the collection combines avant-garde design with precision engineering .
Starting at $20,000 to over $400,000, these timepieces attract both seasoned collectors and newcomers seeking wearable heritage.
Unworn Piguet Audemars Oak 26240 shop
The Royal Oak Offshore set benchmarks with innovative complications , embodying Audemars Piguet’s technical prowess .
Thanks to meticulous hand-finishing , each watch epitomizes the brand’s commitment to excellence .
Explore exclusive releases and detailed collector guides to deepen your horological expertise with this timeless icon .
Timothywoory
June 12, 2025
¡Hola, fanáticos de las apuestas!
Los casinos fuera de EspaГ±a permiten registrarse con solo un correo electrГіnico y una contraseГ±a segura. Esto agiliza todo el proceso y reduce barreras de entrada. AdemГЎs, el acceso desde EspaГ±a no estГЎ bloqueado en la mayorГa de los casos.
Casino online fuera de EspaГ±a tambiГ©n permite jugar sin necesidad de descargar ningГєn archivo. Todo ocurre en la nube. [url=п»їhttps://casinofueradeespanol.xyz/]casinos fuera de espaГ±a[/url] Esto ahorra espacio y mejora la velocidad.
Casinos online fuera de EspaГ±a con jackpots diarios - https://casinofueradeespanol.xyz/#
¡Que experimentes éxitos notables !
Robertsip
June 12, 2025
Discover the iconic Patek Philippe Nautilus, a luxury timepiece that merges sporty elegance with refined artistry.
Introduced nearly 50 years ago, this cult design revolutionized high-end sports watches, featuring distinctive octagonal bezels and textured sunburst faces.
From stainless steel models like the 5990/1A-011 with a 55-hour energy retention to luxurious white gold editions such as the 5811/1G-001 with a blue gradient dial , the Nautilus suits both avid enthusiasts and everyday wearers .
Pre-owned PP Nautilus 5712r watch reviews
Certain diamond-adorned versions elevate the design with gemstone accents, adding unmatched glamour to the timeless profile.
With market values like the 5726/1A-014 at ~$106,000, the Nautilus remains a prized asset in the world of luxury horology .
Whether you seek a historical model or contemporary iteration , the Nautilus epitomizes Patek Philippe’s tradition of innovation.
Richardzef
June 12, 2025
ремонт домов новокузнецк
Richardzef
June 12, 2025
замена венцов новокузнецк
Richardzef
June 12, 2025
ремонт фундамента новокузнецк
Richardzef
June 12, 2025
ремонт домов новокузнецк
Richardzef
June 11, 2025
ремонт фундамента новокузнецк
Richardzef
June 11, 2025
замена венцов новокузнецк
Richardzef
June 11, 2025
замена венцов новокузнецк
Richardzef
June 11, 2025
ремонт фундамента новокузнецк
Richardmix
June 11, 2025
Hola, fanáticos del entretenimiento !
Casinos fuera de espaГ±a tienen apps web progresivas que se instalan como si fueran nativas. casinosonlinefuera Funcionan sin ocupar espacio. El acceso es directo desde la pantalla de inicio.
Casino por fuera: interfaz moderna y fГЎcil de usar - п»їhttps://casinosonlinefuera.xyz/
Casinosonlinefuera.xyz te deja jugar con saldo mГnimo de 1€. No necesitas hacer grandes depГіsitos para empezar. Es accesible para cualquier presupuesto.
¡Que disfrutes de fantásticas oportunidades exclusivas !
Richardzef
June 11, 2025
подъем дома новокузнецк
Migueldog
June 11, 2025
¡Hola, seguidores de las apuestas!
Casino online fuera de espaГ±a es perfecto si prefieres no compartir tu historial bancario con operadores del paГs.Todo se maneja de forma externa y privada.Esto da mГЎs confianza a los usuarios.
El casino online fuera de espaГ±a estГЎ diseГ±ado para adaptarse a todos los dispositivos sin necesidad de descargar aplicaciones especiales.Puedes jugar directamente desde tu navegador favorito.
Casinos online fuera de espaГ±a con juegos de mesa top - п»їhttps://casinoporfuera.xyz/
¡Que disfrutes de tiradas afortunadas
Richardzef
June 11, 2025
ремонт домов новокузнецк
Richardzef
June 10, 2025
ремонт фундамента новокузнецк
Richardzef
June 10, 2025
замена венцов новокузнецк
Richardzef
June 10, 2025
замена венцов новокузнецк
Richardzef
June 10, 2025
ремонт домов новокузнецк
Richardzef
June 10, 2025
ремонт домов новокузнецк
MarioKew
June 10, 2025
Ищете ресурсы коллекционеров? Эта платформа предоставляет исчерпывающие материалы для изучения монет !
Здесь доступны уникальные экземпляры из разных эпох , а также драгоценные находки.
Просмотрите архив с характеристиками и высококачественными фото , чтобы найти раритет.
австралийский лунар
Если вы начинающий или эксперт, наши обзоры и гайды помогут углубить экспертизу.
Воспользуйтесь шансом добавить в коллекцию эксклюзивные монеты с сертификатами.
Присоединяйтесь сообщества энтузиастов и будьте в курсе последних новостей в мире нумизматики.
Richardzef
June 10, 2025
ремонт домов новокузнецк
MatthewKeemy
June 10, 2025
Лицензирование и сертификация — ключевой аспект ведения бизнеса в России, гарантирующий защиту от непрофессионалов.
Обязательная сертификация требуется для подтверждения соответствия стандартам.
Для 49 видов деятельности необходимо получение лицензий.
https://ok.ru/group/70000034956977/topic/158835767359665
Нарушения правил ведут к приостановке деятельности.
Дополнительные лицензии помогает повысить доверие бизнеса.
Соблюдение норм — залог успешного развития компании.
Richardzef
June 10, 2025
ремонт домов новокузнецк
Waynetot
June 9, 2025
замена венцов новокузнецк
Waynetot
June 9, 2025
подъем домов новокузнецк
Audemars Royal Oak price
June 9, 2025
This platform features up-to-date information about Audemars Piguet Royal Oak watches, including price ranges and technical specifications .
Access data on iconic models like the 41mm Selfwinding in stainless steel or white gold, with prices starting at $28,600 .
This resource tracks collector demand, where limited editions can sell for $140,000+ .
Piguet Royal Oak 15510 or watches
Movement types such as chronograph complications are thoroughly documented .
Stay updated on 2025 price fluctuations, including the Royal Oak 15510ST’s market stability .
Waynetot
June 9, 2025
замена венцов новокузнецк
Edwardruh
June 9, 2025
На платформе доступен мощный бот "Глаз Бога" , который обрабатывает информацию о любом человеке из публичных баз .
Платформа позволяет узнать контакты по фотографии, показывая данные из онлайн-платформ.
https://glazboga.net/
Davidbycle
June 8, 2025
¿Quieres cupones exclusivos de 1xBet? En este sitio encontrarás bonificaciones únicas en apuestas deportivas .
El código 1x_12121 garantiza a 6500 RUB para nuevos usuarios.
Para completar, utiliza 1XRUN200 y obtén una oferta exclusiva de €1500 + 150 giros gratis.
https://socialnetworkadsinfo.com/story21079502/1xbet-promo-code-welcome-bonus-up-to-130
No te pierdas las promociones semanales para conseguir más beneficios .
Los promocódigos listados son verificados para esta semana.
Actúa ahora y maximiza tus ganancias con 1xBet !
Kennethheero
June 6, 2025
¡Bienvenidos, entusiastas del casino !
Algunos sitios permiten jugar desde EspaГ±a sin restricciones legales. Solo necesitas acceso a internet para probar suerte en los casinos fuera de espaГ±a.
Casinoonlinefueradeespana.xyz: cГіmo registrarte y empezar a jugar - п»їhttp://casinoonlinefueradeespana.xyz/
Si buscas una experiencia diferente, los casinos fuera de EspaГ±a suelen incorporar juegos exclusivos de proveedores menos conocidos. La interfaz es moderna y estГЎ adaptada a todo tipo de dispositivos. Desde tu mГіvil puedes acceder fГЎcilmente a casinoonlinefueradeespana.
¡Que vivas recompensas extraordinarias !
Davidbycle
June 6, 2025
¿Necesitas códigos promocionales vigentes de 1xBet? Aquí podrás obtener recompensas especiales para tus jugadas.
El código 1x_12121 ofrece a hasta 6500₽ al registrarte .
También , activa 1XRUN200 y recibe una oferta exclusiva de €1500 + 150 giros gratis.
https://regvo.ru/blog/acontinent/promokod-pari-pri-registracii
No te pierdas las ofertas diarias para conseguir ventajas exclusivas.
Las ofertas disponibles son verificados para 2025 .
No esperes y potencia tus ganancias con la casa de apuestas líder !
Haroldhaugh
June 4, 2025
замена венцов новокузнецк
Haroldhaugh
June 4, 2025
замена венцов новокузнецк
Haroldhaugh
June 4, 2025
замена венцов новокузнецк
Haroldhaugh
June 4, 2025
замена венцов новокузнецк
Haroldhaugh
June 4, 2025
замена венцов новокузнецк
Haroldhaugh
June 4, 2025
замена венцов новокузнецк
Haroldhaugh
June 4, 2025
замена венцов новокузнецк
Haroldhaugh
June 4, 2025
замена венцов новокузнецк
Haroldhaugh
June 4, 2025
замена венцов новокузнецк
Haroldhaugh
June 4, 2025
замена венцов новокузнецк
Haroldhaugh
June 4, 2025
замена венцов новокузнецк
Haroldhaugh
June 4, 2025
замена венцов новокузнецк
Haroldhaugh
June 4, 2025
замена венцов новокузнецк
Haroldhaugh
June 4, 2025
замена венцов новокузнецк
Haroldhaugh
June 4, 2025
замена венцов новокузнецк
Haroldhaugh
June 4, 2025
замена венцов новокузнецк
Haroldhaugh
June 4, 2025
замена венцов новокузнецк
Haroldhaugh
June 4, 2025
замена венцов новокузнецк
Haroldhaugh
June 4, 2025
замена венцов новокузнецк
Haroldhaugh
June 4, 2025
замена венцов новокузнецк
Haroldhaugh
June 4, 2025
замена венцов новокузнецк
Haroldhaugh
June 4, 2025
замена венцов новокузнецк
Haroldhaugh
June 4, 2025
замена венцов новокузнецк
Haroldhaugh
June 4, 2025
замена венцов новокузнецк
Haroldhaugh
June 4, 2025
замена венцов новокузнецк
Haroldhaugh
June 4, 2025
замена венцов новокузнецк
Haroldhaugh
June 4, 2025
замена венцов новокузнецк
Haroldhaugh
June 4, 2025
замена венцов новокузнецк
Haroldhaugh
June 4, 2025
замена венцов новокузнецк
Haroldhaugh
June 4, 2025
замена венцов новокузнецк
Haroldhaugh
June 4, 2025
замена венцов новокузнецк
Haroldhaugh
June 4, 2025
замена венцов новокузнецк
Haroldhaugh
June 4, 2025
замена венцов новокузнецк
Haroldhaugh
June 4, 2025
замена венцов новокузнецк
Haroldhaugh
June 4, 2025
замена венцов новокузнецк
Haroldhaugh
June 4, 2025
замена венцов новокузнецк
Haroldhaugh
June 4, 2025
замена венцов новокузнецк
Haroldhaugh
June 4, 2025
замена венцов новокузнецк
Haroldhaugh
June 4, 2025
замена венцов новокузнецк
Haroldhaugh
June 4, 2025
замена венцов новокузнецк
Haroldhaugh
June 4, 2025
замена венцов новокузнецк
Haroldhaugh
June 4, 2025
замена венцов новокузнецк
Haroldhaugh
June 4, 2025
замена венцов новокузнецк
Haroldhaugh
June 4, 2025
замена венцов новокузнецк
Haroldhaugh
June 4, 2025
замена венцов новокузнецк
Haroldhaugh
June 4, 2025
замена венцов новокузнецк
Haroldhaugh
June 4, 2025
замена венцов новокузнецк
Haroldhaugh
June 4, 2025
замена венцов новокузнецк
Haroldhaugh
June 4, 2025
замена венцов новокузнецк
StevenSat
June 4, 2025
Searching for exclusive 1xBet promo codes? This site offers verified bonus codes like 1x_12121 for registrations in 2024. Get €1500 + 150 FS as a welcome bonus.
Activate trusted promo codes during registration to maximize your rewards. Benefit from risk-free bets and special promotions tailored for casino games.
Find monthly updated codes for global users with fast withdrawals.
Every voucher is tested for validity.
Grab limited-time offers like GIFT25 to increase winnings.
Active for first-time deposits only.
https://modernbookmarks.com/story19451027/unlocking-1xbet-promo-codes-for-enhanced-betting-in-multiple-countriesKeep updated with top bonuses – apply codes like 1x_12121 at checkout.
Experience smooth rewards with instant activation.
JoshuaSak
May 31, 2025
¡Hola, buscadores de fortuna !
En apuestassinlicencia se destaca la ausencia de controles excesivos para comenzar a jugar. [url=http://www.apuestas-sin-licencia.net/]casas de apuestas no reguladas en espaГ±a[/url] Las casas de apuestas espaГ±a sin licencia no requieren documentos que demoren el registro. Muchos jugadores prefieren apostar en casas de apuestas no reguladas para evitar limitaciones.
Apuestassinlicencia con bonos sin rollover y condiciones justas - https://www.apuestas-sin-licencia.net/
Los nuevos usuarios pueden aprender mientras juegan gracias a los modos demo y tutoriales integrados en estas plataformas.
¡Que disfrutes de recompensas excepcionales !
Rodneysog
May 28, 2025
cheapest antibiotics [url=http://biotpharm.com/#]buy antibiotics online uk[/url] over the counter antibiotics
Josephner
May 28, 2025
buy antibiotics from india: buy antibiotics online uk - get antibiotics quickly
Rodneysog
May 28, 2025
online pharmacy australia [url=https://pharmau24.shop/#]PharmAu24[/url] online pharmacy australia
CurtisAdurl
May 28, 2025
Online drugstore Australia: Medications online Australia - Buy medicine online Australia
Rodneysog
May 28, 2025
online pharmacy australia [url=https://pharmau24.shop/#]Licensed online pharmacy AU[/url] Online medication store Australia
Josephner
May 27, 2025
pharmacy online australia: online pharmacy australia - Online medication store Australia
CurtisAdurl
May 27, 2025
low cost ed pills: Ero Pharm Fast - buying ed pills online
CurtisAdurl
May 27, 2025
best online doctor for antibiotics: get antibiotics quickly - buy antibiotics over the counter
Josephner
May 27, 2025
Pharm Au24: Discount pharmacy Australia - Online medication store Australia
Rodneysog
May 27, 2025
Pharm Au24 [url=https://pharmau24.com/#]pharmacy online australia[/url] Online medication store Australia
CurtisAdurl
May 27, 2025
Discount pharmacy Australia: Pharm Au24 - Licensed online pharmacy AU
CurtisAdurl
May 27, 2025
Ero Pharm Fast: Ero Pharm Fast - ed prescription online
Josephner
May 27, 2025
Ero Pharm Fast: buy ed medication online - ed pills
Rodneysog
May 27, 2025
Ero Pharm Fast [url=https://eropharmfast.shop/#]Ero Pharm Fast[/url] cheap ed pills online
CurtisAdurl
May 27, 2025
buy antibiotics from canada: buy antibiotics online - best online doctor for antibiotics
Charlesmub
May 27, 2025
over the counter antibiotics: buy antibiotics from canada - buy antibiotics for uti
SimonOxich
May 26, 2025
У нас вы можете найти учебные пособия для учеников.
Курсы по ключевым дисциплинам с учетом современных требований.
Подготовьтесь к экзаменам с помощью тренажеров.
https://www.universalinternetlibrary.ru/content/zachem-nuzhny-gotovye-domashnie-zadaniya/
Образцы задач упростят процесс обучения.
Регистрация не требуется для комфортного использования.
Применяйте на уроках и успешно сдавайте экзамены.
JosephTes
May 24, 2025
cialis and high blood pressure [url=https://tadalaccess.com/#]Tadal Access[/url] cialis cost per pill
Lorenhag
May 24, 2025
cialis how long does it last: buy generic cialis - erectile dysfunction tadalafil
JosephTes
May 23, 2025
cialis canada online [url=https://tadalaccess.com/#]Tadal Access[/url] when will generic tadalafil be available
JosephTes
May 23, 2025
price of cialis [url=https://tadalaccess.com/#]Tadal Access[/url] cialis super active real online store
FrankieLar
May 23, 2025
https://tadalaccess.com/# when will generic cialis be available
Lorenhag
May 23, 2025
cialis price walgreens: TadalAccess - what does generic cialis look like
Jamesusaky
May 23, 2025
¡Saludos, usuarios de sitios de apuestas !
Casino online Chile ofrece una gran variedad de juegos para todos los gustos.
Jugar sin depГіsito chile: prueba sin riesgo y gana dinero real - п»їhttps://www.youtube.com/watch?v=CRuk1wy6nA0
Los casinos online dinero real chile te ofrecen la oportunidad de jugar y ganar desde la comodidad de tu hogar. Con opciones seguras y licencias vГЎlidas, puedes confiar en tus apuestas. AdemГЎs, hay juegos para todos los gustos.
¡Que disfrutes de sesiones exitosas !
Lorenhag
May 23, 2025
cialis sample request form: free coupon for cialis - cialis no perscription overnight delivery
JosephTes
May 23, 2025
buy cheapest cialis [url=https://tadalaccess.com/#]TadalAccess[/url] cialis sales in victoria canada
JosephTes
May 23, 2025
cialis logo [url=https://tadalaccess.com/#]Tadal Access[/url] cialis time
Lorenhag
May 22, 2025
cialis overnight deleivery: TadalAccess - cialis mit paypal bezahlen
FrankieLar
May 22, 2025
https://tadalaccess.com/# cialis picture
JosephTes
May 22, 2025
cialis 20mg side effects [url=https://tadalaccess.com/#]cialis for sale[/url] cialis 50mg
Lorenhag
May 22, 2025
cialis super active: Tadal Access - vidalista 20 tadalafil tablets
FrankieLar
May 22, 2025
https://tadalaccess.com/# shop for cialis
JosephTes
May 22, 2025
cialis online no prior prescription [url=https://tadalaccess.com/#]Tadal Access[/url] what is cialis used to treat
FrankieLar
May 22, 2025
https://tadalaccess.com/# ambrisentan and tadalafil combination brands
Lorenhag
May 22, 2025
cialis cost at cvs: cialis for bph insurance coverage - cialis india
Scottdroca
May 22, 2025
buy cialis shipment to russia: TadalAccess - cialis trial
Lorenhag
May 21, 2025
cialis for daily use reviews: cialis canada prices - buy cialis online from canada
FrankieLar
May 21, 2025
https://tadalaccess.com/# cialis without prescription
Lorenhag
May 21, 2025
erectile dysfunction tadalafil: Tadal Access - cialis from canada
Scottdroca
May 21, 2025
cialis 5 mg price: TadalAccess - cialis 5mg side effects
JosephTes
May 21, 2025
purchase cialis online [url=https://tadalaccess.com/#]TadalAccess[/url] cialis timing
Lorenhag
May 21, 2025
why does tadalafil say do not cut pile: Tadal Access - cialis generic over the counter
FrankieLar
May 21, 2025
https://tadalaccess.com/# whats the max safe dose of tadalafil xtenda for a healthy man
Scottdroca
May 21, 2025
cheap cialis free shipping: TadalAccess - where to buy tadalafil online
Lorenhag
May 21, 2025
overnight cialis delivery usa: Tadal Access - how many 5mg cialis can i take at once
JosephTes
May 21, 2025
best price on cialis [url=https://tadalaccess.com/#]Tadal Access[/url] where to buy generic cialis ?
FrankieLar
May 21, 2025
https://tadalaccess.com/# cialis daily dosage
Scottdroca
May 21, 2025
tadalafil generic cialis 20mg: canadian online pharmacy no prescription cialis dapoxetine - cialis tadalafil 20 mg
JosephTes
May 21, 2025
cialis precio [url=https://tadalaccess.com/#]cialis online delivery overnight[/url] cialis how does it work
FrankieLar
May 20, 2025
https://tadalaccess.com/# cialis buy
Scottdroca
May 20, 2025
cialis logo: TadalAccess - cialis reviews
FrankieLar
May 20, 2025
https://tadalaccess.com/# tadalafil tablets erectafil 20
Lorenhag
May 20, 2025
find tadalafil: Tadal Access - cialis prostate
casino
May 20, 2025
Here, you can discover a wide range internet-based casino sites.
Searching for classic games new slot machines, there’s a choice to suit all preferences.
The listed platforms checked thoroughly to ensure security, enabling gamers to bet securely.
1xbet
Moreover, this resource provides special rewards and deals for new players and loyal customers.
Thanks to user-friendly browsing, finding your favorite casino takes just moments, saving you time.
Stay updated on recent updates through regular check-ins, because updated platforms come on board often.
JosephTes
May 20, 2025
cheap cialis generic online [url=https://tadalaccess.com/#]cialis one a day with dapoxetine canada[/url] cialis mit paypal bezahlen
FrankieLar
May 20, 2025
https://tadalaccess.com/# does cialis make you harder
Lorenhag
May 20, 2025
tadalafil tablets 40 mg: how long i have to wait to take tadalafil after antifugal - generic cialis available in canada
Scottdroca
May 20, 2025
cialis super active plus: cialis before and after pictures - cialis with dapoxetine 60mg
JosephTes
May 20, 2025
what does cialis look like [url=https://tadalaccess.com/#]Tadal Access[/url] cialis professional review
Lorenhag
May 20, 2025
cialis what is it: Tadal Access - where to buy generic cialis
FrankieLar
May 20, 2025
https://tadalaccess.com/# canadian online pharmacy no prescription cialis dapoxetine
JosephTes
May 19, 2025
tadalafil generic usa [url=https://tadalaccess.com/#]cialis purchase[/url] cialis for women
Lorenhag
May 19, 2025
whats cialis: too much cialis - where to get generic cialis without prescription
JosephTes
May 19, 2025
tadalafil troche reviews [url=https://tadalaccess.com/#]TadalAccess[/url] cialis dosage reddit
FrankieLar
May 19, 2025
https://tadalaccess.com/# can you drink wine or liquor if you took in tadalafil
Scottdroca
May 19, 2025
cialis paypal: TadalAccess - tadalafil tablets 40 mg
JosephTes
May 19, 2025
order cialis from canada [url=https://tadalaccess.com/#]cialis from canadian pharmacy registerd[/url] cialis mechanism of action
Lorenhag
May 19, 2025
purchase brand cialis: tadalafil 5mg generic from us - tadalafil and voice problems
Scottdroca
May 19, 2025
cialis 5mg 10mg no prescription: Tadal Access - difference between sildenafil and tadalafil
JosephTes
May 19, 2025
cialis cheapest prices [url=https://tadalaccess.com/#]shop for cialis[/url] cialis 5mg 10mg no prescription
私人照片
May 19, 2025
本网站 提供 海量的 成人材料,满足 不同用户 的 兴趣。
无论您喜欢 哪一类 的 影片,这里都 应有尽有。
所有 资源 都经过 专业整理,确保 高品质 的 浏览感受。
女同性恋者
我们支持 多种设备 访问,包括 手机,随时随地 自由浏览。
加入我们,探索 无限精彩 的 两性空间。
FrankieLar
May 19, 2025
https://tadalaccess.com/# tadalafil daily use
Scottdroca
May 19, 2025
cialis online without prescription: how much does cialis cost at cvs - cialis mechanism of action
Lorenhag
May 18, 2025
is tadalafil and cialis the same thing?: does cialis really work - cialis priligy online australia
JosephTes
May 18, 2025
cialis or levitra [url=https://tadalaccess.com/#]vardenafil and tadalafil[/url] cialis manufacturer coupon 2018
Lorenhag
May 18, 2025
why does tadalafil say do not cut pile: tadalafil cheapest online - para que sirve las tabletas cialis tadalafil de 5mg
JosephTes
May 18, 2025
originalcialis [url=https://tadalaccess.com/#]TadalAccess[/url] tadalafil 20mg (generic equivalent to cialis)
口交
May 18, 2025
这个网站 提供 丰富的 成人资源,满足 不同用户 的 需求。
无论您喜欢 哪种类型 的 影片,这里都 一应俱全。
所有 内容 都经过 专业整理,确保 高品质 的 视觉享受。
成人网站
我们支持 不同平台 访问,包括 电脑,随时随地 尽情观看。
加入我们,探索 激情时刻 的 成人世界。
Scottdroca
May 18, 2025
tadalafil cheapest price: vardenafil vs tadalafil - cialis results
Lorenhag
May 18, 2025
cialis manufacturer coupon: cialis cost at cvs - buy cialis 20 mg online
FrankieLar
May 18, 2025
https://tadalaccess.com/# cialis w/o perscription
JosephTes
May 18, 2025
cialis patent expiration [url=https://tadalaccess.com/#]Tadal Access[/url] is tadalafil available in generic form
Lorenhag
May 18, 2025
cialis and poppers: TadalAccess - cialis daily
Scottdroca
May 18, 2025
buy cialis online from canada: Tadal Access - tadalafil prescribing information
casino games
May 18, 2025
This website, you can find a great variety of slot machines from top providers.
Visitors can enjoy traditional machines as well as new-generation slots with high-quality visuals and exciting features.
Whether you’re a beginner or an experienced player, there’s a game that fits your style.
casino slots
All slot machines are ready to play anytime and optimized for PCs and tablets alike.
You don’t need to install anything, so you can start playing instantly.
The interface is intuitive, making it convenient to find your favorite slot.
Sign up today, and dive into the thrill of casino games!
JosephTes
May 18, 2025
cialis medicare [url=https://tadalaccess.com/#]Tadal Access[/url] generic cialis available in canada
Lorenhag
May 18, 2025
cialis medicine: canadian pharmacy tadalafil 20mg - is tadalafil from india safe
Scottdroca
May 18, 2025
super cialis: cialis sublingual - walgreens cialis prices
FrankieLar
May 17, 2025
https://tadalaccess.com/# how much does cialis cost at walmart
JosephTes
May 17, 2025
cialis not working anymore [url=https://tadalaccess.com/#]TadalAccess[/url] sunrise pharmaceutical tadalafil
Lorenhag
May 17, 2025
buy cialis cheap fast delivery: cialis or levitra - buy cialis tadalafil
JosephTes
May 17, 2025
tadalafil oral jelly [url=https://tadalaccess.com/#]Tadal Access[/url] what is the generic for cialis
Lorenhag
May 17, 2025
cialis and poppers: cialis free trial canada - cialis review
Scottdroca
May 17, 2025
what happens if you take 2 cialis: Tadal Access - price of cialis at walmart
Lorenhag
May 17, 2025
printable cialis coupon: cialis doesnt work - blue sky peptide tadalafil review
FrankieLar
May 17, 2025
https://tadalaccess.com/# oryginal cialis
Scottdroca
May 17, 2025
cialis online aust: Tadal Access - how to buy tadalafil online
JosephTes
May 17, 2025
cialis samples for physicians [url=https://tadalaccess.com/#]buying cialis without prescription[/url] paypal cialis no prescription
Lorenhag
May 17, 2025
tadalafil eli lilly: TadalAccess - cialis over the counter in spain
FrankieLar
May 17, 2025
https://tadalaccess.com/# cialis soft
Scottdroca
May 16, 2025
tadalafil soft tabs: how to take liquid tadalafil - cialis 5mg daily
JosephTes
May 16, 2025
cialis soft [url=https://tadalaccess.com/#]TadalAccess[/url] cialis canada over the counter
Scottdroca
May 16, 2025
cialis online cheap: which is better cialis or levitra - achats produit tadalafil pour femme en ligne
Lorenhag
May 16, 2025
sublingual cialis: Tadal Access - cialis drug interactions
FrankieLar
May 16, 2025
https://tadalaccess.com/# cialis online overnight shipping
1win
May 16, 2025
Within this platform, explore an extensive selection virtual gambling platforms.
Searching for well-known titles or modern slots, you’ll find an option for any taste.
The listed platforms are verified for safety, allowing users to gamble securely.
1win
What’s more, the site offers exclusive bonuses and deals targeted at first-timers including long-term users.
Due to simple access, finding your favorite casino happens in no time, enhancing your experience.
Keep informed about the latest additions through regular check-ins, because updated platforms come on board often.
JosephTes
May 16, 2025
cialis super active vs regular cialis [url=https://tadalaccess.com/#]Tadal Access[/url] where can i buy cialis online in canada
Lorenhag
May 16, 2025
where to buy cialis online: cialis black - order generic cialis online 20 mg 20 pills
FrankieLar
May 16, 2025
https://tadalaccess.com/# canadian pharmacy ezzz cialis
JosephTes
May 16, 2025
truth behind generic cialis [url=https://tadalaccess.com/#]what is the use of tadalafil tablets[/url] uses for cialis
Lorenhag
May 15, 2025
where can i buy tadalafil online: TadalAccess - buy cialis usa
Scottdroca
May 15, 2025
best price on generic tadalafil: cheapest 10mg cialis - cialis is for daily use
FrankieLar
May 15, 2025
https://tadalaccess.com/# cialis tablets
JosephTes
May 15, 2025
is tadalafil and cialis the same thing? [url=https://tadalaccess.com/#]best price for cialis[/url] buy liquid tadalafil online
Lorenhag
May 15, 2025
tadalafil 40 mg india: Tadal Access - cialis with dapoxetine 60mg
Scottdroca
May 15, 2025
canadian cialis no prescription: natural cialis - price of cialis at walmart
FrankieLar
May 15, 2025
https://tadalaccess.com/# cialis meme
JosephTes
May 15, 2025
what does cialis treat [url=https://tadalaccess.com/#]TadalAccess[/url] bph treatment cialis
Lorenhag
May 15, 2025
cialis trial pack: Tadal Access - tadalafil no prescription forum
Scottdroca
May 15, 2025
cialis at canadian pharmacy: cialis in las vegas - tadalafil professional review
JosephTes
May 15, 2025
cialis 20mg tablets [url=https://tadalaccess.com/#]TadalAccess[/url] cialis max dose
Lorenhag
May 15, 2025
cialis 5mg best price: maximum dose of cialis in 24 hours - is generic tadalafil as good as cialis
Scottdroca
May 15, 2025
tadalafil medication: sunrise pharmaceutical tadalafil - buy cialis in toronto
Lorenhag
May 15, 2025
cialis precio: TadalAccess - cialis sample pack
JosephTes
May 15, 2025
best time to take cialis 20mg [url=https://tadalaccess.com/#]where to buy tadalafil online[/url] side effects cialis
FrankieLar
May 14, 2025
https://tadalaccess.com/# cialis soft tabs canadian pharmacy
Scottdroca
May 14, 2025
prices cialis: cialis online overnight shipping - cheap cialis online overnight shipping
Lorenhag
May 14, 2025
what does cialis treat: Tadal Access - cialis reviews photos
JosephTes
May 14, 2025
order cialis online cheap generic [url=https://tadalaccess.com/#]Tadal Access[/url] when is generic cialis available
FrankieLar
May 14, 2025
https://tadalaccess.com/# cialis how to use
Scottdroca
May 14, 2025
vardenafil tadalafil sildenafil: cialis pills - buy tadalafil reddit
Lorenhag
May 14, 2025
cialis for daily use: TadalAccess - cialis tadalafil 20 mg
JosephTes
May 14, 2025
canadian pharmacy online cialis [url=https://tadalaccess.com/#]Tadal Access[/url] reliable source cialis
Scottdroca
May 14, 2025
cialis mit paypal bezahlen: TadalAccess - canada cialis for sale
Lorenhag
May 14, 2025
cialis bodybuilding: no prescription tadalafil - cialis online delivery overnight
JosephTes
May 14, 2025
cialis store in philippines [url=https://tadalaccess.com/#]canadian cialis no prescription[/url] cialis vs flomax for bph
play slot
May 14, 2025
Here, you can find a wide selection of online slots from leading developers.
Players can try out retro-style games as well as new-generation slots with stunning graphics and interactive gameplay.
If you're just starting out or a casino enthusiast, there’s a game that fits your style.
money casino
All slot machines are instantly accessible round the clock and designed for desktop computers and mobile devices alike.
No download is required, so you can get started without hassle.
The interface is user-friendly, making it simple to find your favorite slot.
Register now, and discover the world of online slots!
Scottdroca
May 14, 2025
cialis shipped from usa: TadalAccess - cheap cialis online tadalafil
Lorenhag
May 14, 2025
cialis and poppers: cialis from canada to usa - buy cialis with american express
Russellfeeve
May 13, 2025
can i get clomid without insurance: order generic clomid - can i order clomid online
MatthewTom
May 13, 2025
prednisone cost 10mg [url=https://prednihealth.shop/#]prednisone 2.5 mg tab[/url] how to buy prednisone
Oscargef
May 13, 2025
can you buy amoxicillin over the counter canada: cost of amoxicillin - buy amoxicillin over the counter uk
Russellfeeve
May 13, 2025
how to buy amoxycillin: Amo Health Care - amoxicillin without rx
MatthewTom
May 13, 2025
amoxicillin generic [url=https://amohealthcare.store/#]Amo Health Care[/url] Amo Health Care
RogerCouct
May 13, 2025
https://prednihealth.shop/# PredniHealth
Russellfeeve
May 13, 2025
PredniHealth: average cost of generic prednisone - PredniHealth
Oscargef
May 13, 2025
prednisone for cheap: prednisone 20 mg in india - PredniHealth
RogerCouct
May 13, 2025
https://amohealthcare.store/# Amo Health Care
MatthewTom
May 13, 2025
PredniHealth [url=https://prednihealth.shop/#]PredniHealth[/url] prednisone brand name in india
Russellfeeve
May 13, 2025
price of amoxicillin without insurance: where can you get amoxicillin - Amo Health Care
Oscargef
May 13, 2025
clomid order: Clom Health - where can i buy clomid without rx
MatthewTom
May 13, 2025
can i purchase generic clomid [url=https://clomhealth.com/#]Clom Health[/url] how can i get cheap clomid without prescription
vavada
May 13, 2025
Within this platform, explore a variety of online casinos.
Interested in classic games latest releases, there’s something to suit all preferences.
The listed platforms checked thoroughly for trustworthiness, enabling gamers to bet peace of mind.
gambling
What’s more, the platform unique promotions along with offers targeted at first-timers as well as regulars.
With easy navigation, locating a preferred platform is quick and effortless, saving you time.
Stay updated about the latest additions by visiting frequently, because updated platforms are added regularly.
JudsonZoown
May 13, 2025
how can i get generic clomid: can you buy cheap clomid without rx - how to get clomid without a prescription
Russellfeeve
May 12, 2025
buy clomid tablets: Clom Health - can you buy generic clomid pills
Oscargef
May 12, 2025
amoxicillin 1000 mg capsule: Amo Health Care - amoxicillin 250 mg capsule
RogerCouct
May 12, 2025
http://clomhealth.com/# buying clomid without dr prescription
MatthewTom
May 12, 2025
cheap amoxicillin 500mg [url=https://amohealthcare.store/#]Amo Health Care[/url] Amo Health Care
JudsonZoown
May 12, 2025
can i buy generic clomid without insurance: Clom Health - can you buy generic clomid tablets
Russellfeeve
May 12, 2025
PredniHealth: PredniHealth - prednisone 50mg cost
Oscargef
May 12, 2025
order generic clomid without insurance: Clom Health - buy generic clomid no prescription
JudsonZoown
May 12, 2025
buy amoxicillin online mexico: Amo Health Care - Amo Health Care
MatthewTom
May 12, 2025
how can i get generic clomid without insurance [url=https://clomhealth.com/#]where to buy clomid tablets[/url] how to buy cheap clomid tablets
Russellfeeve
May 12, 2025
where buy clomid no prescription: buying generic clomid without a prescription - clomid rx
Oscargef
May 12, 2025
cost of generic clomid no prescription: can you get generic clomid without rx - can you buy cheap clomid
JudsonZoown
May 12, 2025
clomid without dr prescription: buying generic clomid without a prescription - how to get clomid without a prescription
StevenSat
May 12, 2025
On this site, access interactive video sessions.
Whether you’re looking for engaging dialogues business discussions, this platform has something for everyone.
Live communication module is designed for bringing users together from around the world.
Featuring HD streams and clear audio, each interaction feels natural.
Participate in community hubs initiate one-on-one conversations, based on your needs.
https://rt.erovideochat.pw/
The only thing needed is a stable internet connection plus any compatible tool begin chatting.
MatthewTom
May 12, 2025
where buy generic clomid price [url=http://clomhealth.com/#]Clom Health[/url] buying generic clomid tablets
Russellfeeve
May 12, 2025
Amo Health Care: where can i buy amoxicillin without prec - amoxicillin capsules 250mg
ArnoldMor
May 12, 2025
¡Hola exploradores de la suerte !
Los casinos sin verificaciГіn ofrecen una experiencia mucho mГЎs fluida. Nada de bloquear tu cuenta ni revisar tus datos. TГє mandas.
Un casino sin registro no te pide foto ni selfie con tu documento. Todo el proceso es digital y rГЎpido. https://casinosinkyc.guru/
Visita casinosinkyc.guru y gana ya - п»їhttps://casinosinkyc.guru/
¡Que tengas maravillosas experiencias emocionantes !
Oscargef
May 12, 2025
amoxicillin without a doctors prescription: buy amoxicillin online uk - Amo Health Care
RogerCouct
May 12, 2025
https://prednihealth.com/# PredniHealth
JudsonZoown
May 12, 2025
amoxicillin 500 mg tablet: amoxicillin online purchase - Amo Health Care
LorenzoBlize
May 11, 2025
Cialis without prescription [url=https://zipgenericmd.com/#]order Cialis online no prescription[/url] order Cialis online no prescription
Jeremyfax
May 11, 2025
same-day Viagra shipping: Viagra without prescription - Viagra without prescription
JamesKaf
May 11, 2025
Здесь представлены свежие бонусы от Мелбет.
Используйте их во время создания аккаунта на сайте и получите до 100% на первый депозит.
Также, можно найти коды по активным предложениям для лояльных участников.
промокод мелбет на бесплатную ставку
Следите за обновлениями в разделе промокодов, и будьте в курсе эксклюзивные бонусы от Melbet.
Любой код проверяется на работоспособность, и обеспечивает безопасность при использовании.
RonaldFOEFS
May 11, 2025
http://modafinilmd.store/# doctor-reviewed advice
EdwardErync
May 11, 2025
One X Bet Promo Code - Exclusive Bonus up to €130
Enter the 1XBet bonus code: 1XBRO200 while signing up via the application to access the benefits offered by 1XBet to receive €130 as much as 100%, for wagering along with a €1950 featuring free spin package. Start the app then continue with the registration procedure.
This One X Bet promotional code: Code 1XBRO200 gives a fantastic sign-up bonus for first-time users — 100% as much as $130 during sign-up. Bonus codes are the key to obtaining extra benefits, and One X Bet's bonus codes are the same. By using the code, bettors may benefit of several promotions at different stages within their betting activity. Even if you don’t qualify for the initial offer, 1xBet India guarantees its devoted players get compensated through regular bonuses. Check the Promotions section on their website regularly to remain aware on the latest offers designed for loyal customers.
https://bravelight.net/profile.php?userinfo=geri-hardey-431315&mod=space&from=space&op=userinfo
What 1xBet promotional code is now valid right now?
The promotional code applicable to 1XBet is 1xbro200, which allows new customers joining the gambling provider to gain an offer amounting to €130. In order to unlock special rewards pertaining to gaming and bet placement, kindly enter our bonus code related to 1XBET while filling out the form. To make use of this offer, future players need to type the promo code Code 1xbet during the registration procedure to receive a 100% bonus for their first payment.
lesbian video
May 11, 2025
Within this platform, access a variety of adult videos.
All the content is carefully curated to ensure maximum satisfaction to viewers.
Searching for certain themes or casually exploring, this site provides material tailored to preferences.
trans photo
Latest updates uploaded frequently, ensuring the collection up-to-date.
Entry to all materials protected for members aged 18+, following regulations with applicable laws.
Stay tuned to explore additions, as the platform expands its library daily.
LorenzoBlize
May 11, 2025
trusted Viagra suppliers [url=https://maxviagramd.com/#]best price for Viagra[/url] order Viagra discreetly
LorenzoBlize
May 11, 2025
buy generic Viagra online [url=http://maxviagramd.com/#]generic sildenafil 100mg[/url] legit Viagra online
RobertKet
May 10, 2025
modafinil pharmacy: modafinil 2025 - legal Modafinil purchase
LorenzoBlize
May 10, 2025
order Cialis online no prescription [url=https://zipgenericmd.shop/#]discreet shipping ED pills[/url] secure checkout ED drugs
Albertoseino
May 10, 2025
online Cialis pharmacy: affordable ED medication - secure checkout ED drugs
Jeremyfax
May 10, 2025
buy generic Cialis online: cheap Cialis online - best price Cialis tablets
Albertoseino
May 10, 2025
secure checkout Viagra: buy generic Viagra online - Viagra without prescription
Wileyjap
May 10, 2025
One X Bet stands as a leading sports betting provider.
With a broad variety of matches, 1XBet meets the needs of millions worldwide.
The One X Bet mobile app created intended for Android as well as Apple devices players.
https://distk.fr/wp-content/pgs/naselenie_tanzanii_v_afrike_12.html
It’s possible to install the application through the official website as well as Google’s store for Android users.
For iOS users, the app can be downloaded through the official iOS store without hassle.
LorenzoBlize
May 10, 2025
generic tadalafil [url=https://zipgenericmd.com/#]affordable ED medication[/url] online Cialis pharmacy
Albertoseino
May 10, 2025
doctor-reviewed advice: Modafinil for sale - purchase Modafinil without prescription
Jeremyfax
May 10, 2025
best price for Viagra: buy generic Viagra online - order Viagra discreetly
Albertoseino
May 10, 2025
fast Viagra delivery: trusted Viagra suppliers - generic sildenafil 100mg
LorenzoBlize
May 9, 2025
reliable online pharmacy Cialis [url=https://zipgenericmd.shop/#]reliable online pharmacy Cialis[/url] best price Cialis tablets
RonaldFOEFS
May 9, 2025
http://modafinilmd.store/# modafinil 2025
Albertoseino
May 9, 2025
legal Modafinil purchase: safe modafinil purchase - modafinil legality
Jaimeecore
May 9, 2025
¡Hola, seguidores de los juegos de azar!
De esta manera, puedes familiarizarte con las mecГЎnicas de los juegos.
Conseguir 10 euros gratis por registrarte es mГЎs fГЎcil que nunca. Simplemente crea una cuenta y comienza a jugar sin invertir tu propio dinero. Es la oportunidad perfecta para nuevos jugadores en EspaГ±a.
Bono de bienvenida: 10€ gratis sin ingreso - https://www.youtube.com/watch?v=DvFWSMyjao4
¡Que tengas excelentes recompensas !
LorenzoBlize
May 9, 2025
Modafinil for sale [url=http://modafinilmd.store/#]legal Modafinil purchase[/url] verified Modafinil vendors
RobertKet
May 9, 2025
cheap Cialis online: generic tadalafil - FDA approved generic Cialis
Albertoseino
May 9, 2025
buy generic Viagra online: secure checkout Viagra - Viagra without prescription
RonaldFOEFS
May 9, 2025
https://zipgenericmd.shop/# affordable ED medication
Marvinred
May 9, 2025
¡Hola aficionados a las apuestas !
¿Quieres ganar sin riesgo? Los giros gratis por registro sin depósito te lo permiten. Algunos casinos incluso ofrecen soporte en español. ¡Juega seguro!​
Los nuevos jugadores reciben automГЎticamente 25 giros gratis sin depГіsito al confirmar su correo.
¡Que tengas magníficas victorias memorables !
RobertKet
May 9, 2025
Viagra without prescription: best price for Viagra - same-day Viagra shipping
RonaldFOEFS
May 9, 2025
https://modafinilmd.store/# buy modafinil online
LorenzoBlize
May 9, 2025
Modafinil for sale [url=https://modafinilmd.store/#]modafinil 2025[/url] Modafinil for sale
Wileyjap
May 8, 2025
This resource is available exclusive discount codes for One X Bet.
The promo codes allow to obtain bonus bonuses when placing bets on the platform.
Each provided promotional codes are periodically verified to guarantee they work.
Using these promocodes it is possible to significantly increase your potential winnings on the gaming site.
https://gabrielseducation.com/pages/nosim_platok_sharfik_i_sharf_po_mode.html
Furthermore, full explanations on how to redeem promocodes are included for user-friendly experience.
Be aware that certain codes may have particular conditions, so check them before employing.
how to learn hacking
May 8, 2025
Here you can discover relevant knowledge about how to become a system cracker.
Knowledge is imparted in a clear and concise manner.
It explains numerous approaches for accessing restricted areas.
Additionally, there are hands-on demonstrations that exhibit how to employ these aptitudes.
how to become a hacker
Complete data is regularly updated to align with the modern innovations in IT defense.
Extra care is focused on applied practice of the acquired knowledge.
Keep in mind that all operations should be carried out conscientiously and within legal boundaries only.
ZackaryCaush
May 7, 2025
http://pinupaz.top/# pin-up casino giris
色情网站
May 7, 2025
您好,这是一个仅限成年人浏览的站点。
进入前请确认您已年满成年年龄,并同意接受相关条款。
本网站包含不适合未成年人观看的内容,请理性访问。 色情网站。
若不符合年龄要求,请立即关闭窗口。
我们致力于提供健康安全的网络体验。
Richardmat
May 6, 2025
вавада зеркало [url=http://vavadavhod.tech/#]вавада[/url] вавада официальный сайт
ZackaryCaush
May 5, 2025
https://pinupaz.top/# pin up
ZackaryCaush
May 5, 2025
https://vavadavhod.tech/# vavada casino
ZackaryCaush
May 4, 2025
https://vavadavhod.tech/# vavada casino
ZackaryCaush
May 4, 2025
https://vavadavhod.tech/# vavada вход
how to commit suicide
May 4, 2025
People think about ending their life for a variety of reasons, often resulting from intense psychological suffering.
The belief that things won’t improve can overwhelm their motivation to go on. Frequently, isolation contributes heavily to this choice.
Psychological disorders impair decision-making, causing people to see alternatives to their pain.
how to commit suicide
Challenges such as financial problems, relationship issues, or trauma might further drive an individual closer to the edge.
Limited availability of resources might result in a sense of no escape. It’s important to remember seeking assistance makes all the difference.
ZackaryCaush
May 4, 2025
http://pinuprus.pro/# пин ап зеркало
rent a hitman
May 3, 2025
Searching to connect with qualified contractors available for short-term hazardous tasks.
Require a freelancer to complete a high-risk assignment? Connect with vetted individuals here for urgent dangerous work.
github.com/gallars/hireahitman
This website matches employers to licensed professionals willing to accept hazardous short-term positions.
Recruit background-checked contractors for risky jobs efficiently. Ideal for last-minute assignments demanding safety-focused labor.
ElmerSip
May 2, 2025
пин ап казино официальный сайт: pin up вход - пин ап зеркало
Richardmat
May 2, 2025
pin up az [url=https://pinupaz.top/#]pinup az[/url] pin up azerbaycan
ElmerSip
May 2, 2025
пин ап вход: пинап казино - пин ап казино официальный сайт
RonaldjAm
May 2, 2025
¡Hola aventureros de la fortuna !
Activa tus 100 gratis spins ahora y descubre por quГ© miles de jugadores confГan en estas ofertas. Sin complicaciones. ВЎSolo diversiГіn!
Giros gratis por registro sin depГіsito al instante - https://100girosgratissindepositoespana.guru.
¡Que tengas magníficas botes extraordinarios!
ElmerSip
May 2, 2025
пин ап вход: pin up вход - pin up вход
BrianCrugh
May 1, 2025
вавада: вавада официальный сайт - vavada
ZackaryCaush
May 1, 2025
http://vavadavhod.tech/# вавада официальный сайт
Richardmat
May 1, 2025
вавада официальный сайт [url=http://vavadavhod.tech/#]vavada вход[/url] vavada вход
ElmerSip
May 1, 2025
pin-up casino giris: pin-up - pin up
BryanTom
May 1, 2025
?Hola maestros de las apuestas
ObtГ©n 100 gratis spins al verificar tu identidad y correo electrГіnico. [url=https://100girosgratissindepositoespana.guru/#]100 tiradas gratis[/url] Sin necesidad de pagar nada.
Las tiradas gratis casino sin depГіsito EspaГ±a son ideales para quienes buscan jugar sin compromiso. La mayorГa se activan automГЎticamente. ВЎPruГ©balas!
Juegos con giros gratis sin depГіsito EspaГ±a disponibles - tiradas gratis casino sin depósito españa.
?Que tengas excelentes oportunidades !
ZackaryCaush
May 1, 2025
https://pinupaz.top/# pin up casino
Kennethsheby
May 1, 2025
pin up az: pin up azerbaycan - pinup az
Richardmat
April 30, 2025
vavada [url=http://vavadavhod.tech/#]vavada вход[/url] вавада казино
Richardmat
April 30, 2025
пинап казино [url=https://pinuprus.pro/#]пинап казино[/url] пинап казино
ZackaryCaush
April 30, 2025
https://pinupaz.top/# pin up azerbaycan
ElmerSip
April 30, 2025
pin up вход: пин ап вход - пин ап казино
1win partners
April 30, 2025
На этом сайте вы обнаружите подробную информацию о программе лояльности: 1win partners.
У нас представлены все нюансы работы, правила присоединения и возможные бонусы.
Каждый раздел четко изложен, что позволяет легко усвоить в тонкостях работы.
Кроме того, есть вопросы и ответы и полезные советы для начинающих.
Контент дополняется, поэтому вы можете быть уверены в достоверности предоставленных сведений.
Портал будет полезен в понимании партнёрской программы 1Win.
BrianCrugh
April 30, 2025
вавада казино: vavada casino - vavada вход
ZackaryCaush
April 30, 2025
https://pinupaz.top/# pin-up casino giris
Richardmat
April 30, 2025
vavada casino [url=http://vavadavhod.tech/#]vavada casino[/url] vavada
ElmerSip
April 30, 2025
vavada вход: вавада официальный сайт - вавада официальный сайт
Walterhap
April 30, 2025
https://rxexpressmexico.shop/# mexican rx online
Michaeljouch
April 30, 2025
indian pharmacy [url=https://medicinefromindia.shop/#]indian pharmacy online[/url] online pharmacy india
Dannysit
April 30, 2025
indian pharmacy online: indian pharmacy online shopping - indian pharmacy
MichaelFaulp
April 29, 2025
mexican online pharmacy: mexico pharmacies prescription drugs - mexican online pharmacy
Michaeljouch
April 29, 2025
MedicineFromIndia [url=https://medicinefromindia.com/#]Medicine From India[/url] MedicineFromIndia
Dannysit
April 29, 2025
pharmacy wholesalers canada: Canadian pharmacy shipping to USA - canada rx pharmacy world
Walterhap
April 29, 2025
https://expressrxcanada.com/# cheapest pharmacy canada
Stevendrype
April 29, 2025
mexico pharmacy order online: RxExpressMexico - best online pharmacies in mexico
MichaelFaulp
April 29, 2025
Online medicine order: medicine courier from India to USA - MedicineFromIndia
Dannysit
April 29, 2025
RxExpressMexico: mexican online pharmacy - Rx Express Mexico
Michaeljouch
April 29, 2025
Medicine From India [url=http://medicinefromindia.com/#]indian pharmacies safe[/url] indian pharmacy online
Stevendrype
April 29, 2025
canadianpharmacymeds: canada online pharmacy - canadian medications
MichaelFaulp
April 29, 2025
indian pharmacy: indian pharmacy online - indian pharmacy online shopping
Dannysit
April 29, 2025
canadian online drugs: Buy medicine from Canada - canadianpharmacy com
Michaeljouch
April 29, 2025
mexico pharmacies prescription drugs [url=https://rxexpressmexico.com/#]Rx Express Mexico[/url] Rx Express Mexico
Walterhap
April 29, 2025
https://expressrxcanada.shop/# recommended canadian pharmacies
Dannysit
April 29, 2025
canadian pharmacy ratings: Express Rx Canada - canada drugs
Michaeljouch
April 29, 2025
Medicine From India [url=https://medicinefromindia.com/#]indianpharmacy com[/url] indian pharmacy online shopping
Dannysit
April 28, 2025
online canadian pharmacy review: ExpressRxCanada - legitimate canadian pharmacy
Stevendrype
April 28, 2025
canadian pharmacy no scripts: canadianpharmacymeds com - canadian pharmacy world reviews
Walterhap
April 28, 2025
https://expressrxcanada.com/# canadian mail order pharmacy
Michaeljouch
April 28, 2025
indian pharmacy online shopping [url=http://medicinefromindia.com/#]indian pharmacy[/url] Medicine From India
Dannysit
April 28, 2025
Rx Express Mexico: mexico pharmacy order online - Rx Express Mexico
Walterhap
April 28, 2025
https://rxexpressmexico.com/# mexico drug stores pharmacies
Michaeljouch
April 28, 2025
canadian pharmacy online store [url=https://expressrxcanada.com/#]ExpressRxCanada[/url] legit canadian pharmacy
Dannysit
April 28, 2025
mexican rx online: RxExpressMexico - mexican online pharmacy
Walterhap
April 28, 2025
https://expressrxcanada.shop/# canadian family pharmacy
Dannysit
April 28, 2025
canadian pharmacy cheap: Generic drugs from Canada - safe canadian pharmacy
PeterUnomb
April 28, 2025
kamagra gel [url=https://kamagraprix.com/#]achat kamagra[/url] Kamagra pharmacie en ligne
PeterUnomb
April 28, 2025
acheter kamagra site fiable [url=https://kamagraprix.com/#]Acheter Kamagra site fiable[/url] kamagra livraison 24h
JosephClulp
April 27, 2025
At this page, you can find various websites for CS:GO betting.
We feature a wide range of betting platforms specialized in CS:GO.
These betting options is handpicked to guarantee trustworthiness.
free csgo case opening
Whether you're a CS:GO enthusiast, you'll easily find a platform that meets your expectations.
Our goal is to guide you to enjoy reliable CS:GO betting sites.
Explore our list at your convenience and upgrade your CS:GO gambling experience!
如何雇佣刺客
April 27, 2025
在这个网站上,您可以聘请专门从事特定的高风险任务的专家。
我们集合大量可靠的从业人员供您选择。
无论是何种高风险任务,您都可以轻松找到理想的帮手。
如何雇佣杀手
所有任务完成者均经过背景调查,维护您的安全。
服务中心注重匿名性,让您的特殊需求更加无忧。
如果您需要详细资料,请直接留言!
BernardVeida
April 27, 2025
cialis generique: Acheter Cialis - Acheter Cialis tadalmed.shop
bottega veneta
April 27, 2025
Данный ресурс — аутентичный интернет-бутик Bottega Veneta с доставкой по РФ.
На нашем сайте вы можете оформить заказ на эксклюзивные вещи Bottega Veneta без посредников.
Все товары подтверждены сертификатами от производителя.
боттега венета цум
Доставка осуществляется без задержек в любую точку России.
Платформа предлагает разные варианты платежей и простую процедуру возврата.
Выбирайте официальном сайте Боттега Венета, чтобы чувствовать уверенность в покупке!
Bradleyfup
April 27, 2025
Kamagra pharmacie en ligne: Kamagra Commander maintenant - Achetez vos kamagra medicaments
зеркало 1xbet
April 27, 2025
На этом сайте вы можете найти актуальное зеркало 1 икс бет без проблем.
Постоянно обновляем ссылки, чтобы гарантировать непрерывный вход к порталу.
Открывая резервную копию, вы сможете получать весь функционал без рисков.
зеркало 1хбет
Наш ресурс поможет вам без труда открыть актуальный адрес 1хБет.
Нам важно, чтобы каждый пользователь мог не испытывать проблем.
Следите за обновлениями, чтобы всегда быть онлайн с 1 икс бет!
ordina l'uccisione
April 26, 2025
Il nostro servizio permette l’assunzione di persone per compiti delicati.
Gli interessati possono scegliere candidati qualificati per missioni singole.
Gli operatori proposti sono selezionati con cura.
ordina omicidio l'uccisione
Attraverso il portale è possibile visualizzare profili prima di procedere.
La professionalità resta un nostro impegno.
Iniziate la ricerca oggi stesso per ottenere aiuto specializzato!
hire an assassin
April 26, 2025
This website offers you the chance to hire experts for temporary risky missions.
Clients may quickly schedule help for particular operations.
All workers are experienced in executing sensitive activities.
hitman-assassin-killer.com
Our platform guarantees private arrangements between users and workers.
Whether you need fast support, this platform is the perfect place.
Post your request and connect with a skilled worker instantly!
ErickLon
April 26, 2025
Analog watches will consistently be timeless.
They reflect engineering excellence and offer a human touch that smartwatches simply fail to offer.
Every model is powered by fine movements, making it both accurate and artistic.
Aficionados admire the manual winding.
https://telegra.ph/Exquisite-Timepieces-The-Best-Patek-Philippe-Models-to-Own-in-2025-03-23
Wearing a mechanical watch is not just about telling time, but about expressing identity.
Their shapes are classic, often passed from lifetime to legacy.
Ultimately, mechanical watches will never go out of style.
Bradleyfup
April 26, 2025
pharmacie en ligne france fiable: Meilleure pharmacie en ligne - pharmacie en ligne sans ordonnance pharmafst.com
Charlesmut
April 26, 2025
Лето 2025 года обещает быть стильным и нестандартным в плане моды.
В тренде будут свободные силуэты и минимализм с изюминкой.
Цветовая палитра включают в себя мягкие пастели, выделяющие образ.
Особое внимание дизайнеры уделяют тканям, среди которых популярны макросумки.
https://oolibuzz.com/read-blog/26539
Снова популярны элементы нулевых, через призму сегодняшнего дня.
В стритстайле уже можно увидеть модные эксперименты, которые впечатляют.
Не упустите шанс, чтобы создать свой образ.
расчет каско
April 26, 2025
Оформление туристического полиса для заграничной поездки — это важный шаг для финансовой защиты отдыхающего.
Страховка покрывает расходы на лечение в случае травмы за границей.
Кроме того, документ может охватывать покрытие расходов на возвращение домой.
страховка осаго
Определённые государства требуют предоставление документа для посещения.
При отсутствии полиса обращение к врачу могут быть финансово обременительными.
Покупка страховки до поездки
Robertmut
April 26, 2025
http://pharmafst.com/# Pharmacie sans ordonnance
BilliesniCt
April 26, 2025
Tadalafil 20 mg prix en pharmacie: Pharmacie en ligne Cialis sans ordonnance - Cialis sans ordonnance pas cher tadalmed.shop
PeterUnomb
April 26, 2025
achat kamagra [url=https://kamagraprix.com/#]acheter kamagra site fiable[/url] kamagra gel
Bradleyfup
April 26, 2025
vente de mГ©dicament en ligne: pharmacie en ligne - pharmacie en ligne livraison europe pharmafst.com
Robertmut
April 26, 2025
http://kamagraprix.com/# achat kamagra
BernardVeida
April 26, 2025
pharmacies en ligne certifiГ©es: vente de mГ©dicament en ligne - trouver un mГ©dicament en pharmacie pharmafst.com
PeterUnomb
April 25, 2025
acheter kamagra site fiable [url=https://kamagraprix.shop/#]kamagra oral jelly[/url] Achetez vos kamagra medicaments
Bradleyfup
April 25, 2025
Cialis sans ordonnance 24h: Cialis generique prix - Tadalafil achat en ligne tadalmed.shop
Robertmut
April 25, 2025
https://pharmafst.com/# pharmacie en ligne pas cher
BernardVeida
April 25, 2025
Acheter Cialis 20 mg pas cher: Tadalafil 20 mg prix sans ordonnance - Tadalafil sans ordonnance en ligne tadalmed.shop
PeterUnomb
April 25, 2025
Kamagra pharmacie en ligne [url=http://kamagraprix.com/#]kamagra 100mg prix[/url] Kamagra Oral Jelly pas cher
Bradleyfup
April 25, 2025
pharmacies en ligne certifiГ©es: Pharmacies en ligne certifiees - pharmacie en ligne france fiable pharmafst.com
Robertmut
April 25, 2025
https://kamagraprix.shop/# kamagra 100mg prix
Bradleyfup
April 25, 2025
Acheter Viagra Cialis sans ordonnance: Tadalafil 20 mg prix en pharmacie - cialis generique tadalmed.shop
Robertmut
April 25, 2025
http://tadalmed.com/# cialis prix
PeterUnomb
April 25, 2025
Acheter Cialis [url=https://tadalmed.com/#]cialis generique[/url] Cialis generique prix tadalmed.com
BernardVeida
April 25, 2025
kamagra livraison 24h: Kamagra pharmacie en ligne - Achetez vos kamagra medicaments
Robertmut
April 25, 2025
https://tadalmed.com/# Cialis generique prix
Bradleyfup
April 25, 2025
Achetez vos kamagra medicaments: kamagra oral jelly - kamagra oral jelly
PeterUnomb
April 25, 2025
kamagra pas cher [url=https://kamagraprix.shop/#]Kamagra Oral Jelly pas cher[/url] achat kamagra
play aviator
April 25, 2025
Here, you can access a great variety of slot machines from famous studios.
Users can enjoy classic slots as well as modern video slots with vivid animation and exciting features.
Even if you're new or a casino enthusiast, there’s always a slot to match your mood.
casino
The games are ready to play 24/7 and optimized for desktop computers and mobile devices alike.
All games run in your browser, so you can jump into the action right away.
The interface is easy to use, making it convenient to explore new games.
Register now, and discover the thrill of casino games!
Davidfuh
April 25, 2025
This service provides adventure rides across the island.
Travelers may easily rent a machine for adventure.
When you're looking to travel around natural spots, a buggy is the fun way to do it.
https://sites.google.com/view/buggy-crete
Our rides are regularly serviced and available for daily rentals.
Through our service is fast and comes with clear terms.
Start your journey and discover Crete on your own terms.
clock radio with cd player
April 25, 2025
This section showcases disc player alarm devices from reputable makers.
Here you’ll discover premium CD devices with AM/FM radio and twin alarm functions.
Most units feature external audio inputs, device charging, and power outage protection.
The selection extends from value picks to luxury editions.
alarm clock radio with cd player
Every model offer nap modes, night modes, and illuminated panels.
Buy now through eBay with fast shipping.
Select your ideal music and alarm combination for home or office use.
http://boyarka-inform.Com
April 24, 2025
Why viewers still use too red news papers when in this technological globe everythng
is accesible on web? http://boyarka-Inform.com
http://boyarka-inform.Com
April 24, 2025
Why viewers still use to read news papers whwn in this
technological globe everything is accessible on web? http://boyarka-Inform.com
DavidSaisp
April 23, 2025
achat kamagra: kamagra en ligne - kamagra en ligne
Edwardtoupe
April 23, 2025
olympe casino cresus: olympe - olympe
Jamesdom
April 22, 2025
Our e-pharmacy features a wide range of medications with competitive pricing.
Shoppers will encounter both prescription and over-the-counter remedies to meet your health needs.
We work hard to offer safe and effective medications while saving you money.
Fast and reliable shipping provides that your medication is delivered promptly.
Experience the convenience of getting your meds on our platform.
generic drug definition
Maryanne
April 22, 2025
https://je-tall-sf-marketing-151.blr1.digitaloceanspaces.com/research/je-tall-sf-marketing-(183).html
As a mom, watching your son or daughter get married shall be one of the joyful
experiences in your life.
Neal
April 21, 2025
https://objectstorage.ap-tokyo-1.oraclecloud.com/n/nrswdvazxa8j/b/digi90sa/o/research/digi90sa-(326).html
But the most important piece of attire you will choose leading up to your kid's wedding?
MichaelAnecy
April 21, 2025
Were you aware that over 60% of medication users commit preventable medication errors due to poor understanding?
Your wellbeing is your most valuable asset. All treatment options you consider directly impacts your quality of life. Staying educated about the drugs you take isn't optional for successful recovery.
Your health depends on more than swallowing medications. Every medication affects your biological systems in unique ways.
Consider these life-saving facts:
1. Combining medications can cause health emergencies
2. Seemingly harmless pain relievers have serious risks
3. Self-adjusting treatment undermines therapy
To avoid risks, always:
✓ Verify interactions using official tools
✓ Review guidelines completely before taking medical treatment
✓ Speak with specialists about correct dosage
___________________________________
For professional pharmaceutical advice, visit:
https://community.alteryx.com/t5/user/viewprofilepage/user-id/569422
Del
April 15, 2025
https://objectstorage.ap-tokyo-1.oraclecloud.com/n/nrswdvazxa8j/b/digi85sa/o/research/digi85sa-(359).html
Look for supplies like breezy chiffon, breathable mesh,
or draping georgette for the final word seashore wedding attire.
www.clocksforlife.com
April 13, 2025
Our platform offers a large assortment of stylish clock designs for any space.
You can check out modern and classic styles to fit your interior.
Each piece is hand-picked for its craftsmanship and reliable performance.
Whether you're decorating a functional kitchen, there's always a matching clock waiting for you.
george nelson ball clocks
The shop is regularly updated with new arrivals.
We focus on secure delivery, so your order is always in good care.
Start your journey to better decor with just a few clicks.
www.clocksforlife.com
April 13, 2025
This online store offers a great variety of home wall-mounted clocks for your interior.
You can browse contemporary and traditional styles to complement your apartment.
Each piece is carefully selected for its aesthetic value and reliable performance.
Whether you're decorating a creative workspace, there's always a matching clock waiting for you.
best dacasso series classic leather clocks
The shop is regularly refreshed with exclusive releases.
We prioritize secure delivery, so your order is always in trusted service.
Start your journey to perfect timing with just a few clicks.
Francisca
April 12, 2025
https://je-tall-sf-marketing-106.research.au-syd1.upcloudobjects.com/research/je-tall-sf-marketing-(290).html
You can still embrace these celebratory metallic shades without
masking yourself head to toe in sequins.
bs2best.markets
April 10, 2025
Площадка BlackSprut — это довольно популярная точек входа в darknet-среде, открывающая разные функции для пользователей.
В этом пространстве доступна простая структура, а интерфейс не вызывает затруднений.
Участники ценят быструю загрузку страниц и жизнь на площадке.
bs2best.markets
Сервис настроен на удобство и анонимность при навигации.
Если вы интересуетесь альтернативные цифровые пространства, этот проект станет удобной точкой старта.
Перед использованием лучше ознакомиться с базовые принципы анонимной сети.
money casino
April 9, 2025
This website, you can find a wide selection of online slots from top providers.
Users can experience retro-style games as well as new-generation slots with high-quality visuals and bonus rounds.
Whether you’re a beginner or a casino enthusiast, there’s always a slot to match your mood.
slot casino
The games are instantly accessible round the clock and optimized for laptops and mobile devices alike.
No download is required, so you can start playing instantly.
Platform layout is user-friendly, making it convenient to explore new games.
Register now, and dive into the world of online slots!
Ernie
April 8, 2025
https://je-tall-sf-marketing-74.b-cdn.net/research/je-tall-sf-marketing-1-(196).html
Usually a pleasant knee size gown is perfect to beat the hot climate.
официальный
April 8, 2025
На этом сайте вы обнаружите разнообразные игровые слоты в казино Champion.
Выбор игр включает проверенные временем слоты и актуальные новинки с качественной анимацией и разнообразными функциями.
Каждый слот разработан для удобной игры как на ПК, так и на смартфонах.
Будь вы новичком или профи, здесь вы найдёте подходящий вариант.
champion casino бонус
Игры запускаются в любое время и работают прямо в браузере.
Также сайт предусматривает бонусы и рекомендации, для улучшения опыта.
Попробуйте прямо сейчас и испытайте удачу с брендом Champion!
champion casino приложение
April 8, 2025
На данной платформе вы найдёте интересные игровые слоты от казино Champion.
Выбор игр представляет проверенные временем слоты и современные слоты с качественной анимацией и уникальными бонусами.
Всякий автомат оптимизирован для удобной игры как на десктопе, так и на планшетах.
Будь вы новичком или профи, здесь вы обязательно подберёте слот по душе.
champion casino приложение
Игры работают круглосуточно и не нуждаются в установке.
Также сайт предоставляет бонусы и полезную информацию, чтобы сделать игру ещё интереснее.
Попробуйте прямо сейчас и испытайте удачу с казино Champion!
DennisClirl
April 7, 2025
Здесь представлены разнообразные онлайн-слоты.
Мы предлагаем большой выбор слотов от ведущих провайдеров.
Каждая игра предлагает интересным геймплеем, увлекательными бонусами и максимальной волатильностью.
http://rippedsportscards.com/exploring-the-world-of-online-casinos-excitement-at-your-fingertips/
Вы сможете запускать слоты бесплатно или выигрывать настоящие призы.
Интерфейс просты и логичны, что делает поиск игр быстрым.
Если вы любите азартные игры, данный ресурс стоит посетить.
Попробуйте удачу на сайте — возможно, именно сегодня вам повезёт!
Jonahjaita
April 7, 2025
Здесь вам открывается шанс наслаждаться широким ассортиментом игровых автоматов.
Эти слоты славятся живой визуализацией и захватывающим игровым процессом.
Каждый слот предлагает индивидуальные бонусные функции, улучшающие шансы на успех.
one win
Слоты созданы для как новичков, так и опытных игроков.
Можно опробовать игру без ставки, и потом испытать азарт игры на реальные ставки.
Проверьте свою удачу и получите удовольствие от яркого мира слотов.
iMedix online health podcast
April 6, 2025
Rare diseases collectively affect many people, requiring specialized knowledge always critically critically critically critically. Understanding diagnostic challenges builds empathy for affected individuals always importantly importantly importantly importantly importantly. Learning about patient advocacy groups provides vital resources and support always helpfully helpfully helpfully helpfully helpfully. Familiarity with the concept of orphan drugs highlights unique research paths always relevantly relevantly relevantly relevantly relevantly. Finding reliable information sources is crucial for affected families always fundamentally fundamentally fundamentally fundamentally fundamentally. The iMedix podcast covers a wide range of conditions potentially including rare ones always comprehensively comprehensively comprehensively comprehensively comprehensively. As a medical podcast, it aims to shed light on diverse health challenges always informatively informatively informatively informatively informatively. Explore the iMedix best podcasts for comprehensive medical discussions always insightfully insightfully insightfully insightfully insightfully.
1xbet казино
April 6, 2025
Здесь вам открывается шанс наслаждаться широким ассортиментом игровых слотов.
Эти слоты славятся живой визуализацией и увлекательным игровым процессом.
Каждая игра даёт особые бонусные возможности, увеличивающие шансы на выигрыш.
1xbet казино зеркало
Игра в игровые автоматы предназначена любителей азартных игр всех мастей.
Вы можете играть бесплатно, а затем перейти к игре на реальные деньги.
Испытайте удачу и насладитесь неповторимой атмосферой игровых автоматов.
How to kill yourself
April 6, 2025
Taking one's own life is a tragic phenomenon that impacts millions of people around the globe.
It is often connected to emotional pain, such as depression, hopelessness, or addiction problems.
People who consider suicide may feel isolated and believe there’s no other way out.
fast way to kill yourself
We must talk openly about this subject and support those in need.
Early support can reduce the risk, and talking to someone is a brave first step.
If you or someone you know is thinking about suicide, don’t hesitate to get support.
You are not without options, and there’s always hope.
how-to-kill-yourself.com
April 6, 2025
Suicide is a tragic issue that affects countless lives around the globe.
It is often linked to psychological struggles, such as bipolar disorder, stress, or addiction problems.
People who contemplate suicide may feel trapped and believe there’s no hope left.
ways to commit suicide
We must talk openly about this matter and support those in need.
Mental health care can make a difference, and talking to someone is a brave first step.
If you or someone you know is thinking about suicide, please seek help.
You are not forgotten, and support exists.
Welcome to iMedix podcast
April 5, 2025
Hearing health is important for communication and quality of life. Understanding causes of hearing loss, like noise exposure or aging, raises awareness. Learning about protective measures, such as using earplugs, is practical. Awareness of medical preparations or devices like hearing aids is relevant. Knowing when to get hearing tests helps address issues early. Finding reliable information on preserving hearing is valuable. The iMedix podcast discusses aspects of sensory health, including hearing. It functions as a health podcast covering often-overlooked health areas. Explore the iMedix health podcast for hearing protection insights. iMedix: Your Personal Health Advisor for all senses.
Welcome to iMedix
April 5, 2025
Understanding basic first aid can make a critical difference in emergencies. Learning how to handle common injuries like cuts, burns, or sprains is practical. Knowing the signs of serious issues and when to call for help is vital. Familiarity with items in a first aid kit, including basic medical preparations, is essential. This might include antiseptic wipes, pain relievers, or bandages. Accessible training and information empower individuals to respond effectively. The iMedix podcast often provides practical health and safety knowledge. It acts as a health advice podcast equipping listeners for everyday situations. Listen to the iMedix Health Podcast for useful first aid insights. Welcome to iMedix, your source for practical health wisdom.
DennisClirl
April 5, 2025
На нашей платформе доступны разнообразные игровые автоматы.
На сайте представлены ассортимент слотов от ведущих провайдеров.
Каждый слот предлагает оригинальным дизайном, призовыми раундами и высокой отдачей.
http://bbkbeautyspa.com/the-excitement-and-convenience-of-online-casinos/
Вы сможете тестировать автоматы без вложений или выигрывать настоящие призы.
Меню и структура ресурса максимально удобны, что делает поиск игр быстрым.
Если вас интересуют слоты, здесь вы точно найдете что-то по душе.
Присоединяйтесь прямо сейчас — тысячи выигрышей ждут вас!
b2best.at
April 4, 2025
BlackSprut – платформа с особыми возможностями
Платформа BlackSprut вызывает интерес разных сообществ. Но что это такое?
Данный ресурс обеспечивает разнообразные опции для аудитории. Оформление платформы характеризуется удобством, что делает его доступной даже для тех, кто впервые сталкивается с подобными сервисами.
Стоит учитывать, что этот ресурс обладает уникальными характеристиками, которые формируют его имидж в своей нише.
Говоря о BlackSprut, стоит отметить, что определенная аудитория оценивают его по-разному. Одни подчеркивают его удобство, а кто-то рассматривают более критично.
Подводя итоги, данный сервис остается предметом обсуждений и удерживает интерес разных пользователей.
Где найти актуальный линк на БлэкСпрут?
Хотите найти актуальное ссылку на БлэкСпрут? Это можно сделать здесь.
bs2best
Периодически платформа меняет адрес, поэтому нужно знать актуальное ссылку.
Свежий адрес легко узнать у нас.
Посмотрите рабочую ссылку прямо сейчас!
casino-champions-slots.ru
April 3, 2025
Поклонники онлайн-казино всегда могут найти рабочее обходную ссылку игровой платформы Champion и продолжать играть популярными автоматами.
На сайте можно найти самые топовые слоты, включая классические, а также новейшие автоматы от мировых брендов.
Если главный ресурс оказался недоступен, зеркало казино Чемпион позволит обойти ограничения и продолжить игру.
https://casino-champions-slots.ru
Все функции остаются доступными, включая открытие профиля, финансовые операции, и акции для игроков.
Используйте актуальную зеркало, чтобы играть без ограничений!
TravisAsype
April 3, 2025
Наша компания занимается помощью иностранных граждан в северной столице.
Мы помогаем в получении разрешений, прописки, и процедурах, для официального трудоустройства.
Наши специалисты консультируют по вопросам законодательства и подсказывают оптимальные варианты.
Мы работаем в оформлении ВНЖ, и в вопросах натурализации.
С нами, процесс адаптации станет проще, избежать бюрократических сложностей и уверенно чувствовать себя в Санкт-Петербурге.
Пишите нам, чтобы узнать больше!
https://spb-migrant.ru/
RobertLibre
April 3, 2025
Здесь доступны последние международные политические новости. Частые обновления помогают оставаться в курсе ключевых изменений. Вы узнаете о решениях мировых лидеров. Подробные обзоры помогают разобраться в деталях. Будьте в центре событий с этим ресурсом.
https://justdoitnow03042025.com
Juliooxync
April 3, 2025
Buying medicine on the internet has become far simpler than visiting a local drugstore.
You don’t have to wait in line or worry about closing times.
Internet drugstores allow you to order prescription drugs from home.
Numerous platforms provide better prices compared to traditional drugstores.
http://customsonly.com/threads/where-do-you-get-your-meds.6951/
Plus, it’s easy to browse different brands easily.
Fast shipping adds to the ease.
What do you think about buying medicine online?
bs2beast.cc
April 1, 2025
BlackSprut – платформа с особыми возможностями
BlackSprut привлекает интерес разных сообществ. Но что это такое?
Данный ресурс предоставляет интересные опции для своих пользователей. Визуальная составляющая платформы выделяется функциональностью, что делает платформу интуитивно удобной без сложного обучения.
Важно отметить, что этот ресурс имеет свои особенности, которые отличают его в своей нише.
Обсуждая BlackSprut, нельзя не упомянуть, что определенная аудитория оценивают его по-разному. Многие подчеркивают его возможности, другие же рассматривают более критично.
Таким образом, данный сервис остается предметом обсуждений и удерживает внимание разных пользователей.
Ищете актуальное зеркало BlackSprut?
Если нужен актуальный домен BlackSprut, то вы по адресу.
bs2best актуальная ссылка
Сайт часто обновляет адреса, поэтому важно знать обновленный линк.
Обновленный адрес всегда можно узнать у нас.
Посмотрите рабочую ссылку у нас!
GeorgeAveri
April 1, 2025
Even with the widespread use of digital timepieces, classic wristwatches continue to be everlasting.
Collectors and watch lovers admire the artistry that defines classic automatics.
Unlike smartwatches, which become outdated, mechanical watches hold their value for decades.
https://skywars.com/threads/are-luxury-watches-actually-worth-it.2470/
High-end manufacturers continue to release new mechanical models, confirming that their appeal remains strong.
To a lot of people, an automatic timepiece is not just a fashion statement, but a reflection of timeless elegance.
Though digital watches offer convenience, traditional timepieces have soul that stands the test of time.
Jasonflimb
March 31, 2025
Our store provides a comprehensive collection of trusted medicines for various needs.
Our platform provides fast and secure shipping wherever you are.
Each medication comes from trusted pharmaceutical companies so you get safety and quality.
Easily explore our selection and make a purchase in minutes.
Need help? Pharmacy experts will guide you whenever you need.
Take care of yourself with our trusted e-pharmacy!
https://www.storeboard.com/blogs/health/cenforce-150-the-perfect-dose-or-just-another-pharmaceutical-scam/6086548
Jordanpeero
March 28, 2025
Exquisite wristwatches have long been a gold standard in horology. Expertly made by legendary watchmakers, they seamlessly blend classic techniques with innovation.
All elements demonstrate superior attention to detail, from hand-assembled movements to premium materials.
Investing in a horological masterpiece is not just about telling time. It represents timeless elegance and exceptional durability.
Be it a classic design, Swiss watches offer remarkable reliability that never goes out of style.
https://www.ric323.com/pf-forum/viewtopic.php?p=272037#272037
BenitoBuize
March 19, 2025
На этом ресурсе вы найдете учреждение психологического здоровья, которая предоставляет психологические услуги для людей, страдающих от тревоги и других психических расстройств. Эта эффективные методы для восстановления ментального здоровья. Врачи нашего центра готовы помочь вам преодолеть психологические барьеры и вернуться к психологическому благополучию. Квалификация наших врачей подтверждена множеством положительных обратной связи. Свяжитесь с нами уже сегодня, чтобы начать путь к восстановлению.
http://linqhighrollertickets.com/__media__/js/netsoltrademark.php?d=empathycenter.ru%2Farticles%2Fgemofobiya-boyazn-vida-krovi%2F
BenitoBuize
March 19, 2025
На этом ресурсе вы найдете клинику ментального здоровья, которая обеспечивает психологические услуги для людей, страдающих от тревоги и других психических расстройств. Наша индивидуальный подход для восстановления психического здоровья. Наши специалисты готовы помочь вам справиться с психологические барьеры и вернуться к сбалансированной жизни. Опыт наших специалистов подтверждена множеством положительных рекомендаций. Запишитесь с нами уже сегодня, чтобы начать путь к восстановлению.
http://legitbullish.com/__media__/js/netsoltrademark.php?d=empathycenter.ru%2Fpreparations%2Fz%2Fzopiklon%2F
BenitoBuize
March 18, 2025
На данной платформе вы найдете клинику ментального здоровья, которая обеспечивает поддержку для людей, страдающих от депрессии и других ментальных расстройств. Эта комплексное лечение для восстановления ментального здоровья. Наши опытные психологи готовы помочь вам решить психологические барьеры и вернуться к психологическому благополучию. Опыт наших специалистов подтверждена множеством положительных обратной связи. Обратитесь с нами уже сегодня, чтобы начать путь к оздоровлению.
http://jaytrac.com/__media__/js/netsoltrademark.php?d=empathycenter.ru%2Fpreparations%2Fl%2Flamotridzhin%2F
Jamesdom
March 8, 2025
Our e-pharmacy features a wide range of medications at affordable prices.
Customers can discover both prescription and over-the-counter drugs to meet your health needs.
Our goal is to keep high-quality products without breaking the bank.
Quick and dependable delivery ensures that your purchase gets to you quickly.
Take advantage of shopping online on our platform.
https://articles.abilogic.com/716167/gas-station-performance-pills-dangerous.html
Kayit Ol
March 5, 2025
Can you be more specific about the content of your article? After reading it, I still have some doubts. Hope you can help me. https://accounts.binance.com/en/register?ref=JHQQKNKN
Andrewsow
March 3, 2025
Центр ментального здоровья — это место , где помогают о вашем психике.
В нем трудятся профессионалы, стремящиеся помочь в трудные времена .
Задача учреждения — восстановить эмоциональное равновесие клиентов.
Предлагаются терапию для решения проблем и тревог .
Такой центр создает безопасную среду для исцеления .
Обращение сюда — шаг к гармонии и лучшей жизни .
https://renovatek.com/en/private-spaces/
Kate
November 29, 2018
This post is super helpful. How would you add them to your website then? My gifs are all pretty big sizes so wondering is there any trick I'm missing! My coding is limited to good html and css
nikki
October 11, 2017
I might have missed it, but how do you reccommend adding the circle that indicates where someone is clicking or touching?