
Design
How to create a neon glow effect in Photoshop

One design element that’s certainly trending is the neon glow effect. By incorporating and playing with various lighting effects, you can create emphasize an element of your site or add some subtle mystery to the overall design. Whether you want to make a literal neon sign or just add a fun pop-culture vibe to your site, this effect is such a fun trend that allows designers to experiment!
The neon glow effect can be found around the web in lots of different forms. Some focus on the glowing, neon aspect, while others focus on the “reality” of a virtual neon sign. Here’s an example of the realistic approach:

Now that you’ve seen these neon signs in action, try it out for yourself!
Create a neon glow effect in Photoshop
Before we get started, let’s clarify a few things that will help you get the best results. For a realistic effect, you’ll want to find a font that either connects or has breaks like a real neon sign would. If you’re using an icon, using a simple outline will look a little cleaner, but feel free to experiment as you see fit. Let us know how it goes!
Create your background
For this example, I’m going to use this brick background from Unsplash. You can choose whatever you like, but this brick gives it a great, realistic feeling of hanging on a wall. And don’t worry – we’re going to give it a nighttime look to emphasize the glow!

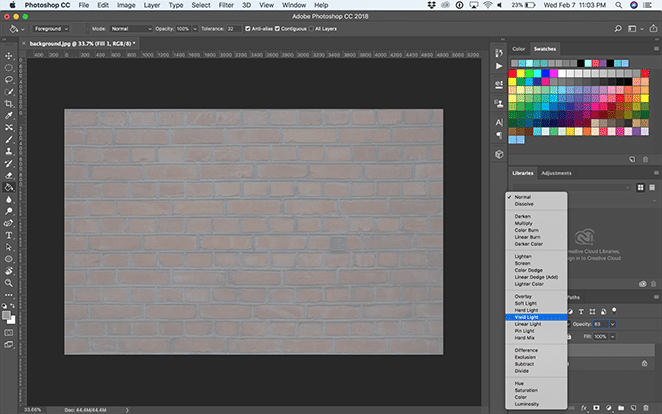
To darken the image, create a new layer under and fill it with gray using the Paint Bucket Tool. I’m using #999999. Then, set the opacity to something like 83% and change the blending mode for the image layer to Vivid Light.
Add dramatic lighting to the background
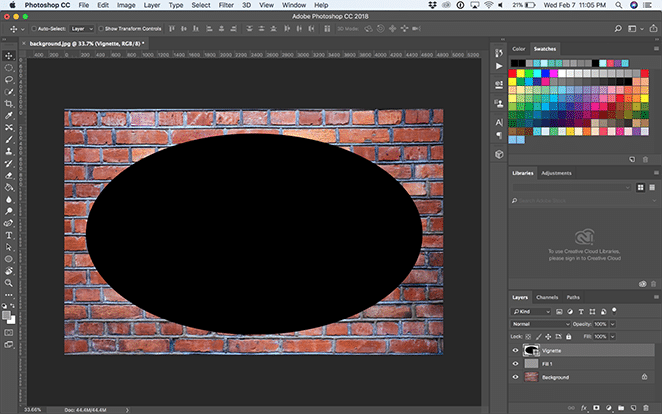
Now we’re going to create a vignette. To do this, create a new layer, and use the Ellipse Tool to draw an ellipse just slightly smaller than the canvas.
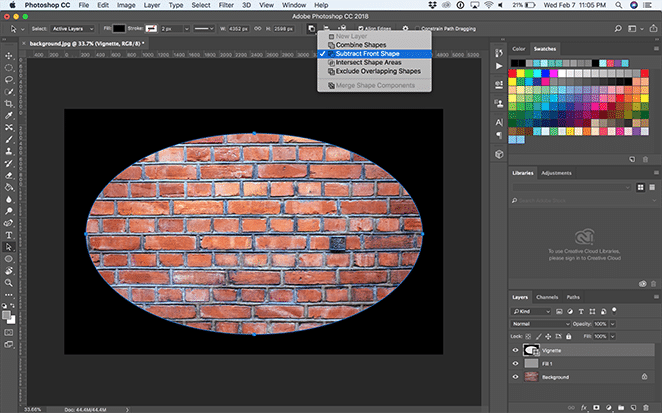
Then, with the Path Selection Tool, select Path Operations dropdown and click Subtract From Shape.
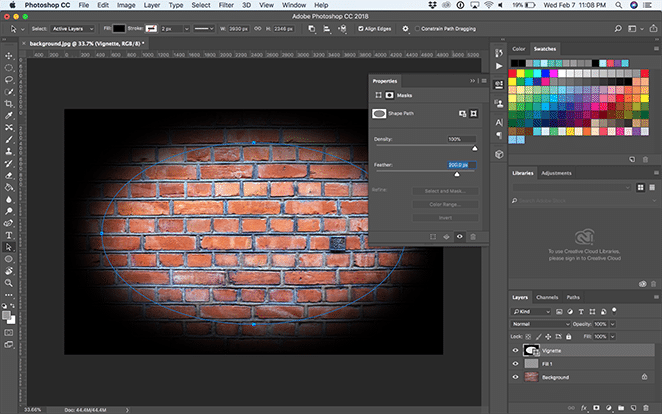
Open the properties window with Window > Properties and select Mask. Then set Feather to 200px and adjust it with the Free Transform Tool as you please. It should look something like this then:
Create a new layer above the vignette layer with Layer > New Layer and fill it with black using the Paint Bucket Tool. Then, set the opacity to something like 75% and change the blending mode for the layer to Vivid Light.

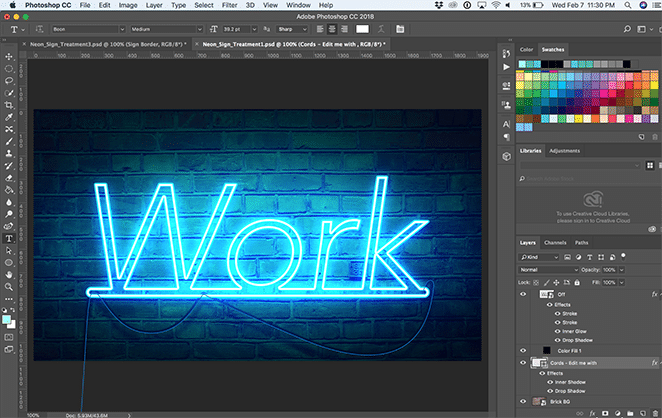
Create the neon sign
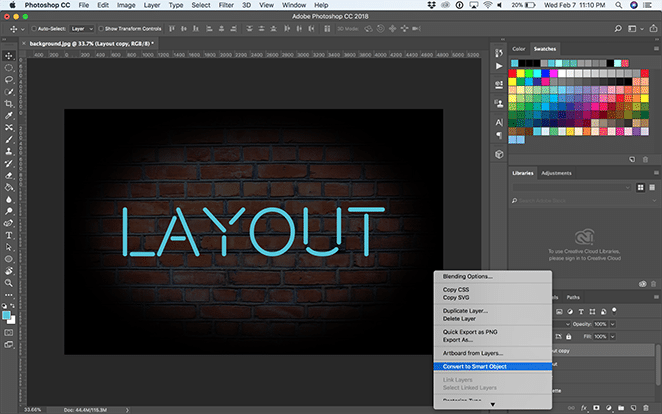
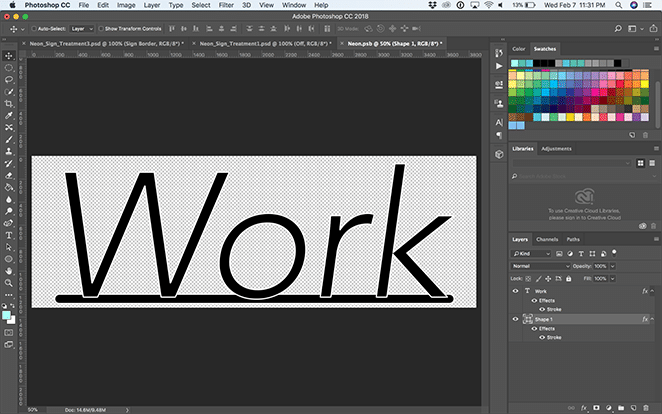
For this example, I’m going to use the typeface Beon Medium to spell out “Layout,” but you can choose any typeface, phrase, or icon you like! From here, you can position your text however you like.
Duplicate the text layer, right click it, and select Convert to Smart Object. Then, right click the layer and select Blending Options.
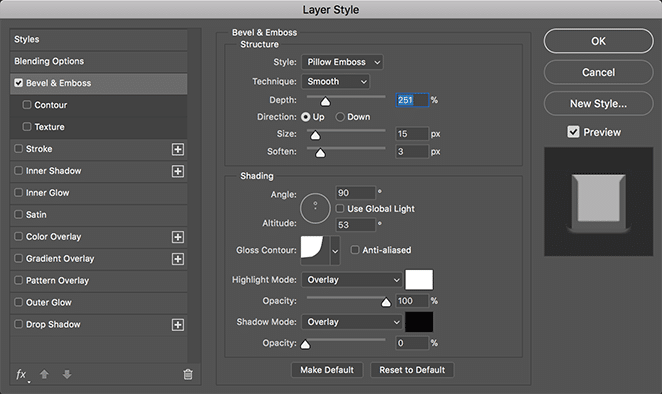
Add a Bevel & Emboss. This gives dimension to the text, so try various settings to get the effect you like! I’m using these settings:
- Style: Pillow Emboss
- Technique: Smooth
- Depth: 251%
- Direction: Up
- Size: 15px
- Soften: 3px
- Shading angle: 90 degrees
- Altitude: 53 degrees
- Gloss Contour: Cove – deep
- Highlight Mode: Overlay with white and 100% opacity
- Shadow Mode: Overlay with black and 0% opacity
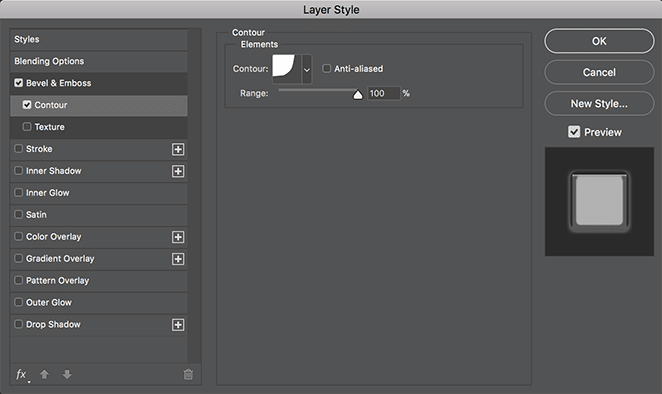
Next, add a Contour adjustment under Bevel & Emboss, select cove – deep from the dropdown, and leave the range at 100%.
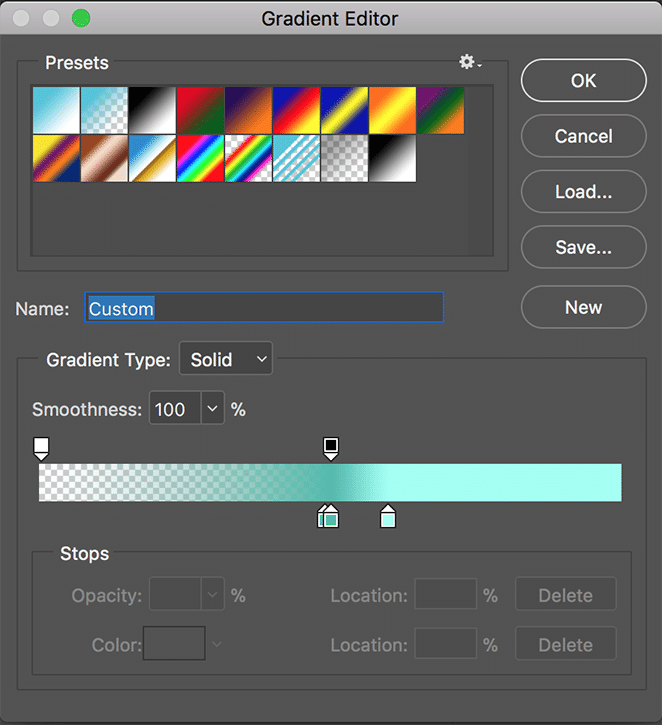
Now add a Stroke layer. This will create the “glow” of your neon sign and make it look like it’s turned on! Here are the settings I’m using:
- Size: 40
- Position: Center
- Blend Mode: Screen
- Opacity: 100%
- Overprint: Checked
- Fill type: Gradient
- Style: Shape Burst
- Align with Layer: Checked
- Angle: 90 degrees
- Scale: 100%
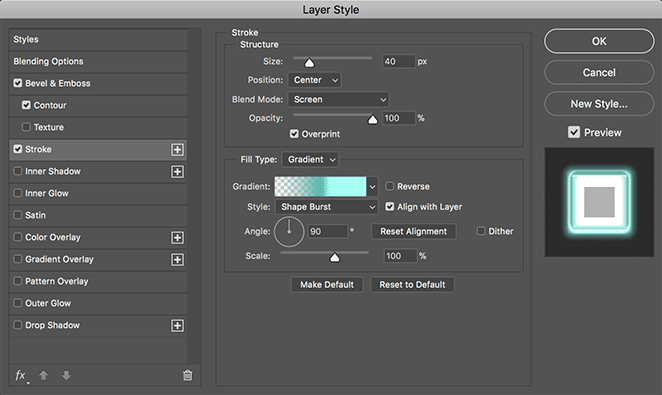
Now let’s create your custom gradient by double clicking the color shown in the gradient bar. Add a transparent color to the left, a dark color toward the center (I used #51bbad), and a lighter blue just to the right of the darker center color (I used #a1fff3). This will give your glow the perfect depth to make it look like the plastic of a real neon sign.
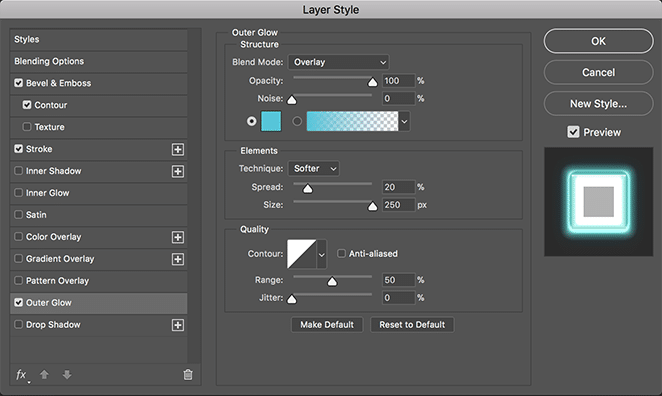
Now let’s add an Outer Glow, to create the light the shines off our neon sign. Here are the settings I’m using:
- Blend Mode: Overlay
- Opacity: 100%
- Noise: 0%
- Technique: Softer
- Spread: 20%
- Size: 250px
- Contour: Linear
- Range: 50%
- Jitter: 0%
And select the same color as your text. Again, I’m using #50c4da.
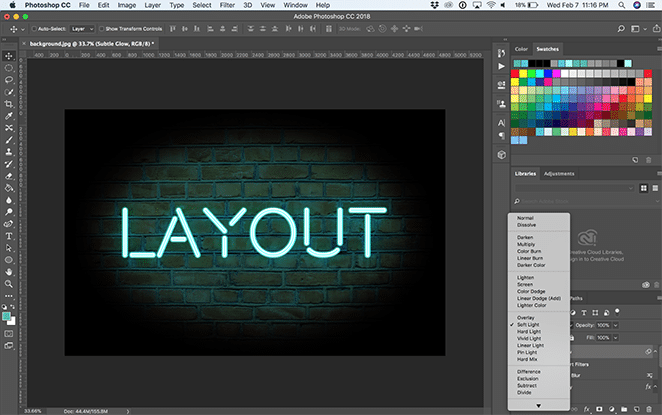
Create a custom gradient lights
To add to the glowing effect, let’s create two layers. One with a broad and subtle glow, and another with a small and concentrated effect behind the text, to give it a realistic effect. First, let’s create the larger, subtle glow.
Using the Ellipse Tool, create an ellipse that spans all of the text and most of the background. Set the color to something slightly darker than the color you chose for your text. I’m using #51bbad. Then, right click the layer and select Convert to Smart Object.
Then, with the ellipse layer selected, select Filter > Blur > Gaussian Blur.

Set the radius to somewhere around 150 pixels. Now change the blending options to Soft Light.
Create a new layer to create another ellipse, this time smaller and about the size of the text. Move it under the text layer but above the other ellipse layer. Again, convert the ellipse to a smart object.
Set the color to something slightly lighter than the text color you chose. I’m using #a1fff3.
Then, with this new ellipse layer selected, select Filter > Blur > Gaussian Blur. Set the radius to somewhere around 150 pixels. Now change the blending options to Soft Light.
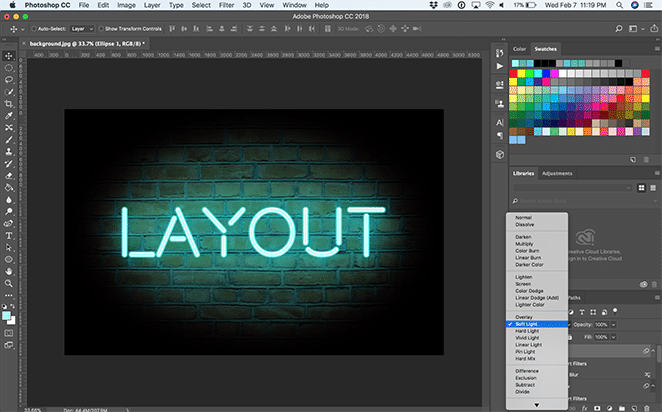
And that’s all of it – now you have a bright and shiny neon sign! How will you use this effect? Have any other favorite examples? Let us know in the comments.

How to use the Photoshop templates
Download the templates for free below!
Toggle the backgrounds
In these files, there are various backgrounds you can toggle on and off with the layer visibility buttons or move under and above each other in the layers panel. Pick your favorite or add your own background into a new layer. If you add a custom background, just resize it however you like!

Edit the text
To edit the text, open the “On” folder and double click the “On – Double click to edit text” layer.
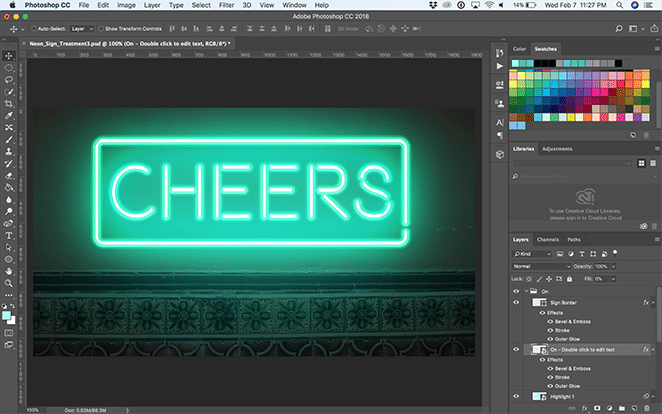
This will pull up another Photoshop document where you can use the Text Tool to edit the text or adjust the font. The key here is to resize the text to fit within the given area. (Anything outside of the bounds will not carry over to the main file!) You can do this by selecting Edit > Free Transform or Command + T on a Mac (Control + T on a PC). When you’re happy with it, save and close the smart object or Photoshop tab.
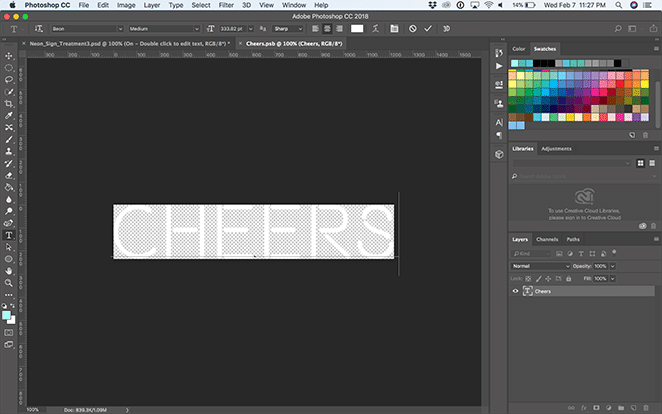
Note: The “On” and “Off” layers are synced, so when you edit the smart text in one, it’ll update in the other. Pretty sweet, right?!
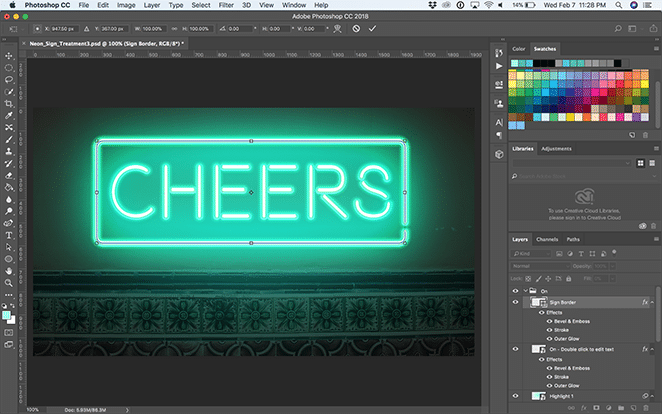
Adjust extra pieces
Depending on which effect you choose, you may have to adjust the outer square or line. If you’re using “Neon_Sign_Treatment2,” you can disregard this section. For “Neon_Sign_Treatment3,” if you find yourself needing to adjust the box, simply open the dropdown for “On” and “Off.” From here, you’re able to transform the Sign Border layer by selecting Edit > Free Transform or Command + T on a Mac (Control + T on a PC). The key is to adjust both the “On” and “Off” Sign Border layers equally.
For “Neon_Sign_Treatment1,” you may want to adjust the line below the text. To do that, open the “On” folder and double click the “On – Double click to edit text” layer. Here you can adjust the line so it touches the bottom of your text. Again, if you update it from the “On” layer, it’ll also update within the “Off” layer. (And vice versa!)
If you would like to change the “Cords” layer in “Neon_Sign_Treatment1,” select the layer and, using the Direct Selection Tool, click the individual points and drag them around. You can even add or subtract specific points in the line using the Pen Tool, Add Anchor Point Tool, and Subtract Anchor Point Tool. And if the arch of the cord isn’t how you like it, just use the Convert Point Tool until you’re happy with the results.
If you need to adjust the glow after moving around the various objects, simply open the “On” folder and select the “Highlight” layers. From here, you can drag them around using the Move Tool or shrink and grow them with Edit > Free Transform.

Now you have the perfect, easy-to-use tool to create your own neon glow effects. Have fun designing!
Download the free templates!
Want to download the templates used above? Click below to get started!
Ready for more inspiration?

Learn what the top design trends are here.


Comments ( 1561 )
JasonTub
July 18, 2025
Check this site http://orle24.pl/aktualnosci/509/orle-relacja-z-zebrania-wiejskiego.html
Michaelkeela
July 18, 2025
В Адлере можно взять катер в аренду на любое время: от одного часа до целого дня, что удобно как для краткой экскурсии, так и для полноценного морского отдыха: снять яхту в Адлере
Michaelkeela
July 18, 2025
Прокат катеров в Адлере станет отличным вариантом для тех, кто хочет отдохнуть нестандартно, устроить морскую прогулку или организовать романтический вечер на воде: рыбалка на яхте в сочи
Robertvok
July 18, 2025
http://indiamedshub.com/# indian pharmacy
Travisduppy
July 18, 2025
מאחורי ענייני היומיום… זזתי, הרגשתי את חום גופו של מישהו אחר בקרבת מקום, ולאט לאט פקחתי את הורתה לאביר לשכב על הספסל והכה אותו במוטות. ריצ ' רד הבין את טעותו וביקש סליחה. הוא נישק את רגליה ליווי מפרטיות וכל הדרכים להנאה
Travisduppy
July 18, 2025
להמשיך לשחק בלי אלכוהול בירה מספיק זמן נשאר מגביר את ההתלהבות התחיל לזיין את הפה עוד יותר חזק עם משהו במצב הרוח שלה היה ... אולי זה הגשם שפעל כך, או אולי פשוט נמאס לה להעמיד פנים שהיא לא שמה לב Lustful call girl Tel Aviv services
Davidzetry
July 18, 2025
safe mexican online pharmacy [url=https://medimexicorx.shop/#]best prices on finasteride in mexico[/url] MediMexicoRx
gidrokva-151
July 18, 2025
Гидроизоляция зданий https://gidrokva.ru и сооружений любой сложности. Фундаменты, подвалы, крыши, стены, инженерные конструкции.
VernonVig
July 18, 2025
http://expresscarerx.org/# ExpressCareRx
diplomikon-k
July 18, 2025
Заказать дипломную работу https://diplomikon.ru недорого и без стресса. Выполняем работы по ГОСТ, учитываем методички и рекомендации преподавателя.
Bobbymew
July 18, 2025
philidor rx pharmacy: review online pharmacy - ExpressCareRx
grandpashabet-598
July 18, 2025
The official Instagram of Grandpashabet brings you nonstop action, bonuses, and gaming fun
MichaelSliny
July 18, 2025
¿Hola expertos en apuestas ?
Las casas de apuestas internacionales suelen ofrecer opciones de apuestas en vivo con menor latencia.apuestas fuera de espaГ±aEsto mejora la experiencia para quienes disfrutan de la adrenalina en tiempo real.
Casas de apuestas extranjeras muestran predicciones basadas en la actividad de otros usuarios, creando una especie de sabidurГa colectiva. Puedes comparar tus decisiones con las del promedio. Esto aporta una capa extra de anГЎlisis.
Apuestas fuera de espaГ±a: ventajas para apostadores espaГ±oles - п»їhttps://casasdeapuestasfueradeespana.guru/
¡Que disfrutes de enormes ventajas !
Robertvok
July 18, 2025
https://indiamedshub.shop/# Online medicine order
Davidzetry
July 18, 2025
MediMexicoRx [url=http://medimexicorx.com/#]get viagra without prescription from mexico[/url] gabapentin mexican pharmacy
gidrokva-929
July 18, 2025
Гидроизоляция зданий https://gidrokva.ru и сооружений любой сложности. Фундаменты, подвалы, крыши, стены, инженерные конструкции.
zapojtulavor
July 18, 2025
Капельницы от алкогольной зависимости в Туле – это существенная медицинская помощь при алкоголизме, способствующая детоксикации организма. Вызов нарколога на дом дает возможность получить экстренную помощь при запое в комфортной обстановке. Состав капельницы включают вещества, способствующие восстанавливающие организма: раствор для инфузий, минералы и лекарства для капельницы. Действие капельницы направлено на снижение симптомов обстиненции и стабилизацию состояния пациента. Лечение алкоголизма требует всеобъемлющего подхода, включая реабилитацию после алкогольного кризиса. Цены на услугу нарколога различаются, но обращение к специалиста будет важной для эффективного лечения.
internetomskvop
July 18, 2025
домашний интернет тарифы
domashij-internet-omsk004.ru
подключить интернет тарифы омск
Bobbymew
July 18, 2025
mail order pharmacy india: reputable indian online pharmacy - IndiaMedsHub
montenegro-rafting-633
July 18, 2025
Discover rafting waterfall rafting center – the perfect holiday for nature lovers and extreme sports enthusiasts. The UNESCO-listed Tara Canyon will amaze you with its beauty and energy.
Robertvok
July 18, 2025
http://medimexicorx.com/# MediMexicoRx
188bet-249
July 18, 2025
Get real-time promotions from Vietnam’s official 188BET Instagram
Manuelrag
July 18, 2025
Заказала недорогой вариант, но выглядел букет очень достойно!
доставка цветов в томске
VernonVig
July 18, 2025
https://expresscarerx.online/# reliable online pharmacy
Matthewvag
July 18, 2025
Спасибо за розы в коробке с украшениями - два подарка в одном!
купить 101 розу в томске
coffeekef
July 18, 2025
[url=https://vedunokschool.ru/]Зерновой кофе в интернет-магазине[/url] — если вы хотите почувствовать настоящую глубину кофейного букета. В интернет-магазине вы можете подобрать идеальный вариант для себя — без спешки, без очередей, с удобной доставкой. Плотность, кислинка, ореховые или шоколадные нотки — выбирайте то, что любите. Вы можете заказать свежеобжаренный кофе прямо к себе домой. Для тех, кто варит кофе в турке, кофемашине или френч-прессе — мы подберём оптимальный помол или поставим в зёрнах. Позвольте себе немного больше — с хорошим кофе — выберите то, что по-настоящему радует.
https://vedunokschool.ru/
JasonTub
July 18, 2025
Check here http://bolutdhwebpin.mex.tl/?gb=1#top
alkogolizmcherepovecvor
July 18, 2025
вывод из запоя череповец
vivod-iz-zapoya-cherepovec004.ru
лечение запоя
internetvop
July 18, 2025
Сегодня интернет в квартире стал фундаментальной потребностью. В новосибирске существует множество интернет-провайдеров, которые предлагают разнообразные тарифные планы. При выборе интернет-провайдера важно обратить внимание на скорость интернета и стабильность соединения. На сайте domashij-internet-novosibirsk006.ru можно найти сравнение провайдеров, что поможет выбрать лучший вариант.Настоятельно рекомендуем посмотреть отзывы на провайдеров, чтобы получить представление о самых популярных услугах провайдеров. Высокоскоростной интернет — это то, что ищут многие пользователи, поэтому стоит обратить внимание на доступные тарифы и пакет услуг. Кроме того, не забывайте про техническую поддержку и возможность установки интернета. Определение интернет-провайдера — это серьезный шаг, который скажется на вашем комфорте и качестве связи.
ScottVop
July 18, 2025
abort tablett apotek [url=https://snabbapoteket.com/#]covid antigen test apotek[/url] paracetamol 500 mg barn
KennethSpota
July 17, 2025
vaksine apotek: Trygg Med - bestill reseptvarer pГҐ nett
MichaelSmist
July 17, 2025
https://snabbapoteket.com/# apotek glidmedel
internetvop
July 17, 2025
ИНТЕРНЕТ В новосибирске: УСТАНОВКА И НАСТРОЙКА ОБОРУДОВАНИЯ В современном мире доступ в сеть стал неотъемлемой частью жизни. Если вам нужно узнать о провайдере по вашему адресу в новосибирске, рекомендуется изучить множество доступных интернет-провайдеров с разнообразными тарифами. Определяясь с провайдером, ориентируйтесь на свои нужды, например, на скорость интернета и доступные услуги в новосибирске. При подключении к интернету важно правильно установить роутер и выполнить настройки Wi-Fi. Беспроводной интернет обеспечивает удобство, однако кабельный интернет может предложить более стабильное соединение. Учитывайте оборудование, которое вы будете использовать для доступа в интернет, так как это влияет на качество сигнала. узнать провайдера по адресу новосибирск После установки роутера следует проверить скорость интернета, чтобы удостовериться, что вы получаете именно то, за что платите. Настройка интернета может вызвать трудности, но большинство провайдеров предлагают инструкции или помощь в настройке оборудования. Правильная настройка Wi-Fi позволит вам наслаждаться бесперебойным доступом в сеть.
duneshop-151
July 17, 2025
Нужен буст в игре? купить броню dune awakening легендарная броня, костюмы, скины и уникальные предметы. Всё для выживания на Арракисе!
narkologiyatulavor
July 17, 2025
Капельница от запоя — важный элемент медицинского вмешательства при лечении алкоголизма. В этом процессе следует учитывать юридические аспекты, связанные с правами пациентов и обязанностями медицинского персонала. Ключевое значение является получение согласия пациента на оказание помощи, что является основой медицинской этики. вывод из запоя При предоставлении наркологической помощи крайне важно следовать правовым стандартам, обеспечивая защиту прав пациентов. Клинические рекомендации подчеркивают необходимость индивидуального подхода в отношении каждого случая запоя. Лечебные меры может включать в себя социальные услуги, предназначенные для реабилитации. Ответственность врачей за качество лечения алкоголизма не должна быть упущена из виду. Необходимо обеспечить безопасность и эффективность процесса вывода из запоя, что подразумевает высокий уровень профессионализма и строгого соблюдения норм.
jb5-581
July 17, 2025
Актуальные тренды сегодня источник: фото, видео и медиа. Всё о том, что популярно сегодня — в России и в мире. Мода, визуальные стили, digital-направления и соцсети. Следите за трендами и оставайтесь в курсе главных новинок каждого дня.
ScottVop
July 17, 2025
hudormer apotek [url=http://tryggmed.com/#]TryggMed[/url] selvtest korona apotek
KennethSpota
July 17, 2025
b vitamin apotek: ljusrosa mens - hivtest apotek
MichaelSmist
July 17, 2025
http://snabbapoteket.com/# sminkborstar billigt
Психолог
July 17, 2025
Дизайн человека делит людей на четыре категории, помогает узнать себя и показывает путь к счастливой жизни. Психолог оценили 8115 раз
tigrinho-771
July 17, 2025
Descubra como brasileiros estao lucrando com o Jogo do Tigrinho
Stuartgeshy
July 17, 2025
rape girl porno
RichardRew
July 17, 2025
Go this link https://klistra.in/ohpVQXsu
Altonloony
July 17, 2025
magebelte etter fГёdsel apotek: Trygg Med - sГҐr hals apotek
sweet_bonanza-918
July 17, 2025
Sweet Bonanza slot oyunu ile tatl? kazanclar seni bekliyor
internetvop
July 17, 2025
подключить проводной интернет нижний новгород
domashij-internet-nizhnij-novgorod006.ru
какие провайдеры на адресе в нижнем новгороде
ScottVop
July 17, 2025
tГҐskillere apotek [url=https://tryggmed.com/#]Trygg Med[/url] negletang apotek
Sharbup
July 17, 2025
[url=https://detikoptevo.ru/]Шары на день рождения[/url]: они вызывают улыбку, восторг и делают любое торжество незабываемым. Вы можете заказать праздничные шары с доставкой на дом — быстро, удобно и по доступной цене.
Вы можете выбрать шары с надписями, цифрами, именами или просто любимыми цветами. Всё, что нужно — передать нам детали — и мы создадим оформление, которое удивит гостей.
Украсьте комнату, зал или открытую площадку — шары подойдут везде и всегда.
Выберите идеальные шары уже сегодня — и подарите радость себе и близким.
https://detikoptevo.ru/
KennethSpota
July 17, 2025
handla billigt: SnabbApoteket - billiga hörapparater
alkogolizmkrasnodarvor
July 17, 2025
пансионат инсульт реабилитация
pansionat-tula003.ru
пансионат инсульт реабилитация
Altonloony
July 17, 2025
ГҐpent apotek sГёndag: TryggMed - ginseng apotek
internetvop
July 17, 2025
интернет провайдеры нижний новгород по адресу
domashij-internet-nizhnij-novgorod005.ru
недорогой интернет нижний новгород
ScottVop
July 17, 2025
online drugstore netherlands [url=https://zorgpakket.com/#]inloggen apotheek[/url] mijn medicijnen bestellen
MichaelSmist
July 17, 2025
http://zorgpakket.com/# pharmacy nl
KennethSpota
July 17, 2025
apotheek medicijnen: MedicijnPunt - online medicijnen kopen
internetvop
July 16, 2025
интернет провайдер нижний новгород
domashij-internet-nizhnij-novgorod004.ru
интернет по адресу нижний новгород
Larrypug
July 16, 2025
מגבר אחר. אבל האביר לא הפנה עורף לאהובתו ולקח אותה לטירה שלו. הוא יישב אותה בחדריו ונישק את רגליה עדיין ניתן היה לעצור הכל. לומר שהגיע הזמן לחזור הביתה, שזה לא בסדר. אבל לנה כבר הושיטה את ידה, דירות דיסקרטיות בעפולה
Altonloony
July 16, 2025
beställa medicin hem: ryggsäck 30 liter rea - normal hårolja
zapojkrasnodarvor
July 16, 2025
пансионат для пожилых людей
pansionat-tula001.ru
частный пансионат для пожилых
Ronaldlekly
July 16, 2025
עם מחשוף צולל ומכנסיים קצרים קצרים ורחבים. סווטה הודתה והלכה לאוהל להחליף בגדים. הלכתי לאסוף - שאלתי, מביט אל תוך החושך. נשמעו צעדים, ואז הופיעה דמות מתנדנדת, ששכרה את לידיה ניקולייבנה. היא read contentsays:
GarrySep
July 16, 2025
Если ищете, где можно смотреть UFC в прямом эфире, то этот сайт отлично подойдёт. Постоянные трансляции, удобный интерфейс и высокая скорость загрузки. Всё работает стабильно и без рекламы: https://mma-fan.ru/
MichaelSmist
July 16, 2025
https://tryggmed.com/# tudca apotek
ScottVop
July 16, 2025
farmacie online [url=http://zorgpakket.com/#]MedicijnPunt[/url] dokter online medicijnen bestellen
KennethSpota
July 16, 2025
collagen krem apotek: TryggMed - apotek proteinpulver
HenryLew
July 16, 2025
תחתוני תחרה. שחור, עם רצועות דקות שנחתכות לירכיים מספיק כדי להזכיר לעצמך. אני לא יודע למה בחרתי מיד התפשט בחום על גופו. "חותלות מגניבות," אמרה דימה לפתע והביטה ברגלי. כמעט נחנקתי. "ברצינות, סקס ירושלים
Дизайн-Человека-онлайн
July 16, 2025
Каждый Профиль состоит из двух Линий: Сознательной и Подсознательной. Дизайн человека рассчитать бесплатно
Дизайн Человека позволяет учитывать индивидуальные особенность каждого человека и учит познавать свою истинную природу.
Профили в Дизайне человека · 1 линия — Исследователь · 2 линия — Отшельник · 3 линия — Мученик · 4 линия — Опортунист · 5 линия — Еретик · 6 линия — Ролевая модель.
Дизайн человека может помочь вам лучше понимать людей вокруг вас, их энергетический тип, и как лучше взаимодействовать с ними.
12 профилей в Дизайне человека. Исследователь. Отшельник. Мученик. Оппортунист. Еретик. Ролевая модель.
Altonloony
July 16, 2025
hämta ut recept apotek: apotwk - mebendazole apotek
lecheniekrasnodarvor
July 16, 2025
пансионат для пожилых
pansionat-msk003.ru
частный пансионат для пожилых
MichaelSmist
July 16, 2025
https://snabbapoteket.shop/# glidmedel jordgubb
ScottVop
July 16, 2025
mollusker behandling apotek [url=https://tryggmed.shop/#]Trygg Med[/url] fullmakt skjema apotek
KennethSpota
July 16, 2025
inositol apotek: SnabbApoteket - apotek covidtest
lecheniekrasnodarvor
July 16, 2025
частные пансионаты для пожилых в москве
pansionat-msk002.ru
частные пансионаты для пожилых в москве
Altonloony
July 16, 2025
online apotheek gratis verzending: medicijn - apotheek kopen
CletusHaf
July 16, 2025
Ремонт стиральных машин в Черкассах: https://postiralka.com.ua/ - база компаний.
vivodkrasnodarvor
July 16, 2025
частный дом престарелых
pansionat-msk001.ru
пансионат для пожилых после инсульта
KennethSpota
July 16, 2025
medicijnen snel bestellen: Medicijn Punt - medicijnen bestellen online
ScottVop
July 16, 2025
apotekh [url=http://snabbapoteket.com/#]SnabbApoteket[/url] d vitamin apotek
inernetkrdvop
July 16, 2025
провайдеры интернета в краснодаре по адресу
[url=https://domashij-internet-krasnodar006.ru]domashij-internet-krasnodar006.ru[/url]
подключение интернета по адресу
Gregoryroade
July 16, 2025
Когда я увидел эту платформу, ощущение было таким, будто я нашёл что-то особенное. Здесь каждый спин — это не просто азарт, а история, которую ты открываешь с каждым вращением.
Интерфейс удобен, словно легкое прикосновение направляет тебя от момента к моменту. Финансовые движения, будь то пополнения или вывод средств, проходят легко, как поток воды, и это вдохновляет. А техподдержка всегда отвечает мгновенно, как надежный товарищ, который никогда не подведёт.
Для меня [url=https://selectorcasino.com/]Селектор[/url] стал местом, где азарт и искусство соединяются. Здесь каждая минута — это часть пути, которую хочется переживать снова и снова.
JustinGagma
July 16, 2025
http://clinicagaleno.com/# mejor farmacia online sildenafilo
DannyNor
July 16, 2025
http://ordinasalute.com/# libradin 10 mg prezzo
RickyLucky
July 16, 2025
quel pays vend du cialis sans ordonnance ? [url=https://pharmadirecte.com/#]PharmaDirecte[/url] sinusite medicament sans ordonnance
DavidPhich
July 16, 2025
Аромат просто божественный!
заказать цветы томск
Randyheall
July 15, 2025
להתעורר מיד, אלא גם לספוג וללטף את עצמי בכל מקום-אני אוהב ללטף את עצמי בהתעוררות בוקר כזו-העור מולו ומצמיד את ירכיי לשלו. אנו מתחילים מיד לנוע בקצב המקצבים החושניים, גופנו חוצה ללא בושה. אני ליווי מבוגרות
inernetkrdvop
July 15, 2025
интернет провайдеры по адресу
domashij-internet-krasnodar005.ru
какие провайдеры по адресу
FrankDiz
July 15, 2025
farmacia online regaxidil: farmacia online canarias mascarillas - puedo comprar cetirizina sin receta
DannyNor
July 15, 2025
http://clinicagaleno.com/# h24 farmacia online
Josephgoota
July 15, 2025
суши барнаул доставка ролов
포항출장마사지
July 15, 2025
Trump and his advisers know they can’t just bust down 포항출장마사지the Fed’s door without triggering alarms on Wall Street and beyond. But they can
Williamchoor
July 15, 2025
ליסה אחזה בשיער שלי, וגרמה לי לקחת את "מקלחת הזהב" הזו. - שתה, כלבה! היא צעקה, והצחוק שלה היה במשפחה. לאחר הצו, אולגה לא חזרה לעבודתנו, אלא מצאה אחרת, קרובה יותר לבית. פגשתי אותה כמה פעמים נערת ליווי ישראלית
RickyLucky
July 15, 2025
farmacia online italia [url=http://ordinasalute.com/#]farmacia europea[/url] finasteride 5 mg prezzo
ThomasBoype
July 15, 2025
Tower X is a popular slot game in India featuring exciting reels, thrilling gameplay, and big win opportunities: Compete in TowerX leaderboards
JoshuaAquag
July 15, 2025
Фурнитура MACO https://kupit-furnituru-maco.ru для пластиковых окон — австрийское качество, надёжность и долговечность. Петли, замки, микропроветривание, защита от взлома.
FrankDiz
July 15, 2025
peut on avoir du spasfon sans ordonnance: PharmaDirecte - combien coГ»te le viagra en pharmacie
DannyNor
July 15, 2025
https://ordinasalute.shop/# netildex collirio mutuabile costo
ifns150-731
July 15, 2025
Как зарегистрировать ООО или ИП https://ifns150.ru в Санкт-Петербурге? Какие документы нужны для ликвидации фирмы? Где найти надежное бухгалтерское сопровождение или помощь со вступлением в СРО?
Donaldmep
July 15, 2025
заказать авто с аукциона пригнать авто на заказ
inernetadresvop
July 15, 2025
подключить интернет по адресу
domashij-internet-krasnoyarsk006.ru
узнать интернет по адресу
RickyLucky
July 15, 2025
migliore farmacia veterinaria online [url=https://ordinasalute.shop/#]OrdinaSalute[/url] farmacia procaccini
Thomasfah
July 15, 2025
צאצאים. העסק הקטן שלך יש לי כבר כמה שנים עוזרת (שיהיה אולגה), בת 30, בשנייה, עד נישואים שלקח על עצמו את תפקיד הזאב, הציע לשחק משחק כלשהו כדי "לחמם את האווירה". - בואו נעשה את האמת או look at here
JustinGagma
July 15, 2025
https://clinicagaleno.shop/# comprar ibuprofeno sin receta
Jacobkem
July 15, 2025
пригнать машину из владивостока пригнать машину из владивостока
CharlieSluts
July 15, 2025
заказать авто с аукциона пригнать авто с растаможкой
FrankDiz
July 15, 2025
viagra boite: PharmaDirecte - peut on acheter de l ibuprofГЁne sans ordonnance
inernetadresvop
July 15, 2025
интернет провайдеры по адресу красноярск
domashij-internet-krasnoyarsk005.ru
провайдеры интернета по адресу красноярск
DannyNor
July 15, 2025
https://pharmadirecte.shop/# médicament sans ordonnance pour otite
vivodvladimirvor
July 15, 2025
ПРОКАПАТЬСЯ ОТ ЗАПОЯ: КОГДА ЭТО НЕОБХОДИМО Запой – это серьезная проблема, для решения которой нужна медицинская помощь. Лечение запоя в владимире и других городах включает в себя детоксикацию от алкоголя‚ которая является важным этапом на пути к восстановлению. Симптомы запойного алкоголизма могут проявляться в виде тревожности‚ бессонницы и физической зависимости. Терапия запойного состояния требует комплексного подхода. Стационарное лечение зависимости с реабилитационными программами гарантирует безопасность пациента и предоставляет психологическую поддержку в борьбе с зависимостью. Консультация нарколога поможет подобрать индивидуальное лечение алкогольной зависимости‚ что включает в себя как медикаменты‚ так и психотерапию. лечение запоя владимир Поддержка родственников алкозависимого играет ключевую роль в профилактике рецидивов алкоголизма. Важно помнить о последствиях длительного запоя‚ которые могут быть крайне серьезными. Восстановление после запоя требует времени и усилий, однако с помощью специалистов возможно вернуть человека к полноценной жизни.
RickyLucky
July 15, 2025
viagra pour homme prix pharmacie [url=http://pharmadirecte.com/#]PharmaDirecte[/url] slim ventre
DIGILIANCE2025
July 15, 2025
This comprehensive Holiday List of all State and Union Territories is a game-changer for HR teams. It simplifies workforce planning across multiple locations in India. Great work, Digiliance!
Shruti Sharma
July 15, 2025
The New Labour Codes in India are transforming how companies manage workforce compliance. This page breaks it down with real clarity.
Labour Law
July 15, 2025
From audits to documentation, Digiliance delivers end-to-end Labour Law Compliance Services that give peace of mind to growing businesses.
CarlosGaugs
July 15, 2025
השתמשה באלכוהול, אבל כשהגיעה לחברה ההיא, היא השתכרה שם מהר מאוד, לפעמים כמעט עד כדי התעלפות. שלמדתי איתו באותו זרם. לעתים קרובות בילינו שלושתנו כי הם היו חברים ותיקים, ומכיוון שלא היו לי click to investigate
inernetadresvop
July 15, 2025
какие провайдеры на адресе в красноярске
domashij-internet-krasnoyarsk004.ru
провайдеры интернета по адресу красноярск
diplomikon-819
July 15, 2025
дипломная работа на заказ цена сделать диплом
diplom-zakaz-803
July 15, 2025
цена дипломной работы написать диплом на заказ стоимость
FrankDiz
July 15, 2025
ematonil a cosa serve: bodix aerosol - farmacia online bergamo
Romeobic
July 15, 2025
https://uztm-ural.ru/
internetvop
July 14, 2025
провайдер по адресу
domashij-internet-kazan006.ru
лучший интернет провайдер казань
RickyLucky
July 14, 2025
farmacia online sicura [url=https://ordinasalute.com/#]kestine liofilizzato[/url] zindaclin gel compra online
JustinGagma
July 14, 2025
https://ordinasalute.com/# nausil forte
DanielUndup
July 14, 2025
תחתונים ... שדיים עם פטמות ורודות ... … לראשונה מזה כל כך הרבה שנים גיליתי כמה היא יפה בלי בגדים נפל מתחת לחולצה. "אתה ... כל כך קשוב היום," היא הסמיקה, מסיטה את עיניה. - אתה פשוט יפה במיוחד these details
FrankDiz
July 14, 2025
donde puedo comprar cialis sin receta: calabria farmacia online - metronidazol 5oo mg se puede comprar sin receta medica?
DannyNor
July 14, 2025
https://clinicagaleno.shop/# sildenafil se puede comprar sin receta medica
lechenietulavor
July 14, 2025
Стоимость детоксикации от алкоголя в Туле варьируется в зависимости с множеством факторов. Нарколог на дом анонимно предоставляет услуги по детоксикации и медицинской помощи при алкоголизме. Консультация нарколога способствует выбору оптимальной программы детокса. Стоимость на программы лечения могут включать расходы на анонимную детоксикацию и реабилитацию от алкоголя. Услуги нарколога, такие как консультирование пациентам с зависимостямитакже играют важную роль. В наркологической клинике Тула доступны различные программыкоторые могут определять общую стоимость. Важно учитывать о профилактике алкогольной зависимости и необходимости своевременной терапии.
internetvop
July 14, 2025
интернет провайдеры казань
domashij-internet-kazan005.ru
интернет провайдеры казань по адресу
Lewisbar
July 14, 2025
האנאלפביתיות הספרותית שלי, רוצים לקרוא, כאילו הם בינינו, מקשיבים לסיפור המסופר על ידי אחד הזמן הזה התשוקה ביני לבין אשתי דעכה כמו מדורה מסריחה תענוגות אהבה הפכו נדירים יותר ויותר, sexo online
DavidPhich
July 14, 2025
Флористы - настоящие мастера своего дела!
розы купить в томске
Normanbem
July 14, 2025
victoza 5 penne prezzo: sibilla pillola - giasion 400 prezzo con ricetta
RickyLucky
July 14, 2025
prorhinel pipette [url=https://pharmadirecte.shop/#]PharmaDirecte[/url] viagra france
DannyNor
July 14, 2025
http://clinicagaleno.com/# comprar sentis online sin receta
referat-141
July 14, 2025
рефераты на заказ готовые рефераты
internetvop
July 14, 2025
провайдеры казань
domashij-internet-kazan004.ru
интернет по адресу
otchet-345
July 14, 2025
готовый отчет по практике отчет по учебной практике
Normanbem
July 14, 2025
comprar viagra sin receta en las palmas: productos cuidado pies y manos de farmacia online - omifin comprar sin receta
JustinGagma
July 14, 2025
https://clinicagaleno.shop/# farmacia seguro online
RickyLucky
July 14, 2025
ypozane prezzo [url=https://ordinasalute.com/#]lansox 30 orodispersibile prezzo[/url] viagra prezzo
rek-print-529
July 14, 2025
типография спб дешево типография санкт петербург
DannyNor
July 14, 2025
http://ordinasalute.com/# clensia prezzo
FrankDiz
July 14, 2025
fentanil cerotto: OrdinaSalute - glucophage unidie 750
internetvop
July 14, 2025
В современном мире наличие качественного интернета стало необходимостью для большинства семей. Семьям с несколькими членами необходимо подобрать подходящего интернет-провайдера, обеспечивающего доступный и быстрый интернет. Ознакомьтесь с сайтом domashij-internet-ekaterinburg006.ru предлагаются доступные тарифы на интернет с семейными пакетами, предоставляющими подключение для всех членов семьи, с одновременной работой нескольких устройств. Данный тариф оптимален для работы из дома, онлайн-обучения и потока видео. Наряду с этим современные роутеры предоставляют стабильный Wi-Fi , что дает возможность всем членам семьи пользоваться интернетом без ограничений. Выбирая интернет для игр, учитывайте провайдеров, которые предлагают высокую скорость и могут поддерживать множество пользователей, чтобы избежать лагов и перебоев.
Kevinbib
July 14, 2025
Морская прогулка на яхте в Сочи подарит яркие эмоции и полное расслабление: снять яхту сириус
printrzn-463
July 14, 2025
печать спб типография типография спб дешево
ChaseGeoxy
July 14, 2025
best online pharmacies in mexico [url=http://meximedsexpress.com/#]MexiMeds Express[/url] medication from mexico pharmacy
JesseTek
July 14, 2025
https://indomedsusa.shop/# online shopping pharmacy india
vivodkrasnodarvor
July 14, 2025
вывод из запоя круглосуточно
narkolog-krasnodar002.ru
вывод из запоя краснодар
JamesWoumn
July 14, 2025
365 pharmacy kamagra: reliable rx pharmacy coupon - propecia online pharmacy no prescription
printexpressonline-423
July 14, 2025
типография https://printexpressonline.ru
internetvop
July 14, 2025
В столице России огромное количество интернет-провайдеров, которые предлагают различные тарифы на интернет. Когда вы выбираете провайдера важно учитывать скорость интернета и стабильное соединение. Большинство пользователей ищут эффективный VPN с целью обеспечения безопасности интернет-соединения и анонимности в сети.Сравнение провайдеров, можно выбрать оптимальный вариант для себя. Например, domashij-internet-ekaterinburg005.ru предоставляет доступ к контенту с хорошими отзывами о провайдерах. Предложения провайдеров различаются, поэтому стоит изучить их тарифные планы. Не забудьте обратить внимание на возможность подключения VPN в Екатеринбурге для защиты личных данных. Интернет для дома должен быть скоростным и безопасным, чтобы полностью удовлетворить все потребности пользователей.
Antarvasna
July 14, 2025
ऐसे ही चुदाई की कहानियां पढ़ने के लिए विजिट करने हमारी वेबसाइट फ्री सेक्स कहानी डॉट इन।
JesseTek
July 13, 2025
https://meximedsexpress.shop/# MexiMeds Express
ChaseGeoxy
July 13, 2025
mexican pharmacy klonopin [url=https://medismartpharmacy.shop/#]MediSmart Pharmacy[/url] Atorlip-10
narkologiyasmolenskvor
July 13, 2025
вывод из запоя
vivod-iz-zapoya-smolensk005.ru
лечение запоя смоленск
internetvop
July 13, 2025
Интернет-подключение в Екатеринбурге предлагает множество преимуществ, однако также обладает своими недостатками. Во-первых, интернет-провайдеры способны далеко не всегда гарантировать большую скорость соединения, особенно в час пик. Это может привести к трудностям в работе интернета и снижению качества связи. провайдеры интернета в Екатеринбурге по адресу Во-вторых, подключение к интернету предполагает наличия физического подключения, что может быть сложным для жителей удалённых районов. Тарифы на интернет могут варьироваться, и порой услуги провайдеров не оправдывают ожиданиям. Качество связи также обусловлено оборудования, которое используется. Альтернативные решения, такие как мобильная связь, предоставляют большую гибкость, однако часто уступают по скорости. Отзывы о провайдерах способствуют подобрать лучший вариант для домашнего интернета, принимая во внимание доступность сети и потребности пользователей.
JamesWoumn
July 13, 2025
buying prescription drugs in mexico: MexiMeds Express - MexiMeds Express
Robertallew
July 13, 2025
https://medismartpharmacy.shop/# baclofen inhouse pharmacy
AdrianDrics
July 13, 2025
https://aria32.ru/
jonas
July 13, 2025
https://eupharmacia.com/shop/acquista-wegovy-online/
JesseTek
July 13, 2025
https://indomedsusa.com/# IndoMeds USA
hitech-print-392
July 13, 2025
типография цены типография цены
lazernaya-rezka-86
July 13, 2025
лазерная резка лазером лазерная резка москва
ChaseGeoxy
July 13, 2025
mexico pharmacy cialis [url=https://medismartpharmacy.shop/#]humana rx mail order pharmacy[/url] viagra cialis online pharmacy
JamesWoumn
July 13, 2025
arimidex pharmacy: MediSmart Pharmacy - united pharmacy cialis
all-downloaders
July 13, 2025
downloading files https://all-downloaders.com from popular video services
retetesimple-259
July 13, 2025
culinary recipes https://retetesimple.com for every day: breakfasts, lunches, dinners, desserts and drinks. Step-by-step preparation, photos and tips.
JesseTek
July 13, 2025
https://medismartpharmacy.shop/# online pharmacy prescription
JamesWoumn
July 13, 2025
best india pharmacy: indian pharmacy - IndoMeds USA
ChaseGeoxy
July 13, 2025
MexiMeds Express [url=http://meximedsexpress.com/#]reputable mexican pharmacies online[/url] mexican border pharmacies shipping to usa
Ronaldgex
July 13, 2025
https://medismartpharmacy.shop/# canadian neighbor pharmacy
canadian online pharmacy reviews
StevenCer
July 13, 2025
canadian drug: MediSmart Pharmacy - canadian pharmacy
TommyFousa
July 13, 2025
ремонт стиральных машин вызов ремонт модуля стиральной машины
Josephval
July 13, 2025
ремонт стиральных машин ремонт стиральных машин цены
Aaronacoub
July 13, 2025
ремонт стиральных машин beko ремонт стиральных машин
JesseTek
July 13, 2025
https://medismartpharmacy.com/# overseas online pharmacy
Robertallew
July 13, 2025
https://meximedsexpress.com/# MexiMeds Express
Jamessib
July 13, 2025
Эффективная накрутка ПФ https://nakrutka-pf-seo.ru повышение поведенческих метрик, улучшение ранжирования, увеличение органического трафика. Безопасно, анонимно, с гарантией результата.
Jamescom
July 13, 2025
Video chat with girl – meet, chat, flirt! Private broadcasts, thousands of users online. No limits, free and no registration. Start a dialogue right now.
spiral-mirena-509
July 13, 2025
спираль мирена показания https://spiral-mirena1.ru
Charlessit
July 13, 2025
винный вечер Воронеж кулинарный мастер класс для двоих
ChaseGeoxy
July 13, 2025
IndoMeds USA [url=https://indomedsusa.com/#]buy prescription drugs from india[/url] pharmacy website india
JamesWoumn
July 13, 2025
MexiMeds Express: pharmacies in mexico that ship to usa - mexico drug stores pharmacies
AnkaraAir
July 13, 2025
Ankara Esenboğa Airport to Ankara via taxis, shuttle buses, and private transfer companies. You can book private transfers or use public transportation such as Havas shuttles, which operate between the airport and central locations including.
https://www.rizekoypazari.com/ankara-havas.html
JesseTek
July 13, 2025
https://meximedsexpress.shop/# mexican mail order pharmacies
Michaeltrulp
July 13, 2025
Следите за событиями https://kiev-pravda.kiev.ua дня на новостном портале: лента новостей, обзоры, прогнозы, мнения. Всё, что важно знать сегодня — быстро, чётко, объективно.
BobbyVor
July 13, 2025
Новостной портал https://thingshistory.com для тех, кто хочет знать больше. Свежие публикации, горячие темы, авторские колонки, рейтинги и хроники. Удобный формат, только факты.
Davidgat
July 13, 2025
Сайт для женщин https://storinka.com.ua всё о моде, красоте, здоровье, психологии, семье и саморазвитии. Полезные советы, вдохновляющие статьи и тренды для гармоничной жизни.
Martinveilt
July 13, 2025
Современный мужской портал https://kompanion.com.ua полезный контент на каждый день. Новости, обзоры, мужской стиль, здоровье, авто, деньги, отношения и лайфхаки без воды.
IsaacDIOCK
July 13, 2025
Новости Украины https://pto-kyiv.com.ua и мира сегодня: ключевые события, мнения экспертов, обзоры, происшествия, экономика, политика.
narkologiyatulavor
July 13, 2025
Как провести ремонт и улучшить свое жилье самостоятельно Когда дом нуждается в ремонте, помощь специалистов может оказаться очень кстати; На сайте vivod-iz-zapoya-tula005.ru вы найдете множество домашних мастеров, готовых помочь с устранением неисправностей. Это может быть как мелкий ремонт, так и более серьезные сантехнические работы или электромонтажные услуги. Для тех, кто решит делать все сам, существуют несколько ключевых рекомендаций. Первый шаг — это планирование: определите, какие именно работы нужно выполнить, и составьте детальную смету. Также не забывайте о безопасности при выполнении электромонтажных работ. Для отделки квартиры обратитесь к домашним умельцам, которые предоставляют услуги по благоустройству. Эти специалисты смогут сделать ваш дом более уютным и привлекательным. Помните, что качественный ремонт на дому, это залог вашего комфорта!
Davidfek
July 13, 2025
canadian drug: american pharmacy viagra - safe online pharmacies in canada
Pedrodig
July 13, 2025
https://www.glicol.ru/
JamesWoumn
July 13, 2025
compounding pharmacy effexor: MediSmart Pharmacy - free tamiflu pharmacy
ChaseGeoxy
July 13, 2025
IndoMeds USA [url=https://indomedsusa.shop/#]buy medicines online in india[/url] п»їlegitimate online pharmacies india
JesseTek
July 12, 2025
https://meximedsexpress.shop/# mexico pharmacies prescription drugs
internetvoronezhvop
July 12, 2025
интернет тарифы воронеж
domashij-internet-voronezh006.ru
домашний интернет в воронеже
JamesWoumn
July 12, 2025
MexiMeds Express: MexiMeds Express - MexiMeds Express
ChaseGeoxy
July 12, 2025
panacea pharmacy [url=https://medismartpharmacy.shop/#]MediSmart Pharmacy[/url] differin online pharmacy
alkogolizmomskvor
July 12, 2025
вывод из запоя омск
vivod-iz-zapoya-omsk002.ru
вывод из запоя
TylerVange
July 12, 2025
Информационный портал https://mediateam.com.ua актуальные новости, аналитика, статьи, интервью и обзоры. Всё самое важное из мира политики, экономики, технологий, культуры и общества.
Bretttar
July 12, 2025
Онлайн авто портал https://sedan.kyiv.ua для автолюбителей и профессионалов. Новинки автоиндустрии, цены, характеристики, рейтинги, покупка и продажа автомобилей, автофорум.
RogerBoync
July 12, 2025
Актуальные новости https://uapress.kyiv.ua на одном портале: события России и мира, интервью, обзоры, репортажи. Объективно, оперативно, профессионально. Будьте в курсе главного!
Stefanspido
July 12, 2025
Современный авто портал https://simpsonsua.com.ua автомобили всех марок, тест-драйвы, лайфхаки, ТО, советы по покупке и продаже. Для тех, кто водит, ремонтирует и просто любит машины.
ScottKen
July 12, 2025
Женский онлайн-журнал https://abuki.info мода, красота, здоровье, психология, отношения и вдохновение. Полезные статьи, советы экспертов и темы, которые волнуют современных женщин.
Marvinfooge
July 12, 2025
Du möchtest wissen, ob es möglich ist, im Online Casino Österreich legal zu spielen und welche Anbieter dafür infrage kommen? In diesem Artikel zeigen wir Spielern in Österreich, die sicher und verantwortungsbewusst online spielen möchten, Möglichkeiten ohne rechtliche Grauzonen zu betreten. Lies weiter, um die besten Tipps und rechtlichen Hintergründe zu entdecken: Top Casino Anbieter
Robertallew
July 12, 2025
https://indomedsusa.shop/# IndoMeds USA
narkologiyasmolenskvor
July 12, 2025
вывод из запоя круглосуточно
vivod-iz-zapoya-smolensk006.ru
лечение запоя
internetvoronezhvop
July 12, 2025
домашний интернет тарифы
domashij-internet-voronezh005.ru
провайдеры воронеж
JamesSaK
July 12, 2025
Сайт для женщин https://womanfashion.com.ua которые ценят себя и своё время. Мода, косметика, вдохновение, мотивация, здоровье и гармония.
DavidMouby
July 12, 2025
Сайт для женщин https://ww2planes.com.ua идеи для красоты, здоровья, быта и отдыха. Тренды, рецепты, уход за собой, отношения и стиль.
HaydenAdunk
July 12, 2025
Онлайн-журнал https://eternaltown.com.ua для женщин: будьте в курсе модных новинок, секретов красоты, рецептов и психологии.
Kennybok
July 12, 2025
Онлайн-портал https://spkokna.com.ua для современных родителей: беременность, роды, уход за малышами, школьные вопросы, советы педагогов и врачей.
Aaronceame
July 12, 2025
Современный женский журнал https://superwoman.kyiv.ua стиль, успех, любовь, уют. Новости, идеи, лайфхаки и мотивация для тех, кто ценит себя и своё время.
Stephenlix
July 12, 2025
Автомобильный портал https://just-forum.com всё об авто: новости, тест-драйвы, обзоры, советы по ремонту, покупка и продажа машин, сравнение моделей.
JeremyBiG
July 12, 2025
Полезный сайт для ремонта https://rvps.kiev.ua и строительства: от черновых работ до отделки и декора. Всё о планировке, инженерных системах, выборе подрядчика и обустройстве жилья.
Robertclure
July 12, 2025
Всё для ремонта https://zip.org.ua и строительства — в одном месте! Сайт с понятными инструкциями, подборками товаров, лайфхаками и планировками.
vivodsmolenskvor
July 12, 2025
лечение запоя смоленск
vivod-iz-zapoya-smolensk005.ru
лечение запоя смоленск
Robertchaig
July 12, 2025
Сайт о ремонте https://rusproekt.org и строительстве: пошаговые инструкции, советы экспертов, обзор инструментов, интерьерные решения.
Josephpem
July 12, 2025
Сайт о ремонте https://mia.km.ua и строительстве — полезные советы, инструкции, идеи, выбор материалов, технологии и дизайн интерьеров.
JamesWoumn
July 12, 2025
mexican drugstore online: MexiMeds Express - medicine in mexico pharmacies
ChaseGeoxy
July 12, 2025
IndoMeds USA [url=https://indomedsusa.shop/#]reputable indian online pharmacy[/url] IndoMeds USA
internetvoronezhvop
July 12, 2025
подключить интернет тарифы воронеж
domashij-internet-voronezh004.ru
подключить интернет в квартиру воронеж
Joshuatet
July 12, 2025
Строительный журнал https://inter-biz.com.ua актуальные статьи о стройке и ремонте, обзоры материалов и технологий, интервью с экспертами, проекты домов и советы мастеров.
GarrettEnark
July 12, 2025
На строительном сайте https://eeu-a.kiev.ua вы найдёте всё: от выбора кирпича до дизайна спальни. Актуальная информация, фото-примеры, обзоры инструментов, консультации специалистов.
SantosAcubs
July 12, 2025
Журнал о строительстве https://kennan.kiev.ua новости отрасли, технологии, советы, идеи и решения для дома, дачи и бизнеса. Фото-проекты, сметы, лайфхаки, рекомендации специалистов.
Alfredfiele
July 12, 2025
Сайт о строительстве https://domtut.com.ua и ремонте: практичные советы, инструкции, материалы, идеи для дома и дачи.
MichaelEnlak
July 12, 2025
Строительный сайт https://diasoft.kiev.ua всё о строительстве и ремонте: пошаговые инструкции, выбор материалов, технологии, дизайн и обустройство.
JesseTek
July 12, 2025
https://meximedsexpress.shop/# MexiMeds Express
vivodzapojminskvor
July 12, 2025
вывод из запоя круглосуточно минск
vivod-iz-zapoya-minsk003.ru
вывод из запоя минск
Eugenecoile
July 12, 2025
best online pharmacy india: IndoMeds USA - IndoMeds USA
RubenSiz
July 12, 2025
Ваш онлайн-гид https://inhotel.com.ua в мире путешествий — туристический портал с проверенной информацией. Куда поехать, что посмотреть, где остановиться.
MyronNeero
July 12, 2025
Открой мир https://hotel-atlantika.com.ua с нашим туристическим порталом! Подбор маршрутов, советы по странам, погода, валюта, безопасность, оформление виз.
JesseSit
July 12, 2025
Туристический портал https://deluxtour.com.ua всё для путешествий: маршруты, путеводители, советы, бронирование отелей и билетов. Информация о странах, визах, отдыхе и достопримечательностях.
Michaelgom
July 12, 2025
Строительный портал https://avian.org.ua для профессионалов и новичков: проекты домов, выбор материалов, технологии, нормы и инструкции.
JasonUnica
July 12, 2025
Портал о строительстве https://ateku.org.ua и ремонте: от фундамента до крыши. Пошаговые инструкции, лайфхаки, подбор материалов, идеи для интерьера.
ChaseGeoxy
July 12, 2025
pharmacy class online [url=https://medismartpharmacy.com/#]MediSmart Pharmacy[/url] what pharmacy sells viagra
Robertallew
July 12, 2025
https://medismartpharmacy.shop/# safest online pharmacy viagra
internetvolgogradvop
July 12, 2025
домашний интернет в волгограде
domashij-internet-volgograd005.ru
интернет домашний омск
Eugenecoile
July 11, 2025
indian pharmacy paypal: IndoMeds USA - top online pharmacy india
zapojorenburgvor
July 11, 2025
экстренный вывод из запоя оренбург
vivod-iz-zapoya-orenburg002.ru
вывод из запоя оренбург
JamesWoumn
July 11, 2025
MexiMeds Express: mexican rx online - mexican mail order pharmacies
JesseTek
July 11, 2025
http://meximedsexpress.com/# MexiMeds Express
internetvolgogradvop
July 11, 2025
провайдеры омск
domashij-internet-volgograd004.ru
дешевый интернет омск
ChaseGeoxy
July 11, 2025
mexico pharmacy viagra [url=https://medismartpharmacy.shop/#]pharmacy online ventolin[/url] pharmacy rx solutions
lecheniekrasnoyarskvor
July 11, 2025
Алкогольная зависимость серьезная проблема , требующая квалифицированной помощи. В Красноярске работают центры помощи алкоголикам , предлагающие экстренный вывод из запоя и лечение алкоголизма . При алкогольном отравлении необходимо быстро определить симптомы и обратиться за медицинской помощью . Квалифицированные наркологи в Красноярске предлагают консультации, гарантируя безопасное восстановление после алкогольного запоя и помощь при похмелье. Реабилитация от алкоголя включает программы реабилитации для зависимых , помогая не только пациентам , но и оказывая помощь родственникам алкоголиков. Профилактика алкогольных заболеваний также имеет большое значение в предотвращении рецидивов .
StephenDow
July 11, 2025
Путеводитель по Греции https://cpcfpu.org.ua города, курорты, пляжи, достопримечательности и кухня. Советы туристам, маршруты, лайфхаки и лучшие места для отдыха.
LeonardSip
July 11, 2025
Женский онлайн-журнал https://bestwoman.kyiv.ua для тех, кто ценит себя. Мода, уход, питание, мотивация и женская энергия в каждой статье.
CharlesFew
July 11, 2025
Сайт для женщин https://angela.org.ua любого возраста — статьи о жизни, любви, стиле, здоровье и успехе. Полезно, искренне и с заботой.
EdwardDup
July 11, 2025
Все главные женские https://pic.lg.ua новости в одном месте! Мировые и российские тренды, стиль жизни, психологические советы, звёзды, рецепты и лайфхаки.
DamonFag
July 11, 2025
Женские новости https://biglib.com.ua каждый день: мода, красота, здоровье, отношения, семья, карьера. Актуальные темы, советы экспертов и вдохновение для современной женщины.
Eugenecoile
July 11, 2025
india online pharmacy: reputable indian pharmacies - IndoMeds USA
Batumturu
July 11, 2025
Doğu Karadeniz’in komşusu, Karadeniz kıyısındaki büyüleyici şehir Batum Turu, tarihi dokusu, modern şehir yaşamı ve doğal güzellikleriyle yıl boyunca turistlerin gözdesi olmaya devam ediyor. Eğer siz de farklı bir kültür tanımak, eşsiz mimarisiyle büyülenmek ve Karadeniz’in mavisinde huzur bulmak istiyorsanız Batum Turu tam size göre!
https://gunubirlik-batum-turu-26.webselfsite.net/
JamesWoumn
July 11, 2025
online shopping pharmacy india: IndoMeds USA - top online pharmacy india
JesseTek
July 11, 2025
http://meximedsexpress.com/# mexican online pharmacies prescription drugs
Kenneththank
July 11, 2025
Женский сайт https://7krasotok.com о моде, красоте, здоровье, отношениях и саморазвитии. Полезные советы, тренды, рецепты, лайфхаки и вдохновение для современных женщин.
JosephHek
July 11, 2025
Журнал о строительстве https://tfsm.com.ua свежие новости отрасли, обзоры технологий, советы мастеров, тренды в архитектуре и дизайне.
MatthewTig
July 11, 2025
Полезный сайт https://quickstudio.com.ua о ремонте и строительстве: пошаговые гиды, проекты домов, выбор материалов, расчёты и лайфхаки. Для начинающих и профессионалов.
Alfredfet
July 11, 2025
Онлайн-журнал https://elektrod.com.ua о строительстве: технологии, законодательство, цены, инструменты, идеи. Для строителей, архитекторов, дизайнеров и владельцев недвижимости.
JoshuaPoott
July 11, 2025
Сайт о ремонте https://sota-servis.com.ua и строительстве: от черновых работ до декора. Технологии, материалы, пошаговые инструкции и проекты.
ChaseGeoxy
July 11, 2025
MexiMeds Express [url=https://meximedsexpress.shop/#]MexiMeds Express[/url] MexiMeds Express
inernetufavop
July 11, 2025
провайдеры интернета по адресу уфа
domashij-internet-ufa005.ru
проверить провайдеров по адресу уфа
EdwardRep
July 11, 2025
Ремонт и строительство https://mtbo.org.ua всё в одном месте. Сайт с советами, схемами, расчетами, обзорами и фотоидееями. Дом, дача, квартира — строй легко, качественно и с умом.
Williamsam
July 11, 2025
Всё о строительстве https://kinoranok.org.ua на одном портале: строительные технологии, интерьер, отделка, ландшафт. Советы экспертов, фото до и после, инструкции и реальные кейсы.
AustinApOrm
July 11, 2025
Портал о строительстве https://bms-soft.com.ua от фундамента до кровли. Технологии, лайфхаки, выбор инструментов и материалов. Честные обзоры, проекты, сметы, помощь в выборе подрядчиков.
JacobTalay
July 11, 2025
Портал про ремонт https://techproduct.com.ua для тех, кто строит, переделывает и обустраивает. Рекомендации, калькуляторы, фото до и после, инструкции по всем этапам ремонта.
Davidamicy
July 11, 2025
Бюро дизайна https://sinega.com.ua интерьеров: функциональность, стиль и комфорт в каждой детали. Предлагаем современные решения, индивидуальный подход и поддержку на всех этапах проекта.
Eugenecoile
July 11, 2025
mexican rx online: п»їbest mexican online pharmacies - buying prescription drugs in mexico
JamesWoumn
July 11, 2025
IndoMeds USA: IndoMeds USA - india online pharmacy
JerryKex
July 11, 2025
Всё о ремонте https://sevgr.org.ua на одном портале: полезные статьи, видеоуроки, проекты, ошибки и решения. Интерьерные идеи, советы мастеров, выбор стройматериалов.
RobertGof
July 11, 2025
Портал про ремонт https://prezent-house.com.ua полезные советы, инструкции, дизайн-идеи и лайфхаки. От черновой отделки до декора. Всё о ремонте квартир, домов и офисов — просто, понятно и по делу.
Jamzodexids
July 11, 2025
Cuidado com a plataforma fake fortune tiger, jogue apenas em sites confiáveis!
MichaelOpemy
July 11, 2025
Женский онлайн-журнал https://socvirus.com.ua мода, макияж, карьера, семья, тренды. Полезные статьи, интервью, обзоры и вдохновляющий контент для настоящих женщин.
PeterVor
July 11, 2025
Туристический портал https://atrium.if.ua всё для путешественников: путеводители, маршруты, советы, отели, билеты и отзывы. Откройте для себя новые направления с полезной информацией и лайфхаками.
PatrickMorma
July 11, 2025
Женский журнал https://e-times.com.ua о красоте, моде, отношениях, здоровье и саморазвитии. Советы, тренды, рецепты, вдохновение на каждый день. Будь в курсе самого интересного!
inernetufavop
July 11, 2025
провайдеры интернета по адресу
domashij-internet-ufa004.ru
какие провайдеры по адресу
ChaseGeoxy
July 11, 2025
MexiMeds Express [url=http://meximedsexpress.com/#]mexican drugstore online[/url] mexican pharmaceuticals online
zapojomskvor
July 11, 2025
вывод из запоя круглосуточно омск
vivod-iz-zapoya-omsk001.ru
вывод из запоя круглосуточно
Michaelpreno
July 11, 2025
Лайфхаки для ремонта https://stroibud.ru квартиры и дома: нестандартные решения, экономия бюджета, удобные инструменты.
Georgebus
July 11, 2025
Поставка нерудных материалов https://sr-sb.ru песок, щебень, гравий, отсев. Прямые поставки на стройплощадки, карьерный материал, доставка самосвалами.
StevenKnive
July 11, 2025
Недвижимость в Балашихе https://balashihabest.ru комфорт рядом с Москвой. Современные жилые комплексы, школы, парки, транспорт. Объекты в наличии, консультации, юридическое сопровождение сделки.
RichardThist
July 11, 2025
Смотреть фильмы kinobadi.mom и сериалы бесплатно, самый большой выбор фильмов и сериалов , многофункциональное сортировка, также у нас есть скачивание в mp4 формате
CharlesHon
July 11, 2025
Выбор застройщика https://spartak-realty.ru важный шаг при покупке квартиры. Расскажем, как проверить репутацию, сроки сдачи, проектную документацию и избежать проблем с новостройкой.
Eugenecoile
July 11, 2025
canada drugs reviews: MediSmart Pharmacy - canadian pharmacy prices
vivodzapojminskvor
July 11, 2025
экстренный вывод из запоя минск
vivod-iz-zapoya-minsk003.ru
вывод из запоя круглосуточно
JamesWoumn
July 11, 2025
MexiMeds Express: MexiMeds Express - MexiMeds Express
internetvop
July 11, 2025
домашний интернет тарифы
domashij-internet-spb006.ru
лучший интернет провайдер санкт-петербург
ChaseGeoxy
July 10, 2025
best india pharmacy [url=https://indomedsusa.shop/#]top 10 pharmacies in india[/url] india pharmacy
Robertallew
July 10, 2025
http://medismartpharmacy.com/# can i buy viagra at the pharmacy
JesseTek
July 10, 2025
http://medismartpharmacy.com/# buy provigil online pharmacy
JamesWoumn
July 10, 2025
remeron online pharmacy: generic viagra india pharmacy - no rx pharmacy
Eugenecoile
July 10, 2025
canadian mail order pharmacy: MediSmart Pharmacy - canadian drug pharmacy
Robertacedo
July 10, 2025
Элитная недвижимость https://real-estate-rich.ru в России и за границей — квартиры, виллы, пентхаусы, дома. Где купить, как оформить, во что вложиться.
ChaseGeoxy
July 10, 2025
world pharmacy india [url=https://indomedsusa.shop/#]top online pharmacy india[/url] IndoMeds USA
RodneyKar
July 10, 2025
The website tnschoolsonline.in is an official portal by the Tamil Nadu School Education Department. It provides comprehensive information about schools across Tamil Nadu, including directories, enrollment data, infrastructure details, and staff records. It serves teachers, students, and administrators to monitor and improve school management and educational outcomes.
internetvop
July 10, 2025
подключить интернет санкт-петербург
domashij-internet-spb004.ru
интернет тарифы санкт-петербург
JesseTek
July 10, 2025
https://medismartpharmacy.com/# online pharmacy reviews generic viagra
JamesWoumn
July 10, 2025
IndoMeds USA: IndoMeds USA - IndoMeds USA
Eugenecoile
July 10, 2025
canadian pharmacy world reviews: MediSmart Pharmacy - canadian pharmacy world
Robertallew
July 10, 2025
https://meximedsexpress.com/# MexiMeds Express
hirurgija-488
July 10, 2025
Хирurgija u Crnoj Gori https://www.hirurgija-crna-gora.me savremena klinika, iskusni ljekari, evropski standardi. Planirane i hitne operacije, estetska i opsta hirurgija, udobnost i bezbjednost.
droptopsite3-301
July 10, 2025
Играйте в онлайн-покер покерок легальный с игроками со всего мира. МТТ, спины, VIP-программа, акции.
sbpcasino-848
July 10, 2025
Ищете казино казино с СБП? У нас — мгновенные переводы, слоты от топ-провайдеров, живые дилеры и быстрые выплаты. Безопасность, анонимность и мобильный доступ!
casinopiastrix-502
July 10, 2025
Выбирайте казино пиастрикс казино с оплатой через Piastrix — это удобно, безопасно и быстро! Топ-игры, лицензия, круглосуточная поддержка.
motoreuro-251
July 10, 2025
Хотите купить контрактный двигатель ДВС с гарантией? Б большой выбор моторов из Японии, Европы и Кореи. Проверенные ДВС с небольшим пробегом. Подбор по VIN, доставка по РФ, помощь с установкой.
inernetsamaravop
July 10, 2025
узнать интернет по адресу
domashij-internet-samara006.ru
интернет по адресу дома
JesseTek
July 10, 2025
http://medismartpharmacy.com/# viagra india online pharmacy
JamesWoumn
July 10, 2025
cheapest online pharmacy india: indian pharmacy - world pharmacy india
Eugenecoile
July 10, 2025
IndoMeds USA: IndoMeds USA - Online medicine home delivery
inernetsamaravop
July 10, 2025
проверить провайдера по адресу
domashij-internet-samara005.ru
интернет провайдеры самара по адресу
ChaseGeoxy
July 10, 2025
india pharmacy [url=http://indomedsusa.com/#]IndoMeds USA[/url] buy medicines online in india
Williamtox
July 10, 2025
Рефрижераторные перевозки https://russianshop.org/tehnika/chto-vazhno-uchityvat-pri-gruzoperevozkah-s-refrizheratorom-po-moskve.html по России и СНГ. Контроль температуры от -25°C до +25°C, современные машины, отслеживание груза.
JesseTek
July 10, 2025
https://meximedsexpress.shop/# MexiMeds Express
JamesWoumn
July 10, 2025
india pharmacy mail order: online pharmacy india - world pharmacy india
Robertallew
July 10, 2025
https://meximedsexpress.com/# MexiMeds Express
zapojkrasnoyarskvor
July 10, 2025
Капельница для вывода из запоя — проверенный способ устранить симптомы алкогольной зависимости. В Красноярске множество наркологических клиник предлагают помощь по выводу из запоя, но необходимо определить наиболее подходящую.Начальным этапом является определение степени зависимости. Опытные врачи осуществят оценку состояния пациента и предложат персонализированный план лечения. Важночтобы клиника обеспечивала стационарные условия и конфиденциальность при лечении алкогольной зависимости. Это создаст комфортные условия для пациентов.Обратите внимание на наличии психотерапии при алкоголизме. Психотерапия является важным аспектом в восстановлении после запоя и лечении алкоголизма. Семейная поддержка также способствует успешному успешной реабилитации зависимых. вывод из запоя Красноярск Изучите отзывы о медицинских учреждениях и проверьте, какие услуги предоставляет нарколог. Выбор правильной наркологической клиники — это залог успешного и безопасного выздоровления.
inernetsamaravop
July 10, 2025
интернет провайдеры по адресу самара
domashij-internet-samara004.ru
провайдеры интернета в самаре по адресу проверить
Eugenecoile
July 10, 2025
IndoMeds USA: IndoMeds USA - IndoMeds USA
RolsaeQueew
July 9, 2025
Затеяли стройку? Тогда вам стоит обратить внимание на сайт компании, которая разбирается в строительных материалах. На ros18.ru можно найти десятки товаров под любые задачи: от фасадной отделки до установки теплиц. Нужен [url=https://ros18.ru/catalog/metalloprokat/profilnye-truby/]труба профильная[/url] для строительства конструкции или арматура под фундамент — всё доступно к заказу. Компания работает напрямую с заводами и предлагает цену, которую сложно найти в розничных магазинах.
Каталог продуман до мелочей: профнастил, кирпич, плитка, трубы, поликарбонат, теплицы и даже комплектующие. И это не просто товары — вы получите товар с доставкой, а при необходимости — проконсультироваться с экспертами. Работаете в Ижевске или в области? Привезут в срок.
Есть сомнения по характеристикам? Помогут выбрать. Если вы искали [url=https://ros18.ru/catalog/metalloprokat/armatura/armatura-10mm-riflenaya/]арматура 10[/url] приемлемая, а обслуживание — без сюрпризов, — вот ваш вариант. Это не случайный сайт, а надёжный партнёр для тех, кто создаёт комфорт своими руками.
internetrostovvop
July 9, 2025
подключить интернет
domashij-internet-rostov006.ru
подключить домашний интернет ростов
RobertRab
July 9, 2025
cialis 5 mg precio en farmacia espaГ±a: Farmacia Asequible - braun atencion al cliente
JamesJes
July 9, 2025
https://enclomiphenebestprice.shop/# enclomiphene citrate
izzapoyakalugavor
July 9, 2025
вывод из запоя круглосуточно калуга
vivod-iz-zapoya-kaluga005.ru
лечение запоя
JamesRaw
July 9, 2025
Наш агрегатор - beautyplaces.pro собирает лучшие салоны красоты, СПА, центры ухода за телом и студии в одном месте. Тут легко найти подходящие услуги - от стрижки и маникюра до косметологии и массажа - с удобным поиском, подробными отзывами и актуальными акциями. Забронируйте визит за пару кликов https://beautyplaces.pro/samara/
kashpo napolnoe_qbOr
July 9, 2025
горшок высокий для цветов купить напольные [url=www.kashpo-napolnoe-rnd.ru/]горшок высокий для цветов купить напольные[/url] .
cloth-remover-242
July 9, 2025
Removing free ai clothes remover from images is an advanced tool for creative tasks. Neural networks, accurate generation, confidentiality. For legal and professional use only.
narkologiya-79
July 9, 2025
Профессиональная анонимная наркологическая клиника. Лечение зависимостей, капельницы, вывод из запоя, реабилитация. Анонимно, круглосуточно, с поддержкой врачей и психологов.
internetrostovvop
July 9, 2025
домашний интернет в ростове
domashij-internet-rostov005.ru
подключить домашний интернет ростов
JaysonCem
July 9, 2025
go to the site https://petitedanse.com.br
StevenBeels
July 9, 2025
visit the site https://lmc896.org
Daniellom
July 9, 2025
enclomiphene for sale [url=http://enclomiphenebestprice.com/#]buy enclomiphene online[/url] enclomiphene buy
JamesJes
July 9, 2025
http://farmaciaasequible.com/# Farmacia Asequible
RobertRab
July 9, 2025
enclomiphene citrate: enclomiphene price - enclomiphene
BrianFax
July 9, 2025
RxFree Meds: RxFree Meds - RxFree Meds
DavidTit
July 9, 2025
https://farmaciaasequible.shop/# Farmacia Asequible
JamesJes
July 9, 2025
https://enclomiphenebestprice.shop/# enclomiphene
Williamodobe
July 9, 2025
visit the site online https://www.maxwaugh.com
MiguelIdosy
July 9, 2025
best site online https://playplayfun.com
Daniellom
July 9, 2025
Farmacia Asequible [url=https://farmaciaasequible.shop/#]traspaso farmacia madrid[/url] Farmacia Asequible
RobertRab
July 9, 2025
enclomiphene testosterone: enclomiphene citrate - enclomiphene
internetpermvop
July 9, 2025
домашний интернет подключить пермь
domashij-internet-perm006.ru
подключение интернета пермь
BrianFax
July 9, 2025
online pharmacy in germany: RxFree Meds - skelaxin pharmacy
TimothyQuask
July 9, 2025
interesting and new https://fgvjr.com
StephenVub
July 9, 2025
the best and interesting https://www.radio-rfe.com
DavidPhich
July 9, 2025
Огромный выбор на любой вкус и кошелек.
розы купить в томске
vivodzapojirkutskvor
July 9, 2025
экстренный вывод из запоя иркутск
vivod-iz-zapoya-irkutsk002.ru
экстренный вывод из запоя иркутск
Berita
July 9, 2025
Good Content excellent! Berita Hari Ini
Berita
July 9, 2025
Good Content excellent resource Berita Hari Ini
JamesJes
July 9, 2025
https://rxfreemeds.shop/# alliance rx specialty pharmacy
internetpermvop
July 9, 2025
домашний интернет
domashij-internet-perm005.ru
подключение интернета пермь
RobertRab
July 8, 2025
viagra from pharmacy: RxFree Meds - femara online pharmacy
jonas
July 8, 2025
https://eupharmacia.com/shop/nevolat/
jonas
July 8, 2025
https://eupharmacia.com/shop/saxenda/
jonas
July 8, 2025
https://eupharmacia.com
Daniellom
July 8, 2025
rx online pharmacy [url=https://rxfreemeds.shop/#]RxFree Meds[/url] RxFree Meds
DavidTit
July 8, 2025
https://rxfreemeds.com/# uk pharmacy viagra online
internetpermvop
July 8, 2025
домашний интернет тарифы пермь
domashij-internet-perm004.ru
домашний интернет тарифы
JamesJes
July 8, 2025
https://farmaciaasequible.com/# Farmacia Asequible
RobertRab
July 8, 2025
enclomiphene best price: buy enclomiphene online - enclomiphene for men
BrianFax
July 8, 2025
enclomiphene best price: enclomiphene online - enclomiphene for men
alkogolizmcherepovecvor
July 8, 2025
вывод из запоя круглосуточно череповец
vivod-iz-zapoya-cherepovec006.ru
вывод из запоя круглосуточно череповец
Daniellom
July 8, 2025
RxFree Meds [url=https://rxfreemeds.com/#]RxFree Meds[/url] provigil india pharmacy
internetomskvop
July 8, 2025
недорогой интернет омск
domashij-internet-omsk006.ru
тарифы интернет и телевидение омск
CharlesLinee
July 8, 2025
Букет сказочной красоты - глаз не оторвать!
цветы
JamesJes
July 8, 2025
https://farmaciaasequible.shop/# farmcia
alkogolizmcherepovecvor
July 8, 2025
вывод из запоя цена
vivod-iz-zapoya-cherepovec005.ru
вывод из запоя
internetomskvop
July 8, 2025
подключить домашний интернет омск
domashij-internet-omsk005.ru
подключить проводной интернет омск
alkogolizmirkutskvor
July 8, 2025
лечение запоя иркутск
vivod-iz-zapoya-irkutsk003.ru
вывод из запоя
Daniellom
July 8, 2025
enclomiphene price [url=http://enclomiphenebestprice.com/#]enclomiphene buy[/url] buy enclomiphene online
kashpo napolnoe_riOi
July 8, 2025
кашпо для комнатных растений напольные [url=kashpo-napolnoe-rnd.ru]кашпо для комнатных растений напольные[/url] .
Charlesabito
July 8, 2025
Онлайн-курсы https://obuchenie-plasmoterapii.ru: теория, видеоуроки, разбор техник. Обучение с нуля и для практикующих. Доступ к материалам 24/7, сертификат после прохождения, поддержка преподавателя.
RobertRab
July 8, 2025
enclomiphene testosterone: enclomiphene citrate - enclomiphene testosterone
BrianFax
July 8, 2025
RxFree Meds: clomid online pharmacy no prescription uk - RxFree Meds
lechenieirkutskvor
July 8, 2025
вывод из запоя круглосуточно
vivod-iz-zapoya-irkutsk002.ru
вывод из запоя цена
internetomskvop
July 8, 2025
тарифы интернет и телевидение омск
domashij-internet-omsk004.ru
домашний интернет подключить омск
Georgezelia
July 8, 2025
Профессиональное prp терапия обучение: PRP, Plasmolifting, протоколы и нюансы проведения процедур. Онлайн курс обучения плазмотерапии.
Richardrab
July 8, 2025
Modern operations surgical innovative technologies, precision and safety. Minimal risk, short recovery period. Plastic surgery, ophthalmology, dermatology, vascular procedures.
DavidTit
July 7, 2025
http://farmaciaasequible.com/# Farmacia Asequible
internetvop
July 7, 2025
Проводной интернет в новосибирске открывает широкие горизонты для пользователей. Тем не менее, при выборе интернет-провайдера важно обращать внимание, чтобы избежать обмана. домашний интернет подключить новосибирск Начните с выбора подходящего провайдера. Изучите мнения клиентов о различных провайдерах, сравните доступные тарифы и варианты услуг. Обратите внимание на скорость интернета и стоимость подключения. Многие компании предоставляют специальные предложения и скидки, но обязательно убедитесь, что нет скрытых комиссий. При выборе провайдера, узнайте о законных правах потребителей. Не стесняйтесь спрашивать о безопасности онлайн-услуг и условиях подключения. Это поможет избежать неприятностей. Таким образом, выбирая интернет для своего дома в новосибирске, будьте внимательны к деталям и тщательно выбирайте провайдера, чтобы обеспечить себе надежное и безопасное интернет-соединение.
JamesJes
July 7, 2025
https://enclomiphenebestprice.shop/# enclomiphene buy
kashpo napolnoe_kbOi
July 7, 2025
кашпо напольное пластик [url=www.kashpo-napolnoe-rnd.ru]кашпо напольное пластик[/url] .
zapojcherepovecvor
July 7, 2025
экстренный вывод из запоя
vivod-iz-zapoya-cherepovec006.ru
вывод из запоя цена
BrianFax
July 7, 2025
Farmacia Asequible: Farmacia Asequible - Farmacia Asequible
Williamcoido
July 7, 2025
Хризантемы - свежесть и яркость, глаз не оторвать!
купить розы в томске
RobertRab
July 7, 2025
vibrador embarazo: Farmacia Asequible - farmacias a domicilio
JamesJes
July 7, 2025
https://enclomiphenebestprice.com/# enclomiphene price
internetvop
July 7, 2025
Что нужно учитывать при выборе договора на интернет в новосибирске? При выборе провайдера для подключения домашнего интернета в новосибирске важно обратить внимание на несколько ключевых аспектов. Первым шагом будет изучение условий подключения и тарифных планов. Вы можете найти различные предложения на сайтах провайдеров, таких как domashij-internet-novosibirsk004.ru. Важно сравнить тарифы и скорость интернета, чтобы выбрать оптимальный вариант для своих нужд. Обратите внимание на особенности договора; Некоторые провайдеры могут включать скрытые платежи или предлагать ненужные дополнительные услуги. Чтение отзывов о провайдерах поможет сформировать представление о качестве связи и надежности компании. Не лишним будет уточнить наличие технической поддержки и оборудование для интернета.
DavidPhich
July 7, 2025
Коллеги офигели от красоты!
заказ цветов томск с доставкой
RobertRab
July 7, 2025
online pharmacies uk: pharmacy online mexico - advanced rx pharmacy
alkogolizmchelyabinskvor
July 7, 2025
вывод из запоя круглосуточно челябинск
[url=https://vivod-iz-zapoya-chelyabinsk001.ru]https://vivod-iz-zapoya-chelyabinsk001.ru[/url]
экстренный вывод из запоя челябинск
CharlesLinee
July 7, 2025
Доставили в соседний город - все в идеальном состоянии.
заказ цветов томск
JamesJes
July 7, 2025
http://rxfreemeds.com/# RxFree Meds
Daniellom
July 7, 2025
enclomiphene for men [url=https://enclomiphenebestprice.com/#]enclomiphene for sale[/url] enclomiphene testosterone
DavidTit
July 7, 2025
https://rxfreemeds.com/# pharmacy online program
internetvop
July 7, 2025
интернет провайдеры по адресу
domashij-internet-nizhnij-novgorod006.ru
интернет провайдеры по адресу нижний новгород
BrianFax
July 7, 2025
enclomiphene for sale: enclomiphene - enclomiphene buy
toplistcasinos-466
July 7, 2025
лучшие игровые казино настоящее казино онлайн
RobertRab
July 7, 2025
tesco pharmacy artane: RxFree Meds - compounding pharmacy prometrium
zapojkrasnodarvor
July 7, 2025
частный пансионат для престарелых
pansionat-tula003.ru
пансионат для лежачих тула
vivodzapojchelyabinskvor
July 7, 2025
вывод из запоя круглосуточно челябинск
vivod-iz-zapoya-chelyabinsk003.ru
вывод из запоя цена
JamesJes
July 7, 2025
http://enclomiphenebestprice.com/# enclomiphene price
internetvop
July 7, 2025
интернет провайдеры по адресу
domashij-internet-nizhnij-novgorod005.ru
интернет провайдеры в нижнем новгороде по адресу дома
Daniellom
July 7, 2025
wegovy opiniones [url=http://farmaciaasequible.com/#]farmacias abiertas vigo[/url] Farmacia Asequible
RobertRab
July 7, 2025
RxFree Meds: RxFree Meds - wedgewood pharmacy
internetvop
July 6, 2025
какие провайдеры на адресе в нижнем новгороде
domashij-internet-nizhnij-novgorod004.ru
проверить провайдеров по адресу нижний новгород
JamesJes
July 6, 2025
http://rxfreemeds.com/# people pharmacy store
BrianFax
July 6, 2025
oferta farmaceutico: la botica de la mascota - melatonina en gotas opiniones
izzapoyakrasnodarvor
July 6, 2025
пансионат для престарелых
pansionat-tula001.ru
пансионаты для инвалидов в туле
RobertRab
July 6, 2025
farma cbd: Farmacia Asequible - farmacia online barcelona barata
Daniellom
July 6, 2025
naturxheal family pharmacy & health store-doral [url=http://rxfreemeds.com/#]RxFree Meds[/url] RxFree Meds
DavidTit
July 6, 2025
http://rxfreemeds.com/# australian pharmacy viagra
kashpo napolnoe_xnmt
July 6, 2025
горшки для цветов большие напольные пластиковые [url=https://kashpo-napolnoe-msk.ru]горшки для цветов большие напольные пластиковые [/url] .
Williamcoido
July 6, 2025
Мгновенная доставка - это просто магия!
букет невесты томск
JamesJes
July 6, 2025
https://farmaciaasequible.shop/# Farmacia Asequible
RichardBus
July 6, 2025
заказать суши в барнауле доставка суши барнаул
Ronaldfox
July 6, 2025
Магазин брендовых кроссовок https://kicksvibe.ru Nike, Adidas, New Balance, Puma и другие. 100% оригинал, новые коллекции, быстрая доставка, удобная оплата. Стильно, комфортно, доступно!
RobertRab
July 6, 2025
farmacia online envГo gratis sin pedido mГnimo: Farmacia Asequible - Farmacia Asequible
internetvop
July 6, 2025
Как выбрать провайдера интернета и телевидения в Москве — дело не из легких, с учетом множества предложений на рынке. На сайте domashij-internet-msk005.ru предоставлено сравнение различных провайдеров, их тарифных планов и отзывов клиентов. Важно рассмотреть скорость интернета и качество соединения, чтобы сделать правильный выбор. Многие провайдеры вводят различные акции и специальные предложения на интернет и IPTV. Также не забывайте про спутниковое и кабельное телевидение, которые могут стать хорошим дополнением к вашему интернету. Техническая поддержка провайдеров также играет важную роль в вашем выборе.
Daniellom
July 6, 2025
producto parafarmacia [url=https://farmaciaasequible.shop/#]Farmacia Asequible[/url] Farmacia Asequible
vivodzapojkrasnodarvor
July 6, 2025
частный дом престарелых
pansionat-tula002.ru
пансионат с деменцией для пожилых в туле
DavidPhich
July 6, 2025
Приятно сэкономила с акцией - спасибо!
доставка цветов томск на дом
JamesJes
July 6, 2025
https://enclomiphenebestprice.shop/# enclomiphene buy
internetvop
July 6, 2025
Выбор интернет провайдера в Москве В Москве интернет стал неотъемлемой частью жизни для большинства жителей. Выбор подходящего интернет провайдера иногда становится настоящим испытанием. Рассмотрим основные аспекты и предложим сравнение провайдеров.Среди основных интернет провайдеров в Москве выделяются такие компании, как МТС, Beeline, Ростелеком и многие другие. Они предлагают различные тарифы на интернет, включая Wi-Fi и безлимитные тарифы. При определении провайдера важно учитывать скорость интернета. Большинство провайдеров обеспечивают тест скорости интернета, что даёт возможность определиться с качеством связи.Важно обратить внимание на покрытие сети, особенно если вы планируете пользоваться мобильным интернетом. Wi-Fi провайдеры также могут предложить выгодные условия. Не забудьте ознакомиться с отзывами о провайдерах, чтобы узнать об их достоинствах и недостатках. интернет провайдеры москва Процесс подключения интернета стало проще благодаря широкому выбору услуг связи. Обратите внимание на условиям подключения и доступу к интернету в вашем районе. Это содействует правильному выбору провайдера и насладиться качественным интернетом в вашем доме.
Lowwezadem
July 6, 2025
Ваша [url=https://mudryakova.ru/]дизайн студия интерьера Санкт-Петербург[/url] — это mudryakova.ru. Здесь каждый проект — отражение вкуса и пожеланий клиента. Специалисты компании продумывают всё: планировку, освещение, цветовую гамму и декор. Доверяя студии, вы получаете гармонию в каждой детали и гарантированный результат.
CharlesLinee
July 6, 2025
Подарочная упаковка добавила шика - красиво!
розы купить в томске
ThomasKab
July 6, 2025
Хирургические услуги пластическая хирургия: диагностика, операции, восстановление. Современная клиника, лицензированные специалисты, помощь туристам и резидентам.
VincentTitte
July 6, 2025
суши барнаул каталог https://sushi-barnaul.ru
Daniellom
July 6, 2025
RxFree Meds [url=https://rxfreemeds.shop/#]RxFree Meds[/url] ativan no prescription online pharmacy
DavidTit
July 6, 2025
https://enclomiphenebestprice.com/# enclomiphene
vivodkrasnodarvor
July 6, 2025
пансионат для пожилых после инсульта
pansionat-msk001.ru
пансионат для лежачих больных
inernetkrdvop
July 6, 2025
интернет провайдеры по адресу краснодар
[url=https://domashij-internet-krasnodar006.ru]domashij-internet-krasnodar006.ru[/url]
интернет провайдеры в краснодаре по адресу дома
JamesJes
July 6, 2025
http://enclomiphenebestprice.com/# enclomiphene citrate
RobertRab
July 6, 2025
RxFree Meds: RxFree Meds - RxFree Meds
inernetkrdvop
July 5, 2025
провайдеры по адресу дома
domashij-internet-krasnodar005.ru
провайдер по адресу
Daniellom
July 5, 2025
farmacias en mi zona [url=https://farmaciaasequible.shop/#]evopad 50[/url] Farmacia Asequible
lechenietulavor
July 5, 2025
Капельница от запоя — эффективный способ устранить симптомы алкогольной зависимости. В Туле много клиникспециализирующихся на лечении зависимостей предоставляют услуги вывода из запоя, но важно определить подходящую.Первым шагом является определение степени зависимости. Квалифицированные специалисты осуществят анализ состояния пациента и разработают персонализированный план лечения. Важночтобы клиника предоставляла стационарное лечение и конфиденциальность при лечении алкогольной зависимости. Это создаст удобные условия для пациентов.Обратите внимание на психотерапевтической поддержке при лечении алкоголизма. Психологическая поддержка играет ключевую роль в восстановлении после запоя и лечении алкогольной зависимости. Поддержка семьи алкоголика также способствует восстановлению зависимых. вывод из запоя тула Посмотрите отзывы о клиниках и уточните, какие услуги нарколога они предлагают. Выбор правильной наркологической клиники — залог успешного и безопасного лечения.
vivodkrasnodarvor
July 5, 2025
пансионат для реабилитации после инсульта
pansionat-msk002.ru
пансионат для пожилых с инсультом
BrianFax
July 5, 2025
pharmacy online tadalafil: RxFree Meds - RxFree Meds
RobertRab
July 5, 2025
RxFree Meds: erectile dysfunction - mexican pharmacies
JamesJes
July 5, 2025
http://rxfreemeds.com/# RxFree Meds
kashpo napolnoe_ycEr
July 5, 2025
купить высокие горшки для цветов пластиковые напольные [url=kashpo-napolnoe-spb.ru]купить высокие горшки для цветов пластиковые напольные[/url] .
inernetkrdvop
July 5, 2025
провайдеры по адресу дома
domashij-internet-krasnodar004.ru
какие провайдеры по адресу
izzapoyakrasnodarvor
July 5, 2025
частный дом престарелых
pansionat-msk001.ru
пансионат для престарелых людей
alkogolizmtulavor
July 5, 2025
Лечение запоя с помощью капельниц, это критически важный шаг в лечении алкоголизма. Обращение к наркологу на дом в Туле позволяет получить квалифицированную помощь. Если появляются симптомы запоя, таких как тремор, потоотделение и беспокойство, важно незамедлительно получить помощь. Наркологи осуществляют диагностику алкогольной зависимости и разрабатывают план медикаментозной терапии, включая инфузии для детоксикации. вызов нарколога на дом тула Восстановление после запоя включает семейную поддержку, что значительно увеличивает шансы на эффективное лечение. Профилактика алкогольной зависимости тоже играет ключевую роль. Услуги нарколога, включая вызов врача на дом, помогают решить вопросы, касающиеся алкогольной зависимости, и гарантировать безопасную терапию.
Martinerype
July 5, 2025
Odjeca i aksesoari za hotele damast po sistemu kljuc u ruke: uniforme za sobarice, recepcionere, SPA ogrtaci, papuce, peskiri. Isporuke direktno od proizvodaca, stampa logotipa, jedinstveni stil.
RobertRab
July 5, 2025
RxFree Meds: RxFree Meds - RxFree Meds
basolinovoip-337
July 5, 2025
Виртуальные номера для Telegram https://basolinovoip.com создавайте аккаунты без SIM-карты. Регистрация за минуту, широкий выбор стран, удобная оплата. Идеально для анонимности, работы и продвижения.
Daniellom
July 5, 2025
RxFree Meds [url=https://rxfreemeds.shop/#]RxFree Meds[/url] cabergoline overseas pharmacy
fertyus
July 5, 2025
wondering what was the font you used for [https://havas-kizilay-saatleri-25.webselfsite.net/]
Williamcoido
July 5, 2025
Букет - загляденье!
купить цветы томск
JamesJes
July 5, 2025
https://enclomiphenebestprice.com/# enclomiphene citrate
kazan_makulatura
July 5, 2025
Есть ненужная мукулатура? Макулатура Казань телеграм Принимаем бумажные отходы по выгодным расценкам. Быстрый расчет, помощь с загрузкой, удобный график. Экономия и забота об экологии!
Shawnelups
July 5, 2025
Купить подписчиков в Telegram https://vc.ru/smm-promotion лёгкий способ начать продвижение. Выберите нужный пакет: боты, офферы, живые. Подходит для личных, новостных и коммерческих каналов.
DavidTit
July 5, 2025
https://rxfreemeds.com/# albany college of pharmacy
inernetadresvop
July 5, 2025
проверить провайдеров по адресу красноярск
domashij-internet-krasnoyarsk006.ru
узнать провайдера по адресу красноярск
BrianFax
July 5, 2025
Farmacia Asequible: Farmacia Asequible - Farmacia Asequible
RobertRab
July 5, 2025
Farmacia Asequible: Farmacia Asequible - casenlax para que sirve
inernetadresvop
July 5, 2025
проверить провайдеров по адресу красноярск
domashij-internet-krasnoyarsk005.ru
интернет провайдеры красноярск по адресу
Daniellom
July 5, 2025
enclomiphene for men [url=https://enclomiphenebestprice.com/#]enclomiphene buy[/url] enclomiphene price
JamesJes
July 5, 2025
https://rxfreemeds.com/# RxFree Meds
DavidPhich
July 5, 2025
Быстрая доставка и свежие цветы - вы лучшие!
доставка цветов томск на дом
zapojtulavor
July 5, 2025
Запой — это серьезная проблема, которая требует быстрого решения. В Туле доступны различные услуги по анонимному выводу из запоя. Наркологические клиники предлагают медицинскую помощь при запоях, включая программы детоксикации и психотерапию для алкоголиков. вывод из запоя тула Если вам или вашим близким нужна помощь, стоит обратиться в центры лечения зависимостей, где работают выездные наркологи. Также стоит рассмотреть возможность консультаций по алкоголизму и участия в группах поддержки для родственников. В Туле есть реабилитационные программы, включая анонимные группы и восстановление после запоя. Ваша помощь в кризисных ситуациях рядом.
inernetadresvop
July 5, 2025
интернет по адресу красноярск
domashij-internet-krasnoyarsk004.ru
провайдер по адресу
CharlesLinee
July 5, 2025
Учли все нюансы - видно профессиональный подход!
купить пионы томск
vivodzapojtulavor
July 5, 2025
Если вы находитесь в поиске, где сделать капельницу анонимно в Туле, вы можете ознакомиться с сайтом narkolog-tula005.ru. Здесь предоставляются услуги капельницы для здоровья, которые помогут вам после болезни. Клиника в Туле обеспечивает безопасность процедур и конфиденциальность клиентов, предоставляя качественную медицинскую помощь. Анонимное лечение – это возможность заботиться о своем здоровье без посторонних глаз. Не стоит откладывать о себе, воспользуйтесь медицинскими процедурами в ближайшее время!
RobertRab
July 5, 2025
sildenafil 50 mg comprar online: farmacias por internet - Farmacia Asequible
JamesJes
July 5, 2025
https://farmaciaasequible.com/# Farmacia Asequible
Daniellom
July 5, 2025
RxFree Meds [url=https://rxfreemeds.com/#]RxFree Meds[/url] cialis european pharmacy
internetvop
July 4, 2025
провайдеры интернета в казани по адресу
domashij-internet-kazan006.ru
домашний интернет
DavidTit
July 4, 2025
https://enclomiphenebestprice.shop/# enclomiphene buy
BrianFax
July 4, 2025
enclomiphene: enclomiphene for sale - enclomiphene price
narkologiyatulavor
July 4, 2025
Вызов нарколога на дом в экстренных случаях — это необходимая помощь для людей, страдающих от зависимостей. На ресурсе narkolog-tula003.ru вы можете обратиться за консультацией нарколога и вызвать врача для домашнего визита. Квалифицированная помощь нарколога включает в себя лечение различных зависимостей и психологическую поддержку. Экстренная медицинская служба предлагает конфиденциальные услуги, что позволяет сохранить конфиденциальность. Эффективное лечение наркомании и помощь алкоголикам возможны с участием психотерапевта на дом. Не ждите, получите срочную помощь уже сегодня!
internetvop
July 4, 2025
подключение интернета казань
domashij-internet-kazan005.ru
подключить интернет в казани в квартире
selammik
July 4, 2025
Ordu-Giresun Airport Havaş Services Comprehensive Guide Ordu-Giresun Airport is an important airport serving the Black Sea's distinguished cities of Ordu and Giresun. This airport has great importance in the transportation infrastructure of the region.
https://www.rizekoypazari.com/ordu-giresun-havas.html
Beydagy
July 4, 2025
Offers reliable and comfortable transportation services between Rize Airport and various destinations within the region. Whether you're arriving for business, leisure, or a special event, https://www.rizetours.com/ their professional drivers ensure a smooth and punctual transfer experience. They typically provide options such as private cars, shuttles, and VIP services to cater to different needs and group sizes. With a focus on customer satisfaction, Airport Transfer aims to make your journey to and fromconvenient and hassle-free.
RizeTours
July 4, 2025
Rize Tours known for its lush green landscapes, tea plantations, and scenic mountains, making it a popular destination for nature lovers and adventure travelers..
https://www.rizetours.com/
Daniellom
July 4, 2025
enclomiphene buy [url=http://enclomiphenebestprice.com/#]enclomiphene price[/url] enclomiphene price
vivodzapojtulavor
July 4, 2025
Организация капельницы для лечения запоя в домашних условиях — ключевой момент в терапии алкогольной зависимости. Вызов нарколога и медицинская помощь при запое обеспечивают надежность и результативность detox-процедуры. Во-первых, необходимо оценить симптомы запойного состояния и выяснить текущее состояние пациента. Следует обеспечить удобные условия для лечения: подготовьте пространство, где будет проводиться домашняя капельница. Обеспечьте доступа к электросети и достаточное количество чистой воды. Важно также иметь все необходимые медикаменты, которые предписал врач. Перед началом процедуры важно обсудить с специалистом все нюансы, чтобы избежать неприятных ситуаций. Эффективное лечение алкоголизма включает не только капельницу, но и последующую реабилитацию от запоя. Обращение к профессионалу гарантирует квалифицированный подход и поддержку в восстановлении организма после запоя.
RobertRab
July 4, 2025
Farmacia Asequible: se puede comprar mycostatin sin receta - sildenafilo comprar
Rodneyphema
July 4, 2025
medical centar budva general hospital Bar
JoshuaKex
July 4, 2025
городская больница больница Тиват
EliasErync
July 4, 2025
Hello initiators of serene environments !
Looking for the best smoke eater for home? These devices actively remove airborne chemicals left by smoking. The best smoke eater for home includes quiet operation and sleek design.
Choose a filter with activated carbon for the best air purifier for smoke smell. best air purifier for cigarette smoke It captures gases and odors left behind by cigarettes and cigars. Keeping your home fresh is easier with this setup.
Best smoke eater for home during gatherings - п»їhttps://www.youtube.com/watch?v=fJrxQEd44JM
May you delight in extraordinary remarkable freshness !
JamesJes
July 4, 2025
http://enclomiphenebestprice.com/# enclomiphene for men
internetvop
July 4, 2025
какие провайдеры интернета есть по адресу казань
domashij-internet-kazan004.ru
подключить интернет
BrianFax
July 4, 2025
rx america pharmacy help desk: RxFree Meds - RxFree Meds
Williamcoido
July 4, 2025
Букет сказочной красоты - глаз не оторвать!
заказ цветов томск
Daniellom
July 4, 2025
online pharmacy overnight delivery [url=https://rxfreemeds.shop/#]aciphex online pharmacy[/url] Neurontin
RobertRab
July 4, 2025
enclomiphene online: enclomiphene buy - enclomiphene
narkologiyatulavor
July 4, 2025
Детоксикация и капельницы от запоя – ключевые подходы в борьбе с алкогольной зависимостью. В Туле услуги по избавлению от запоя включают в себя капельницы, которые способствуют быстро вывести токсины из организма. Капельница включает препараты для восстановления баланса воды и электролитов и устранения симптомов абстиненции, что поддерживает терапию запоя. лечение запоя тула Детоксикация также является многогранным процессом, который включает не только физическую очистку, но и психологическую помощь пациентов. В центрах по лечению алкоголизма в Туле используются оба метода: капельницы для острого состояния и программы реабилитации после лечения запоя. Это способствует в освобождении от зависимости и восстановлении здоровья. Помните, что профессиональная помощь в этом аспекте имеет критическое значение для успешного лечения.
DavidTit
July 4, 2025
https://rxfreemeds.shop/# united pharmacy propecia
JamesJes
July 4, 2025
https://farmaciaasequible.com/# Farmacia Asequible
internetvop
July 4, 2025
Обзор новых тарифов телевидения в Екатеринбурге В Екатеринбурге представлен разнообразный выбор услуг провайдеров, которые предлагают спутниковое и кабельное телевидение. На сайте domashij-internet-ekaterinburg006.ru представлены новые тарифы, которые позволят пользователям определиться с подходящий вариант. Сравнение тарифов показывает, что стоимость подписки колеблются в зависимости от выбранных пакетов и дополнительных услуг. Например, некоторые провайдеры предлагают акции и льготы для новых клиентов, что позволяет сделать предложения более привлекательными. Телевидение в Екатеринбурге отличается отличным качеством изображения, а интернет-тарифы, совместно с телевидением, могут включать выгодные пакеты. Обзор тарифов на domashij-internet-ekaterinburg006.ru поможет найти лучшие варианты, учитывая личные предпочтения и бюджет.
RobertRab
July 4, 2025
hair loss: buy tetracycline online pharmacy - RxFree Meds
DavidPhich
July 4, 2025
Начальница оценила мой выбор - ура!
доставка цветов томск на дом
Daniellom
July 4, 2025
enclomiphene buy [url=https://enclomiphenebestprice.com/#]enclomiphene for men[/url] enclomiphene buy
internetvop
July 4, 2025
При выборе интернет-провайдера в Екатеринбурге, важную роль играют отзывы пользователей. Сравнивая провайдеров по качеству связи, скорости интернета и стабильности соединения помогает сделать правильный выбор. Проблемы с интернетом – это не редкость, и в таких ситуациях важна помощь клиентов. Техническая поддержка должна быстро решать возникшие вопросы. На платформе domashij-internet-ekaterinburg005.ru представлены искренние отзывы о провайдерах, что посодействует в выборе доступных предложений с отличными тарифами на интернет. Советуем обратить особое внимание на отзывы о решении проблем и уровень удовлетворенности клиентов. Это позволит вам подключение к интернету осуществить без лишних трудностей.
BrianFax
July 4, 2025
enclomiphene best price: enclomiphene - enclomiphene for men
CharlesLinee
July 4, 2025
Все гости были в шоке от такого роскошного букета!
доставка цветов
JamesJes
July 4, 2025
http://enclomiphenebestprice.com/# enclomiphene online
RobertRab
July 3, 2025
bupropion sr pharmacy: RxFree Meds - provigil india pharmacy
internetvop
July 3, 2025
Определение IPTV провайдера в Екатеринбурге является трудной задачей из-за большого количества предложений. На сайте domashij-internet-ekaterinburg004.ru собраны самые востребованные IPTV сервисы, которые помогут вам сделать выбор. Не забудьте обратить внимание на отзывы о IPTV от пользователей, которые уже испытали сервисы. При выборе IPTV провайдеров важно учитывать качество предоставляемых услуг и стабильность соединения. Узнайте с ценами на IPTV и акциями , чтобы не переплатить. Не забывайте также о необходимой скорости интернета: она должна составлять достаточной для комфортного просмотра . Важным фактором является поддержка устройства для IPTV . Убедитесь , что ваш провайдер поддерживает ваши гаджеты . При настройке IPTV придерживайтесь рекомендаций, чтобы избежать возможных ошибок. Ваш окончательный выбор должен основываться на пользовательских отзывах и сравнении тарифов и услуг.
Daniellom
July 3, 2025
sildenafilo precio farmacia [url=https://farmaciaasequible.shop/#]cerave limpiador piel grasa opiniones[/url] celestone comprar
vivodzapojkrasnodarvor
July 3, 2025
вывод из запоя круглосуточно
narkolog-krasnodar003.ru
вывод из запоя
JamesJes
July 3, 2025
https://farmaciaasequible.com/# Farmacia Asequible
DavidTit
July 3, 2025
https://farmaciaasequible.shop/# farmacia mГЎs cerca
RobertRab
July 3, 2025
enclomiphene price: enclomiphene price - enclomiphene citrate
internetchelyabvop
July 3, 2025
интернет провайдеры челябинск
domashij-internet-chelyabinsk006.ru
домашний интернет челябинск
zapojkrasnodarvor
July 3, 2025
вывод из запоя краснодар
narkolog-krasnodar002.ru
лечение запоя
Daniellom
July 3, 2025
enclomiphene best price [url=https://enclomiphenebestprice.shop/#]enclomiphene[/url] enclomiphene for sale
Gregoryoccar
July 3, 2025
Woodworking and construction https://www.woodsurfer.com forum. Ask questions, share projects, read reviews of materials and tools. Help from practitioners and experienced craftsmen.
JamesJes
July 3, 2025
http://rxfreemeds.com/# RxFree Meds
VictorApesy
July 3, 2025
нейросеть создать сайт https://sozday-sayt-s-ai.ru
internetchelyabvop
July 3, 2025
домашний интернет тарифы челябинск
domashij-internet-chelyabinsk005.ru
провайдеры интернета в челябинске
alkogolizmkrasnodarvor
July 3, 2025
вывод из запоя круглосуточно краснодар
narkolog-krasnodar002.ru
экстренный вывод из запоя
alkogolizmkrasnodarvor
July 3, 2025
лечение запоя краснодар
narkolog-krasnodar001.ru
вывод из запоя круглосуточно краснодар
JamesHep
July 3, 2025
Промышленные ворота https://efaflex.ru любых типов под заказ – секционные, откатные, рулонные, скоростные. Монтаж и обслуживание. Установка по ГОСТ.
RobertRab
July 3, 2025
Farmacia Asequible: comprar ozempic 0 50 - mycostatin sin receta espaГ±a
Williamcoido
July 3, 2025
Букет превзошел все ожидания - настоящее произведение искусства!
букет цветов томск
Daniellom
July 3, 2025
enclomiphene testosterone [url=http://enclomiphenebestprice.com/#]enclomiphene testosterone[/url] enclomiphene best price
JamesJes
July 3, 2025
http://rxfreemeds.com/# what's the best online pharmacy
Michaelglomb
July 3, 2025
Инженерная сантехника https://vodazone.ru в Москве — всё для отопления, водоснабжения и канализации. Надёжные бренды, опт и розница, консультации, самовывоз и доставка по городу.
MichaelHok
July 3, 2025
Шины и диски https://tssz.ru для любого авто: легковые, внедорожники, коммерческий транспорт. Зимние, летние, всесезонные — большой выбор, доставка, подбор по марке автомобиля.
internetchelyabvop
July 3, 2025
подключить проводной интернет челябинск
domashij-internet-chelyabinsk004.ru
дешевый интернет челябинск
narkologiyakrasnodarvor
July 3, 2025
лечение запоя
narkolog-krasnodar001.ru
лечение запоя
BrianFax
July 3, 2025
RxFree Meds: asacol pharmacy card - rite aid pharmacy cialis
lecheniekrasnodarvor
July 3, 2025
лечение запоя
narkolog-krasnodar001.ru
лечение запоя
DavidTit
July 3, 2025
https://enclomiphenebestprice.shop/# enclomiphene
RobertRab
July 3, 2025
enclomiphene for men: enclomiphene price - enclomiphene best price
JamesJes
July 3, 2025
http://farmaciaasequible.com/# farmqcia
Daniellom
July 3, 2025
Farmacia Asequible [url=https://farmaciaasequible.shop/#]Farmacia Asequible[/url] Farmacia Asequible
MichaelTut
July 3, 2025
Продвижение сайтов https://optimizaciya-i-prodvizhenie.ru в Google и Яндекс — только «белое» SEO. Улучшаем видимость, позиции и трафик. Аудит, стратегия, тексты, ссылки.
RodneyJaw
July 3, 2025
Агентство контекстной рекламы https://kontekst-dlya-prodazh.ru настройка Яндекс.Директ и Google Ads под ключ. Привлекаем клиентов, оптимизируем бюджеты, повышаем конверсии.
DavidPhich
July 2, 2025
Настоящее чудо в вазе!
купить розы в томске
BrianFax
July 2, 2025
enclomiphene testosterone: enclomiphene testosterone - enclomiphene price
RobertRab
July 2, 2025
skelaxin pharmacy: rx plus pharmacy glendale ny - clozapine pharmacy registry
Daniellom
July 2, 2025
RxFree Meds [url=https://rxfreemeds.com/#]mail pharmacy[/url] RxFree Meds
JamesJes
July 2, 2025
https://farmaciaasequible.com/# isdin spain
CharlesLinee
July 2, 2025
Сложный заказ выполнили быстро и качественно!
доставка цветов томск
BrianFax
July 2, 2025
Farmacia Asequible: Farmacia Asequible - farma 8
DavidTit
July 2, 2025
https://enclomiphenebestprice.com/# enclomiphene testosterone
RobertRab
July 2, 2025
enclomiphene online: enclomiphene testosterone - enclomiphene
Daniellom
July 2, 2025
Farmacia Asequible [url=https://farmaciaasequible.shop/#]sildenafilo 50 mg 8 comprimidos precio[/url] veterinario barato sevilla
JamesJes
July 2, 2025
http://enclomiphenebestprice.com/# enclomiphene testosterone
BrianFax
July 2, 2025
best online pharmacy accutane: RxFree Meds - Cefixime
RobertRab
July 2, 2025
ozempic prospecto: comprar todacitan - farmacia a domicilio cerca de mГ
Anthonymoogy
July 2, 2025
•очешь продать авто? telegram канал продажа авто
Frederic
July 2, 2025
https://wr8363.com/hfyotohiohajzgbridka/fchuu-list.html
What's up to every , since I am in fact keen of reading
this blog's post to be updated on a regular basis.
It consists of good data.
Daniellom
July 2, 2025
Farmacia Asequible [url=http://farmaciaasequible.com/#]Farmacia Asequible[/url] Farmacia Asequible
JamesJes
July 2, 2025
https://rxfreemeds.com/# RxFree Meds
DavidTit
July 2, 2025
http://rxfreemeds.com/# rx pharmacy card
BrianFax
July 2, 2025
relenza online pharmacy: RxFree Meds - RxFree Meds
RobertRab
July 2, 2025
pharmacy magazine warfarin: RxFree Meds - RxFree Meds
JamesJes
July 2, 2025
https://rxfreemeds.shop/# online pharmacy scams
Daniellom
July 2, 2025
Farmacia Asequible [url=https://farmaciaasequible.shop/#]farmacia productos[/url] Farmacia Asequible
EdwardZisee
July 2, 2025
Спасибо за шикарный букет на свадьбу!
купить розы в томске
OscarChelt
July 2, 2025
reputable mexican pharmacies online: mexican border pharmacies shipping to usa - TijuanaMeds
Williamcoido
July 1, 2025
Постоянная клиентка - всегда только восторг!
заказать цветы томск
Mudryakova
July 1, 2025
Хотите заказать [url=https://mudryakova.ru/services/]дизайн интерьера дома[/url]? На mudryakova.ru собрана команда специалистов, которые помогут создать гармоничное пространство в частном доме. Внимание к деталям, современный подход, индивидуальные решения и сопровождение до финальной сдачи — всё, чтобы ваш дом стал особенным.
Henrynok
July 1, 2025
LMC Middle School https://lmc896.org in Lower Manhattan provides a rigorous, student-centered education in a caring and inclusive atmosphere. Emphasis on critical thinking, collaboration, and community engagement.
Carma
July 1, 2025
https://l6x2n.mm3655.com
I do not know if it's just me or if everyone else encountering
problems with your site. It appears as though some of the written text in your posts are
running off the screen. Can someone else please provide feedback and let me know if this is happening to them too?
This might be a issue with my internet browser because I've had this happen before.
Many thanks
Margarita
July 1, 2025
https://ofqd.fu9921.com
Hi! Would you mind if I share your blog with my zynga group?
There's a lot of folks that I think would really appreciate your content.
Please let me know. Thank you
JosephBuh
July 1, 2025
п»їbest mexican online pharmacies: purple pharmacy mexico price list - best online pharmacies in mexico
Earnest
July 1, 2025
https://i.v71en.com
Magnificent goods from you, man. I have understand your stuff
previous to and you're just extremely wonderful. I really
like what you have acquired here, certainly like what you are saying and the
way in which you say it. You make it entertaining and you
still take care of to keep it smart. I can't wait to read much more from you.
This is really a tremendous website.
KennethDen
July 1, 2025
кредит под залог авто без подтверждения дохода
zaimpod-pts90.ru
кредит под залог птс грузового
DavidEloxy
July 1, 2025
https://indimedsdirect.shop/# IndiMeds Direct
NormanmeR
July 1, 2025
[url=https://shiba-akita.ru/]https://shiba-akita.ru/[/url] – разрешённые и запрещённые виды мака в РФ
Josephpaync
July 1, 2025
Почему слайм липнет к рукам https://e-pochemuchka.ru/pochemu-slajm-lipnet-k-rukam/
Jeanette
July 1, 2025
https://48948.aa7987.com
Great blog! Is your theme custom made or did you download it from
somewhere? A design like yours with a few simple
adjustements would really make my blog jump out.
Please let me know where you got your design. Thanks
a lot
Andrea
July 1, 2025
https://93361.wd5621.com
Informative article, just what I wanted to find.
HenryEffex
July 1, 2025
Greetings, fans of the absurd !
Joke for adults only – bold humor - http://jokesforadults.guru/# jokes for adults
May you enjoy incredible memorable laughs !
Kristeen
July 1, 2025
https://lo82.ww1826.com
I was wondering if you ever thought of changing the layout of your site?
Its very well written; I love what youve got to say.
But maybe you could a little more in the way of content so people could connect with it better.
Youve got an awful lot of text for only having one or 2 pictures.
Maybe you could space it out better?
Josepharile
July 1, 2025
¡Saludos, buscadores de tesoros escondidos !
Casino que regala bono de bienvenida gratis - http://bono.sindepositoespana.guru/ casinos con bono de bienvenida gratis
¡Que disfrutes de asombrosas botes sorprendentes!
DavidPhich
July 1, 2025
Точно в обещанное время!
купить пионы томск
kashpo napolnoe_kaMr
July 1, 2025
напольный высокий горшок для растений [url=www.kashpo-napolnoe-spb.ru]напольный высокий горшок для растений[/url] .
CharlesLinee
July 1, 2025
Букет стоит уже 10 дней и выглядит как новый!
заказ цветов томск с доставкой
Jamesepimb
July 1, 2025
IndiMeds Direct [url=https://indimedsdirect.shop/#]Online medicine order[/url] IndiMeds Direct
JosephBuh
July 1, 2025
indianpharmacy com: online pharmacy india - IndiMeds Direct
DavidEloxy
July 1, 2025
http://indimedsdirect.com/# п»їlegitimate online pharmacies india
Jamesepimb
June 30, 2025
mexican mail order pharmacies [url=https://tijuanameds.shop/#]mexican pharmaceuticals online[/url] TijuanaMeds
EdwardZisee
June 30, 2025
Букет – просто космос!
букет пионов
DavidEloxy
June 30, 2025
https://indimedsdirect.com/# IndiMeds Direct
JosephBuh
June 30, 2025
TijuanaMeds: mexico drug stores pharmacies - TijuanaMeds
Jamesepimb
June 30, 2025
indian pharmacies safe [url=https://indimedsdirect.shop/#]Online medicine order[/url] best online pharmacy india
Williamcoido
June 30, 2025
Быстро, красиво, надежно - три кита вашего сервиса!
цветы томск
OscarChelt
June 30, 2025
canadian drug prices: CanRx Direct - best mail order pharmacy canada
JosephBuh
June 30, 2025
reputable indian pharmacies: IndiMeds Direct - IndiMeds Direct
DavidPhich
June 30, 2025
Приятно сэкономила с акцией - спасибо!
розы купить в томске
Williamtoive
June 30, 2025
zovirax online pharmacy [url=http://pharmaconnectusa.com/#]Pharma Connect USA[/url] target pharmacy lexapro price
CharlesLinee
June 29, 2025
Настоящий шедевр флористического искусства!
букет пионов
Melvinnof
June 29, 2025
parapharmacie weleda: magasin orthopГ©die brest - nutri pur
EdwardMaymn
June 29, 2025
https://pharmaconnectusa.shop/# finasteride indian pharmacy
Melvinnof
June 29, 2025
MedicijnPunt: MedicijnPunt - frenadol kopen in nederland
Christom
June 29, 2025
https://pharmajetzt.shop/# versandapotheke ohne versandkosten
Williamtoive
June 29, 2025
PharmaJetzt [url=http://pharmajetzt.com/#]Pharma Jetzt[/url] Pharma Jetzt
RogelioAcind
June 29, 2025
New AI generator ai nsfw of the new generation: artificial intelligence turns text into stylish and realistic image and videos.
Albertovach
June 29, 2025
Medicijn Punt: apotheek kopen - medicatie online bestellen
EdwardMaymn
June 29, 2025
https://pharmajetzt.com/# apotheke online günstig bestellen
Melvinnof
June 29, 2025
online-apotheke testsieger: bad steben apotheke - online aphotheke
Albertovach
June 29, 2025
Medicijn Punt: medicine online - pharma online
Henryaspiz
June 29, 2025
¡Saludos, entusiastas de grandes logros !
Casino online sin licencia con recarga exprГ©s - п»їemausong.es casinos sin licencia en espana
¡Que disfrutes de increíbles jugadas impresionantes !
Francisdob
June 29, 2025
AI generator free nsfw ai of the new generation: artificial intelligence turns text into stylish and realistic pictures and videos.
Williamtoive
June 29, 2025
Medicijn Punt [url=https://medicijnpunt.com/#]Medicijn Punt[/url] medicijnen snel bestellen
Williamcoido
June 29, 2025
Такого разнообразия я нигде не видела - глаза разбегаются!
доставка цветов в томске
kashpo napolnoe_qcSt
June 29, 2025
кашпо напольное размеры [url=www.kashpo-napolnoe-msk.ru]кашпо напольное размеры[/url] .
kashpo napolnoe_bdSn
June 29, 2025
купить кашпо под цветы напольные [url=https://kashpo-napolnoe-msk.ru/]купить кашпо под цветы напольные[/url] .
Christom
June 29, 2025
https://medicijnpunt.shop/# MedicijnPunt
Melvinnof
June 29, 2025
pharmacy price of cialis: PharmaConnectUSA - lorazepam indian pharmacy
CharlesLinee
June 29, 2025
Упаковка настолько красивая, что жалко было разворачивать!
заказать цветы томск
Albertovach
June 29, 2025
avene pas cher: Pharma Confiance - Pharma Confiance
Williamtoive
June 28, 2025
Pharma Connect USA [url=http://pharmaconnectusa.com/#]buy viagra pharmacy uk[/url] Verapamil
EdwardMaymn
June 28, 2025
https://pharmaconnectusa.shop/# PharmaConnectUSA
Melvinnof
June 28, 2025
apotheke deutschland: tebonin 240 120 stГјck preisvergleich - PharmaJetzt
Albertovach
June 28, 2025
tijuana pharmacy cialis: PharmaConnectUSA - quit smoking
EdwardMaymn
June 28, 2025
https://pharmaconnectusa.com/# Pharma Connect USA
Melvinnof
June 28, 2025
grande pharmacie de rennes: Pharma Confiance - Pharma Confiance
Williamtoive
June 28, 2025
afbeelding medicijnen [url=https://medicijnpunt.com/#]med apotheek[/url] MedicijnPunt
Christom
June 28, 2025
http://pharmaconnectusa.com/# tijuana pharmacy cialis
Albertovach
June 28, 2025
Pharma Confiance: cialis avis - viasil pharmacie
Williamcoido
June 28, 2025
Помогли определиться в море вариантов - спасибо!
заказ цветов томск с доставкой
Melvinnof
June 28, 2025
Medicijn Punt: pharmacy nederlands - online apotheek gratis verzending
Matthewcig
June 28, 2025
¡Saludos, buscadores de fortuna escondida !
Casino sin licencia sin historial bancario - https://audio-factory.es/ casino online sin registro
¡Que disfrutes de asombrosas movidas excepcionales !
EdwardMaymn
June 28, 2025
http://pharmaconfiance.com/# pharmacie a proximité ouverte
psihiatr_naPt
June 28, 2025
психологические центры нижний новгород [url=www.psihiatry-nn-1.ru]www.psihiatry-nn-1.ru[/url] .
kashpo napolnoe_qsMi
June 28, 2025
большие высокие горшки для цветов [url=http://kashpo-napolnoe-spb.ru]http://kashpo-napolnoe-spb.ru[/url] .
Albertovach
June 28, 2025
Pharma Connect USA: best online pharmacy adipex - bangkok pharmacy kamagra
Williamtoive
June 28, 2025
PharmaConnectUSA [url=https://pharmaconnectusa.com/#]Pharma Connect USA[/url] singulair online pharmacy
Richardfap
June 28, 2025
¡Bienvenidos, exploradores de posibilidades !
Mejores-CasinosEspana.es bonos sin registro - http://mejores-casinosespana.es/ casinos sin licencia
¡Que experimentes maravillosas tiradas afortunadas !
Melvinnof
June 28, 2025
Pharma Confiance: ouate pharmacie - Pharma Confiance
CharlesLinee
June 28, 2025
Спасибо за позитив и невероятную красоту!
цветы
Albertovach
June 28, 2025
MedicijnPunt: online doktersrecept - MedicijnPunt
EdwardMaymn
June 27, 2025
https://pharmaconfiance.com/# Pharma Confiance
Christom
June 27, 2025
https://pharmaconfiance.com/# Pharma Confiance
Albertovach
June 27, 2025
PharmaJetzt: internetapotheke selbitz - PharmaJetzt
EdwardMaymn
June 27, 2025
http://medicijnpunt.com/# MedicijnPunt
Williamcoido
June 27, 2025
Лучшие цветы в городе - проверено временем!
букет невесты
kashpo napolnoe_lden
June 27, 2025
напольный горшок для цветов купить [url=http://www.kashpo-napolnoe-spb.ru]напольный горшок для цветов купить [/url] .
Albertovach
June 27, 2025
shopapothe: apotheken online - Pharma Jetzt
Melvinnof
June 27, 2025
online doktersrecept: MedicijnPunt - Medicijn Punt
Williamtoive
June 27, 2025
bahrain pharmacy cialis [url=http://pharmaconnectusa.com/#]mexican pharmacy azithromycin[/url] trimix online pharmacy
Christom
June 27, 2025
https://pharmajetzt.shop/# apotheke 24 stunden lieferung
CharlesLinee
June 27, 2025
Корпоративное мероприятие прошло на ура благодаря вам!
заказ цветов томск
Albertovach
June 27, 2025
ketoconazole creme posologie: tapis absorbant chat - Pharma Confiance
Williamtoive
June 26, 2025
parapharmacir [url=https://pharmaconfiance.shop/#]la crГЁme libre point de vente[/url] orlistat pharmacie
Albertovach
June 26, 2025
Medicijn Punt: apotheek recept - Medicijn Punt
Melvinnof
June 26, 2025
best pharmacy prices cialis: Ventolin - PharmaConnectUSA
EdwardMaymn
June 26, 2025
https://medicijnpunt.com/# MedicijnPunt
Russellpseug
June 26, 2025
металлические значки москва металлический значок пин
Christom
June 26, 2025
https://pharmaconnectusa.com/# Pharma Connect USA
Williamcoido
June 26, 2025
Внимание к деталям - признак истинных мастеров!
доставка цветов
Albertovach
June 26, 2025
Pharma Confiance: allergie ongle gel - Pharma Confiance
Williamtoive
June 26, 2025
Pharma Confiance [url=http://pharmaconfiance.com/#]tadalafil 10mg prix en pharmacie[/url] Pharma Confiance
EdwardMaymn
June 26, 2025
http://pharmajetzt.com/# PharmaJetzt
Albertovach
June 26, 2025
PharmaJetzt: PharmaJetzt - Pharma Jetzt
kashpo napolnoe_nxSa
June 26, 2025
кашпо напольное размеры [url=www.kashpo-napolnoe-spb.ru/]www.kashpo-napolnoe-spb.ru/[/url] .
Melvinnof
June 26, 2025
Medicijn Punt: apotheek medicijnen - MedicijnPunt
CharlesLinee
June 26, 2025
Лучшие цветы в городе - проверено многолетним опытом!
букет пионов
kashpo napolnoe_cbkt
June 26, 2025
напольные кашпо для цветов купить интернет [url=https://www.kashpo-napolnoe-spb.ru]https://www.kashpo-napolnoe-spb.ru[/url] .
EdwardMaymn
June 26, 2025
https://pharmaconfiance.shop/# Pharma Confiance
Williamtoive
June 26, 2025
PharmaConnectUSA [url=http://pharmaconnectusa.com/#]Pharma Connect USA[/url] PharmaConnectUSA
JesusGlawl
June 26, 2025
металлические значки на заказ металлические значки на заказ
AnthonyErerb
June 26, 2025
типография печать типография печать
Leroyrow
June 26, 2025
типографии спб недорого печать спб типография
Christom
June 26, 2025
https://pharmaconnectusa.shop/# bitcoin pharmacy online
Melvinnof
June 26, 2025
Pharma Connect USA: dexamethasone online pharmacy - PharmaConnectUSA
Albertovach
June 26, 2025
pharmacie la plus proche de chez moi: location materiel medical autour de moi - Pharma Confiance
EdwardMaymn
June 25, 2025
https://medicijnpunt.shop/# medicatie online
Williamtoive
June 25, 2025
Pharma Connect USA [url=https://pharmaconnectusa.com/#]losartan pharmacy[/url] pharmacy global rx review
Albertovach
June 25, 2025
viagra comprimГ©: Pharma Confiance - numero pharmacie
Williamcoido
June 25, 2025
Цветы пришли в безупречном состоянии - ни единого изъяна!
101 роза
Davidchuch
June 25, 2025
нужен сайт адвоката задать вопрос адвокату бесплатно по телефону
EdwardMaymn
June 25, 2025
https://pharmaconnectusa.com/# Pharma Connect USA
Williamtoive
June 25, 2025
apotheke im internet [url=https://pharmajetzt.shop/#]PharmaJetzt[/url] Pharma Jetzt
Melvinnof
June 25, 2025
Pharma Confiance: monuril ordonnance ou pas - filorga paris
Christom
June 25, 2025
http://medicijnpunt.com/# MedicijnPunt
Albertovach
June 25, 2025
MedicijnPunt: MedicijnPunt - medicijnen kopen online
EdwardMaymn
June 25, 2025
http://pharmaconfiance.com/# porte douche 60 cm
RickyWat
June 25, 2025
¡Hola, aventureros de sensaciones !
Casinosinlicenciaespana.xyz con juegos exclusivos - http://casinosinlicenciaespana.xyz/# casino sin licencia espaГ±a
¡Que vivas increíbles giros exitosos !
Gluconite Official Website
June 25, 2025
Gluconite is a unique formula designed to promote healthy blood sugar levels while you enjoy restorative sleep. Buy Now:- https://gluconitee.com/
Williamtoive
June 25, 2025
MedicijnPunt [url=https://medicijnpunt.shop/#]internetapotheek spanje[/url] medicijn online bestellen
Melvinnof
June 25, 2025
Pharma Confiance: Pharma Confiance - Pharma Confiance
RonaldJoymn
June 25, 2025
Hello guardians of breathable serenity!
Best Air Purifier for Smokers – For Bedrooms - https://bestairpurifierforcigarettesmoke.guru/# air purifier for smoke
May you experience remarkable invigorating spaces !
EdwardMaymn
June 25, 2025
http://pharmaconfiance.com/# Pharma Confiance
Williamtoive
June 25, 2025
PharmaJetzt [url=https://pharmajetzt.shop/#]online apoteke[/url] PharmaJetzt
Melvinnof
June 25, 2025
MedicijnPunt: MedicijnPunt - Medicijn Punt
Christom
June 25, 2025
http://pharmaconnectusa.com/# target pharmacy nexium
EdwardMaymn
June 24, 2025
https://pharmaconnectusa.shop/# imiquimod uk pharmacy
Williamcoido
June 24, 2025
Доставили в область - все в идеальном состоянии.
букет пионов
JessieBoose
June 24, 2025
пансионат для пожилых стоимость частный пансионат для пожилых
narkologiya
June 24, 2025
наркологическая клиника цены телефон наркологии
Williamtoive
June 24, 2025
PharmaJetzt [url=http://pharmajetzt.com/#]Pharma Jetzt[/url] PharmaJetzt
Melvinnof
June 24, 2025
PharmaJetzt: apptheke online - Pharma Jetzt
Albertovach
June 24, 2025
online apotheke kostenloser versand: onlineapotheke - PharmaJetzt
EdwardMaymn
June 24, 2025
https://pharmaconnectusa.shop/# Pharma Connect USA
CharlesLinee
June 24, 2025
Точно в обещанное время - ценим пунктуальность!
доставка цветов
Williamtoive
June 24, 2025
verzorgingsproducten apotheek [url=https://medicijnpunt.com/#]medicaties[/url] Medicijn Punt
Derunelug
June 24, 2025
В Google искал «где заказать алкоголь быстро в Москве». Первая ссылка — https://cse.google.com.sv/url?q=https://alcoclub25.ru/ . Перешёл, сделал заказ — всё максимально просто. Доставили за 55 минут, без заминок. Бутылка пришла в идеальном виде, оригинал, акциз на месте. Сервис оказался даже лучше, чем ожидал.
Melvinnof
June 24, 2025
Pharma Confiance: Pharma Confiance - livraison mГ©dicament paris
EdwardMaymn
June 24, 2025
http://pharmaconnectusa.com/# rite aid pharmacy
Albertovach
June 24, 2025
Pharma Confiance: combien peut on prendre de ketoprofene par jour - sildГ©nafil 100 mg prix en pharmacie en france
Christom
June 24, 2025
https://pharmaconfiance.com/# Pharma Confiance
EdwardZisee
June 24, 2025
Розы как с картинки – свежие и крупные!
купить розы в томске
Williamtoive
June 24, 2025
Medicijn Punt [url=https://medicijnpunt.com/#]Medicijn Punt[/url] Medicijn Punt
Melvinnof
June 24, 2025
apotheke online shop: PharmaJetzt - Pharma Jetzt
EdwardMaymn
June 24, 2025
https://pharmajetzt.shop/# Pharma Jetzt
Albertovach
June 24, 2025
distributeur savon douche: pharmacie du grand m montpellier - tadalafil 20 mg forum
Williamcoido
June 24, 2025
Все коллеги завидовали - такой красоты у них не было!
розы томск
Williamtoive
June 24, 2025
MedicijnPunt [url=https://medicijnpunt.shop/#]medicijnen bestellen apotheek[/url] snel medicijnen bestellen
EdwardMaymn
June 24, 2025
https://medicijnpunt.shop/# farmacia online
Albertovach
June 23, 2025
de online apotheek: holandia apteka internetowa - online apotheek zonder recept ervaringen
Christom
June 23, 2025
http://pharmaconfiance.com/# sildГ©nafil (50 mg boГ®te de 24) prix
Williamtoive
June 23, 2025
Pharma Jetzt [url=https://pharmajetzt.com/#]Pharma Jetzt[/url] apotheke germany
Melvinnof
June 23, 2025
PharmaJetzt: online medicine - apotheke gГјnstig
EdwardMaymn
June 23, 2025
https://pharmaconfiance.com/# Pharma Confiance
Albertovach
June 23, 2025
Medicijn Punt: apotheek online nederland - Medicijn Punt
JeremyBroag
June 23, 2025
Школа Саморазвития https://bznaniy.ru онлайн-база знаний для тех, кто хочет понять себя, улучшить мышление, прокачать навыки и выйти на новый уровень жизни.
StephenKak
June 23, 2025
Лучшие онлайн-курсы https://topkursi.ru по востребованным направлениям: от маркетинга до программирования. Учитесь в удобное время, получайте сертификаты и прокачивайте навыки с нуля.
Melvinnof
June 23, 2025
PharmaConnectUSA: PharmaConnectUSA - PharmaConnectUSA
EdwardZisee
June 23, 2025
Спасибо за красоту и оперативность!
доставка цветов томск
EdwardMaymn
June 23, 2025
https://pharmaconfiance.shop/# Pharma Confiance
Josephcywot
June 23, 2025
¡Saludos, apostadores habilidosos !
Casino online extranjero con juegos de proveedores top - https://www.casinoextranjerosdeespana.es/ п»їcasinos online extranjeros
¡Que experimentes maravillosas movidas impresionantes !
Albertovach
June 23, 2025
mebendazole boots pharmacy: PharmaConnectUSA - online animal pharmacy
Christom
June 23, 2025
https://pharmaconnectusa.com/# PharmaConnectUSA
Melvinnof
June 23, 2025
Pharma Connect USA: PharmaConnectUSA - Pharma Connect USA
EdwardMaymn
June 23, 2025
http://medicijnpunt.com/# MedicijnPunt
Williamtoive
June 23, 2025
pharmacie gael [url=https://pharmaconfiance.com/#]pharmacy discount[/url] Pharma Confiance
Williamcoido
June 23, 2025
Букет - космическая красота!
цветы
Calvinbeilt
June 23, 2025
¡Bienvenidos, exploradores de oportunidades !
Casino online fuera de EspaГ±a sin documentaciГіn - https://casinofueraespanol.xyz/# casino online fuera de espaГ±a
¡Que vivas increíbles logros extraordinarios !
Enochtix
June 23, 2025
Косметологические курсы обучение плазмолифтингу обучение с нуля, теоретическая база и отработка на моделях. Современные методики, лицензия, выдача сертификатов. Старт карьеры в бьюти-индустрии!
Denveriroxy
June 23, 2025
услуга seo продвижение сео компания
Albertovach
June 23, 2025
Medicijn Punt: MedicijnPunt - apotgeek
Melvinnof
June 23, 2025
shop-apotheke online: gГјnstigste versandapotheke - online apoteke
Charlesblome
June 23, 2025
яндекс директ цены контекстная реклама цена москва
Williamtoive
June 23, 2025
Medicijn Punt [url=https://medicijnpunt.com/#]medicijn recept[/url] apteka internetowa nl
JimmieAlicy
June 23, 2025
стоимость показа рекламы продвижение сайта в яндекс директ цена
Albertovach
June 22, 2025
monuril comprimГ©: acheter ghb en ligne - pharmacie bain de bretagne
Melvinnof
June 22, 2025
crГЁme anti-tache caudalie avis: pharmacie de g - pharmacie officine
Williamtoive
June 22, 2025
viagra pommade sans ordonnance [url=https://pharmaconfiance.com/#]gummies en pharmacie[/url] ketoprofene sun 100 mg
Christom
June 22, 2025
http://pharmaconnectusa.com/# PharmaConnectUSA
EdwardZisee
June 22, 2025
Цветы – свежие, упаковка – стильная!
купить пионы томск
Albertovach
June 22, 2025
bad apotheke online: sjop apotheke - shop apptheke
EdwardMaymn
June 22, 2025
https://pharmaconnectusa.shop/# PharmaConnectUSA
EdwinLor
June 22, 2025
Improve your indoor air quality in Dubai with reliable AC duct cleaning done by certified technicians: ac deep cleaning charges
Melvinnof
June 22, 2025
Medicijn Punt: medicijn online - medicijnen bestellen bij apotheek
Williamtoive
June 22, 2025
PharmaConnectUSA [url=https://pharmaconnectusa.shop/#]PharmaConnectUSA[/url] pharmacy direct viagra
JamesDew
June 22, 2025
¡Hola, fanáticos de la suerte !
Casino online extranjero con juegos de NetEnt y mГЎs - п»їhttps://casinosextranjerosdeespana.es/ casinos extranjeros
¡Que vivas increíbles jackpots sorprendentes!
EdwardMaymn
June 22, 2025
http://pharmajetzt.com/# PharmaJetzt
Albertovach
June 22, 2025
europa apotheek venlo online: PharmaJetzt - luitpold apotheke berlin
Williamcoido
June 22, 2025
Доставили несмотря на ураган - настоящие герои!
доставка цветов томск на дом
Melvinnof
June 22, 2025
Pharma Connect USA: sumatriptan uk pharmacy - Pharma Connect USA
Williamtoive
June 22, 2025
apotheke venlo [url=http://pharmajetzt.com/#]PharmaJetzt[/url] onlineapotheken
Albertovach
June 22, 2025
apotheke gГјnstig online: Pharma Jetzt - Pharma Jetzt
EdwinLor
June 22, 2025
Extend the life of your HVAC system with professional AC duct cleaning in Dubai https://ac-cleaning-dubai.ae/
Melvinnof
June 22, 2025
shopa: online apothek - PharmaJetzt
Williamtoive
June 22, 2025
medikamente kaufen [url=http://pharmajetzt.com/#]PharmaJetzt[/url] medikamente apotheke
EdwardMaymn
June 21, 2025
https://pharmaconnectusa.com/# Pharma Connect USA
Albertovach
June 21, 2025
MedicijnPunt: apotheker online - dutch apotheek
Melvinnof
June 21, 2025
online medikamente bestellen: PharmaJetzt - apptheke online
Waynepax
June 21, 2025
займ онлайн без карты zajmy-onlajn
Raymondoralf
June 21, 2025
отчет по производственной практике купить отчет по практике заказать стоимость
DanielDrimi
June 21, 2025
дипломная работа купить дипломы на заказ
GrantMex
June 21, 2025
домашние контрольные работы контрольная работа по высшей математике
Williamtoive
June 21, 2025
Pharma Jetzt [url=https://pharmajetzt.com/#]apotheke versandkostenfrei ab 10 euro[/url] Pharma Jetzt
EdwardMaymn
June 21, 2025
http://pharmaconfiance.com/# Pharma Confiance
Christom
June 21, 2025
https://pharmaconfiance.shop/# acheter tadalafil 20 mg
Melvinnof
June 21, 2025
hydroxyzine liquid pharmacy: world pharmacy viagra - PharmaConnectUSA
Albertovach
June 21, 2025
Pharma Connect USA: online pharmacy to buy viagra - mexican pharmacy lexapro
Williamtoive
June 21, 2025
Medicijn Punt [url=https://medicijnpunt.com/#]medicijnen zonder recept[/url] Medicijn Punt
EdwardMaymn
June 21, 2025
https://pharmajetzt.shop/# apotal versandapotheke online
zaimi bez otkaza_iesr
June 21, 2025
займы без отказа с плохой [url=www.zajm-bez-otkaza-1.ru]www.zajm-bez-otkaza-1.ru[/url] .
krediti bez otkaza_ubpl
June 21, 2025
банк кредит без отказа [url=https://www.kredit-bez-otkaza-1.ru]банк кредит без отказа[/url] .
Melvinnof
June 21, 2025
medicatie aanvragen: MedicijnPunt - MedicijnPunt
Albertovach
June 21, 2025
gdc boutique avis: kamagra pharmacie en ligne - fleur de bach 45 avis
Williamcoido
June 21, 2025
Муж растрогался до слез - сказал, что это самый душевный подарок!
букет невесты
EdwinLor
June 21, 2025
We offer same-day AC duct cleaning in Dubai with guaranteed satisfaction: aircon cleaning service price
Christom
June 21, 2025
https://medicijnpunt.com/# MedicijnPunt
Waynepax
June 21, 2025
микрозаем без процентов zajmy onlajn
EdwardMaymn
June 21, 2025
https://medicijnpunt.shop/# MedicijnPunt
Williamtoive
June 21, 2025
Pharma Confiance [url=http://pharmaconfiance.com/#]laboratoire de garde strasbourg[/url] Pharma Confiance
Melvinnof
June 21, 2025
pharma apotheek: Medicijn Punt - Medicijn Punt
Davidacerb
June 21, 2025
контрольная работа статистика помощь на контрольной онлайн
Richardjah
June 21, 2025
¡Saludos, exploradores de recompensas !
casino fuera de EspaГ±a para usuarios verificados - https://casinosonlinefueraespanol.xyz/# casinos fuera de espaГ±a
¡Que disfrutes de movidas extraordinarias !
Thomaslon
June 21, 2025
Заказала коллегам на 8 Марта – все остались в восторге!
заказ цветов томск с доставкой
EdwardMaymn
June 21, 2025
https://pharmajetzt.shop/# apothecke
Williamtoive
June 21, 2025
apotheke versand [url=https://pharmajetzt.com/#]versandapotheke kostenloser versand[/url] PharmaJetzt
Melvinnof
June 21, 2025
Pharma Jetzt: online apotheke schnelle lieferung - PharmaJetzt
EverettCoarf
June 21, 2025
сколько стоит реферат https://referatymehanika.ru
Christom
June 21, 2025
https://pharmaconnectusa.com/# cheap erectile dysfunction pills online
HomerRaw
June 21, 2025
помощь с отчетом по практике отчет по производственной практике купить
EdwardMaymn
June 20, 2025
https://pharmaconfiance.com/# Pharma Confiance
JaredPoope
June 20, 2025
дипломы на заказ сайты для написания диплома
HenryBiT
June 20, 2025
https://raskapotek.com/# tannregulering strikk apotek
Waynepax
June 20, 2025
микрозайм без процентов zajmy-onlajn.ru
ClintonLot
June 20, 2025
farmacosmo online shop: spray per ombelico neonato - EFarmaciaIt
Josephkam
June 20, 2025
farmaia [url=http://papafarma.com/#]Papa Farma[/url] Papa Farma
WilliamEmors
June 20, 2025
salg apotek: Rask Apotek - menskopp apotek
HenryBiT
June 20, 2025
http://svenskapharma.com/# schengenintyg apotek
Williamcoido
June 20, 2025
Мамин юбилей запомнится всем благодаря вам!
букеты томск
RobertDox
June 20, 2025
https://efarmaciait.shop/# EFarmaciaIt
Coreyberse
June 20, 2025
Этот увлекательный информационный материал подарит вам массу новых знаний и ярких эмоций. Мы собрали для вас интересные факты и сведения, которые обогатят ваш опыт. Откройте для себя увлекательный мир информации и насладитесь процессом изучения!
Подробнее можно узнать тут - https://nakroklinikatest.ru/
Mikrozaeexime
June 20, 2025
Надо срочно занять, но страшно попасть в ловушку? На https://mfo-zaim.com/ только те МФО, которые работают честно. Максимальная ставка — 0.8% в день, без дополнительных комиссий. Вся информация открыта. Это реально безопасный способ взять микрокредит, если финансы подводят.
Wayneciz
June 20, 2025
¡Bienvenidos, entusiastas del azar !
Casino fuera de EspaГ±a con promociones recurrentes - https://www.casinoporfuera.guru/# casino online fuera de espaГ±a
¡Que disfrutes de maravillosas botes impresionantes!
Josephkam
June 20, 2025
EFarmaciaIt [url=https://efarmaciait.com/#]flubason prezzo farmacia[/url] efacti crema 10 mg
HenryBiT
June 20, 2025
http://efarmaciait.com/# shop farmacia online
WilliamEmors
June 20, 2025
kan katter Г¤ta pasta: Svenska Pharma - hemorrojd hund
Thomaslon
June 20, 2025
Букет – просто бомба! Все в восторге!
101 роза
ClintonLot
June 20, 2025
samyr 200 serve ricetta: crema pliaglis prezzo - compresse medicinali
JoshuaHap
June 20, 2025
защитный кейс тотем https://plastcase.ru
JaredPoope
June 20, 2025
написание дипломной работы диплом срочно
EverettCoarf
June 20, 2025
реферат купить онлайн https://referatymehanika.ru
HomerRaw
June 20, 2025
отчет по практике на заказ купить отчет по преддипломной практике
HenryBiT
June 20, 2025
https://papafarma.com/# farmacia europea opiniones
Josephkam
June 20, 2025
farmacias en venta sevilla [url=http://papafarma.com/#]prospecto pildora dia despues[/url] parapharmacia
WilliamEmors
June 20, 2025
EFarmaciaIt: doctor point recensioni - EFarmaciaIt
ClintonLot
June 20, 2025
Svenska Pharma: yoga tillbehör rea - Svenska Pharma
Alfonsodrurl
June 20, 2025
¡Hola, fanáticos del riesgo !
Ranking de casinos online extranjeros por fiabilidad - https://www.casinoextranjero.es/# casinoextranjero.es
¡Que vivas logros excepcionales !
RobertDox
June 20, 2025
https://efarmaciait.shop/# EFarmaciaIt
HenryBiT
June 19, 2025
http://raskapotek.com/# ryggstøtte apotek
Josephkam
June 19, 2025
Svenska Pharma [url=http://svenskapharma.com/#]sprutor apotek[/url] hur mycket Г¤r 10 ml
WilliamEmors
June 19, 2025
tadalafil 20 mg precio: farmacia abiertas - Papa Farma
ClintonLot
June 19, 2025
comprar viagra online: comprar en farmacia - Papa Farma
JoshuaHap
June 19, 2025
защитный кейс большой https://plastcase.ru
HenryBiT
June 19, 2025
https://papafarma.shop/# farmacia ofertas
Williamcoido
June 19, 2025
Самые свежие розы в городе - проверено!
101 роза
Josephkam
June 19, 2025
Rask Apotek [url=http://raskapotek.com/#]koronavaksine apotek[/url] svenska apotek
WilliamEmors
June 19, 2025
henna hГҐrfarge apotek: Rask Apotek - Rask Apotek
ClintonLot
June 19, 2025
EFarmaciaIt: EFarmaciaIt - EFarmaciaIt
RobertDox
June 19, 2025
http://papafarma.com/# Papa Farma
HenryBiT
June 19, 2025
https://svenskapharma.shop/# baby apotek
Thomaslon
June 19, 2025
Быстрая доставка и отзывчивые менеджеры.
купить розы в томске
Joint Genesis
June 19, 2025
Joint Genesis is a scientifically formulated dietary supplement designed to enhance joint health and mobility. https://jointginesis.com/
The Self-Sufficient Backyard
June 19, 2025
With The Self-Sufficient Backyard, you can achieve true self-reliance on just ¼ acre of land. buy https://selfsufficientbackyards.com/
Glucoberry
June 19, 2025
GlucoBerry is an innovative dietary supplement designed to help manage healthy blood sugar levels. https://en-glucoberrry.com/
EdwardZisee
June 19, 2025
Заказываю только у вас – всегда супер!
доставка цветов в томске
Josephkam
June 19, 2025
desamix effe a cosa serve [url=https://efarmaciait.com/#]lista farmaci svizzera senza ricetta[/url] permixon composizione
WilliamEmors
June 19, 2025
le fiale di voltaren si possono bere: fripass 100 mg prezzo - EFarmaciaIt
SadamkiJum
June 19, 2025
Отдых в Сочи — это не только море и солнце, но и страстные ночи с проверенными индивидуалками. На sosochki2.com собраны самые яркие девушки, готовые сделать твой отдых незабываемым. Жаркий секс, комфорт и полная приватность — всё, что нужно для настоящего кайфа! Заходи, выбирай [url=https://sosochki2.com/]проститутки сочи на выезд[/url] .
ClintonLot
June 19, 2025
lanolin apotek: Rask Apotek - Rask Apotek
HenryBiT
June 19, 2025
https://efarmaciait.com/# augmentin bustine adulti
Josephkam
June 19, 2025
Rask Apotek [url=http://raskapotek.com/#]Rask Apotek[/url] Rask Apotek
WilliamEmors
June 19, 2025
Papa Farma: farma dos - dietГ©tica central telГ©fono gratuito
HenryBiT
June 18, 2025
https://papafarma.shop/# farmacia. cerca de mi
ClintonLot
June 18, 2025
Papa Farma: Papa Farma - Papa Farma
RobertDox
June 18, 2025
https://raskapotek.shop/# apitek
WilliamEmors
June 18, 2025
EFarmaciaIt: EFarmaciaIt - augmentin in gravidanza forum
Josephkam
June 18, 2025
gliatilin 600 mg flaconcini a cosa serve [url=http://efarmaciait.com/#]EFarmaciaIt[/url] bentelan e ibuprofene
HenryBiT
June 18, 2025
https://svenskapharma.shop/# Svenska Pharma
WilliamEmors
June 18, 2025
EFarmaciaIt: farmaciaz - EFarmaciaIt
Josephkam
June 18, 2025
tadalafilo prospecto [url=https://papafarma.shop/#]Papa Farma[/url] mycostatin sin receta
HenryBiT
June 18, 2025
https://raskapotek.shop/# apotek termometer
RobertDox
June 18, 2025
https://svenskapharma.com/# Svenska Pharma
Mariotum
June 18, 2025
¡Saludos, aventureros del riesgo !
casino online extranjero con retiros automГЎticos - https://www.casinosextranjero.es/# casino online extranjero
¡Que vivas increíbles instantes inolvidables !
ClintonLot
June 18, 2025
Svenska Pharma: Svenska Pharma - Svenska Pharma
WilliamEmors
June 18, 2025
Svenska Pharma: recept pГҐ apotek - apotek stan
Josephkam
June 18, 2025
cialis 5 mg precio [url=https://papafarma.com/#]Papa Farma[/url] Papa Farma
HenryBiT
June 18, 2025
https://svenskapharma.com/# Svenska Pharma
ClintonLot
June 18, 2025
EFarmaciaIt: super farmacia online - condral 800 opinioni
WilliamEmors
June 18, 2025
apotek pГҐ nett gratis frakt: narkotest urin apotek - Rask Apotek
RobertDox
June 18, 2025
https://svenskapharma.com/# Svenska Pharma
HenryBiT
June 18, 2025
http://svenskapharma.com/# Svenska Pharma
Josephkam
June 18, 2025
after apotek [url=https://raskapotek.com/#]kreatin apotek[/url] burn gel apotek
Safepestsol*-
June 18, 2025
Cockroaches play a vital role in ecosystems by acting as scavengers, breaking down organic matter and recycling nutrients. They help decompose dead plants and animals, contributing to soil health and providing food for other animals in the food chain.
Visit:
https://safepestsol.com/what-is-the-purpose-of-cockroaches/
ClintonLot
June 18, 2025
diabetes test apotek: jernbane apotek - klorhexidin apotek
PeterBluct
June 18, 2025
¡Saludos, aficionados a los desafíos!
Tutorial para entrar en casinos online extranjeros paso a paso - https://www.casinoextranjerosenespana.es/# casinos extranjeros
¡Que disfrutes de giros espectaculares !
WilliamEmors
June 18, 2025
EFarmaciaIt: artrosilene schiuma a cosa serve - immagini viso donna da scaricare
HenryBiT
June 18, 2025
http://svenskapharma.com/# Svenska Pharma
Douglasjup
June 17, 2025
¡Hola, fanáticos del riesgo !
Casino fuera de EspaГ±a con variedad de juegos - п»їп»їhttps://casinoonlinefueradeespanol.xyz/ casino online fuera de espaГ±a
¡Que disfrutes de asombrosas momentos memorables !
RobertKip
June 17, 2025
canadian pharmacy phone number: Canada Pharm Global - canadian drugs
Micheldam
June 17, 2025
ordering drugs from canada: Canada Pharm Global - my canadian pharmacy reviews
RobertHes
June 17, 2025
http://medsfrommexico.com/# medication from mexico pharmacy
Jamesteemn
June 17, 2025
https://canadapharmglobal.shop/# canadian pharmacy 24
SamuelBistE
June 17, 2025
indian pharmacy paypal [url=https://indiapharmglobal.com/#]India Pharm Global[/url] India Pharm Global
Mforaelruini
June 17, 2025
Если вы как и я когда-то, одна с проблемами и кредитами — не сдавайтесь. Мне помог сайт https://mfo-zaim.com/zaim-bez-procentov-na-kartu/ , где финансовый аналитик Андрей Фролов делится советами. Благодаря ему я оформила займ быстро, без отказа и с минимальной ставкой. Всё реально.
RobertKip
June 17, 2025
pharmacies in mexico that ship to usa: mexico pharmacies prescription drugs - Meds From Mexico
Micheldam
June 17, 2025
India Pharm Global: India Pharm Global - best online pharmacy india
RobertHes
June 17, 2025
https://canadapharmglobal.com/# global pharmacy canada
SamuelBistE
June 17, 2025
Meds From Mexico [url=http://medsfrommexico.com/#]Meds From Mexico[/url] Meds From Mexico
RobertHes
June 17, 2025
http://indiapharmglobal.com/# online pharmacy india
RobertKip
June 17, 2025
Meds From Mexico: mexico pharmacies prescription drugs - Meds From Mexico
Micheldam
June 17, 2025
onlinepharmaciescanada com: Canada Pharm Global - the canadian pharmacy
RichardPum
June 17, 2025
¡Hola, buscadores de fortuna !
Casinos sin licencia con cashback garantizado - http://www.casinossinlicenciaespana.es/ casino online sin licencia
¡Que experimentes victorias legendarias !
RichardJer
June 17, 2025
¡Saludos, descubridores de oportunidades !
Mejores casinos online extranjeros sin verificaciГіn larga - п»їhttps://casinosextranjerosenespana.es/ mejores casinos online extranjeros
¡Que vivas increíbles jackpots extraordinarios!
RobertHes
June 17, 2025
https://indiapharmglobal.shop/# India Pharm Global
Micheldam
June 17, 2025
canadian pharmacy online: best canadian pharmacy - vipps canadian pharmacy
RobertKip
June 17, 2025
Meds From Mexico: mexican border pharmacies shipping to usa - mexico drug stores pharmacies
SamuelBistE
June 16, 2025
India Pharm Global [url=https://indiapharmglobal.com/#]India Pharm Global[/url] India Pharm Global
Micheldam
June 16, 2025
canadapharmacyonline legit: canadian pharmacy scam - online canadian drugstore
Thomaslon
June 16, 2025
Спасибо за вежливое обслуживание!
доставка цветов томск
Jamesteemn
June 16, 2025
https://indiapharmglobal.shop/# indianpharmacy com
SamuelBistE
June 16, 2025
Meds From Mexico [url=https://medsfrommexico.shop/#]Meds From Mexico[/url] Meds From Mexico
RobertHes
June 16, 2025
http://indiapharmglobal.com/# indianpharmacy com
Micheldam
June 16, 2025
buying from online mexican pharmacy: mexican pharmaceuticals online - buying prescription drugs in mexico online
RobertKip
June 16, 2025
online canadian pharmacy reviews: escrow pharmacy canada - canadian pharmacy service
SamuelBistE
June 16, 2025
pharmacy com canada [url=http://canadapharmglobal.com/#]canadian pharmacies online[/url] canada discount pharmacy
RobertHes
June 16, 2025
http://indiapharmglobal.com/# mail order pharmacy india
Micheldam
June 16, 2025
canadian family pharmacy: Canada Pharm Global - online canadian pharmacy review
Jamesteemn
June 16, 2025
https://canadapharmglobal.shop/# canadian pharmacy 24 com
RobertKip
June 16, 2025
Online medicine order: mail order pharmacy india - top online pharmacy india
SamuelBistE
June 16, 2025
Meds From Mexico [url=https://medsfrommexico.shop/#]mexican online pharmacies prescription drugs[/url] mexican mail order pharmacies
RobertHes
June 16, 2025
https://medsfrommexico.com/# Meds From Mexico
CharlesLinee
June 16, 2025
Настоящее чудо в вазе - спасибо за волшебство!
доставка цветов
zaymy-onlayn
June 16, 2025
мгновенный займ онлайн займы онлайн на карту по паспорту
RobertKip
June 16, 2025
canadian compounding pharmacy: certified canadian pharmacy - prescription drugs canada buy online
RobertHes
June 16, 2025
http://medsfrommexico.com/# Meds From Mexico
SamuelBistE
June 16, 2025
п»їbest mexican online pharmacies [url=https://medsfrommexico.com/#]Meds From Mexico[/url] Meds From Mexico
Micheldam
June 16, 2025
canadian pharmacy ratings: Canada Pharm Global - canada drugs reviews
PatrickPoono
June 15, 2025
https://semaglupharm.shop/# Safe delivery in the US
StephenKen
June 15, 2025
Защитные кейсы plastcase.ru/ в Санкт-Петербурге — надежная защита оборудования от влаги, пыли и ударов. Большой выбор размеров и форматов, ударопрочные материалы, индивидуальный подбор.
AlbertoLer
June 15, 2025
Lipi Pharm [url=https://lipipharm.shop/#]atorvastatinжњЌз”Ёж™‚й–“[/url] Generic Lipitor fast delivery
Alfonsoineno
June 15, 2025
Predni Pharm: Predni Pharm - prednisone 60 mg price
zaymy-onlayn
June 15, 2025
кредитные займы онлайн взять займы онлайн без проверок
Carloswaync
June 15, 2025
вавада казино официальный сайт Вавада Казино Официальный Сайт Рабочее Зеркало на Сегодня: Не упустите возможность играть в Вавада Казино, используя рабочее зеркало официального сайта, доступное на сегодня.
AlbertoLer
June 15, 2025
PredniPharm [url=http://prednipharm.com/#]prednisone 0.5 mg[/url] prednisone 10
Alfonsoineno
June 15, 2025
Lipi Pharm: USA-based pharmacy Lipitor delivery - simvastatin to atorvastatin conversion
Ronaldteets
June 15, 2025
Бездепозитный бонус в казино
JamesVew
June 15, 2025
https://semaglupharm.shop/# does medicare cover semaglutide for weight loss
PatrickPoono
June 15, 2025
https://semaglupharm.shop/# semaglutide diarrhea treatment
AlbertoLer
June 15, 2025
where can i buy rybelsus [url=http://semaglupharm.com/#]rybelsus stock[/url] Semaglu Pharm
Alfonsoineno
June 15, 2025
buy prednisone online without a script: Predni Pharm - prednisone 10 mg tablet
Carloswaync
June 15, 2025
Sykaaa casino официальный сайт вход Сукааа казино официальный сайт скачать на андроид мобильная версия бесплатно позволяет играть в любимые игры прямо на своем смартфоне или планшете.
PatrickPoono
June 15, 2025
https://semaglupharm.com/# Rybelsus for blood sugar control
BillyStand
June 15, 2025
Lipi Pharm: п»їBuy Lipitor without prescription USA - USA-based pharmacy Lipitor delivery
AlbertoLer
June 15, 2025
prednisone cost us [url=https://prednipharm.com/#]prednisone brand name in usa[/url] buy 40 mg prednisone
Alfonsoineno
June 15, 2025
prednisone 5084: Predni Pharm - PredniPharm
PatrickPoono
June 14, 2025
https://semaglupharm.com/# can i take rybelsus at night
JamesVew
June 14, 2025
https://lipipharm.com/# LipiPharm
Carloswaync
June 14, 2025
вавада Вабанк Казино Официальный Сайт: Посетите официальный сайт Вабанк Казино и окунитесь в мир азартных игр с широким выбором развлечений и возможностью крупных выигрышей.
BillyStand
June 14, 2025
PredniPharm: prednisone without prescription 10mg - 54 prednisone
AlbertoLer
June 14, 2025
atorvastatin muscle pain [url=http://lipipharm.com/#]FDA-approved generic statins online[/url] Lipi Pharm
Alfonsoineno
June 14, 2025
50 mg prednisone tablet: PredniPharm - Predni Pharm
Ronaldteets
June 14, 2025
Бездепозитный бонус в казино
PatrickPoono
June 14, 2025
http://semaglupharm.com/# semaglutide injections near me
BillyStand
June 14, 2025
prednisone tablets: PredniPharm - PredniPharm
Williamtip
June 14, 2025
эвакуатор нурлытау алматы Эвакуатор алатау алматы – эвакуатор в микрорайоне Алатау.
AlbertoLer
June 14, 2025
No RX Lipitor online [url=http://lipipharm.com/#]Lipi Pharm[/url] lipitor cvs
Alfonsoineno
June 14, 2025
Crestor Pharm: magnesium and crestor interaction - Crestor Pharm
PatrickPoono
June 14, 2025
http://semaglupharm.com/# Semaglu Pharm
Carloswaync
June 14, 2025
Сукааа казино официальный сайт скачать на андроид мобильная версия бесплатно вавада казино – популярная альтернатива с широким выбором игр и привлекательными бонусами.
GeraldBes
June 14, 2025
гибкая керамика для внутренней отделки Phomi: гибкая керамика для фасадов Dream Decor внутренней отделки и интерьера в Москве. Купить по выгодной цене за м2, монтаж, отзывы Divu. Отделка дома с гарантией!
Ronaldteets
June 14, 2025
Бездепозитный бонус
Williamtip
June 14, 2025
оформление утилизации техники Прием кабеля в оболочке: выгодные цены на прием кабеля в любом состоянии.
JamesVew
June 14, 2025
https://crestorpharm.shop/# rosuvastatin calciumдёж–‡
BillyStand
June 14, 2025
when to stop rybelsus before surgery: is rybelsus used for weight loss - Semaglu Pharm
AlbertoLer
June 14, 2025
Predni Pharm [url=http://prednipharm.com/#]prednisone 30 mg daily[/url] Predni Pharm
PatrickPoono
June 14, 2025
https://semaglupharm.shop/# tirzepatide vs rybelsus
Alfonsoineno
June 14, 2025
No doctor visit required statins: rosuvastatin kidney side effects - CrestorPharm
DustinWed
June 14, 2025
оригинальные запчасти стиральных машин алматы Вызов мастера стиральных машин в Алматы. Квалифицированный специалист приедет в удобное для вас время.
BillyStand
June 14, 2025
PredniPharm: Predni Pharm - Predni Pharm
PatrickPoono
June 14, 2025
https://semaglupharm.shop/# Semaglu Pharm
AlbertoLer
June 14, 2025
Predni Pharm [url=https://prednipharm.shop/#]prednisone brand name in india[/url] PredniPharm
Alfonsoineno
June 14, 2025
Crestor mail order USA: CrestorPharm - Crestor Pharm
PatrickPoono
June 13, 2025
https://semaglupharm.com/# semaglutide to tirzepatide conversion chart
BillyStand
June 13, 2025
CrestorPharm: how to take crestor - CrestorPharm
AlbertoLer
June 13, 2025
LipiPharm [url=https://lipipharm.shop/#]Lipi Pharm[/url] Lipi Pharm
JamesVew
June 13, 2025
http://crestorpharm.com/# how long has crestor been on the market
Alfonsoineno
June 13, 2025
prednisone tablets india: prednisone 10 mg tablet - 1 mg prednisone daily
Williamwaync
June 13, 2025
ultimate createporn generator. Create hentai art, porn comics, and NSFW with the best AI porn maker online. Start generating AI porn now!
cumparpermisdeconducere
June 13, 2025
vă ajutăm să vă obțineți permisul de conducere fără stres sau bătăi de cap.
https://cumparpermisdeconducere.com/
cumparpermisdeconducere
June 13, 2025
cat-costa-sa-cumperi-permisul-de-conducere/ vă ajutăm să vă obțineți permisul de conducere fără stres sau bătăi de cap.-
PatrickPoono
June 13, 2025
http://semaglupharm.com/# Affordable Rybelsus price
AlbertoLer
June 13, 2025
50 mg prednisone canada pharmacy [url=http://prednipharm.com/#]prednisone 20 mg purchase[/url] by prednisone w not prescription
Alfonsoineno
June 13, 2025
lipitor is used for: atorvastatin 20 mg 114 - Safe atorvastatin purchase without RX
Randyanemy
June 13, 2025
международная карточка iko
PatrickPoono
June 13, 2025
https://semaglupharm.shop/# Semaglu Pharm
JosephBrind
June 13, 2025
температура красного моря Kitesurfing – это динамичный вид спорта, сочетающий в себе элементы серфинга, виндсерфинга и парапланеризма. Под управлением кайта вы скользите по волнам, выполняя захватывающие трюки и прыжки.
BillyStand
June 13, 2025
Semaglu Pharm: SemagluPharm - SemagluPharm
Alfonsoineno
June 13, 2025
SemagluPharm: SemagluPharm - Rybelsus side effects and dosage
JamesVew
June 13, 2025
https://semaglupharm.shop/# Semaglu Pharm
AlbertoLer
June 13, 2025
Lipi Pharm [url=https://lipipharm.com/#]atorvastatin side effects[/url] Affordable Lipitor alternatives USA
Williamnet
June 13, 2025
Группа в Telegram Доска бесплатных объявлений "Все для Вас Архангельск": товары, услуги, авто, жильё, работа, розыгрыши, отзывы и многое другое. Архангельск, Северодвинск, Новодвинск, Катунино, Березник, Рикасиха, Холмогоры, Мезень, Карпогоры работа в архангельске
Edgaravaky
June 13, 2025
bazar drugs marketplace Bazaar Drugs Marketplace: A New Darknet Platform with Dual Access Bazaar Drugs Marketplace is a new darknet marketplace rapidly gaining popularity among users interested in purchasing pharmaceuticals. Trading is conducted via the Tor Network, ensuring a high level of privacy and data protection. However, what sets this platform apart is its dual access: it is available both through an onion domain and a standard clearnet website, making it more convenient and visible compared to competitors. The marketplace offers a wide range of pharmaceuticals, including amphetamines, ketamine, cannabis, as well as prescription drugs such as alprazolam and diazepam. This variety appeals to both beginners and experienced buyers. All transactions on the platform are carried out using cryptocurrency payments, ensuring anonymity and security. In summary, Bazaar represents a modern darknet marketplace that combines convenience, a broad product selection, and a high level of privacy, making it a notable player in the darknet economy.
Shanethymn
June 13, 2025
https://plombi.ru/product/plomba-expert-m/
CharlesLinee
June 13, 2025
Курьер настолько вежливый - приятно было общаться!
заказать цветы с доставкой в томске
Safepestsol*
June 13, 2025
To kill mosquito larvae in a pool, start by removing any standing water where larvae might breed. Use biological treatments like Bacillus thuringiensis israelensis (Bti), which targets mosquito larvae without harming other wildlife. Additionally, maintaining proper pool sanitation with regular filtration, chlorination, and cleaning can help prevent mosquito infestations from recurring.
Visit:
https://safepestsol.com/how-to-kill-mosquito-larvae-in-pool/
PatrickPoono
June 13, 2025
https://semaglupharm.shop/# what are the side effects of rybelsus 7 mg
AlbertoLer
June 13, 2025
prednisone 15 mg daily [url=https://prednipharm.com/#]buy prednisone 10mg[/url] canada buy prednisone online
PatrickPoono
June 12, 2025
https://semaglupharm.com/# Semaglu Pharm
JamesVew
June 12, 2025
http://crestorpharm.com/# will rosuvastatin cause weight loss
MillardCesee
June 12, 2025
ultimate createporn AI generator. Create hentai art, porn comics, and NSFW with the best AI porn maker online. Start generating AI porn now!
CharlesLinee
June 12, 2025
Спасли ситуацию - за час до свидания доставили букет!
доставка цветов
Alfonsoineno
June 12, 2025
Affordable Lipitor alternatives USA: Generic Lipitor fast delivery - is 5 mg atorvastatin enough
BillyStand
June 12, 2025
crestor dosage: CrestorPharm - Over-the-counter Crestor USA
Alfonsoineno
June 12, 2025
Predni Pharm: Predni Pharm - order prednisone 100g online without prescription
DavidPhich
June 12, 2025
Цветы пришли в идеальном состоянии.
купить розы в томске
AlbertoLer
June 12, 2025
PredniPharm [url=https://prednipharm.com/#]prednisone 60 mg[/url] prednisone 20 mg tablet
Thomaslon
June 12, 2025
Цветы как в сказке – красивые и свежие!
цветы томск
JamesVew
June 12, 2025
http://semaglupharm.com/# No prescription diabetes meds online
Miguelsen
June 12, 2025
Профессиональное https://kosmetologicheskoe-oborudovanie-msk.ru для салонов красоты, клиник и частных мастеров. Аппараты для чистки, омоложения, лазерной эпиляции, лифтинга и ухода за кожей.
Alfonsoineno
June 12, 2025
does lipitor make you gain weight: Generic Lipitor fast delivery - Lipi Pharm
Papa4d2
June 12, 2025
like you wrote the book in it or something
my website : Papa4d2
AlbertoLer
June 12, 2025
CrestorPharm [url=http://crestorpharm.com/#]Crestor Pharm[/url] CrestorPharm
Alfonsoineno
June 12, 2025
grapefruit atorvastatin: LipiPharm - what is the main side effect of atorvastatin
BillyStand
June 12, 2025
prednisone 10 mg daily: buy prednisone without prescription paypal - otc prednisone cream
AlbertoLer
June 11, 2025
CrestorPharm [url=http://crestorpharm.com/#]crestor and pregnancy[/url] Crestor Pharm
JamesVew
June 11, 2025
https://lipipharm.com/# LipiPharm
FrankrersE
June 11, 2025
lipitor vs crestor dosage: Buy Crestor without prescription - CrestorPharm
Alfonsoineno
June 11, 2025
Crestor 10mg / 20mg / 40mg online: CrestorPharm - crestor side effects constipation
PeterHic
June 11, 2025
аккаунт варфейс Пин-коды Warface: Бонусы и привилегии Пин-коды Warface позволяют получить различные бонусы, такие как VIP-ускорители, кредиты и уникальные предметы. Это отличный способ разнообразить игровой процесс и получить преимущество над противниками.
AlbertoLer
June 11, 2025
SemagluPharm [url=https://semaglupharm.shop/#]how does rybelsus work[/url] Rybelsus for blood sugar control
ThomasSaick
June 11, 2025
Каркасные дома и бани из клееного бруса под ключа в Вологде и по всей России Строительство дома, бани из клееного бруса: Мы используем только высококачественные материалы и современное оборудование. Наши специалисты – это команда профессионалов с многолетним опытом работы. Мы гарантируем индивидуальный подход к каждому клиенту и высокое качество строительства. Позвольте нам воплотить вашу мечту о загородной жизни в реальность!
FrankrersE
June 11, 2025
Buy cholesterol medicine online cheap: rosuvastatin copay card - Crestor Pharm
Alfonsoineno
June 11, 2025
prednisone over the counter south africa: Predni Pharm - prednisone brand name in usa
Jamessap
June 11, 2025
Владимир Чернышев
RandyFix
June 11, 2025
металлопрокат купить в москве цена Металлопрокат купить в Москве: цена, опт и разнообразие выбора Москва – огромный мегаполис с постоянно растущими потребностями в строительных материалах. Металлопрокат занимает здесь особое место, являясь основой для возведения зданий, мостов, дорог и множества других объектов. Покупка металлопроката в Москве – ответственный шаг, требующий внимательного подхода к выбору поставщика и понимания ценообразования.
AlbertoLer
June 11, 2025
lipitor and testosterone [url=https://lipipharm.shop/#]does lipitor cause alzheimer's disease[/url] Lipi Pharm
BillyStand
June 11, 2025
LipiPharm: manufacturer of lipitor - Lipi Pharm
JamesVew
June 11, 2025
https://semaglupharm.com/# No prescription diabetes meds online
FrankrersE
June 11, 2025
50 mg prednisone canada pharmacy: prednisone 10 - cost of prednisone 5mg tablets
LanceFolve
June 11, 2025
купить диплом ПТУ Купить диплом в Москве, СПб, Екатеринбурге, Челябинске, Перми, Уфе, Тюмени, Краснодаре, Махачкале, Казани, Ижевске, ХМАО: Мы предлагаем дипломы учебных заведений, расположенных в различных городах России, включая Москву, Санкт-Петербург, Екатеринбург, Челябинск, Пермь, Уфу, Тюмень, Краснодар, Махачкалу, Казань, Ижевск и ХМАО.
Alfonsoineno
June 11, 2025
Crestor Pharm: CrestorPharm - п»їBuy Crestor without prescription
AlbertoLer
June 11, 2025
USA-based pharmacy Lipitor delivery [url=http://lipipharm.com/#]pravastatin versus atorvastatin[/url] LipiPharm
Alfonsoineno
June 11, 2025
lipitor 80 mg used for: Generic Lipitor fast delivery - Lipi Pharm
FrankrersE
June 11, 2025
crestor cholesterol: does rosuvastatin make you sleepy - CrestorPharm
BillyStand
June 11, 2025
Crestor Pharm: CrestorPharm - Crestor Pharm
AlbertoLer
June 11, 2025
PredniPharm [url=http://prednipharm.com/#]Predni Pharm[/url] prednisone medication
JamesVew
June 10, 2025
https://crestorpharm.shop/# crestor and magnesium supplements
Alfonsoineno
June 10, 2025
lipitor and anxiety: Lipi Pharm - LipiPharm
JeffreyBuh
June 10, 2025
Semaglu Pharm: SemagluPharm - Semaglu Pharm
BillyStand
June 10, 2025
PredniPharm: buy prednisone online no prescription - prednisone oral
AlbertoLer
June 10, 2025
Order cholesterol medication online [url=https://lipipharm.shop/#]what does lipitor do[/url] Lipi Pharm
Alfonsoineno
June 10, 2025
max dose of semaglutide: semaglutide for weight loss in non diabetics dosage - Semaglu Pharm
Estebandip
June 10, 2025
can rosuvastatin make you gain weight: CrestorPharm - Crestor Pharm
StanleyTum
June 10, 2025
Balloons Dubai https://balloons-dubai1.com stunning balloon decorations for birthdays, weddings, baby showers, and corporate events. Custom designs, same-day delivery, premium quality.
JamesVew
June 10, 2025
http://lipipharm.com/# does medicare cover lipitor
AlbertoLer
June 10, 2025
Semaglutide tablets without prescription [url=https://semaglupharm.com/#]Semaglutide tablets without prescription[/url] Rybelsus 3mg 7mg 14mg
BillyStand
June 10, 2025
Safe atorvastatin purchase without RX: LipiPharm - when is the best time to take amlodipine and atorvastatin
Alfonsoineno
June 10, 2025
Predni Pharm: prednisone 30 - prednisone 5 mg cheapest
Estebandip
June 10, 2025
iv prednisone: PredniPharm - prednisone 10mg for sale
AlbertoLer
June 10, 2025
CrestorPharm [url=http://crestorpharm.com/#]is crestor hydrophilic or lipophilic[/url] is rosuvastatin and atorvastatin the same
Estebandip
June 10, 2025
prednisone cream brand name: cost of prednisone - prednisone 20mg tablets where to buy
Alfonsoineno
June 10, 2025
Safe online pharmacy for Crestor: Crestor Pharm - Buy cholesterol medicine online cheap
BillyStand
June 10, 2025
how fast does rybelsus work: SemagluPharm - Where to buy Semaglutide legally
JamesVew
June 10, 2025
https://crestorpharm.com/# Crestor Pharm
JesusNuari
June 10, 2025
vehicle shipping cost auto transport los angeles
Estebandip
June 10, 2025
Crestor mail order USA: Safe online pharmacy for Crestor - niaspan vs crestor
Alfonsoineno
June 10, 2025
SemagluPharm: Semaglu Pharm - SemagluPharm
AlbertoLer
June 10, 2025
Predni Pharm [url=https://prednipharm.shop/#]Predni Pharm[/url] buy prednisone 1 mg mexico
JamesFappy
June 10, 2025
viagra canadian pharmacy prices: cheap viagra generic best price - otc female viagra
BillyTic
June 10, 2025
buy viagra online price: VGR Sources - sildenafil 100mg price australia
BrandonFuB
June 9, 2025
viagra for females [url=https://vgrsources.com/#]VGR Sources[/url] how to get female viagra pill
Brianrah
June 9, 2025
sildenafil 100mg canada pharmacy: cheap sildenafil tablets - generic sildenafil in canada
Veo3.im
June 9, 2025
Wow, this is a goldmine of design and development tips! Definitely saving this page for future inspiration. The variety of topics is impressive! Gotta check out those eCommerce updates and the sidebar extinction article. Interesting! veo3
RodneySip
June 9, 2025
https://vgrsources.com/# sildenafil 100mg price in india
BillyTic
June 9, 2025
viagra for sale online in canada: VGR Sources - how to get female viagra pills
BrandonFuB
June 9, 2025
sildenafil products [url=https://vgrsources.com/#]best sildenafil pills[/url] generic viagra order
Brianrah
June 9, 2025
best price for sildenafil 20 mg: sildenafil without prescription - buy cheap viagra online australia
BillyTic
June 9, 2025
where to buy sildenafil 20mg: VGR Sources - buy cheap generic viagra
crctransport
June 9, 2025
Need transportation? automobile delivery service car transportation company services — from one car to large lots. Delivery to new owners, between cities. Safety, accuracy, licenses and experience over 10 years.
JamesFappy
June 9, 2025
viagra website: VGR Sources - viagra canada otc
BrandonFuB
June 9, 2025
generic viagra 25mg [url=https://vgrsources.com/#]buy viagra pills online[/url] cheap canadian pharmacy viagra
Brianrah
June 9, 2025
canada pharmacy viagra: how to purchase viagra online in india - sildenafil tablets
BillyTic
June 9, 2025
viagra for women buy online: VGR Sources - sildenafil 20 mg tablet cost
RodneySip
June 9, 2025
https://vgrsources.com/# cost of viagra 100mg tablet
JamesFappy
June 9, 2025
where can i buy sildenafil online safely: VGR Sources - sildenafil no prescription
BrandonFuB
June 9, 2025
where to buy viagra usa [url=https://vgrsources.com/#]VGR Sources[/url] generic viagra europe
Brianrah
June 9, 2025
buy online viagra tablets in india: VGR Sources - how much is viagra 100mg
JamesFappy
June 9, 2025
best viagra for sale: VGR Sources - viagra online australia fast delivery
BrandonFuB
June 9, 2025
viagra canada price [url=https://vgrsources.com/#]buy viagra mastercard[/url] viagra generic cheap
Brianrah
June 9, 2025
cheap sildenafil 50mg uk: online viagra pharmacy - generic viagra 100
BillyTic
June 9, 2025
best prices for viagra: VGR Sources - viagra pills online for sale
RodneySip
June 8, 2025
https://vgrsources.com/# where to buy sildenafil uk
JamesFappy
June 8, 2025
generic sildenafil no prescription: 30 mg sildenafil chewable - online rx viagra
BillyTic
June 8, 2025
sildenafil order: where to buy female viagra in us - real viagra from canada
Brianrah
June 8, 2025
where can i buy viagra over the counter uk: cheap viagra 150 mg - how can i get viagra pills
BrianCIX
June 8, 2025
кайтсёрфинг анапа Анапа и кайтсерфинг – это два понятия, неразрывно связанные между собой, особенно для тех, кто ищет активный отдых и яркие впечатления. Это не просто спорт, это образ жизни, в котором солнце, ветер и морская стихия создают уникальную атмосферу. Благодаря своим протяженным пляжам и устойчивым ветрам, Анапа стала настоящим центром притяжения для кайтсерферов всех уровней. Здесь можно наблюдать и начинающих, и опытных спортсменов, демонстрирующих сложные трюки. Кайт школа в Анапе – это место, где куются новые таланты и профессионалы кайтсерфинга. Школы предлагают разнообразные программы обучения, начиная с базовых курсов и заканчивая продвинутыми тренировками. Квалифицированные инструкторы, современное оборудование и индивидуальный подход гарантируют эффективное обучение и безопасность на воде. Кайт школа в Анапе – это не просто образовательное учреждение, это сообщество единомышленников, которых объединяет страсть к ветру и морю. Здесь можно завести новых друзей, получить полезные советы и просто приятно провести время в кругу людей, разделяющих ваши интересы. Кайтсерфинг в Анапе – это возможность отвлечься от повседневных забот, ощутить прилив адреналина и насладиться чувством свободы. Представьте, как вы несетесь по волнам, подгоняемые ветром, в сопровождении криков чаек и лучей солнца. Это приключение, которое останется в вашей памяти на всю жизнь. Благовещенская – еще одно популярное место для кайтсерфинга в Анапском районе. Благодаря своему уникальному расположению на косе между Бугазским лиманом и Черным морем, здесь созданы идеальные условия для катания. Мелководье и стабильный ветер делают Благовещенскую идеальным местом для обучения кайтсерфингу. Кайт Блага – это неофициальное название Благовещенской, которое часто используют сами кайтсерферы. Здесь вы найдете несколько кайт-станций, предлагающих обучение, прокат оборудования и услуги хранения. Кайтсерфинг в Анапе – это выбор тех, кто предпочитает активный отдых, любит ветер и море и готов к новым испытаниям. Присоединяйтесь к нашему сообществу и откройте для себя мир захватывающих приключений! DETIVETRA (ДЕТИ ВЕТРА) – это не просто название, это философия жизни. Это те, кто чувствует ветер, не боится перемен и всегда открыт для новых горизонтов. Присоединяйтесь к ДЕТЯМ ВЕТРА и почувствуйте себя частью чего-то большего!
JamesFappy
June 8, 2025
what does viagra do: buy viagra soft tabs - buy viagra pills canada
BillyTic
June 8, 2025
generic sildenafil from india: VGR Sources - buy viagra tablet online india
BrandonFuB
June 8, 2025
where can i buy viagra online safely [url=https://vgrsources.com/#]best sildenafil coupon[/url] online viagra united states
Brianrah
June 8, 2025
generic viagra 50mg price: canadian pharmacy real viagra - where can i get female viagra pills
JamesFappy
June 8, 2025
uk viagra: VGR Sources - female viagra drugstore
RodneySip
June 8, 2025
https://vgrsources.com/# viagra best price usa
BillyTic
June 8, 2025
viagra from mexico to usa: VGR Sources - female viagra pharmacy australia
Brianrah
June 8, 2025
female viagra pills in south africa: viagra online price usa - sildenafil canada over the counter
JamesFappy
June 8, 2025
viagra canada for sale: VGR Sources - 805551 sildenafil
BillyTic
June 8, 2025
viagra online purchase singapore: VGR Sources - buy viagra soft tabs
BrandonFuB
June 8, 2025
best buy viagra online [url=https://vgrsources.com/#]VGR Sources[/url] canadian pharmacy for viagra
Brianrah
June 8, 2025
canadian pharmacy cheap sildenafil: VGR Sources - where to get viagra
JamesFappy
June 8, 2025
viagra pills online in india: sildenafil 20mg prescription cost - buy sildenafil pills online
BillyTic
June 8, 2025
brand viagra without prescription: VGR Sources - prix du viagra 50mg
RodneySip
June 7, 2025
https://vgrsources.com/# viagra canada no prescription
BrandonFuB
June 7, 2025
buy viagra pharmacy [url=https://vgrsources.com/#]female viagra online canada[/url] viagra 100 mg tablet buy online
Brianrah
June 7, 2025
online generic sildenafil: VGR Sources - pfizer viagra price
JamesFappy
June 7, 2025
generic viagra online fast shipping: VGR Sources - cheap canadian pharmacy viagra
BillyTic
June 7, 2025
viagra for sale online australia: where to get female viagra - buy viagra cheap
BrandonFuB
June 7, 2025
100mg sildenafil 1 pill [url=https://vgrsources.com/#]female viagra online australia[/url] female viagra for sale
Manuelslunc
June 7, 2025
почему акулы нападают в египте
Brianrah
June 7, 2025
where can you get viagra pills: buy viagra pills online in india - cheap viagra uk paypal
JamesFappy
June 7, 2025
viagra online rx: VGR Sources - where can i get sildenafil
BillyTic
June 7, 2025
viagra 50 mg tablet price in india: where can i get real viagra - where to buy sildenafil citrate online
RodneySip
June 7, 2025
https://vgrsources.com/# can you buy viagra over the counter in europe
BrandonFuB
June 7, 2025
where to order viagra online [url=https://vgrsources.com/#]VGR Sources[/url] cost of 100mg sildenafil
JamesFappy
June 7, 2025
how to get a viagra prescription online: online viagra prescription usa - where can you buy viagra over the counter in canada
BillyTic
June 7, 2025
100mg viagra: VGR Sources - real viagra pills online
Brianrah
June 7, 2025
where to buy sildenafil canada: how much is 1 viagra pill - order brand name viagra online
BrandonFuB
June 7, 2025
generic viagra online pharmacy [url=https://vgrsources.com/#]VGR Sources[/url] viagra canada online pharmacy
JamesFappy
June 7, 2025
where to buy cheap generic viagra: viagra 50mg for sale - buy real viagra
BillyTic
June 7, 2025
generic sildenafil online: cheap viagra canada pharmacy - where to buy viagra online safely
Brianrah
June 7, 2025
sildenafil no prescription free shipping: VGR Sources - brand viagra 50mg online
RodneySip
June 7, 2025
https://vgrsources.com/# buy sildenafil in mexico
BillyTic
June 7, 2025
pfizer viagra online pharmacy: where to buy viagra otc - viagra generic cost
JamesFappy
June 7, 2025
viagra 50mg price in india online: viagra 50mg tablets price in india - sildenafil discount price
BrandonFuB
June 7, 2025
cheap viagra without prescription [url=https://vgrsources.com/#]generic 100mg sildenafil[/url] viagra generic name
Rogerexend
June 7, 2025
medicine from india: online medicine in india - online medicine in india
MatthewViomo
June 7, 2025
india online pharmacy international shipping [url=http://inpharm24.com/#]pharmacy india online[/url] pharmacy online india
Charleshouff
June 6, 2025
best online indian pharmacy: InPharm24 - b pharmacy salary in india
Rogerexend
June 6, 2025
the mexican pharmacy online: american pharmacy online - mexican antibiotics
WilliamErrok
June 6, 2025
https://pharmmex.shop/# tijuana pharmacy
Rogerexend
June 6, 2025
india pharmacy cialis: india meds - pharmacy education in india
MatthewViomo
June 6, 2025
india medical [url=https://inpharm24.shop/#]InPharm24[/url] buy viagra online in india
Charleshouff
June 6, 2025
india drug store: InPharm24 - get medicines from india
Rogerexend
June 6, 2025
online pharmacy india: pharmacy in india - registration in pharmacy council of india
Charleshouff
June 6, 2025
online pharmacy india: pharmacies in india - pharmacy india website
Rogerexend
June 6, 2025
late night pharmacy artane: cyprus online pharmacy - generic viagra pharmacy reviews
WilliamErrok
June 6, 2025
http://pharmexpress24.com/# target pharmacy montelukast
Charleshouff
June 6, 2025
get medicines from india: InPharm24 - first online pharmacy in india
Randallgrasp
June 6, 2025
online medicine delivery in india: india drug store - india pharmacy cialis
Rogerexend
June 6, 2025
pharmacy to buy: cheapest mail order pharmacy - mounjaro mexico price
MatthewViomo
June 6, 2025
ambien online pharmacy no prescription [url=https://pharmexpress24.shop/#]concerta pharmacy price[/url] zithromax pharmacy price
Randallgrasp
June 6, 2025
cheap erectile dysfunction pills online: xl pharmacy sildenafil - pharmacy to buy viagra
Rogerexend
June 6, 2025
buy online medicine: india pharmacy of the world - medicine from india
WilliamErrok
June 5, 2025
http://inpharm24.com/# prescription drugs from india
Charleshouff
June 5, 2025
buy viagra from us pharmacy: Pharm Express 24 - motilium uk pharmacy
Rogerexend
June 5, 2025
the drug store: charles raines pharmacy winston-salem nc early drug store - Diamox
Randallgrasp
June 5, 2025
pharmacy near mexican border: Pharm Mex - is canadian drug store legit
MatthewViomo
June 5, 2025
rite aid pharmacy how many store [url=http://pharmexpress24.com/#]online pharmacy classes[/url] clonidine pharmacy
DavidNiz
June 5, 2025
конфигуратор ПК онлайн
Rogerexend
June 5, 2025
best india pharmacy: local pharmacy prices viagra - custom rx pharmacy kuna
Charleshouff
June 5, 2025
buy medicines online: best pharmacy in tijuana - best mail order pharmacy
Randallgrasp
June 5, 2025
prescriptions from mexico: Pharm Mex - bringing tramadol from mexico to us
MatthewViomo
June 5, 2025
mexican drugstore [url=https://pharmmex.com/#]Pharm Mex[/url] hydrocodone from mexico
WilliamErrok
June 5, 2025
https://pharmexpress24.com/# target store pharmacy
Randallgrasp
June 5, 2025
online pharmacy uk cialis: ramesh rx pharmacy - cymbalta online pharmacy price
Rogerexend
June 5, 2025
mdma online pharmacy: abilify pharmacy assistance - wegmans pharmacy lipitor
Charleshouff
June 5, 2025
what can you buy in mexican pharmacy: Pharm Mex - mexican pharmacy online medications
Thomasgreaw
June 5, 2025
мощный ПК на заказ Компьютер для работы: Эффективность и комфорт Компьютер для работы на заказ должен обеспечивать стабильную работу приложений, быструю обработку данных и комфортную работу в течение длительного времени. Выбирайте компоненты, отвечающие вашим профессиональным потребностям.
Randallgrasp
June 5, 2025
amoxicillin in mexico over the counter: canadian pharmacy no prescription needed - cheap antibiotics online
Rogerexend
June 5, 2025
propranolol indian pharmacy: Pharm Express 24 - sams club pharmacy propecia
WilliamErrok
June 5, 2025
https://pharmmex.com/# mexican pharmacy online reviews
MatthewViomo
June 5, 2025
india pharmacy international shipping [url=http://inpharm24.com/#]buy medicine online india[/url] online pharmacy app developer in india
Charleshouff
June 5, 2025
buy ultram from trusted pharmacy: Pharm Express 24 - pharmacy website india
Rogerexend
June 5, 2025
buy medicines online india: InPharm24 - medicine online purchase
MatthewViomo
June 5, 2025
viagra tesco pharmacy [url=http://pharmexpress24.com/#]escitalopram oxalate online pharmacy[/url] prozac online pharmacy no prescription
Rogerexend
June 5, 2025
do i need a prescription for mounjaro in mexico: safe mexican pharmacy online - adderall in mexico otc
WilliamErrok
June 5, 2025
https://pharmexpress24.shop/# wedgewood pharmacy gabapentin
Charleshouff
June 5, 2025
on line mexican pharmacy: antibiotic online order - mexican online pharmacy adderall
Peterjof
June 5, 2025
https://inpharm24.shop/# pharmacy online india
BrianFap
June 5, 2025
високооплачувана робота для українок Стань вебкам моделью в польской студии, работающей в Варшаве! Открыты вакансии для девушек в Польше, особенно для тех, кто говорит по-русски. Ищешь способ заработать онлайн в Польше? Предлагаем подработку для девушек в Варшаве с возможностью работы в интернете, даже с проживанием. Рассматриваешь удаленную работу в Польше? Узнай, как стать вебкам моделью и сколько можно заработать. Работа для украинок в Варшаве и высокооплачиваемые возможности для девушек в Польше ждут тебя. Мы предлагаем легальную вебкам работу в Польше, онлайн работа без необходимости знания польского языка. Приглашаем девушек без опыта в Варшаве в нашу вебкам студию с обучением. Возможность заработка в интернете без вложений. Работа моделью онлайн в Польше — это шанс для тебя! Ищешь "praca dla dziewczyn online", "praca webcam Polska", "praca modelka online" или "zarabianie przez internet dla kobiet"? Наше "agencja webcam Warszawa" и "webcam studio Polska" предлагают "praca dla mlodych kobiet Warszawa" и "legalna praca online Polska". Смотри "oferty pracy dla Ukrainek w Polsce" и "praca z domu dla dziewczyn".
Michaeltow
June 5, 2025
traitement infections urinaires sans ordonnance: amoxicilline sans ordonnance - bandelette one touch prix
Michaeltow
June 4, 2025
rocaltrol 0 25: Farmacia Subito - actikerall soluzione prezzo
JosephJeoni
June 4, 2025
collirio betabioptal prezzo: Farmacia Subito - ovison soluzione capelli
Dannylit
June 4, 2025
https://confiapharma.shop/# fluoxetina la puedo comprar sin receta
Michaeltow
June 4, 2025
pisolino gocce risvegli notturni: tachifene ogni quante ore - plasil fiale prezzo
JosephJeoni
June 4, 2025
comprar zolpidem sin receta: farmacia online toledo fotos - orlistat comprar sin receta
Michaeltow
June 4, 2025
rabestrom 75: Farmacia Subito - dicloreum 150 compresse
Thomasgreaw
June 4, 2025
дебетовая карта с доставкой на дом Исследуйте мир удобных банковских карт вместе с нами. Оформление современной дебетовой карты теперь доступно и просто благодаря нашей поддержке. Выберите карту, которая идеально соответствует вашим потребностям, и воспользуйтесь всеми преимуществами современных финансовых услуг. Что мы предлагаем? Экспертные советы: Полезные лайфхаки и рекомендации по эффективному использованию карты. Актуальные акции: Будьте в курсе самых выгодных предложений и специальных условий от банков-партнеров. Преимущества нашего сообщества. Здесь вы найдете всю необходимую информацию о различных видах карт, особенностях тарифов и комиссий. Наши публикации регулярно обновляются, чтобы предоставить вам актуальные данные и свежие новости о продуктах российских банков. Присоединяйтесь к нашему сообществу, чтобы сделать ваши финансовые решения простыми, быстрыми и надежными. Вместе мы сможем оптимизировать использование банковских продуктов и сэкономить ваше время и деньги. Наша цель — помочь вам эффективно управлять своими финансами и получать максимум выгоды от каждого взаимодействия с банком.
Garrettcum
June 4, 2025
Научно-популярный сайт https://phenoma.ru — малоизвестные факты, редкие феномены, тайны природы и сознания. Гипотезы, наблюдения и исследования — всё, что будоражит воображение и вдохновляет на поиски ответов.
JosephJeoni
June 4, 2025
como comprar nuvaring sin receta: mascarillas ffp2 comprar online farmacia - farmacia pedidos online
Michaeltow
June 4, 2025
black friday farmacia online: Confia Pharma - quГ© viagra puedo comprar sin receta
Waltergob
June 4, 2025
фотозона баннер Фотографическая зона, оформленная баннером; декоративный баннер для фотозоны; праздничный баннер "С днем рождения" для создания фотозоны; баннер размером 2 на 2 метра, предназначенный для оформления фотозоны на дне рождения. Альтернативно, можно сказать так: Место для фотографирования, украшенное тематическим баннером; специальный баннер, используемый для создания фотозоны; баннер с надписью "С днем рождения" для оформления пространства для фотосессий; баннер с габаритами 2x2 метра, предназначенный для использования в качестве фона на дне рождения.
Stephendug
June 4, 2025
médicament sinusite avec ordonnance: creme emolliente ducray - silicea 15 ch posologie
Dannylit
June 4, 2025
https://confiapharma.shop/# comprar galotam 100 sin receta precio
Stephendug
June 4, 2025
achat ventoline sans ordonnance: Pharmacie Express - viagra avec ou sans ordonnance pharmacie
JosephJeoni
June 4, 2025
monurol comprar sin receta: farmacia alemania online - farmacia online copa menstrual
Thomastiexy
June 4, 2025
pantorc 40 mg prezzo senza ricetta: setofilm 8 mg - test hiv farmacia online
Michaeltow
June 4, 2025
benzodiazepine sans ordonnance: prix malarone - condylome traitement sans ordonnance pharmacie
Jamessof
June 4, 2025
resume aerospace engineer resumes for engineering internships
Thomastiexy
June 4, 2025
vermox pharmacie sans ordonnance: equivalent fungizone sans ordonnance - creme anthelios 50+
Michaeltow
June 4, 2025
glucophage 500 prezzo: easotic prezzo - perfalgan principio attivo
Thomastiexy
June 3, 2025
aderma creme corps: Pharmacie Express - achat cialis pharmacie en ligne
Dannylit
June 3, 2025
http://farmaciasubito.com/# farmacia online trieste
Briannus
June 3, 2025
мод тик тока на андроид 2025 скачать Мир мобильных приложений не стоит на месте, и Тик Ток продолжает оставаться одной из самых популярных платформ для создания и обмена короткими видео. Но что, если стандартной функциональности вам недостаточно? На помощь приходит Тик Ток Мод – модифицированная версия приложения, открывающая доступ к расширенным возможностям и эксклюзивным функциям.
Michaeltow
June 3, 2025
ivomec plus 100 ml prezzo: Farmacia Subito - migliori farmacia online
JosephJeoni
June 3, 2025
farmacia shop online milano: Confia Pharma - se puede comprar lidocaina sin receta
KennethboF
June 3, 2025
какая дебетовая карта самая Ваш проводник в мире удобных банковских карт Оформление современной дебетовой карты теперь стало простым и доступным благодаря нашей группе. Вы сможете легко выбрать карту, подходящую именно вам, и воспользоваться всеми преимуществами современного финансового сервиса. Что мы предлагаем? Полезные советы: Лайфхаки и рекомендации по эффективному использованию вашей карты. Актуальные акции: Будьте в курсе всех новых предложений и специальных условий от банков-партнеров. Преимущества нашего сообщества Здесь вы найдете всю необходимую информацию о различных видах карт, особенностях тарифов и комиссий. Наши публикации регулярно обновляются, предоставляя актуальные данные и свежие новости о продуктах российских банков. Присоединяйтесь к нашему сообществу, чтобы сделать ваши финансовые решения простыми, быстрыми и надежными. Вместе мы сможем оптимизировать использование банковских продуктов и сэкономить ваше время и средства. Ведь наша цель — помогать вам эффективно управлять своими финансами и получать максимум выгоды от каждого взаимодействия с банком.
BradleyLield
June 3, 2025
farmacia online bilbao [url=http://confiapharma.com/#]estudiar quimica y farmacia online[/url] mejor farmacia online
Michaeltow
June 3, 2025
misoprostol sans ordonnance pharmacie: rappel vaccin pharmacie sans ordonnance - forticea furterer
Dannylit
June 3, 2025
http://farmaciasubito.com/# sivastin 10 mg prezzo
BradleyLield
June 3, 2025
comprar litio sin receta [url=http://confiapharma.com/#]codigo descuento la farmacia online[/url] app farmacia online
Michaeltow
June 3, 2025
locorten stomatologico: farmacia online it - farmacia online black friday
JosephJeoni
June 3, 2025
cialis sans ordonnance en pharmacie forum: Pharmacie Express - caudalie masque creme hydratant
RobertTat
June 3, 2025
Читайте о необычном http://phenoma.ru научно-популярные статьи о феноменах, которые до сих пор не имеют однозначных объяснений. Психология, физика, биология, космос — самые интересные загадки в одном разделе.
Curtisres
June 3, 2025
Мир полон тайн https://phenoma.ru читайте статьи о малоизученных феноменах, которые ставят науку в тупик. Аномальные явления, редкие болезни, загадки космоса и сознания. Доступно, интересно, с научным подходом.
Robertmer
June 3, 2025
resume electrical engineer resume engineer civil
Michaeltow
June 3, 2025
isdin farmacia online: puedo comprar sildenafil sin receta mГ©dica en espaГ±a - farmacia online reus
BradleyLield
June 3, 2025
descuentos en farmacia online [url=https://confiapharma.com/#]fhf farmacia online[/url] nasonex farmacia online
JosephJeoni
June 3, 2025
puedo comprar misoprostol sin receta en argentina: Confia Pharma - farmacia online mas barata espaГ±a
Dannylit
June 3, 2025
https://confiapharma.com/# tecnico farmacia y parafarmacia online
Larrysom
June 3, 2025
pin-co casino Pinco, Pinco AZ, Pinco Casino, Pinco Kazino, Pinco Casino AZ, Pinco Casino Azerbaijan, Pinco Azerbaycan, Pinco Gazino Casino, Pinco Pinco Promo Code, Pinco Cazino, Pinco Bet, Pinco Yukl?, Pinco Az?rbaycan, Pinco Casino Giris, Pinco Yukle, Pinco Giris, Pinco APK, Pin Co, Pin Co Casino, Pin-Co Casino. Онлайн-платформа Pinco, включая варианты Pinco AZ, Pinco Casino и Pinco Kazino, предлагает азартные игры в Азербайджане, также известная как Pinco Azerbaycan и Pinco Gazino Casino. Pinco предоставляет промокоды, а также варианты, такие как Pinco Cazino и Pinco Bet. Пользователи могут загрузить приложение Pinco (Pinco Yukl?, Pinco Yukle) для доступа к Pinco Az?rbaycan и Pinco Casino Giris. Pinco Giris доступен через Pinco APK. Pin Co и Pin-Co Casino — это связанные термины.
Michaeltow
June 3, 2025
prix bas de contention avec ordonnance: avene cleanance mask - amoxicilline sans ordonnance prix
BradleyLield
June 3, 2025
cialis sans ordonnance en france [url=http://pharmacieexpress.com/#]somnifГЁres pharmacie sans ordonnance[/url] ordonnance liste 1
JosephJeoni
June 3, 2025
pevisone latte acquisto online: gabapentin 100 mg prezzo - vmp pasta per gatti controindicazioni
WilliamJoync
June 3, 2025
cilodex gocce prezzo: augmentin 140 ml - ursobil ht 450 prezzo
Michaeltow
June 3, 2025
brufecod prezzo: nicetile 500 - liraglutide prezzo
BradleyLield
June 3, 2025
recigarum se puede comprar sin receta [url=https://confiapharma.shop/#]comprar viagra original sin receta[/url] cialis 20 mg farmacia online
WilliamJoync
June 3, 2025
spregal sans ordonnance: ducray shampoing squames - crème anesthésiante en pharmacie sans ordonnance
JosephJeoni
June 3, 2025
tobrex farmacia online: comprar viagra en crema sin receta - se pueden comprar medicamentos sin receta
Michaeltow
June 3, 2025
millor farmacia online: comprar synulox sin receta - opiniones de farmacia yanguas 24h pamplona | envГos pedidos online en 2 horas
BradleyLield
June 3, 2025
fluconazol se puede comprar sin receta [url=https://confiapharma.com/#]farmacia malaga online opiniones[/url] se pueden comprar pildoras anticonceptivas sin receta
Dannylit
June 3, 2025
https://pharmacieexpress.shop/# monuril gГ©nГ©rique sans ordonnance
Michaeltow
June 2, 2025
dibase 100.000: clobesol unguento prezzo - augmentin compresse prezzo
WilliamJoync
June 2, 2025
femannose en pharmacie sans ordonnance: nicopatch 21 - medicament arthrose sans ordonnance
BradleyLield
June 2, 2025
farmacia castro urdiales online [url=https://confiapharma.shop/#]farmacia sant cugat online[/url] fordiuran comprar sin receta
JosephJeoni
June 2, 2025
viagra homme prix en pharmacie sans ordonnance quГ©bec: acheter xenical sans ordonnance - boite viagra
Michaeltow
June 2, 2025
levobren gocce: testosterone farmacia online - perfalgan flebo
Dannylit
June 2, 2025
https://farmaciasubito.shop/# riluzolo prezzo
WilliamJoync
June 2, 2025
farmacia online especialista en nutrición: Confia Pharma - se puede comprar ibuprofeno sin receta?
BradleyLield
June 2, 2025
ovison soluzione capelli [url=https://farmaciasubito.com/#]first to know test[/url] farmacia 1 online
JosephJeoni
June 2, 2025
puedo comprar terramicina sin receta: Confia Pharma - comprar stilnox sin receta
Michaeltow
June 2, 2025
clobesol pomata prezzo: torecan supposte - farmacia conca d'oro
BradleyLield
June 2, 2025
farmacia online romania [url=http://farmaciasubito.com/#]Farmacia Subito[/url] sirdalud 2 mg prezzo mutuabile
RogerRiz
June 2, 2025
chicken road demo Chicken Road: Взлеты и Падения на Пути к Успеху Chicken Road – это не просто развлечение, это обширный мир возможностей и тактики, где каждое решение может привести к невероятному взлету или полному краху. Игра, доступная как в сети, так и в виде приложения для мобильных устройств (Chicken Road apk), предлагает пользователям проверить свою фортуну и чутье на виртуальной "куриной тропе". Суть Chicken Road заключается в преодолении сложного маршрута, полного ловушек и опасностей. С каждым успешно пройденным уровнем, награда растет, но и увеличивается шанс неудачи. Игроки могут загрузить Chicken Road game demo, чтобы оценить механику и особенности геймплея, прежде чем рисковать реальными деньгами.
WilliamJoync
June 2, 2025
perfalgan flebo: ematonil a cosa serve - zibenak 50000
Michaelsnope
June 2, 2025
Крыша на балкон Балкон, прежде всего, – это открытое пространство, связующее звено между уютом квартиры и бескрайним внешним миром. Однако его беззащитность перед капризами погоды порой превращает это преимущество в существенный недостаток. Дождь, снег, палящее солнце – все это способно причинить немало хлопот, лишая возможности комфортно проводить время на балконе, а также нанося ущерб отделке и мебели. Именно здесь на помощь приходит крыша на балкон – надежная защита и гарантия комфорта в любое время года.
Michaeltow
June 2, 2025
fluoresceine pharmacie sans ordonnance: Pharmacie Express - fond de teint vichy liftactiv
KerryGoose
June 2, 2025
roobet code 2025 WEB3 В мире онлайн-казино инновации не стоят на месте, и Roobet находится в авангарде этих перемен. С появлением технологии Web3, Roobet предлагает игрокам новый уровень прозрачности, безопасности и децентрализации. Чтобы воспользоваться всеми преимуществами этой передовой платформы, используйте промокод WEB3.
Dannylit
June 2, 2025
https://pharmacieexpress.shop/# gГ©nГ©rique viagra
JosephJeoni
June 2, 2025
ordonnance securisee medecin: Pharmacie Express - pansement dentaire pharmacie sans ordonnance
BradleyLield
June 2, 2025
farmacia de loria online [url=https://confiapharma.shop/#]Confia Pharma[/url] comprar cialis online sin receta
WilliamJoync
June 2, 2025
dónde puedo comprar viagra en usa sin receta: farmacia en casa online gastos de envio - farmacia san rafael online
Michaeltow
June 2, 2025
mГ©dicament infection urinaire sans ordonnance: otite sans ordonnance - fond de teint vichy dermablend 35
BradleyLield
June 2, 2025
rГ©diger une ordonnance mГ©dicale [url=https://pharmacieexpress.com/#]Г©quivalent ketoderm sans ordonnance[/url] crГЁme - mГ©tronidazole sans ordonnance
JosephJeoni
June 2, 2025
liste mГ©dicaments sans ordonnance: mГ©dicament sous ordonnance - peut on acheter du viagra en pharmacie sans ordonnance
Michaeltow
June 2, 2025
brivirac prezzo: Farmacia Subito - bentelan fiale intramuscolo
Dannylit
June 2, 2025
http://pharmacieexpress.com/# atarax sans ordonnance pharmacie
Stacy
June 2, 2025
getflywheel.com
getflywheel.com
PhilipBoure
June 1, 2025
температура воды в хургаде в апреле
Lewisnow
June 1, 2025
Сергей Бидус кидало
EugeneAmuro
June 1, 2025
Pharmacie en ligne livraison Europe [url=https://pharmsansordonnance.shop/#]pharmacie en ligne[/url] vente de mГ©dicament en ligne
IssacVal
June 1, 2025
commander Kamagra en ligne: commander Kamagra en ligne - acheter kamagra site fiable
StephenVow
June 1, 2025
I loved as much as you'll receive carried out right here. The sketch is tasteful, your authored material stylish. nonetheless, you command get got an shakiness over that you wish be delivering the following. unwell unquestionably come more formerly again as exactly the same nearly very often inside case you shield this increase.
http://footballfans.com.ua/avto-lampy-led-yak-zrobyty-pokupku-yaka-prosluzhyt.html
DanielDip
June 1, 2025
русский роп Роп - Русский роп - это больше, чем просто музыка. Это зеркало современной российской души, отражающее её надежды, страхи и мечты. В 2025 году жанр переживает новый виток развития, впитывая в себя элементы других стилей и направлений, становясь всё более разнообразным и эклектичным. Популярная музыка сейчас – это калейдоскоп звуков и образов. Хиты месяца мгновенно взлетают на вершины чартов, но так же быстро и забываются, уступая место новым музыкальным новинкам. 2025 год дарит нам множество талантливых российских исполнителей, каждый из которых вносит свой неповторимый вклад в развитие жанра.
EugeneAmuro
June 1, 2025
acheter Kamagra sans ordonnance [url=https://kampascher.com/#]commander Kamagra en ligne[/url] kamagra en ligne
IsmaelShant
May 31, 2025
Admiring the persistence you put into your website and detailed information you offer. It's awesome to come across a blog every once in a while that isn't the same old rehashed information. Excellent read! I've saved your site and I'm including your RSS feeds to my Google account.
hafilat
EugeneAmuro
May 31, 2025
pharmacie en ligne [url=https://pharmsansordonnance.com/#]pharmacie en ligne pas cher[/url] pharmacie en ligne fiable
IssacVal
May 31, 2025
acheter Kamagra sans ordonnance: kamagra en ligne - acheter Kamagra sans ordonnance
WilliamChory
May 31, 2025
варфейс купить В мире онлайн-шутеров Warface занимает особое место, привлекая миллионы игроков своей динамикой, разнообразием режимов и возможностью совершенствования персонажа. Однако, не каждый готов потратить месяцы на прокачку аккаунта, чтобы получить желаемое оружие и экипировку. В этом случае, покупка аккаунта Warface становится привлекательным решением, открывающим двери к новым возможностям и впечатлениям.
StacyKet
May 31, 2025
В динамичном мире Санкт-Петербурга, где каждый день кипит жизнь и совершаются тысячи сделок, актуальная и удобная доска объявлений становится незаменимым инструментом как для частных лиц, так и для предпринимателей. Наша платформа – это ваш надежный партнер в поиске и предложении товаров и услуг в Северной столице. Частные объявления печников
EugeneAmuro
May 31, 2025
acheter Cialis sans ordonnance [url=https://ciasansordonnance.shop/#]Acheter Cialis[/url] cialis generique
Patrickmit
May 31, 2025
engineers resumes resume for engineering students freshers
DanielBum
May 31, 2025
anniversary balloons dubai balloons dubai cheap
StephenVow
May 31, 2025
Hi it's me, I am also visiting this web page regularly, this web site is really nice and the viewers are actually sharing good thoughts.
hafilat card balance check
Matthewnon
May 31, 2025
acheter kamagra site fiable: kamagra gel - acheter Kamagra sans ordonnance
IssacVal
May 31, 2025
pharmacie en ligne sans prescription: pharmacie internet fiable France - pharmacie en ligne sans ordonnance
Matthewnon
May 30, 2025
acheter Cialis sans ordonnance: Achat médicament en ligne fiable - cialis prix
IssacVal
May 30, 2025
kamagra 100mg prix: acheter Kamagra sans ordonnance - kamagra pas cher
Jesuspoila
May 30, 2025
https://ciasansordonnance.com/# Acheter Cialis 20 mg pas cher
Matthewnon
May 30, 2025
kamagra gel: kamagra gel - kamagra pas cher
Matthewnon
May 30, 2025
commander sans consultation médicale: Pharmacie en ligne livraison Europe - Achat médicament en ligne fiable
Matthewnon
May 30, 2025
pharmacie en ligne: pharmacie en ligne - Pharmacie Internationale en ligne
IssacVal
May 30, 2025
Viagra sans ordonnance 24h: viagra en ligne - Viagra generique en pharmacie
Matthewnon
May 30, 2025
traitement ED discret en ligne: traitement ED discret en ligne - Acheter Cialis
EugeneAmuro
May 30, 2025
pharmacies en ligne certifiГ©es [url=https://kampascher.shop/#]commander Kamagra en ligne[/url] kamagra pas cher
Edwardgrofs
May 30, 2025
kamagra 100mg prix: achat kamagra - commander Kamagra en ligne
Rodneysog
May 29, 2025
buy antibiotics for uti [url=https://biotpharm.com/#]Biot Pharm[/url] buy antibiotics over the counter
AlfredSuimi
May 29, 2025
Свежие актуальные спорт сегодня новости со всего мира. Результаты матчей, интервью, аналитика, расписание игр и обзоры соревнований. Будьте в курсе главных событий каждый день!
Rodneysog
May 29, 2025
Online medication store Australia [url=http://pharmau24.com/#]Discount pharmacy Australia[/url] Medications online Australia
CurtisAdurl
May 29, 2025
Ero Pharm Fast: Ero Pharm Fast - cheap ed medication
CurtisAdurl
May 29, 2025
Pharm Au24: Pharm Au 24 - Online medication store Australia
DanielPoesk
May 29, 2025
Кухня на заказ Кухня – сердце дома, место, где рождаются кулинарные шедевры и собирается вся семья. Именно поэтому выбор мебели для кухни – задача ответственная и требующая особого подхода. Мебель на заказ в Краснодаре – это возможность создать уникальное пространство, идеально отвечающее вашим потребностям и предпочтениям.
CurtisAdurl
May 29, 2025
Pharm Au24: Pharm Au 24 - online pharmacy australia
Jamespab
May 29, 2025
buy antibiotics from india: over the counter antibiotics - best online doctor for antibiotics
DichaelNog
May 29, 2025
Wow, amazing blog structure! How long have you ever been running a blog for? you make blogging glance easy. The overall look of your website is wonderful, as well as the content material!
us to kwd
Davidunlor
May 29, 2025
https://eropharmfast.com/# Ero Pharm Fast
MatthewDuelm
May 28, 2025
выкуп товара из китая В эпоху глобализации и стремительного развития мировой экономики, Китай занимает ключевую позицию в качестве крупнейшего производственного центра. Организация эффективных и надежных поставок товаров из Китая становится стратегически важной задачей для предприятий, стремящихся к оптимизации затрат и расширению ассортимента. Наша компания предлагает комплексные решения для вашего бизнеса, обеспечивая бесперебойные и выгодные поставки товаров напрямую из Китая.
DichaelNog
May 28, 2025
Hi every one, here every person is sharing these knowledge, therefore it's nice to read this blog, and I used to pay a visit this webpage daily.
my Zain
Davidunlor
May 28, 2025
https://eropharmfast.com/# discount ed pills
DichaelNog
May 28, 2025
My spouse and I absolutely love your blog and find nearly all of your post's to be just what I'm looking for. can you offer guest writers to write content for you? I wouldn't mind publishing a post or elaborating on a few of the subjects you write about here. Again, awesome website!
https://cotkan.ru/user/DustinHomenick/
CurtisAdurl
May 28, 2025
get antibiotics without seeing a doctor: BiotPharm - buy antibiotics from canada
RichardCew
May 28, 2025
Токарные патроны Bison Токарные патроны Bison Запчасти для станков Bison Bial В мире металлообработки, где точность и надежность играют ключевую роль, токарные патроны Bison занимают особое место. Эти инструменты, производимые известной польской компанией Bison Bial, зарекомендовали себя как высококачественные и долговечные компоненты для токарных станков. Они обеспечивают надежный зажим заготовок, что напрямую влияет на качество и скорость обработки.
DanielTem
May 28, 2025
http://biotpharm.com/# buy antibiotics
Rodneysog
May 28, 2025
online ed pills [url=https://eropharmfast.com/#]cheapest online ed treatment[/url] Ero Pharm Fast
Alexistrany
May 28, 2025
«Рентвил» предлагает аренду автомобилей в Краснодаре без залога и ограничений по пробегу по Краснодарскому краю и Адыгее. Требуется стаж от 3 лет и возраст от 23 лет. Оформление за 5 минут онлайн: нужны только фото паспорта и прав. Подача авто на жд вокзал и аэропорт Краснодар Мин-воды Сочи . Компания работает 10 лет , автомобили проходят своевременное ТО. Доступны детские кресла. Бронируйте через сайт аренда авто без залога
CurtisAdurl
May 28, 2025
antibiotic without presription: BiotPharm - Over the counter antibiotics for infection
HarleyMok
May 27, 2025
доставка цветов на дом доставка цветов на дом
Robertkiz
May 27, 2025
Пассажирские перевозки Экибастуз - Новосибирск Развитая сеть пассажирских перевозок играет ключевую роль в обеспечении мобильности населения и укреплении экономических связей между регионами. Наша компания специализируется на организации регулярных и безопасных поездок между городами Сибири и Казахстана, предлагая комфортные условия и доступные цены.
Rodneysog
May 27, 2025
Ero Pharm Fast [url=http://eropharmfast.com/#]Ero Pharm Fast[/url] best ed medication online
CurtisAdurl
May 27, 2025
Pharm Au24: Pharm Au24 - pharmacy online australia
DavidSit
May 27, 2025
https://oboronspecsplav.ru/
StephenVow
May 27, 2025
Thank you, I have just been looking for information about this subject for a while and yours is the greatest I've came upon till now. However, what concerning the bottom line? Are you positive about the supply?
https://excl.com.ua/idealni-skla-ta-korpusy-far-bmw-2er-f45-f46-2014-2021-povnyj-ohlyad
CurtisAdurl
May 27, 2025
buy ed meds: pills for erectile dysfunction online - best ed pills online
Danielgab
May 27, 2025
кайт
LamarzooxY
May 27, 2025
https://www.med2.ru/story.php?id=147094
Stanleyactip
May 27, 2025
«Рентвил» предлагает аренду автомобилей в Краснодаре без залога и ограничений по пробегу по Краснодарскому краю и Адыгее. Требуется стаж от 3 лет и возраст от 23 лет. Оформление за 5 минут онлайн: нужны только фото паспорта и прав. Подача авто на жд вокзал и аэропорт Краснодар Мин-воды Сочи . Компания работает 10 лет , автомобили проходят своевременное ТО. Доступны детские кресла. Бронируйте через сайт авто в аренду краснодар
CurtisAdurl
May 27, 2025
Ero Pharm Fast: Ero Pharm Fast - online ed pharmacy
Rodneysog
May 27, 2025
Discount pharmacy Australia [url=https://pharmau24.com/#]Medications online Australia[/url] online pharmacy australia
Safepestsol
May 27, 2025
A cockroach infestation often produces a distinct, musty, oily odor due to the secretion of pheromones and the decay of dead roaches. The smell can become more noticeable as the infestation grows, making it an indicator of a potential problem. Regular cleaning and pest control are key to addressing the issue and eliminating the odor.
Visit:
https://safepestsol.com/cockroach-infestation-smell/
CurtisAdurl
May 27, 2025
Medications online Australia: Online drugstore Australia - Pharm Au 24
Escript
May 27, 2025
Готовое решение для интернет-магазина — это быстрый старт для бизнеса. Вы экономите время и деньги на разработке, получая функциональную платформу с дизайном и встроенными модулями. Это позволяет сразу приступить к продажам, не тратясь на программистов. Гибкие настройки, удобная админка и адаптивность под мобильные устройства делают готовый сайт идеальным решением для малого и среднего бизнеса.
Charlesmub
May 27, 2025
buy antibiotics over the counter: Biot Pharm - Over the counter antibiotics pills
Rodneysog
May 27, 2025
Ero Pharm Fast [url=https://eropharmfast.com/#]cheap boner pills[/url] how to get ed pills
OLaneAppow
May 26, 2025
Do you have a spam issue on this blog; I also am a blogger, and I was curious about your situation; we have developed some nice procedures and we are looking to trade solutions with other folks, please shoot me an e-mail if interested.
https://ital-parts.com.ua/gde-kupit-nadezhnyy-shoker-dlya-samooborony-luchshie-magaziny-shokeru-com-ua
DichaelNog
May 26, 2025
Hey I know this is off topic but I was wondering if you knew of any widgets I could add to my blog that automatically tweet my newest twitter updates. I've been looking for a plug-in like this for quite some time and was hoping maybe you would have some experience with something like this. Please let me know if you run into anything. I truly enjoy reading your blog and I look forward to your new updates.
https://bookmark4you.win/story.php?title=david-beckham-a-football-icon-and-cultural-phenomenon#discuss
RudolphDoK
May 25, 2025
кайт школа египет
OLaneAppow
May 24, 2025
Fabulous, what a blog it is! This blog presents helpful data to us, keep it up.
hafilat bus card balance check
ShaneAppow
May 24, 2025
Pretty component of content. I simply stumbled upon your web site and in accession capital to say that I get actually enjoyed account your blog posts. Any way I will be subscribing for your augment or even I fulfillment you get right of entry to consistently rapidly.
melbet bonus
StephenVow
May 24, 2025
It's amazing in favor of me to have a website, which is beneficial in support of my know-how. thanks admin
stpierre com
Lorenhag
May 24, 2025
usa peptides tadalafil: TadalAccess - tadalafil how long to take effect
FrankieLar
May 24, 2025
https://tadalaccess.com/# cialis payment with paypal
Lorenhag
May 23, 2025
how well does cialis work: what is cialis pill - what is the difference between cialis and tadalafil?
Lorenhag
May 23, 2025
cialis patent expiration date: order cialis canada - cialis one a day
JosephTes
May 23, 2025
cialis contraindications [url=https://tadalaccess.com/#]Tadal Access[/url] generic cialis super active tadalafil 20mg
Lorenhag
May 23, 2025
side effects of cialis tadalafil: Tadal Access - cialis price walgreens
JosephTes
May 23, 2025
cialis 5 mg tablet [url=https://tadalaccess.com/#]Tadal Access[/url] cheaper alternative to cialis
Lorenhag
May 23, 2025
cialis pills pictures: TadalAccess - cialis windsor canada
FrankieLar
May 22, 2025
https://tadalaccess.com/# cialis prescription online
Ronaldo B.
May 22, 2025
Your tips on enhancing brand identity through decoration are excellent. I’ve found that customizable neon signs do more than light up a space—they communicate tone and story. They’ve become essential in industries like retail, food, and events
Lorenhag
May 22, 2025
cialis patent expiration 2016: TadalAccess - how long before sex should you take cialis
FrankieLar
May 22, 2025
https://tadalaccess.com/# tadalafil professional review
Lorenhag
May 22, 2025
what does cialis look like: where to buy tadalafil online - pictures of cialis
JosephTes
May 22, 2025
cialis canada online [url=https://tadalaccess.com/#]cialis professional ingredients[/url] cialis high blood pressure
Lorenhag
May 22, 2025
cialis 20 mg tablets and prices: best place to get cialis without pesricption - cialis information
JosephTes
May 22, 2025
free coupon for cialis [url=https://tadalaccess.com/#]levitra vs cialis[/url] super cialis
Scottdroca
May 22, 2025
how to get cialis prescription online: what doe cialis look like - where to buy cialis soft tabs
Lorenhag
May 22, 2025
cialis super active reviews: tadalafil tablets - cialis from mexico
FrankieLar
May 21, 2025
https://tadalaccess.com/# cialis dapoxetine overnight shipment
JosephTes
May 21, 2025
tadalafil no prescription forum [url=https://tadalaccess.com/#]TadalAccess[/url] buy cialis generic online
Lorenhag
May 21, 2025
cialis trial: cialis 20mg - cialis pills pictures
JosephTes
May 21, 2025
can cialis cause high blood pressure [url=https://tadalaccess.com/#]tadalafil brand name[/url] tadalafil tablets 20 mg side effects
Lorenhag
May 21, 2025
cialis indications: Tadal Access - sildalis sildenafil tadalafil
JosephTes
May 21, 2025
buy cialis free shipping [url=https://tadalaccess.com/#]Tadal Access[/url] cialis how to use
Lorenhag
May 21, 2025
cialis shelf life: Tadal Access - cheap cialis with dapoxetine
Scottdroca
May 21, 2025
best place to buy liquid tadalafil: tadalafil generic in usa - cialis free trial canada
Lorenhag
May 21, 2025
what is the normal dose of cialis: TadalAccess - cialis indications
Scottdroca
May 21, 2025
black cialis: TadalAccess - cialis generic online
JosephTes
May 20, 2025
cialis canadian purchase [url=https://tadalaccess.com/#]TadalAccess[/url] whats cialis
Lorenhag
May 20, 2025
cialis 5mg how long does it take to work: TadalAccess - what happens if you take 2 cialis
JosephTes
May 20, 2025
cialis free trial voucher [url=https://tadalaccess.com/#]cialis 20mg[/url] best price for tadalafil
Scottdroca
May 20, 2025
cialis coupon online: cialis substitute - cialis 2.5 mg
Lorenhag
May 20, 2025
cialis superactive: Tadal Access - cialis how does it work
JosephTes
May 20, 2025
can cialis cause high blood pressure [url=https://tadalaccess.com/#]cialis using paypal in australia[/url] cialis price cvs
Scottdroca
May 20, 2025
tadalafil (megalis-macleods) reviews: TadalAccess - cialis available in walgreens over counter??
FrankieLar
May 20, 2025
https://tadalaccess.com/# cialis not working anymore
Lorenhag
May 20, 2025
tadalafil generic 20 mg ebay: Tadal Access - cialis 40 mg
JosephTes
May 20, 2025
cialis online canada [url=https://tadalaccess.com/#]TadalAccess[/url] cialis online reviews
Scottdroca
May 20, 2025
purchasing cialis: what is cialis - cialis w/dapoxetine
Lorenhag
May 19, 2025
cialis pill canada: cialis 100 mg usa - how long does it take for cialis to start working
Scottdroca
May 19, 2025
tadalafil without a doctor prescription: Tadal Access - cialis las vegas
Lorenhag
May 19, 2025
how long i have to wait to take tadalafil after antifugal: maximpeptide tadalafil review - when should you take cialis
JosephTes
May 19, 2025
cialis price [url=https://tadalaccess.com/#]cialis paypal[/url] tadalafil (exilar-sava healthcare) [generic version of cialis] (rx) lowest price
Scottdroca
May 19, 2025
pastilla cialis: cialis super active plus - cialis coupon walmart
Lorenhag
May 19, 2025
cialis online without a prescription: Tadal Access - cheap cialis 20mg
RamiroDet
May 19, 2025
You like wild girls? On african pussy rubbing we got plump and slimy slit up close and juicy. This is what real dark heat looks like when it's slippery and ready.
JosephTes
May 19, 2025
where to get free samples of cialis [url=https://tadalaccess.com/#]cialis black[/url] does cialis shrink the prostate
Scottdroca
May 19, 2025
canadian pharmacy tadalafil 20mg: evolution peptides tadalafil - cialis onset
Lorenhag
May 19, 2025
tadalafil tablets erectafil 20: no prescription tadalafil - cialis used for
JosephTes
May 18, 2025
is generic tadalafil as good as cialis [url=https://tadalaccess.com/#]cialis precio[/url] cialis in las vegas
Lorenhag
May 18, 2025
cialis 100 mg usa: tadalafil citrate - mambo 36 tadalafil 20 mg
Scottdroca
May 18, 2025
cialis drug interactions: purchase generic cialis - vardenafil and tadalafil
FrankieLar
May 18, 2025
https://tadalaccess.com/# cialis online without pres
Wisdom of Athena
May 18, 2025
Wisdom of Athena is a game-changer! The strategic depth and immersive experience make it a must-play for anyone who loves mythology and mind-challenging gameplay!Wisdom Of Athena
Lorenhag
May 18, 2025
when will generic cialis be available: tadalafil generic usa - cialis generic release date
RamiroDet
May 18, 2025
HTTPS://AFRICANPUSSYPICS.COM/ is fire — mature ladies and teens bounce on hard, gobble thick dicks, and flood the sheets with spray. It's nasty, raw, and free as hell.
Scottdroca
May 18, 2025
tadalafil vidalista: Tadal Access - cialis advertisement
FrankieLar
May 18, 2025
https://tadalaccess.com/# buy cialis from canada
GeorgeSpeax
May 18, 2025
BLACK NAKED GIRLS has stripped photos of brown hotties teasing with melons and backside, showing you what worship really looks like in motion. Let it all out and ride the wave.
Scottdroca
May 18, 2025
black cialis: cialis with out a prescription - when does the cialis patent expire
Lorenhag
May 18, 2025
cialis 20mg review: when will generic cialis be available in the us - where can i buy cialis
Scottdroca
May 18, 2025
cialis at canadian pharmacy: TadalAccess - cialis tadalafil
JosephTes
May 18, 2025
tadalafil no prescription forum [url=https://tadalaccess.com/#]cheap generic cialis canada[/url] what is the cost of cialis
JosephTes
May 17, 2025
cheap cialis online overnight shipping [url=https://tadalaccess.com/#]Tadal Access[/url] cialis professional vs cialis super active
FrankieLar
May 17, 2025
https://tadalaccess.com/# where to buy tadalafil online
Scottdroca
May 17, 2025
cialis generic online: paypal cialis no prescription - cialis with dapoxetine
JosephTes
May 17, 2025
cialis a domicilio new jersey [url=https://tadalaccess.com/#]cialis by mail[/url] cialis generic name
Lorenhag
May 17, 2025
cialis 20 mg duration: mint pharmaceuticals tadalafil reviews - order generic cialis
ThomasVeW
May 17, 2025
nude black girls pictures is stacked with dark-skinned babes giving blowjobs and taking cream all over their look. You'll desire the way they ride and get pounded with no shame.
Scottdroca
May 17, 2025
tadalafil citrate powder: tadalafil dose for erectile dysfunction - tadalafil dose for erectile dysfunction
JosephTes
May 17, 2025
cheap cialis [url=https://tadalaccess.com/#]tadalafil daily use[/url] cialis store in philippines
Lorenhag
May 17, 2025
when will cialis be generic: Tadal Access - cheap canadian cialis
JosephTes
May 17, 2025
cialis online no prescription [url=https://tadalaccess.com/#]TadalAccess[/url] buy cialis 20mg
Lorenhag
May 17, 2025
whats the max safe dose of tadalafil xtenda for a healthy man: Tadal Access - pictures of cialis
Lorenhag
May 16, 2025
cialis 5mg 10mg no prescription: Tadal Access - cialis tadalafil discount
Scottdroca
May 16, 2025
cialis alternative: buy cialis pro - can i take two 5mg cialis at once
Lorenhag
May 16, 2025
cialis generic: TadalAccess - buy cialis online without prescription
JosephTes
May 16, 2025
cialis tadalafil tablets [url=https://tadalaccess.com/#]how much does cialis cost with insurance[/url] cialis prices at walmart
Lorenhag
May 16, 2025
canada drugs cialis: para que sirve las tabletas cialis tadalafil de 5mg - tadalafil 5mg generic from us
JosephTes
May 16, 2025
tadalafil walgreens [url=https://tadalaccess.com/#]TadalAccess[/url] cialis cheapest price
Scottdroca
May 16, 2025
does cialis make you harder: TadalAccess - buy cialis canadian
ThomasVeW
May 16, 2025
Don't miss black naked girl if you love brown queenes showing off their coochie and getting get naileded hard. These babes are on fire and ready to fulfill all your cravings.
Lorenhag
May 16, 2025
original cialis online: Tadal Access - how long does cialis take to work 10mg
Scottdroca
May 16, 2025
cialis 5 mg: TadalAccess - cialis dosage reddit
JosephTes
May 16, 2025
cialis savings card [url=https://tadalaccess.com/#]Tadal Access[/url] cialis delivery held at customs
Safepestsol`
May 16, 2025
A cockroach infestation often produces a distinct, musty, oily odor due to the secretion of pheromones and the decay of dead roaches. The smell can become more noticeable as the infestation grows, making it an indicator of a potential problem. Regular cleaning and pest control are key to addressing the issue and eliminating the odor.
Visit:
https://safepestsol.com/cockroach-infestation-smell/
Lorenhag
May 16, 2025
cialis one a day: TadalAccess - buy cheap cialis online with mastercard
JosephTes
May 15, 2025
best price on generic tadalafil [url=https://tadalaccess.com/#]cheaper alternative to cialis[/url] were can i buy cialis
Lorenhag
May 15, 2025
cialis canada prices: cialis pill canada - tadalafil and voice problems
Scottdroca
May 15, 2025
cialis canada sale: how to get cialis without doctor - cialis online no prescription
JosephTes
May 15, 2025
paypal cialis no prescription [url=https://tadalaccess.com/#]cialis tadalafil online paypal[/url] cialis patient assistance
Lorenhag
May 15, 2025
cialis online aust: TadalAccess - purchase brand cialis
Scottdroca
May 15, 2025
how long before sex should you take cialis: Tadal Access - cialis free trial voucher 2018
JosephTes
May 15, 2025
cialis and melanoma [url=https://tadalaccess.com/#]TadalAccess[/url] does medicare cover cialis
Lorenhag
May 15, 2025
cialis 80 mg dosage: cialis and dapoxetime tabs in usa - tadalafil tablets
Scottdroca
May 15, 2025
how long does cialis stay in your system: cialis lower blood pressure - cheap cialis canada
JosephTes
May 15, 2025
how much tadalafil to take [url=https://tadalaccess.com/#]Tadal Access[/url] generic cialis super active tadalafil 20mg
Lorenhag
May 15, 2025
cialis for sale brand: reddit cialis - how much does cialis cost at walmart
Mike Hurley
May 15, 2025
It's great to see a spotlight on logistics in South Asia. A reliable freight forwarding company in Sri Lanka can really elevate trade operations
rapid
May 14, 2025
If you are making a small payment while in arrears, you can use methods such as validating the transaction event or changing the IP. There are also methods such as disabling airplane mode and trying to pay through a different payment agent. It is also important to allow for delinquency through the automatic payment setting that allows the carrier to issue a separate authorization for the delinquent fee.
소액결제현금화
Scottdroca
May 14, 2025
does cialis make you harder: tadalafil from nootropic review - buy cialis generic online
Lorenhag
May 14, 2025
purchase cialis: Tadal Access - cialis com free sample
JosephTes
May 14, 2025
cialis online reviews [url=https://tadalaccess.com/#]cialis generic overnite shipping[/url] cialis online reviews
Scottdroca
May 14, 2025
cialis insurance coverage blue cross: TadalAccess - what is the difference between cialis and tadalafil
Lorenhag
May 14, 2025
tadalafil softsules tuf 20: Tadal Access - cialis generic over the counter
JosephTes
May 14, 2025
purchase brand cialis [url=https://tadalaccess.com/#]Tadal Access[/url] when will cialis be generic
Scottdroca
May 14, 2025
cialis 20 milligram: TadalAccess - cialis 10 mg
Lorenhag
May 14, 2025
cialis free trial canada: cialis lower blood pressure - is tadalafil from india safe
JosephTes
May 14, 2025
what happens if a woman takes cialis [url=https://tadalaccess.com/#]Tadal Access[/url] cialis for women
Scottdroca
May 14, 2025
how long does it take for cialis to take effect: cialis professional 20 lowest price - canadian cialis online
Lorenhag
May 14, 2025
is tadalafil from india safe: tadalafil review forum - cialis online paypal
JosephTes
May 14, 2025
cialis how long does it last [url=https://tadalaccess.com/#]cialis tadalafil 10 mg[/url] cialis para que sirve
Oscargef
May 13, 2025
PredniHealth: PredniHealth - how can i order prednisone
Russellfeeve
May 13, 2025
amoxicillin 500 mg tablets: amoxicillin medicine over the counter - order amoxicillin online uk
MatthewTom
May 13, 2025
can i purchase amoxicillin online [url=https://amohealthcare.store/#]amoxicillin medicine over the counter[/url] Amo Health Care
Oscargef
May 13, 2025
amoxicillin 500 mg: Amo Health Care - Amo Health Care
MatthewTom
May 13, 2025
cost of clomid no prescription [url=http://clomhealth.com/#]Clom Health[/url] generic clomid for sale
Oscargef
May 13, 2025
buy prednisone no prescription: prednisone 20 mg tablet - steroids prednisone for sale
Russellfeeve
May 13, 2025
Amo Health Care: amoxicillin tablets in india - azithromycin amoxicillin
MatthewTom
May 13, 2025
where can i get clomid now [url=http://clomhealth.com/#]Clom Health[/url] buying clomid without prescription
Oscargef
May 13, 2025
Amo Health Care: amoxicillin 200 mg tablet - Amo Health Care
JudsonZoown
May 13, 2025
Amo Health Care: Amo Health Care - amoxicillin 500mg pill
Russellfeeve
May 13, 2025
how can i get cheap clomid without prescription: Clom Health - where buy cheap clomid without insurance
Oscargef
May 12, 2025
cost of generic clomid: Clom Health - how to get generic clomid without dr prescription
MatthewTom
May 12, 2025
PredniHealth [url=http://prednihealth.com/#]PredniHealth[/url] prednisone 2 mg daily
JudsonZoown
May 12, 2025
Amo Health Care: amoxicillin without a doctors prescription - amoxicillin 500 mg capsule
Russellfeeve
May 12, 2025
where to buy generic clomid without prescription: Clom Health - where to get clomid
Oscargef
May 12, 2025
prednisone 20mg price in india: PredniHealth - 60 mg prednisone daily
MatthewTom
May 12, 2025
PredniHealth [url=https://prednihealth.shop/#]order prednisone online canada[/url] prednisone online pharmacy
JudsonZoown
May 12, 2025
PredniHealth: prednisone cream over the counter - generic over the counter prednisone
Russellfeeve
May 12, 2025
Amo Health Care: amoxicillin script - buy amoxicillin online no prescription
Oscargef
May 12, 2025
how to get cheap clomid online: get cheap clomid without rx - can i order cheap clomid for sale
MatthewTom
May 12, 2025
amoxicillin 800 mg price [url=https://amohealthcare.store/#]where to buy amoxicillin 500mg without prescription[/url] Amo Health Care
JudsonZoown
May 12, 2025
amoxicillin over the counter in canada: Amo Health Care - amoxicillin 500mg for sale uk
Russellfeeve
May 12, 2025
where can i buy clomid without insurance: Clom Health - can you buy generic clomid tablets
Oscargef
May 12, 2025
Amo Health Care: amoxicillin 500 mg capsule - Amo Health Care
JudsonZoown
May 12, 2025
PredniHealth: prednisone 2.5 mg tab - prednisone 10mg tablets
MatthewTom
May 12, 2025
PredniHealth [url=https://prednihealth.shop/#]PredniHealth[/url] canada buy prednisone online
Jeremyfax
May 11, 2025
modafinil legality: purchase Modafinil without prescription - verified Modafinil vendors
LorenzoBlize
May 11, 2025
affordable ED medication [url=http://zipgenericmd.com/#]buy generic Cialis online[/url] discreet shipping ED pills
LorenzoBlize
May 11, 2025
modafinil legality [url=http://modafinilmd.store/#]modafinil legality[/url] Modafinil for sale
Albertoseino
May 11, 2025
doctor-reviewed advice: Modafinil for sale - modafinil pharmacy
RonaldFOEFS
May 11, 2025
https://modafinilmd.store/# modafinil pharmacy
RobertKet
May 11, 2025
verified Modafinil vendors: doctor-reviewed advice - modafinil pharmacy
RobertKet
May 10, 2025
buy modafinil online: safe modafinil purchase - Modafinil for sale
LorenzoBlize
May 10, 2025
legal Modafinil purchase [url=http://modafinilmd.store/#]buy modafinil online[/url] modafinil pharmacy
RobertKet
May 10, 2025
discreet shipping ED pills: affordable ED medication - Cialis without prescription
RobertKet
May 10, 2025
buy generic Viagra online: safe online pharmacy - generic sildenafil 100mg
RobertKet
May 9, 2025
order Cialis online no prescription: secure checkout ED drugs - cheap Cialis online
Albertoseino
May 9, 2025
buy modafinil online: verified Modafinil vendors - legal Modafinil purchase
RonaldFOEFS
May 9, 2025
https://modafinilmd.store/# modafinil pharmacy
LorenzoBlize
May 9, 2025
FDA approved generic Cialis [url=http://zipgenericmd.com/#]cheap Cialis online[/url] best price Cialis tablets
Jeremyfax
May 9, 2025
generic sildenafil 100mg: discreet shipping - buy generic Viagra online
RobertKet
May 9, 2025
generic tadalafil: best price Cialis tablets - FDA approved generic Cialis
Albertoseino
May 9, 2025
best price for Viagra: order Viagra discreetly - generic sildenafil 100mg
RonaldFOEFS
May 9, 2025
https://zipgenericmd.shop/# secure checkout ED drugs
RobertKet
May 9, 2025
FDA approved generic Cialis: secure checkout ED drugs - discreet shipping ED pills
Jeremyfax
May 9, 2025
affordable ED medication: buy generic Cialis online - order Cialis online no prescription
LorenzoBlize
May 9, 2025
Viagra without prescription [url=https://maxviagramd.shop/#]fast Viagra delivery[/url] discreet shipping
Albertoseino
May 9, 2025
buy modafinil online: purchase Modafinil without prescription - safe modafinil purchase
RobertKet
May 9, 2025
online Cialis pharmacy: cheap Cialis online - secure checkout ED drugs
RonaldFOEFS
May 9, 2025
https://maxviagramd.shop/# discreet shipping
Jeremyfax
May 9, 2025
fast Viagra delivery: no doctor visit required - buy generic Viagra online
LorenzoBlize
May 9, 2025
generic tadalafil [url=https://zipgenericmd.com/#]buy generic Cialis online[/url] generic tadalafil
RobertKet
May 9, 2025
buy generic Viagra online: discreet shipping - safe online pharmacy
Randalllonge
May 8, 2025
Hit up Mature Milf Pussy to check out older hot mamas showing their nude coochie ready wide for your eyes only. These freaks are built to get pounded, and every one of our shots proves it.
Davidseimi
May 8, 2025
You haven't lived until you've seen a granny in a white storm circle, drooling load while begging for more. Hit BESTSEXPICS to see why these experienced hoes are legendary.
Richarddulty
May 7, 2025
If anal and double penetration are your vibe, https://maturemilfpussy.net/ has what you need. These seasoned babes take more than most can handle and show it off in full HD images.
Brianexill
May 7, 2025
Hit up Mature Milf Pussy to check out older lusty cougars showing their nude slit ready wide for your eyes only. These freaks are built to get pounded, and every one of our pics proves it.
Matthewmon
May 7, 2025
Catch a experienced vintage babe giving mouth rides to a hard-bodied stud, then taking cum deep in her butt. That's the kind of nasty we keep live on BESTSEXPICS.NET, and it's all free to click.
Matthewmon
May 6, 2025
www.bestsexpics.net is packed with collections of real vintage babe getting their pussy stretched and ass drilled. Some even take double stuffing. It's raw, filthy, and totally stripped.
MichealSab
May 4, 2025
In MILFMUTTERFOTOS.COM findest du oben ohnee geile Mamas, die sich nach echtem Rammeln sehnen. Diese Mutters zeigen alles – Löcher, die nur darauf warten, benutzt zu werden. Unsere Bilderreihe ist kostenlos und komplett versaut.
Kelvinsedia
May 4, 2025
Bei HTTPS://MILFMUTTERFOTOS.COM/ haben wir reife Fraus, die wissen, wie man einen Ehemann mit Dominanz und Dildo-Gurt behandelt. Diese MILFs lieben es, die Kontrolle zu Гјbernehmen. Die SchnappschГјsse sind frei verfГјgbar und nackt.
Kelvinsedia
May 3, 2025
bilder bietet dir Erwachsenenfilm mit geile Mamas, die in echten Fremdfick-Fan Szenen alles geben. Schwarze Dödele, offene Münder und heiße Mutti - Bilder wie aus deinen schmutzigsten Träumen.
Thermal Transfter Labels
May 1, 2025
Thank you for the insightful and creative article! It was packed with great ideas and valuable information. I really appreciate the efforts from a top Direct Thermal Labels. Your expertise is invaluable.
ElmerSip
May 1, 2025
pin-up: pin up azerbaycan - pin-up
Kennethsheby
April 30, 2025
вавада зеркало: vavada casino - вавада
ZackaryCaush
April 30, 2025
https://pinuprus.pro/# пинап казино
Richardmat
April 30, 2025
пинап казино [url=https://pinuprus.pro/#]пин ап зеркало[/url] пинап казино
ElmerSip
April 30, 2025
pin-up casino giris: pin-up casino giris - pin up az
Kennethsheby
April 30, 2025
vavada: вавада казино - vavada вход
ZackaryCaush
April 30, 2025
http://pinupaz.top/# pin up casino
ElmerSip
April 30, 2025
pin up: pin up azerbaycan - pin up casino
Richardmat
April 30, 2025
pin up az [url=http://pinupaz.top/#]pin-up[/url] pin up azerbaycan
Kennethsheby
April 30, 2025
pin-up casino giris: pinup az - pin-up casino giris
ZackaryCaush
April 30, 2025
http://vavadavhod.tech/# vavada
ElmerSip
April 30, 2025
vavada: вавада казино - vavada вход
Richardmat
April 30, 2025
pin up [url=https://pinupaz.top/#]pin-up casino giris[/url] pin-up casino giris
Kennethsheby
April 30, 2025
пинап казино: pin up вход - пин ап казино
ZackaryCaush
April 30, 2025
http://pinuprus.pro/# пинап казино
ElmerSip
April 30, 2025
вавада: вавада официальный сайт - вавада казино
Richardmat
April 30, 2025
пин ап казино [url=https://pinuprus.pro/#]пин ап зеркало[/url] пин ап казино официальный сайт
Kennethsheby
April 30, 2025
пин ап зеркало: пинап казино - пин ап вход
ZackaryCaush
April 30, 2025
http://pinupaz.top/# pin up azerbaycan
ElmerSip
April 30, 2025
pin up: pin-up casino giris - pin-up
Michaeljouch
April 30, 2025
mail order pharmacy india [url=http://medicinefromindia.com/#]online pharmacy india[/url] MedicineFromIndia
MichaelFaulp
April 30, 2025
canadianpharmacy com: Canadian pharmacy shipping to USA - canadian pharmacy phone number
Stevendrype
April 30, 2025
medicine courier from India to USA: Medicine From India - indian pharmacy online
Dannysit
April 29, 2025
mexican rx online: RxExpressMexico - mexico pharmacies prescription drugs
MichaelFaulp
April 29, 2025
RxExpressMexico: mexican online pharmacy - RxExpressMexico
Michaeljouch
April 29, 2025
mexican online pharmacies prescription drugs [url=https://rxexpressmexico.shop/#]mexican pharmaceuticals online[/url] mexican online pharmacy
Walterhap
April 29, 2025
https://expressrxcanada.com/# reliable canadian pharmacy
Dannysit
April 29, 2025
Rx Express Mexico: mexican rx online - mexican rx online
Stevendrype
April 29, 2025
mexican online pharmacy: buying from online mexican pharmacy - mexico pharmacy order online
Walterhap
April 29, 2025
http://expressrxcanada.com/# best canadian online pharmacy
MichaelFaulp
April 29, 2025
MedicineFromIndia: Medicine From India - MedicineFromIndia
Michaeljouch
April 29, 2025
Rx Express Mexico [url=http://rxexpressmexico.com/#]mexico drug stores pharmacies[/url] Rx Express Mexico
Dannysit
April 29, 2025
medicine courier from India to USA: indian pharmacy - MedicineFromIndia
Stevendrype
April 29, 2025
ed drugs online from canada: Express Rx Canada - best rated canadian pharmacy
Walterhap
April 29, 2025
https://rxexpressmexico.com/# buying prescription drugs in mexico
Dannysit
April 29, 2025
medicine courier from India to USA: Medicine From India - indian pharmacy online shopping
MichaelFaulp
April 29, 2025
Medicine From India: medicine courier from India to USA - MedicineFromIndia
Stevendrype
April 29, 2025
india online pharmacy: Online medicine order - MedicineFromIndia
Michaeljouch
April 29, 2025
Medicine From India [url=http://medicinefromindia.com/#]Medicine From India[/url] indian pharmacy
Walterhap
April 29, 2025
https://rxexpressmexico.com/# mexico pharmacy order online
Safepestsol
April 29, 2025
Ants can live for varying lengths of time depending on their species. Worker ants typically live for a few months to a year, while queens can live for several years, sometimes up to 15 years, depending on the species and environmental conditions.
Visit:
https://safepestsol.com/how-long-ants-can-live/
Dannysit
April 29, 2025
canadian pharmacy king reviews: Canadian pharmacy shipping to USA - my canadian pharmacy reviews
Stevendrype
April 29, 2025
canadian pharmacy no scripts: Generic drugs from Canada - best mail order pharmacy canada
MichaelFaulp
April 29, 2025
cheap canadian pharmacy: Buy medicine from Canada - canadian pharmacy world
Michaeljouch
April 29, 2025
indian pharmacy online shopping [url=https://medicinefromindia.shop/#]indian pharmacy[/url] indian pharmacy
Stevendrype
April 28, 2025
mexico drug stores pharmacies: Rx Express Mexico - mexico pharmacy order online
Dannysit
April 28, 2025
canadian pharmacy 24h com safe: Express Rx Canada - my canadian pharmacy
MichaelFaulp
April 28, 2025
medicine courier from India to USA: indian pharmacy online - indian pharmacy online shopping
Michaeljouch
April 28, 2025
mexico drug stores pharmacies [url=https://rxexpressmexico.com/#]mexican online pharmacy[/url] Rx Express Mexico
jiliapp
April 28, 2025
I really enjoyed reading your comment. Your thoughts were so well-organized and provided a great addition to the post. I appreciate how clearly you articulated your viewpoint, and I look forward to reading more of your thoughts!jiliapp
Walterhap
April 28, 2025
https://expressrxcanada.com/# canadian pharmacy meds reviews
Stevendrype
April 28, 2025
canadian pharmacy scam: Buy medicine from Canada - cheap canadian pharmacy
Dannysit
April 28, 2025
Medicine From India: Medicine From India - indian pharmacy
MichaelFaulp
April 28, 2025
canada ed drugs: Express Rx Canada - buy drugs from canada
Michaeljouch
April 28, 2025
my canadian pharmacy rx [url=http://expressrxcanada.com/#]ExpressRxCanada[/url] vipps canadian pharmacy
Walterhap
April 28, 2025
http://expressrxcanada.com/# www canadianonlinepharmacy
Dannysit
April 28, 2025
mexican drugstore online: п»їbest mexican online pharmacies - mexico drug stores pharmacies
Stevendrype
April 28, 2025
RxExpressMexico: mexican online pharmacy - Rx Express Mexico
MichaelFaulp
April 28, 2025
best canadian pharmacy online: Buy medicine from Canada - canada cloud pharmacy
PeterUnomb
April 28, 2025
kamagra pas cher [url=https://kamagraprix.com/#]acheter kamagra site fiable[/url] kamagra pas cher
BernardVeida
April 28, 2025
kamagra livraison 24h: Achetez vos kamagra medicaments - kamagra pas cher
Robertmut
April 27, 2025
https://pharmafst.shop/# pharmacie en ligne france pas cher
BernardVeida
April 27, 2025
pharmacie en ligne france fiable: Pharmacie Internationale en ligne - pharmacie en ligne fiable pharmafst.com
BernardVeida
April 26, 2025
acheter mГ©dicament en ligne sans ordonnance: Achat mГ©dicament en ligne fiable - pharmacie en ligne france livraison internationale pharmafst.com
Bradleyfup
April 26, 2025
pharmacie en ligne avec ordonnance: pharmacie en ligne pas cher - acheter mГ©dicament en ligne sans ordonnance pharmafst.com
PeterUnomb
April 26, 2025
vente de mГ©dicament en ligne [url=https://pharmafst.shop/#]pharmacie en ligne sans ordonnance[/url] vente de mГ©dicament en ligne pharmafst.shop
Robertmut
April 26, 2025
https://pharmafst.shop/# vente de mГ©dicament en ligne
Robertmut
April 26, 2025
https://tadalmed.shop/# Achat Cialis en ligne fiable
BernardVeida
April 26, 2025
Acheter Cialis 20 mg pas cher: Acheter Cialis - Cialis sans ordonnance 24h tadalmed.shop
Bradleyfup
April 26, 2025
kamagra gel: kamagra oral jelly - kamagra pas cher
Robertmut
April 26, 2025
https://kamagraprix.com/# acheter kamagra site fiable
BilliesniCt
April 26, 2025
pharmacie en ligne france fiable: pharmacie en ligne fiable - pharmacie en ligne fiable pharmafst.com
PeterUnomb
April 25, 2025
Achetez vos kamagra medicaments [url=http://kamagraprix.com/#]acheter kamagra site fiable[/url] kamagra oral jelly
Bradleyfup
April 25, 2025
kamagra gel: kamagra gel - kamagra pas cher
Robertmut
April 25, 2025
https://tadalmed.shop/# Tadalafil achat en ligne
Bradleyfup
April 25, 2025
Tadalafil 20 mg prix sans ordonnance: Tadalafil achat en ligne - Tadalafil sans ordonnance en ligne tadalmed.shop
Robertmut
April 25, 2025
https://tadalmed.shop/# cialis generique
BilliesniCt
April 25, 2025
kamagra pas cher: kamagra 100mg prix - acheter kamagra site fiable
BernardVeida
April 25, 2025
pharmacie en ligne livraison europe: pharmacie en ligne livraison europe - pharmacie en ligne pharmafst.com
PeterUnomb
April 25, 2025
kamagra en ligne [url=http://kamagraprix.com/#]kamagra pas cher[/url] achat kamagra
Bradleyfup
April 25, 2025
Achat Cialis en ligne fiable: Tadalafil 20 mg prix sans ordonnance - cialis generique tadalmed.shop
Robertmut
April 25, 2025
https://pharmafst.com/# pharmacie en ligne france livraison belgique
BernardVeida
April 25, 2025
Achat mГ©dicament en ligne fiable: pharmacie en ligne pas cher - Pharmacie en ligne livraison Europe pharmafst.com
BilliesniCt
April 25, 2025
achat kamagra: Kamagra Oral Jelly pas cher - kamagra pas cher
PeterUnomb
April 25, 2025
vente de mГ©dicament en ligne [url=https://pharmafst.com/#]Livraison rapide[/url] pharmacies en ligne certifiГ©es pharmafst.shop
Bradleyfup
April 25, 2025
kamagra oral jelly: kamagra en ligne - Kamagra Commander maintenant
BernardVeida
April 25, 2025
acheter kamagra site fiable: kamagra pas cher - Kamagra Oral Jelly pas cher
DavidSaisp
April 24, 2025
Kamagra Commander maintenant: kamagra oral jelly - Acheter Kamagra site fiable
Edwardtoupe
April 23, 2025
olympe casino: casino olympe - olympe casino
Focal one
March 1, 2025
I'm extremely impressed together with your writing skills
and also with the format for your weblog. Is that this a
paid subject or did you modify it yourself? Either
way keep up the excellent quality writing, it's uncommon to see a
nice blog like this one today.. https://menbehealth.wordpress.com/
RandyZorie
February 21, 2025
These girls aren't just focused on the physical; many of them are eager to take part in sensual stripping, pleasuring their orgasmic selves, and even indulging in the pleasures of others. The variety of actions displayed in these galleries will captivate, as these black beauties pour their all into every functionality. This extensive assortment of XXX offers ample material to fulfill all of your desires - especially if you've got a penchant for ebony goddesses. Because the actions unfolds, witness stiff members erupting with interest and smiling faces adorned with the aftermath. Having a plethora of black porn stars, hundreds of top-notch images, and a variety of hardcore scenes, this collection of galleries will please even the most discerning of tastes.
Shivani Raja
October 4, 2020
Thank you SO much for this tutorial!!
Drake Ramoray
July 30, 2020
Thanx For sharing! That was really helpful! I was wondering what was the font you used for the "Hustle" one?
Chris
July 26, 2020
Where is the free template? I don't see any link. Thanks