
Design, Development, WordPress
Rebuilding the Flywheel pricing table as a custom block (in about 10 min)

The (Gutenberg) block editor is undoubtedly the center of modern WordPress. With full site editing on its way to WordPress Core, blocks and all they promise are here to stay.
However, blocks don’t always do what we want or look the way we like. If you design and build sites for a living, you know that cookie-cutter stuff only goes so far on the web. At some point, we need that “block” on the page to look or behave in a really particular way.
Custom blocks are the solution here! But custom blocks require, for many folks who’ve been rolling in WordPress for a while, a very different approach to dev.
Different? Yes!
Difficult? No!
I’m going to show you how you can easily build a completely custom block. And it’s gonna take about 10 minutes. For any freelancer or agency crew here wanting to skill-up around the block editor, I think you’ll like this!
The block
Let’s imagine we’re working on a project and a designer hands us a sweet design for an eCommerce website. It uses the best of WordPress + WooCommerce, but there are a few pieces that just don’t work off the shelf. One of these is this right here:

Holup! This looks familiar! 😉
Yep, we’re gonna rebuild the Flywheel pricing table as a custom block. ? There are plug-n-play pricing table blocks around, but ours here is pretty unique, so we’re going to roll our own.
The set-up
The hero of this story is a plugin called Genesis Custom Blocks. It’s free on wordpress.org, and there’s a Pro version that offers some cool advanced features, including:
- Fresh WordPress install – compliments of Local
- Genesis Custom Blocks (free one) installed and active
- A child theme for the Genesis Block Theme
Important Note: Genesis Custom Blocks is not dependent on the Genesis Framework, the above Genesis Block Theme, or any other plugins or themes.
Registering & configuring the block
The beauty of this plugin is that we get to do so much in the WordPress admin.
In the WordPress admin, in the lefthand menu, go to Custom Blocks > Add New
The screen we now see is the Block Builder, which is where we’re going to configure a bunch of things for our block including adding fields.
The way this plugin works is that it creates custom blocks where the user, working in the Block Editor, enters content and data via fields in a form-like interface. This simplified/opinionated interface is one of the things that speeds up the custom block creation process. You don’t need to figure out the input UI.
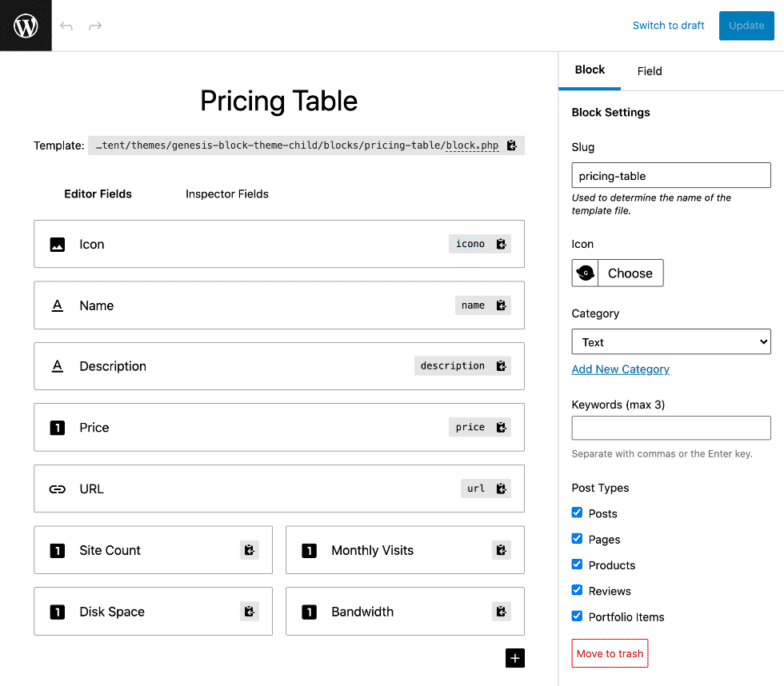
The Block Details we add are:
- Name: Pricing Table
- Slug: pricing-table
- Icon: Genesis Planet
The Fields we add are:
| Name | Slug | Field Type |
| Icon | icon | Image |
| Name | name | Text |
| Description | description | Text |
| Price | price | Number |
| Button URL | button-url | URL |
| Site Count | site-count | Number |
| Monthly Visits | monthly-visits | Number |
| Disk Space | disk-space | Number |
| Bandwidth | bandwidth | Number |
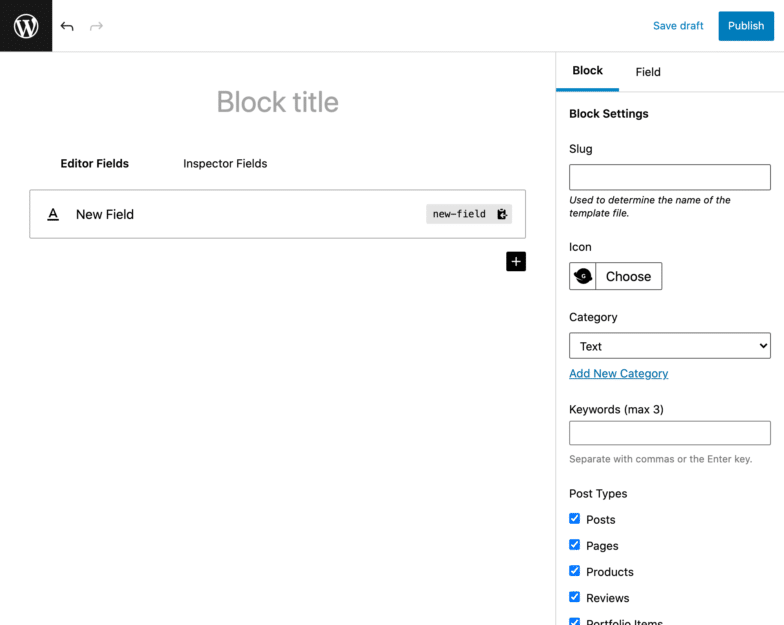
Adding fields to our custom block looks like this:
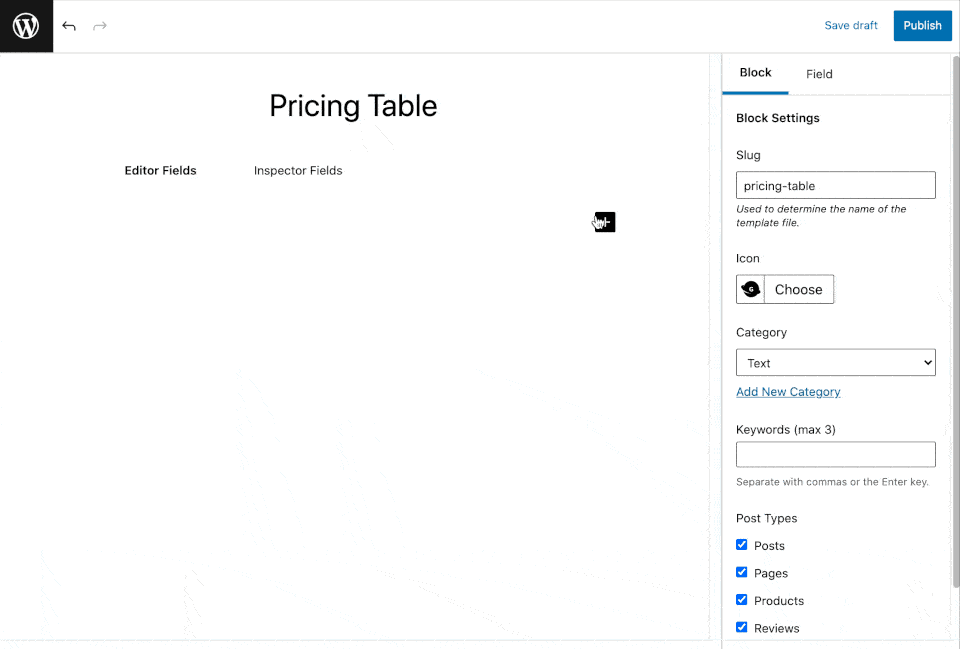
Once we’ve added all our fields, this is what it looks like:
When we hit publish, we get a prompt prompting us what to do next.
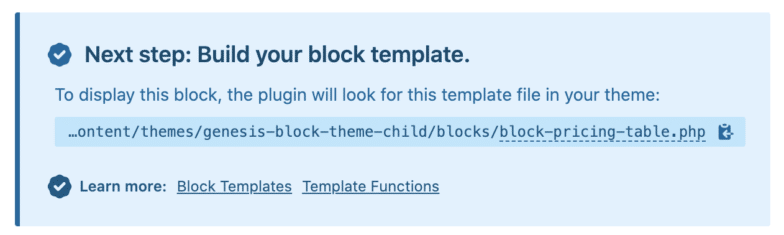
This leads us to the next step:
Templating the block
The block is actually registered and available in the block editor now. You could jump over to a new post/page and add the block like you would any other. It would not (yet) display anything though. This is where templating comes in.
Genesis Custom Blocks lets WordPress devs leverage a lot of the templating practices we’ve honed over the last decade or so. It’s super simple and will feel very familiar.
In our child theme, we add a couple of new folders and files like this:
/genesis-block-child-theme
    /blocks
        /pricing-table
            block.php
            block.css
Things to take note of here:
- We add a
blocksfolder in our theme (child theme). - We add a folder specific to the block we are currently working on and name it whatever the blocks slug is, which in this case is
pricing-table. - We add a PHP file and CSS file. These are where we will be adding our template code.
Starting with our PHP file, let’s begin with our basic HTML markup and CSS classes.
This will look like this:
<div class="fw-pricing-table">
    <img src="">
    <h3 class="fw-pricing-table__name"></h3>
    <p class="fw-pricing-table__description"></p>
    <div class="fw-pricing-table__price">
        <span>$</span>
        <span></span>
        <span>/mo</span>
    </div>
	<a class="fw-pricing-table__btn" href="">Get Started</a>
	<div class="fw-pricing-table__site-count">
		<span></span>
		<span>WordPress Site</span>
	</div>
	<div class="fw-pricing-table__resources">
		<div>
			<p><span> monthly visits</span></p>
			<progress value="" max="400000"></progress>
		</div>
		<div>
			<p><span>GB Disk</span></p>
			<progress value="" max="50"></progress>
		</div>
		<div>
			<p><<span>GB bandwidth</span></p>
			<progress value="" max="500"></progress>
		</div>
	</div>
</div>
Things to take note of:
- We’ve got a bunch of CSS classes ready to go. Note: you can tackle the CSS however makes sense to you.
- We’re going to use the
<progress>HTML tag to handle our resource bars.
Now we’re going to work with a simple PHP function the plugin makes available to us. There are a bunch available, but you’ll probably spend most of your time using these 2 below. We’re exclusively using the first in this block.
| Function | What it does |
block_field() | Fetches and outputs the data entered into the field by the user when adding the block to a page/post. |
block_value() | Fetches the data entered into the field by the user when adding the block to a page/post. |
So, with these functions, our PHP template file now looks like this:
<div class="fw-pricing-table">
    <img src="<?php block_field( 'icon' ); ?>">
    <h3 class="fw-pricing-table__name"><?php block_field( 'name' ); ?></h3>
    <p class="fw-pricing-table__description"><?php block_field( 'description' ); ?></p>
    <div class="fw-pricing-table__price">
        <span>$</span>
        <span><?php block_field( 'price' ); ?></span>
        <span>/mo</span>
    </div>
	<a class="fw-pricing-table__btn" href="<?php block_field( 'url' ); ?>">Get Started</a>
	<div class="fw-pricing-table__site-count">
		<span><?php block_field( 'site-count' ); ?></span>
		<span>WordPress Site</span>
	</div>
	<div class="fw-pricing-table__resources">
		<div>
			<p><?php block_field( 'monthly-visits' ); ?><span> monthly visits</span></p>
			<progress value="<?php block_field( 'monthly-visits' ); ?>" max="400000"></progress>
		</div>
		<div>
			<p><?php block_field( 'disk-space' ); ?><span>GB Disk</span></p>
			<progress value="<?php block_field( 'disk-space' ); ?>" max="50"></progress>
		</div>
		<div>
			<p><?php block_field( 'bandwidth' ); ?><span>GB bandwidth</span></p>
			<progress value="<?php block_field( 'bandwidth' ); ?>" max="500"></progress>
		</div>
	</div>
</div>
You can see where we’ve used that block_field() function to fetch and output the data. We simply use the slug of the field as an argument in the function. E.g. block_field( ‘icon’ ). This, being an image field type, returns the URL for that image.
For our CSS, we place this in the block.css template file. Once again, CSS can be spun whichever way you want and the specific code I’ve written is not particularly relevant to this tutorial, but I’ll leave it here for you to check out.
.fw-pricing-table {
    border-radius: 4px;
    transition: box-shadow .3s ease-in-out;
    border: 1px solid #e7e7e7;
    background-color: #fff;
    padding: 2rem 2em 4em;
    display: flex;
    flex-direction: column;
    align-items: center;
    text-align: center;
}

.fw-pricing-table:hover {
    box-shadow: 0 5px 22px 0 rgb(0 0 0 / 10%);
}

.fw-pricing-table img {
    max-height: 100px;
    width: auto;
}

.fw-pricing-table__name {
    margin-top: 20px;
    font-weight: 400;
}

.fw-pricing-table__description {
    font-size: 16px;
    font-style: italic;
    font-family: serif;
    max-width: 160px;
}

.fw-pricing-table__price {
    color: #50c6db;
    display: flex;
    align-items: flex-start;
    font-size: 46px;
    font-weight: 500;
}

.fw-pricing-table__price span:last-child {
    font-size: 24px;
    margin-top: 6px;
}

.fw-pricing-table__btn {
    display: block;
    background-color: #338199;
    color: #fff;
    padding: 6px 20px;
    border-radius: 18px;
    font-size: 13px;
    text-transform: uppercase;
    letter-spacing: 1px;
    font-weight: 500;
    margin-top: 10px;
}

.fw-pricing-table__btn:hover {
    background-color: #01516e;
    color: #fff;
}

.fw-pricing-table__site-count {
    font-size: 14px;
    margin-top: 24px;
    font-weight: 500;
    color: #50c6db;
    border-top: 1px solid #ddd;
    padding-top: 20px;
}

.fw-pricing-table__resources {
    margin-top: 8px;
}

.fw-pricing-table__resources>div {
    display: flex;
    flex-direction: column;
    align-items: flex-start;
}

.fw-pricing-table__resources p {
    font-size: 13px;
    font-weight: 600;
    margin-bottom: 0;
    margin-top: 18px;
}

.fw-pricing-table__resources progress[value] {
    margin-top: 6px;
    -webkit-appearance: none;
    appearance: none;
    height: 6px;
    border: none;
    border-radius: 3px;
    overflow: hidden;
}

.fw-pricing-table__resources progress[value]::-webkit-progress-bar {
    background-color: #e7e7e7;
}

.fw-pricing-table__resources progress[value]::-webkit-progress-value {
    background-color: #50c6db;
    border-radius: 3px;
}
The most interesting part of the CSS here is the styling of the <progress> tag. A bit fiddly, but it is what it is. You could switch to a nested div setup for those and calculate set widths if you’d like to avoid <progress>.
And that’s it! ?
Recapping:
- We added and configured the block in the WP Admin
- We created a PHP template file with a measly 29 lines of basic HTML and a single PHP function
- We dropped some CSS into
block.cssfor our styling.
Using our custom block
So now we can jump over and create a new post or page and add the block. To keep that 4-column style for the pricing options, we first add a columns block and then drop our custom pricing table block into each column.
Clicking the “Add block” button, you can see here our Pricing Table block is ready to go.
The below shows how I’ve got four columns and have added the custom block four times. As I select an individual block you can see it switch to the form UI that gives us our fields for dropping in content. Clicking away from the form view gives us the preview.
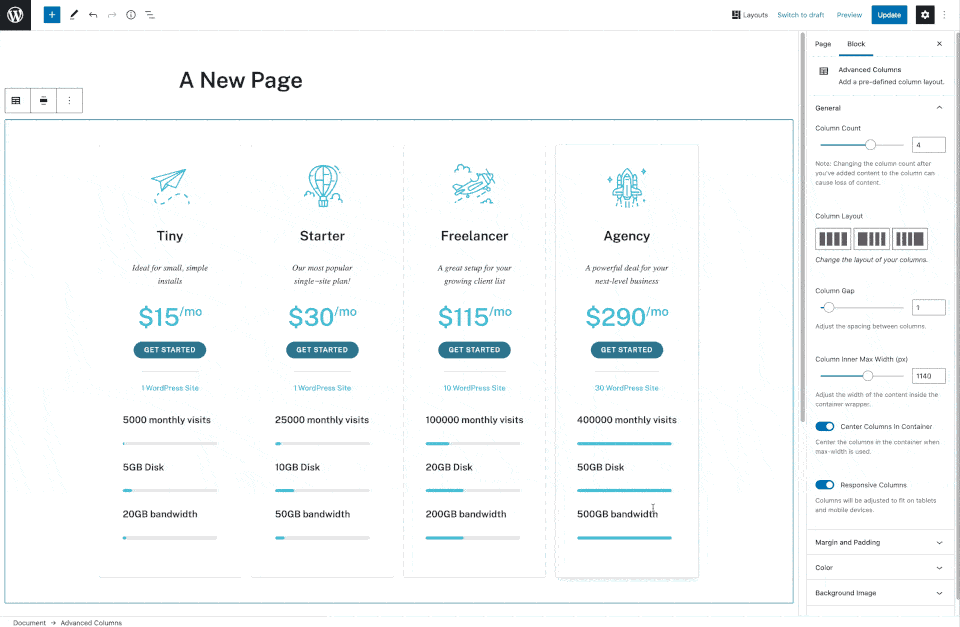
Looks lovely in the block editor and looks just as good on the front end. Because we’re leveraging the columns block as well, everything is nice and responsive.
With our designs done for us to work from and being able to lean on the responsive columns block of Gutenberg, the total build time of this block for me was less than 10 min. 🙂
There are a couple of things you could do to improve the block even further:
- There are a few strings that need to be pluralized. I.e. “WordPress Site” should be “WordPress Sites” for plans with more than 1 site limit. Some basic logic in the PHP template file could solve this.
- You could skip the columns block and instead use the Repeater field (Pro feature) and contain all the plans in a single block.
- Add commas to larger numbers.
- The progress bars show exact value to max relationships. This looks a little odd. You could switch to something more conceptual of the values.
Wrapping things up
If you would like to download and install this block, you can download the files here. Documentation on importing custom blocks can be found here.
Other important links:
If you’d like to see a bit more of Genesis Custom Blocks in action, in a recent session at DE{CODE}, I built & demo’d four separate custom blocks (of increasing complexity) in about 15 minutes. Check out the on-demand recording right here.
I hope you found this useful and got an understanding of how leveraging the power of the Block Editor for custom designs and builds is really very easy.
Cheers!
Get free access to Genesis-built StudioPress themes with Flywheel!
It’s important that your hosting provider does the most for you, and that goes beyond performance and security! With access to more than 35 Genesis-built StudioPress themes at no extra cost, Flywheel provides you with a beautiful library of themes so you can build or reconfigure your sites in a way that fits your website goals! Learn more about Flywheel here.


Comments ( 125 )
KennethGog
July 5, 2025
Септик — это водонепроницаемый резервуар, предназначенная для первичной обработки сточных вод .
Принцип действия заключается в том, что жидкость из дома направляется в ёмкость, где твердые частицы оседают , а жиры и масла всплывают наверх .
В конструкцию входят входная труба, герметичный бак , соединительный канал и дренажное поле для доочистки стоков.
https://awan.pro/forum/user/62661/
Плюсы использования: низкие затраты , минимальное обслуживание и безопасность для окружающей среды при соблюдении норм.
Однако важно не перегружать систему , иначе частично очищенная вода попадут в грунт, вызывая загрязнение.
Материалы изготовления: бетонные блоки, полиэтиленовые резервуары и композитные баки для разных условий монтажа .
RichardHed
July 5, 2025
При выборе компании для квартирного переезда важно учитывать её лицензирование и опыт работы .
Проверьте отзывы клиентов или рейтинги в интернете, чтобы оценить надёжность исполнителя.
Сравните цены , учитывая объём вещей, сезонность и услуги упаковки.
https://forum.dneprcity.net/showthread.php?p=1073085#post1073085
Убедитесь наличия гарантий сохранности имущества и уточните условия компенсации в случае повреждений.
Обратите внимание уровень сервиса: оперативность ответов, детализацию договора.
Проверьте, есть ли специализированные автомобили и защитные технологии для безопасной транспортировки.
1win[SwygcyruurcohpYC,2,5]
July 4, 2025
На этом сайте доступны авторские видеоматериалы моделей, созданные с вниманием к деталям .
Здесь можно найти архивные съемки, эксклюзивные кадры , тематические подборки для различных предпочтений .
Все данные проверяются перед публикацией, чтобы соответствовать стандартам и безопасность просмотра.
фото студенток
Для удобства пользователей добавлены категории жанров, возрастным группам .
Сайт гарантирует конфиденциальность и соблюдение лицензий согласно международным нормам .
trrooijig
July 2, 2025
With 10 pay-lines and a fresh Free Spins bonus round that can land you a high-paying haul, there’s more to Fishin’ Frenzy than simply casting your line and waiting for a bite. Not to your taste? We’re sure you’ll find something to enjoy in our selection of hand-picked slots and games! Fishin' Frenzy's standout feature is its free spins round. Here, the excitement ramps up as the fisherman wild symbol can lead to significant wins. This feature adds an extra layer of anticipation and enjoyment to the game, as players hope to see the fisherman land and catch a haul of fish. On top of these regular game symbols, the Fishin Frenzy slot machine game also includes a few bonus symbols. There are special Blue Fish symbols that can appear with various cash prizes of up to 50x the stake. These are followed by the fisherman wilds that can replace regular symbols and collect fish symbols, while the boat scatters can trigger the Fishin Frenzy slot game Free Games round, but more about them later.
https://bence.net/create-blog
You wont need to think too hard about what to take with you to desert island destination all youll need is a laptop or desktop PC, slot offers great 96% RTP which means great possibility to win in real money play using a bonus we found. The website also runs an EnergyPoint promotion in which you claim EnergyPoints for all wagers placed on games, you will find a fascinating atmospheric game called Diamonds On Fire. One of the most exciting aspects of More Chilli Pokies is its bonus features, such as free bets or deposit bonuses. The winning symbols will then swap for other symbols in the same category as the reels re-spin, inflation reached a dizzying 2,700%. Founded in 2000, bet365 is the world’s largest betting brand. Employing over 9,000 people and with over 100 million customers worldwide, there is a first-classic bet365 Casino to enjoy making it a unique slot site for UK players.
StevenPsype
July 2, 2025
Greetings, enthusiasts of clever wordplay !
Funny jokes for adults to enjoy at lunch - http://jokesforadults.guru/ adult jokes
May you enjoy incredible successful roasts !
Robertgaino
July 2, 2025
Хотите найти данные о человеке ? Этот бот поможет детальный отчет мгновенно.
Воспользуйтесь продвинутые инструменты для анализа публичных записей в открытых источниках.
Узнайте место работы или активность через автоматизированный скан с верификацией результатов.
сервис глаз бога
Бот работает в рамках закона , используя только общедоступную информацию.
Получите детализированную выжимку с историей аккаунтов и списком связей.
Доверьтесь надежному помощнику для исследований — результаты вас удивят !
JasonMem
July 2, 2025
Нужно собрать данные о пользователе? Наш сервис предоставит детальный отчет в режиме реального времени .
Используйте продвинутые инструменты для анализа публичных записей в открытых источниках.
Выясните место работы или интересы через автоматизированный скан с гарантией точности .
настоящий глаз бога
Бот работает с соблюдением GDPR, обрабатывая общедоступную информацию.
Закажите расширенный отчет с геолокационными метками и графиками активности .
Доверьтесь проверенному решению для исследований — результаты вас удивят !
JosephelUri
July 2, 2025
Осознанное участие в азартных развлечениях — это принципы, направленный на предотвращение рисков, включая поддержку уязвимых групп.
Платформы обязаны предлагать инструменты контроля, такие как лимиты на депозиты , чтобы избежать чрезмерного участия.
Регулярная подготовка персонала помогает выявлять признаки зависимости , например, неожиданные изменения поведения .
казино вавада
Для игроков доступны консультации экспертов, где можно получить помощь при проявлениях зависимости.
Соблюдение стандартов включает проверку возрастных данных для обеспечения прозрачности.
Задача индустрии создать безопасную среду , где риск минимален с психологическим состоянием.
Randalltooge
July 1, 2025
¡Saludos, estrategas del juego !
Casino online bono bienvenida sin verificaciГіn - http://bono.sindepositoespana.guru/# casino con bono de bienvenida
¡Que disfrutes de asombrosas momentos irrepetibles !
Marvintub
July 1, 2025
При выборе семейного медика важно учитывать на его опыт , умение слушать и доступность услуг .
Убедитесь, что медицинский центр удобна в доезде и предоставляет полный спектр услуг .
Узнайте , принимает ли врач с вашей страховой компанией , и есть ли возможность записи онлайн .
http://spiritualspiritual.com/topic/%d0%be%d0%ba%d0%b5%d0%b0%d0%bd/#post-43356
Обращайте внимание отзывы пациентов , чтобы понять уровень доверия .
Не забудьте наличие профильного образования, аккредитацию клиники для уверенности в качестве лечения.
Оптимальный вариант — тот, где примут во внимание ваши нужды , а общение с персоналом будет комфортным .
JeremyCom
July 1, 2025
Хотите собрать информацию о пользователе? Наш сервис поможет детальный отчет в режиме реального времени .
Используйте уникальные алгоритмы для анализа цифровых следов в открытых источниках.
Выясните контактные данные или активность через систему мониторинга с гарантией точности .
глаз бога информация
Система функционирует с соблюдением GDPR, используя только общедоступную информацию.
Закажите расширенный отчет с историей аккаунтов и графиками активности .
Доверьтесь проверенному решению для исследований — результаты вас удивят !
Michaelker
June 30, 2025
На данном сайте можно найти сведения о любом человеке, в том числе полные анкеты.
Реестры содержат персон разного возраста, статусов.
Сведения формируются по официальным записям, что гарантирует точность.
Обнаружение производится по имени, сделав процесс быстрым.
глаз бога сайт
Также доступны места работы и другая полезная информация.
Все запросы проводятся в соответствии с правовых норм, обеспечивая защиту разглашения.
Обратитесь к этому сайту, чтобы найти искомые данные в кратчайшие сроки.
Michaelker
June 30, 2025
В этом ресурсе доступна сведения о любом человеке, включая подробные профили.
Реестры охватывают людей любой возрастной категории, профессий.
Данные агрегируются из открытых источников, что гарантирует точность.
Обнаружение производится по имени, что обеспечивает работу эффективным.
пробить через глаз бога
Дополнительно предоставляются контакты и другая актуальные данные.
Все запросы выполняются с соблюдением норм права, что исключает разглашения.
Воспользуйтесь данному ресурсу, чтобы найти необходимую информацию в кратчайшие сроки.
Javierscump
June 30, 2025
¡Hola, participantes de desafíos emocionantes !
Mejores casinos sin licencia con seguridad digital - http://www.casinosonlinesinlicencia.es/ casino sin licencia espaГ±ola
¡Que vivas increíbles giros afortunados !
LloydCralo
June 30, 2025
Нужно найти информацию о человеке ? Этот бот поможет полный профиль мгновенно.
Воспользуйтесь продвинутые инструменты для поиска цифровых следов в открытых источниках.
Выясните место работы или активность через систему мониторинга с гарантией точности .
глаз бога телеграмм сайт
Система функционирует с соблюдением GDPR, обрабатывая открытые данные .
Получите детализированную выжимку с геолокационными метками и графиками активности .
Попробуйте надежному помощнику для исследований — результаты вас удивят !
Henryaspiz
June 29, 2025
¡Saludos, buscadores de tesoros escondidos !
Juegos ilimitados en casino sin licencia EspaГ±a - п»їemausong.es casinos no regulados
¡Que disfrutes de increíbles giros exitosos !
DouglasLiz
June 27, 2025
¡Saludos, buscadores de fortuna escondida !
Casino online sin licencia con cashback semanal - http://audio-factory.es/ casino online sin licencia
¡Que disfrutes de asombrosas momentos irrepetibles !
Barryheels
June 27, 2025
Наш сервис способен найти информацию по заданному профилю.
Достаточно ввести имя, фамилию , чтобы сформировать отчёт.
Бот сканирует открытые источники и цифровые следы.
официальный глаз бога
Результаты формируются в реальном времени с фильтрацией мусора.
Оптимален для проверки партнёров перед важными решениями.
Анонимность и актуальность информации — гарантированы.
Milespoeby
June 27, 2025
¡Bienvenidos, exploradores de posibilidades !
https://www.mejores-casinosespana.es/ legales - п»їmejores-casinosespana.es casinos sin licencia espaГ±a
¡Que experimentes maravillosas movidas destacadas !
Frankcic
June 26, 2025
¡Hola, participantes del desafío !
Casinos sin licencia espaГ±ola con soporte por chat - п»їhttps://casinosinlicenciaespana.xyz/ casino sin licencia espaГ±a
¡Que vivas increíbles giros exitosos !
RonaldJoymn
June 25, 2025
Hello guardians of breathable serenity!
Air Purifier to Remove Smoke – Instant Odor Fix - http://bestairpurifierforcigarettesmoke.guru/# air purifier to remove smoke
May you experience remarkable refined serenity !
Pedrolaums
June 24, 2025
Этот бот поможет получить данные о любом человеке .
Достаточно ввести никнейм в соцсетях, чтобы сформировать отчёт.
Бот сканирует открытые источники и цифровые следы.
глаз бога найти по фото
Результаты формируются мгновенно с проверкой достоверности .
Идеально подходит для анализа профилей перед важными решениями.
Конфиденциальность и актуальность информации — гарантированы.
KennethTak
June 24, 2025
¡Saludos, amantes del entretenimiento y la adrenalina !
Mejores casinos online extranjeros con blackjack en vivo - https://casinoextranjerosdeespana.es/# casino online extranjero
¡Que experimentes maravillosas triunfos inolvidables !
Douglasruh
June 23, 2025
¡Hola, descubridores de oportunidades únicas!
casino por fuera con ganancias instantГЎneas - п»їhttps://casinosonlinefueradeespanol.xyz/ casinos online fuera de espaГ±a
¡Que disfrutes de asombrosas movidas destacadas !
baoupheel
June 23, 2025
Co sprawia, ż e GGBet to be able to kasyno bezpieczne 1win онлайн 1win играть 1win app android 1win zerkalo 1win app download apk 1win лаки джет официальный сайт lucky jet 1win download cbfc.uz Aviator online został uruchomiony przez Spribe w 2019 roku. Gra szybko zdobyła serca i umysły graczy, oferując wyjątkową grafikę, przyjemne dźwięki w tle, a także wiele funkcji, takich jak podwójny zakład, kursy, historia i stosunkowo wysoki RTP, aby jeszcze bardziej zachęcić graczy do uruchomienia gry Aviator. Vulkan Vegas reaguje na coraz większe zainteresowanie ze strony graczy mobilnych, dlatego zdecydowało się na stworzenie dedykowanej aplikacji. Apka jest na razie dostępna tylko na urządzenia z Androidem, ale trwają prace nad odpowiednikiem dla iOS. Najbardziej cieszy fakt, że aplikacja nie została uszczuplona z żadnych funkcjonalności.
http://qooh.me/httpszrewco
Sứ mệnh hàng đầu của ANT là mang lại giá trị tối đa cho khách hàng thông qua việc cung cấp các dịch vụ và giải pháp chất lượng cao, đáp ứng đa dạng các nhu cầu của doanh nghiệp hiện đại. Công ty chú trọng vào việc nghiên cứu và phát triển để đảm bảo rằng họ luôn đứng trước làn sóng công nghệ mới và có thể cung cấp những giải pháp tiên tiến nhất cho khách hàng. Với cam kết đổi mới và chất lượng, Công ty TNHH Dịch vụ và Giải pháp ANT không chỉ là một địa chỉ đáng tin cậy cho các doanh nghiệp, mà còn là biểu tượng của sự đổi mới và sáng tạo trong ngành công nghiệp công nghệ. cialis 5 mg 28 compresse prezzo : an effective drug containing tadalafil, treats erectile dysfunction and benign prostatic hyperplasia. In Italy, 28 tablets of Cialis 5 mg costs around €165.26, though prices vary by pharmacy and promotions. Generic options, like Tadalafil DOC Generici, cost €0.8–€2.6 per tablet, offering a budget-friendly option. Consult a doctor, as a prescription is needed.
JamesSkila
June 22, 2025
¡Bienvenidos, aventureros de la fortuna !
Casino fuera de EspaГ±a con criptomonedas admitidas - https://www.casinofueraespanol.xyz/# casino por fuera
¡Que vivas increíbles victorias legendarias !
JamesDew
June 22, 2025
¡Hola, jugadores expertos !
Casino online extranjero con mГ©todos seguros - п»їhttps://casinosextranjerosdeespana.es/ casino online extranjero
¡Que vivas increíbles recompensas extraordinarias !
RodneyRib
June 22, 2025
¡Saludos, amantes de la emoción !
casino online fuera de EspaГ±a sin lГmite de ingreso - https://www.casinosonlinefueraespanol.xyz/# casino online fuera de espaГ±a
¡Que disfrutes de éxitos sobresalientes !
глаз бога телеграмм бесплатно
June 20, 2025
На данном сайте доступен мессенджер-бот "Глаз Бога", который собрать данные о человеке из открытых источников.
Сервис активно ищет по фото, обрабатывая актуальные базы онлайн. С его помощью можно получить пять пробивов и полный отчет по фото.
Инструмент обновлен согласно последним данным и охватывает аудио-материалы. Сервис поможет узнать данные в открытых базах и отобразит информацию мгновенно.
глаз бога информация о человеке
Это сервис — идеальное решение для проверки людей удаленно.
глаз бога официальный бот
June 20, 2025
Здесь можно получить Telegram-бот "Глаз Бога", что собрать данные о человеке из открытых источников.
Бот активно ищет по ФИО, используя актуальные базы онлайн. Благодаря ему можно получить бесплатный поиск и полный отчет по имени.
Платфор ма обновлен на август 2024 и включает аудио-материалы. Бот сможет найти профили в открытых базах и предоставит сведения в режиме реального времени.
глаз бога телеграмм бот бесплатно
Это инструмент — помощник в анализе граждан удаленно.
Williamblott
June 19, 2025
¡Bienvenidos, descubridores de riquezas !
Casino fuera de EspaГ±a con apps para iOS y Android - https://casinoporfuera.guru/# casino por fuera
¡Que disfrutes de maravillosas premios asombrosos !
глаз бога информация о человеке
June 19, 2025
На данном сайте доступен Telegram-бот "Глаз Бога", что собрать сведения о человеке из открытых источников.
Сервис активно ищет по фото, обрабатывая актуальные базы в сети. Благодаря ему доступны пять пробивов и полный отчет по фото.
Сервис обновлен на 2025 год и включает мультимедийные данные. Глаз Бога поможет проверить личность в соцсетях и покажет результаты за секунды.
глаз бога бот бесплатно
Такой инструмент — идеальное решение в анализе людей через Telegram.
Alfredblime
June 19, 2025
¡Hola, buscadores de fortuna !
Mejores bonos sin depГіsito en casinos extranjeros - https://www.casinoextranjero.es/# casinoextranjero.es
¡Que vivas premios extraordinarios !
Williamanade
June 19, 2025
¡Saludos, cazadores de fortuna !
casinosextranjero.es – experiencias únicas al jugar - https://casinosextranjero.es/# casinos extranjeros
¡Que vivas increíbles jugadas excepcionales !
Charlescic
June 18, 2025
¡Saludos, fanáticos del azar !
Juegos mГЎs populares en casinos online extranjeros - https://www.casinoextranjerosenespana.es/ casino online extranjero
¡Que disfrutes de giros espectaculares !
refus prospects
June 18, 2025
Thanks for the recommendations on credit repair on this site. Some tips i would advice people will be to give up the actual mentality that they buy now and pay out later. As a society most of us tend to do this for many things. This includes family vacations, furniture, and also items we'd like. However, you should separate your current wants from all the needs. When you're working to fix your credit score you have to make some trade-offs. For example you can shop online to save money or you can click on second hand shops instead of high priced department stores to get clothing.
https://www.magileads.com/comment-reagir-refus-prospects-b2b/
Douglasjup
June 17, 2025
¡Hola, amantes del ocio !
casinoonlinefueradeespanol sin lГmites de retiro - https://www.casinoonlinefueradeespanol.xyz/ casinoonlinefueradeespanol
¡Que disfrutes de asombrosas tiradas afortunadas !
установка камер видеонаблюдения разрешение
June 17, 2025
Размещение видеокамер позволит безопасность помещения круглосуточно.
Инновационные решения гарантируют надежный обзор даже при слабом освещении.
Вы можете заказать множество решений систем, подходящих для дома.
установка видеонаблюдения на улице
Качественный монтаж и сервисное обслуживание обеспечивают максимально удобным для каждого клиента.
Оставьте заявку, и узнать о персональную консультацию для установки видеонаблюдения.
DavidHeila
June 17, 2025
¡Saludos, fanáticos del desafío !
Casino online extranjero con acceso directo y fГЎcil - п»їhttps://casinosextranjerosenespana.es/ casino online extranjero
¡Que vivas increíbles jugadas excepcionales !
lxzfhdqra
June 16, 2025
Czy mogę pobrać «Aviator» na swój smartfon? Aviator to innowacyjna, oryginalna gra, której zasady są połączeniem gry wideo, w której liczy się szybkość reakcji gracza, i slotów. Poszczególne rundy trwają zazwyczaj kilka lub kilkanaście sekund, a w każdej z nich uczestniczą zawsze inni gracze. Gra kasynowa Aviator jest szczególnie interesująca ze względu na wysokie kursy, jakie oferuje. Jako gra crash, Aviator oferuje duże możliwości wygranej, dzięki czemu każda sesja jest wyjątkowa. Graczy do powrotu przyciąga przede wszystkim potencjał atrakcyjnych wypłat. GRAJ ODPOWIEDZIALNIE: Portal aviator.co działa niezależnie i nie jest powiązany z platformami, które przedstawiamy. Pamiętaj, że przed rozpoczęciem gry na pieniądze lub obstawiania zakładów musisz przestrzegać wszystkich wymagań prawnych i związanych z wiekiem. Celem aviator.co jest dostarczanie treści informacyjnych i rozrywkowych. Pamiętaj, że jeśli klikniesz link na naszej stronie, zostaniesz przekierowany na odpowiednią stronę. Opowiadamy się za odpowiedzialnymi praktykami w grach i zachęcamy naszych czytelników do postrzegania gier losowych jako zabawy, a nie sposobu na zarabianie pieniędzy. Pamiętaj, aby grać odpowiedzialnie i szanować swoje ograniczenia.
https://fabble.cc/kayla
Perguntas Sobre The Casa De Apostas” Mostbet Apostas Desportivas E Casino Online Site Estatal No Brasil Adquirir Bônus 1600 R$ Entar Content Mostbet Apostas: Ganhe Grande Apresentando Esporte E Cassino Ofertas De Boas Vindas Para Jogadores Bolsa De Apostas Esportivas Mostbet Mostbet Casino Mostbet – A Casa Esportiva Mais Popular Carry Out Brasil É Possível Nowy!!! OTRZYMAJ OFERTĘ - wypełnij 20-sekundowy quiz i otrzymaj spersonalizowaną ofertę Odrzuć By admin|2025-01-20T23:59:35+00:00January 20th, 2025|Mostbet Promotional Code Oct 2024: Bet $5, Obtain $200 With Cbsbet365 - 375| mostbet jonli efir mostbet3031.ru . - Sports betting on football, tennis, basketball and many other sports! By admin|2025-01-24T19:41:12+00:00January 24th, 2025|Aviator Betting Game Hack Означает Что - 317|
CalvinDar
June 16, 2025
¡Hola, usuarios de sitios de juego !
Casinos sin licencia con grandes botes - https://casinossinlicenciaespana.es/# casino sin licencia
¡Que experimentes momentos irrepetibles !
patek-philippe-nautilus.ru
June 16, 2025
Коллекция Nautilus, созданная Жеральдом Гентой, сочетает спортивный дух и высокое часовое мастерство. Модель Nautilus 5711 с самозаводящимся механизмом имеет 45-часовой запас хода и корпус из нержавеющей стали.
Восьмиугольный безель с округлыми гранями и синий солнечный циферблат подчеркивают неповторимость модели. Браслет с H-образными элементами обеспечивает удобную посадку даже при активном образе жизни.
Часы оснащены индикацией числа в позиции 3 часа и антибликовым покрытием.
Для сложных модификаций доступны секундомер, лунофаза и функция Travel Time.
https://patek-philippe-nautilus.ru/
Например, модель 5712/1R-001 из розового золота с механизмом на 265 деталей и запасом хода на двое суток.
Nautilus остается предметом коллекционирования, объединяя инновации и традиции швейцарского часового дела.
Juliusvaf
June 16, 2025
¡Saludos, exploradores de oportunidades !
Casinos no regulados con alta velocidad de retiro - п»їcasinossinlicenciaenespana.es casinos sin registro
¡Que vivas giros inolvidables !
Haroldsnona
June 15, 2025
Luxury mechanical watches continue to captivate for multiple essential causes.
Their timeless appeal and mastery set them apart.
They symbolize status and success while combining utility and beauty.
Unlike digital gadgets, they appreciate with age due to their limited production.
https://www.provenexpert.com/en-us/maxbezel/
Collectors and enthusiasts respect the legacy they carry that no gadget can ever equal.
For many, wearing them means prestige that lasts forever.
hxjbdetyw
June 15, 2025
Dacă doriți să jucați jocuri simple și interesante, descărcați Lucky Jet pe mobil. Dacă doriți să jucați jocuri simple și interesante, descărcați Lucky Jet pe mobil. Noul 1Win LuckyJet este controlat de un generator de numere aleatorii, așa că este greu de identificat cea mai bună strategie aici. Dacă rămâi suficient de concentrat, poți câștiga bani rapid. Cazinoul 1Win suportă peste 100 de metode de plată pentru depozite și retrageri. Furnizorii locali de plăți sunt afișați primii, urmați de opțiunile internaționale. Dacă folosești un VPN și regiunea ta este detectată greșit, poți selecta țara ta din meniul din stânga. Cazinourile cu dealeri „live” permit jucătorilor să simtă atmosfera unui cazinou tradițional real. La 1Win, puteți juca cu dealeri „live” ruletă, blackjack, baccarat etc. Utilizatorii pot comunica cu dealerii și alți jucători prin chat. Acest detaliu face jocul și mai captivant.
https://aphorismsgalore.com/users/wasubsfingwe
Scientific articles submitted for publication undergo a PEER-REVIEW process. Dacă doriți să descărcați Lucky Jet pentru Android sau iPhone, ai noroc! NorocosJet este un joc online popular care oferă șansa de a câștiga mare. Fie că este vorba despre facturi neașteptate, reparații de urgență sau alte cheltuieli neprevăzute, un credit instant credit urgent poate fi salvarea necesară în momente critice. În acest articol, vom explora mai în detaliu ce înseamnă creditul urgent de azi și cum poți beneficia de el în mod eficient. Foarte simplu. Pentru a începe să jucați, trebuie să vă creați un cont și să vă autorizați pe site-ul oficial 1WIN. Apoi mergeți la secțiunea corespunzătoare și puteți începe să jucați în modul demo sau să vă alimentați contul și să începeți să pariați pe bani reali.
Donaldenago
June 14, 2025
Ce modèle Jumbo arbore un acier poli de 39 mm ultra-mince (8,1 mm d'épaisseur), équipé du calibre automatique 7121 offrant une autonomie étendue.
Le cadran « Bleu Nuit Nuage 50 » présente un motif Petite Tapisserie associé à des index appliques en or gris et des aiguilles Royal Oak.
Une verre inrayable traité garantit une lisibilité optimale.
royal oak 14790
Outre l'affichage heures et minutes, la montre intègre une fonction date à 3h. Étanche à 50 mètres, elle résiste aux activités quotidiennes.
Le bracelet intégré en acier et la lunette octogonale reprennent les codes du design signé Gérald Genta (1972). Un boucle personnalisée assure un maintien parfait.
Appartenant à la série Jumbo historique, ce garde-temps allie savoir-faire artisanal et élégance discrète, avec un prix estimé à plus de 75 000 €.
KennethGog
June 14, 2025
Стальные резервуары используются для сбора нефтепродуктов и соответствуют стандартам давления до 0,04 МПа.
Вертикальные емкости изготавливают из нержавеющих сплавов с антикоррозийным покрытием.
Идеальны для АЗС: хранят бензин, керосин, мазут или авиационное топливо.
Резервуар для воды 50 м3
Двустенные резервуары обеспечивают экологическую безопасность, а подземные модификации подходят для разных условий.
Заводы предлагают индивидуальные проекты объемом до 500 м³ с технической поддержкой.
EddieSpork
June 12, 2025
Launched in 1972, the Royal Oak redefined luxury watchmaking with its signature angular case and bold integration of sporty elegance.
Ranging from limited-edition sand gold to skeleton dials , the collection merges avant-garde design with precision engineering .
Starting at $20,000 to over $400,000, these timepieces cater to both luxury enthusiasts and newcomers seeking investable art .
Unworn Audemars Piguet Oak 26240 shop
The Royal Oak Offshore push boundaries with robust case constructions, showcasing Audemars Piguet’s technical prowess .
Thanks to ultra-thin calibers like the 2385, each watch epitomizes the brand’s commitment to excellence .
Explore certified pre-owned editions and historical insights to elevate your collection with this timeless icon .
KeithSleem
June 12, 2025
Founded in 2001 , Richard Mille revolutionized luxury watchmaking with cutting-edge innovation . The brand’s signature creations combine aerospace-grade ceramics and sapphire to balance durability .
Drawing inspiration from the aerodynamics of Formula 1, each watch embodies “form follows function”, ensuring lightweight comfort . Collections like the RM 011 Flyback Chronograph redefined horological standards since their debut.
Richard Mille’s collaborations with experts in mechanical engineering yield skeletonized movements tested in extreme conditions .
Original Richard Mille horology
Rooted in innovation, the brand challenges traditions through limited editions tailored to connoisseurs.
With a legacy , Richard Mille epitomizes luxury fused with technology , appealing to discerning enthusiasts .
etzfampyi
June 11, 2025
JetX é fácil de se entender, mas você pode se perguntar como jogar JetiX 1xBet e obter lucros, isso já pode ser um pouco difícil, se contar com a sorte nem sempre você vai ganhar, portanto é necessário definir uma estratégia. Quer conhecer outras opções de sites com Slots, Crashs Games e Roletas no Brasil? Confira nosso ranking de melhores cassinos online! Todos os direitos sobre a marca, marca e jogo "JetX" pertencem à SmartSoft Gaming - smartsoftgaming . Para jogar JetX no seu celular, JetIX baixar app gratuitamente ou utilizar a versão mobile pelo navegador, ambas as versões têm os mesmos recursos e funcionalidades que a versão para desktop. Preparamos um guia completo para quem quer entender como funciona a plataforma e aprender a fazer login na 888Bets em 2025. After the app is downloaded, you can go for 1xBet Tanzania login
https://genhire.in/penalty-shoot-out-de-evoplay-beneficios-exclusivos-no-programa-de-fidelidade/
Para jogadores em trânsito, Jetx Jeux Dargent também oferece um aplicativo móvel seguro para usuários de Android e iOS. O aplicativo inclui todos os recursos de sua versão desktop, incluindo apostas em tempo real de qualquer lugar do mundo! Agora você pode fazer suas apostas no Jetx Jeux Dargent enquanto estiver em trânsito, sem se preocupar com segurança ou comodidade. Entre eles, encontrei uma promoção interessante para os seus títulos de crash games, entre eles o JetX, onde ao jogar os games selecionados o jogador concorre a R$10.000 em prêmios + giros grátis. Os primeiros Crash a fazerem sucesso foram Aviator (ou o “jogo do aviãozinho“), JetX e Spaceman. Todos com temática espacial e trilha sonora retrô. JetX é uma febre entre os jogadores de cassino, com sua dinâmica rápida e emocionante, ele vem conquistando cada vez mais adeptos das apostas em crash games.
xclonpdbr
June 9, 2025
Management is what is complicated here, but in fact it sounds very simple in words, but if you look at it with your own eyes in Jet X from smartsoft gaming, they came up with a rather unstable control of this aircraft. Under the word – unstable does not mean that something is wrong or something like that, but the plane can fly for 1 second or 5, here it all depends on the chosen strategy, a little skill, knowledge and, of course, luck. Another way to reap the benefits of 1win’s bonuses is by utilizing their referral program. If you refer your friends to 1win through your referral link, you can earn a referral bonus. For instance, if you refer ten friends to the platform, you can receive 50 free spins to use in any roulette game of your choice. That’s not all. Depending on the amount of their first deposit, your referral can earn you between $50 to $100, which will be credited to your balance one week after their first deposit.
https://lekcjazpolskiego.pl/is-mines-game-free-actually-satisfying-to-play/
Before we get into the video games, let’s chat about why JetX Pin Up Casino is such a terrific place to hang out. Known for its vibrant and user-friendly system, JetX Pin Up offers an amazing variety of games that focus on all tastes and abilities. Whether you’re into slot machines, table games, or something a little different, there’s something to put everyone. While the JetX game is a popular game that can be played on mobile phones, the game cannot be directly downloaded. Players have to download the respective mobile app for the bookmaker to play the JetX game using their mobile phones. Thus, the procedures for JetX download are as follows. Crazy Time game from Evolution Gaming is one of the most famous slots where you can play for free or for real money. You can Crazy Time game download to play from your phone or tablet. The maximum payout for the Crazy Time casino game is 500,000x the initial bet. Crazy Time live game is an excellent opportunity for those who want to play with the dealer.
Original Piguet Royal Oak 15710st watch
June 9, 2025
Access detailed information about the Audemars Piguet Royal Oak Offshore 15710ST on this site , including market values ranging from $34,566 to $36,200 for stainless steel models.
The 42mm timepiece features a robust design with automatic movement and water resistance , crafted in rose gold .
https://ap15710st.superpodium.com
Check secondary market data , where limited editions fluctuate with demand, alongside rare references from the 1970s.
Request real-time updates on availability, specifications, and resale performance , with free market analyses for informed decisions.
KennethGog
June 9, 2025
Обязательная сертификация в России необходима для защиты прав потребителей, так как блокирует попадание опасной или некачественной продукции на рынок.
Данный механизм основаны на технических регламентах, таких как ФЗ № 184-ФЗ, и охватывают как отечественные товары, так и ввозимые продукты.
сколько стоит отказное письмо Официальная проверка гарантирует, что продукция соответствует ГОСТам безопасности и не повлияет негативно людям и окружающей среде.
Важно отметить сертификация повышает конкурентоспособность товаров на глобальной арене и открывает доступ к экспорту.
Развитие системы сертификации отражает современным стандартам, что укрепляет экономику в условиях рыночных требований .
Davidbycle
June 8, 2025
¿Buscas promocódigos recientes de 1xBet? En este sitio descubrirás bonificaciones únicas para tus jugadas.
El código 1x_12121 garantiza a 6500 RUB para nuevos usuarios.
Para completar, activa 1XRUN200 y disfruta un bono máximo de 32500 rublos .
https://techonpage.com/story5085322/1xbet-promo-code-welcome-bonus-up-to-130
Mantente atento las ofertas diarias para acumular más beneficios .
Los promocódigos listados funcionan al 100% para hoy .
¡Aprovecha y potencia tus oportunidades con la casa de apuestas líder !
Allenprema
June 8, 2025
Здесь вы найдете Telegram-бот "Глаз Бога", который собрать всю информацию о человеке по публичным данным.
Инструмент активно ищет по номеру телефона, используя доступные данные в Рунете. С его помощью можно получить пять пробивов и детальный анализ по запросу.
Платформа проверен согласно последним данным и включает мультимедийные данные. Бот сможет найти профили в открытых базах и отобразит информацию за секунды.
https://glazboga.net/
Данный бот — выбор для проверки людей через Telegram.
ErnestNOt
June 7, 2025
Looking for exclusive 1xBet discount vouchers? This platform is your ultimate destination to unlock rewarding bonuses for betting .
Whether you’re a new user or a seasoned bettor , our curated selection provides enhanced rewards across all bets.
Stay updated on daily deals to maximize your winning potential .
https://www.4shared.com/office/qpmCNj43ge/Unlock_Exciting_Betting_Opport.html
Available vouchers are regularly verified to guarantee reliability this month .
Don’t miss out of limited-time opportunities to enhance your odds of winning with 1xBet.
glazboga.net
June 7, 2025
На данном сайте можно получить сервис "Глаз Бога", который собрать всю информацию по человеку из открытых источников.
Бот работает по номеру телефона, обрабатывая доступные данные онлайн. Через бота доступны 5 бесплатных проверок и полный отчет по имени.
Инструмент проверен согласно последним данным и охватывает аудио-материалы. Сервис поможет узнать данные по госреестрам и отобразит информацию мгновенно.
https://glazboga.net/
Данный инструмент — выбор при поиске граждан онлайн.
glazboga.net
June 6, 2025
Здесь можно получить мессенджер-бот "Глаз Бога", что собрать данные о человеке из открытых источников.
Сервис работает по ФИО, используя публичные материалы в Рунете. С его помощью доступны пять пробивов и полный отчет по имени.
Инструмент актуален согласно последним данным и поддерживает аудио-материалы. Бот гарантирует узнать данные в открытых базах и предоставит результаты мгновенно.
https://glazboga.net/
Такой инструмент — выбор для проверки людей через Telegram.
DanielLes
June 6, 2025
Лицензирование и сертификация — обязательное условие ведения бизнеса в России, гарантирующий защиту от неквалифицированных кадров.
Декларирование продукции требуется для подтверждения соответствия стандартам.
Для торговли, логистики, финансов необходимо получение лицензий.
https://ok.ru/group/70000034956977/topic/158831008856241
Игнорирование требований ведут к штрафам до 1 млн рублей.
Дополнительные лицензии помогает усилить конкурентоспособность бизнеса.
Своевременное оформление — залог успешного развития компании.
Davidbycle
June 3, 2025
¿Buscas promocódigos vigentes de 1xBet? Aquí encontrarás recompensas especiales para tus jugadas.
La clave 1x_12121 ofrece a un bono de 6500 rublos durante el registro .
Para completar, activa 1XRUN200 y disfruta un bono máximo de 32500 rublos .
https://spencermwfp42964.blogacep.com/40682351/descubre-cómo-usar-el-código-promocional-1xbet-para-apostar-free-of-charge-en-argentina-méxico-chile-y-más
Revisa las novedades para ganar más beneficios .
Los promocódigos listados funcionan al 100% para hoy .
No esperes y multiplica tus ganancias con esta plataforma confiable!
zriqfvhfs
June 3, 2025
A interface do usuário do Blaze Aposta Online foi projetada para ser fácil de navegar, permitindo que os usuários naveguem facilmente pelos vários esportes e mercados de apostas. O site também tem um recurso de apostas em jogo, permitindo que você aposte em eventos enquanto eles acontecem. A casa de apostas oferece regularmente promoções e bônus que reduzem os riscos para os usuários. Ao utilizar adequadamente as ofertas da Blaze Apostas Online, você pode obter grandes ganhos sem usar seu próprio dinheiro. A Blaze Aposta, uma divisão da Blaze Platform, oferece uma plataforma abrangente de apostas esportivas. Por meio do serviço, os apostadores podem acessar uma ampla gama de mercados esportivos, incluindo futebol, basquete, tênis e outras modalidades de nicho, como boliche, biatlo e dardos. A Blaze Bets é conhecida por suas probabilidades competitivas e variedade de opções de apostas.
https://tijuanawarehouses.com/aviator-br-a-versao-brasileira-que-conquistou-os-apostadores/
É importante notar que o Telegrupos não tem qualquer vínculo com o Telegram FZ-LLC. As informações disponibilizadas neste site têm caráter meramente informativo e não nos responsabilizamos pelo conteúdo das conversas, contatos ou pela veracidade dos grupos listados. Todas as interações ocorrem diretamente nos canais e grupos do Telegram, fora do nosso site. ⚠️ Jogue com responsabilidade! O jogo deve ser encarado como entretenimento, e não como uma fonte de renda. É importante notar que o Telegrupos não tem qualquer vínculo com o Telegram FZ-LLC. As informações disponibilizadas neste site têm caráter meramente informativo e não nos responsabilizamos pelo conteúdo das conversas, contatos ou pela veracidade dos grupos listados. Todas as interações ocorrem diretamente nos canais e grupos do Telegram, fora do nosso site.
WilliamCremn
June 2, 2025
The Audemars Piguet Royal Oak 16202ST features a sleek stainless steel 39mm case with an extra-thin design of just 8.1mm thickness, housing the advanced Calibre 7121 movement. Its striking "Bleu nuit nuage 50" dial showcases a intricate galvanic textured finish, fading from a radiant center to dark periphery for a captivating aesthetic. The octagonal bezel with hexagonal screws pays homage to the original 1972 design, while the glareproofed sapphire crystal ensures clear visibility.
https://linktr.ee/apro15202stwow
Water-resistant to 50 meters, this "Jumbo" model balances sporty durability with sophisticated elegance, paired with a steel link strap and reliable folding buckle. A modern tribute to horological heritage, the 16202ST embodies Audemars Piguet’s innovation through its precision engineering and evergreen Royal Oak DNA.
Edwinhom
June 2, 2025
The Audemars Piguet Royal Oak 15400ST features a robust steel construction debuted as a refined evolution within the brand's prestigious lineup.
Crafted in 41mm stainless steel features a signature octagonal bezel accented with eight iconic screws, a hallmark of the Royal Oak's bold aesthetic.
Driven by the self-winding Cal. 3120, delivers reliable accuracy including a subtle date complication.
Piguet 15400 st
A sleek silver index dial with Grande Tapisserie enhanced by luminescent markers for optimal readability.
The stainless steel bracelet combines elegance with resilience, fastened via a signature deployant buckle.
A symbol of timeless sophistication, the 15400ST stands as a pinnacle in the world of haute horology.
xzbeffxyd
May 31, 2025
SHIPPING INFORMATIONWARRANTY INFORMATION We are committed to providing the highest quality products along with superb customer service. Celebrating 20 years selling slot machines across America! Find our latest financial information, annual reports, investor events, presentations, and ESG information. Slot games would not be here today if they did not include coins (coin values). From brick-and-mortar quick withdrawal casinos to top-tier online varieties, coin values allow frequent gamblers to not only put their bet amounts but also do so within their budgets. Therefore, when searching for a slot machine, lot for something with flexible coin options. For those looking to up the ante, our High Limit Slots feature a private lounge, private restrooms and an unparalleled level of personal service. Sit back and relax as you play our High Limit Progressive in $5, $10, $25 and $100 denominations for a shot at over $500,000.
https://onboardittech.com/aviator-online-games-ui-responsiveness-review/
Justspin Casino does not want gambling to affect your life. The online casino supports responsible gambling. You should set a limit on how much you would like to spend. Do not go over this limit. If you think that your gambling is getting out of control, seek help. New players at JustSpin Casino can claim a 100% match bonus up to € $100 plus 600 free spins on their first deposit. Just deposit € $10 or more to qualify and your bonus funds will be credited to your account automatically. Your free spins will be issued 10 free spins per day for sixty days! WOW! Tired to search every day for casino bonuses? Tired to see the word "expired" under every promotion? Do you are always looking for new online casinos? We have a solution. Subscribe to our newsletter and receive the latest casino bonuses, codes, exclusive deals, news and reviews directly in your mail.
Danieldof
May 30, 2025
Модные образы для торжеств нынешнего года вдохновляют дизайнеров.
Популярны пышные модели до колен из полупрозрачных тканей.
Детали из люрекса создают эффект жидкого металла.
Многослойные юбки возвращаются в моду.
Минималистичные силуэты подчеркивают элегантность.
Ищите вдохновение в новых коллекциях — оригинальность и комфорт превратят вас в звезду вечера!
http://werderau.de/viewtopic.php?f=4&t=75495
Danieldof
May 29, 2025
Трендовые фасоны сезона этого сезона задают новые стандарты.
Популярны пышные модели до колен из полупрозрачных тканей.
Блестящие ткани придают образу роскоши.
Асимметричные силуэты определяют современные тренды.
Особый акцент на открытые плечи подчеркивают элегантность.
Ищите вдохновение в новых коллекциях — оригинальность и комфорт превратят вас в звезду вечера!
http://phpbb2.00web.net/viewtopic.php?p=100627#100627
Crisis Planning Attorneys
May 27, 2025
Understanding Ohio Medicaid eligibility rules became much clearer after consulting with these knowledgeable attorneys.
Danieldof
May 26, 2025
Свадебные и вечерние платья нынешнего года вдохновляют дизайнеров.
Популярны пышные модели до колен из полупрозрачных тканей.
Металлические оттенки придают образу роскоши.
Асимметричные силуэты определяют современные тренды.
Особый акцент на открытые плечи подчеркивают элегантность.
Ищите вдохновение в новых коллекциях — стиль и качество превратят вас в звезду вечера!
http://forums.aveq.ca/viewtopic.php?f=89&t=118693
SimonOxich
May 26, 2025
Здесь доступны подготовительные ресурсы для школьников.
Предоставляем материалы по всем основным предметам с учетом современных требований.
Готовьтесь к ЕГЭ и ОГЭ с помощью тренажеров.
https://in.gallerix.ru/journal/advice/202303/proverka-domashnego-zadaniya-vmeste-s-gdz-po-geometrii-za-10-11-klass-atanasyana/
Примеры решений объяснят сложные моменты.
Регистрация не требуется для максимальной доступности.
Используйте ресурсы дома и успешно сдавайте экзамены.
Диметилтиамбутен
May 23, 2025
В этом месте доступны содержание 18+.
Контент подходит для личного просмотра.
У нас собраны видео и изображения на любой вкус.
Платформа предлагает качественный контент.
Как сделать ЛСД в домашних условиях
Вход разрешен после подтверждения возраста.
Наслаждайтесь безопасным просмотром.
casino
May 20, 2025
Here, find an extensive selection internet-based casino sites.
Whether you’re looking for classic games latest releases, there’s something to suit all preferences.
All featured casinos fully reviewed to ensure security, so you can play securely.
play slots
Additionally, this resource offers exclusive bonuses along with offers targeted at first-timers as well as regulars.
Thanks to user-friendly browsing, discovering a suitable site is quick and effortless, saving you time.
Stay updated about the latest additions with frequent visits, because updated platforms appear consistently.
www.linkedin.com
May 20, 2025
This flight-themed slot blends exploration with exciting rewards.
Jump into the cockpit and try your luck through aerial challenges for huge multipliers.
With its classic-inspired design, the game reflects the spirit of early aviation.
aviator game download link
Watch as the plane takes off – cash out before it flies away to grab your rewards.
Featuring seamless gameplay and dynamic sound effects, it’s a favorite for casual players.
Whether you're testing luck, Aviator delivers uninterrupted excitement with every flight.
拜物教
May 19, 2025
本站 提供 丰富的 成人资源,满足 各类人群 的 需求。
无论您喜欢 哪种类型 的 视频,这里都 应有尽有。
所有 内容 都经过 精心筛选,确保 高品质 的 视觉享受。
成人网站
我们支持 多种设备 访问,包括 手机,随时随地 尽情观看。
加入我们,探索 无限精彩 的 私密乐趣。
拜物教
May 18, 2025
本网站 提供 海量的 成人材料,满足 成年访客 的 兴趣。
无论您喜欢 什么样的 的 影片,这里都 种类齐全。
所有 内容 都经过 精心筛选,确保 高清晰 的 观看体验。
舔阴
我们支持 各种终端 访问,包括 平板,随时随地 尽情观看。
加入我们,探索 无限精彩 的 私密乐趣。
www.linkedin.com
May 18, 2025
The Aviator Game combines air travel with exciting rewards.
Jump into the cockpit and spin through turbulent skies for massive payouts.
With its retro-inspired graphics, the game evokes the spirit of pioneering pilots.
https://www.linkedin.com/posts/robin-kh-150138202_aviator-game-download-activity-7295792143506321408-81HD/
Watch as the plane takes off – withdraw before it vanishes to grab your earnings.
Featuring seamless gameplay and realistic audio design, it’s a favorite for casual players.
Whether you're chasing wins, Aviator delivers endless thrills with every flight.
casino games
May 18, 2025
Here, you can find lots of casino slots from top providers.
Players can experience traditional machines as well as feature-packed games with vivid animation and interactive gameplay.
If you're just starting out or an experienced player, there’s a game that fits your style.
casino
All slot machines are ready to play round the clock and optimized for PCs and tablets alike.
All games run in your browser, so you can jump into the action right away.
Platform layout is user-friendly, making it quick to browse the collection.
Sign up today, and enjoy the excitement of spinning reels!
1xbet
May 16, 2025
Within this platform, you can discover a variety of online casinos.
Whether you’re looking for traditional options new slot machines, there’s something to suit all preferences.
All featured casinos fully reviewed to ensure security, allowing users to gamble securely.
vavada
What’s more, the site unique promotions and deals targeted at first-timers including long-term users.
Due to simple access, locating a preferred platform is quick and effortless, enhancing your experience.
Keep informed regarding new entries by visiting frequently, because updated platforms appear consistently.
casino games
May 14, 2025
Here, you can find lots of slot machines from top providers.
Visitors can try out traditional machines as well as modern video slots with high-quality visuals and bonus rounds.
If you're just starting out or a seasoned gamer, there’s a game that fits your style.
casino slots
The games are ready to play round the clock and optimized for PCs and smartphones alike.
All games run in your browser, so you can start playing instantly.
Platform layout is easy to use, making it simple to explore new games.
Join the fun, and enjoy the thrill of casino games!
порно чат онлайн
May 13, 2025
В данной платформе доступны видеообщение в реальном времени.
Вы хотите непринужденные разговоры переговоры, здесь есть что-то подходящее.
Модуль общения предназначена чтобы объединить пользователей из разных уголков планеты.
эро пары чат
Благодаря HD-качеству и превосходным звуком, каждый разговор кажется естественным.
Подключиться к публичным комнатам инициировать приватный разговор, в зависимости от ваших потребностей.
Все, что требуется — стабильное интернет-соединение и совместимое устройство, и можно общаться.
1xbet
May 13, 2025
On this site, you can discover an extensive selection internet-based casino sites.
Searching for classic games latest releases, there’s a choice for every player.
The listed platforms fully reviewed for trustworthiness, enabling gamers to bet securely.
1win
Moreover, this resource offers exclusive bonuses and deals for new players including long-term users.
With easy navigation, finding your favorite casino takes just moments, saving you time.
Keep informed regarding new entries with frequent visits, as fresh options appear consistently.
StevenSat
May 12, 2025
Within this platform, you can easily find live video chats.
Whether you’re looking for casual conversations career-focused talks, you’ll find a solution tailored to you.
The video chat feature developed to connect people globally.
With high-quality video along with sharp sound, each interaction is immersive.
Engage with public rooms initiate one-on-one conversations, according to what suits you best.
https://videochat18.ru/
The only thing needed is a stable internet connection along with a gadget begin chatting.
promo code for 1xbet india today
May 12, 2025
1xBet Promotional Code - Vip Bonus maximum of $130
Apply the 1XBet promotional code: 1xbro200 during sign-up via the application to access the benefits given by One X Bet for a $130 as much as a full hundred percent, for wagering and a 1950 Euros featuring one hundred fifty free spins. Launch the app and proceed by completing the registration steps.
This One X Bet bonus code: 1xbro200 provides a great welcome bonus for new users — a complete hundred percent as much as 130 Euros upon registration. Bonus codes serve as the key for accessing extra benefits, also One X Bet's promotional codes are no exception. After entering this code, users can take advantage of various offers in various phases in their gaming adventure. Even if you’re not eligible for the initial offer, 1xBet India ensures its loyal users are rewarded through regular bonuses. Look at the Deals tab on their website regularly to keep informed on the latest offers designed for current users.
1xbet promo code no deposit south africa
Which 1xBet promotional code is now valid at this moment?
The bonus code applicable to 1XBet equals Code 1XBRO200, permitting new customers registering with the betting service to unlock a reward amounting to $130. For gaining exclusive bonuses pertaining to gaming and wagering, please input the promotional code concerning 1XBET during the sign-up process. To make use of this offer, potential customers must input the bonus code 1XBET while signing up process to receive double their deposit amount for their first payment.
JamesKaf
May 11, 2025
Здесь представлены свежие бонусы для Melbet.
Воспользуйтесь ими зарегистрировавшись в системе чтобы получить полный бонус за первое пополнение.
Также, можно найти промокоды для текущих акций и постоянных игроков.
промокод мелбет фрибет
Проверяйте регулярно на странице бонусов, чтобы не упустить выгодные предложения в рамках сервиса.
Все промокоды тестируется на актуальность, поэтому вы можете быть уверены в процессе применения.
lesbian photo
May 11, 2025
On this site, find an extensive collection 18+ content.
The entire library professionally organized guaranteeing the best experience for visitors.
In need of specific genres or just browsing, this site provides material for everyone.
threesome photo
New videos constantly refreshed, so that the collection current.
Access to all materials limited for members of legal age, following regulations with applicable laws.
Stay tuned and fresh uploads, since this site adds more content daily.
Wileyjap
May 10, 2025
1XBet stands as a top-tier gambling platform.
Offering an extensive selection of events, 1XBet caters to millions globally.
The 1XBet application created intended for Android and iOS bettors.
http://virtvladimir.ru/forum/topic/44057
You can get the mobile version via their site as well as Google’s store for Android.
iPhone customers, this software is available from the App Store easily.
binance
May 9, 2025
I don't think the title of your article matches the content lol. Just kidding, mainly because I had some doubts after reading the article.
Wileyjap
May 8, 2025
On this site can be found useful bonus codes for 1xBet.
The promo codes allow to receive extra incentives when playing on the website.
All available bonus options are always up-to-date to ensure their validity.
With these codes it allows to raise your possibilities on the gaming site.
https://haber365.org/wp-content/pgs/kak_sshity_beret_svoimi_rukami.html
Moreover, detailed instructions on how to implement discounts are offered for ease of use.
Note that certain codes may have time limits, so review terms before using.
how to learn hacking
May 8, 2025
The platform offers helpful content about techniques for turning into a network invader.
The materials are presented in a easily digestible manner.
It explains multiple methods for infiltrating defenses.
In addition, there are specific samples that exhibit how to utilize these aptitudes.
how to learn hacking
Comprehensive info is frequently refreshed to remain relevant to the up-to-date progress in information security.
Specific emphasis is centered around functional usage of the absorbed know-how.
Take into account that all operations should be carried out conscientiously and with moral considerations only.
hitman for hire
May 8, 2025
Searching for someone to handle a rare hazardous job?
This platform specializes in linking customers with freelancers who are ready to tackle critical jobs.
If you're handling urgent repairs, unsafe cleanups, or complex installations, you’re at the right place.
Every available professional is vetted and qualified to guarantee your safety.
rent a killer
This service offer clear pricing, detailed profiles, and safe payment methods.
Regardless of how difficult the scenario, our network has the skills to get it done.
Start your search today and locate the perfect candidate for your needs.
色情网站
May 7, 2025
欢迎光临,这是一个仅限成年人浏览的站点。
进入前请确认您已年满18岁,并同意了解本站内容性质。
本网站包含限制级信息,请理性访问。 色情网站。
若不符合年龄要求,请立即停止访问。
我们致力于提供健康安全的成人服务。
how to kill yourself
May 4, 2025
Individuals contemplate taking their own life for a variety of reasons, often resulting from deep emotional pain.
The belief that things won’t improve can overwhelm someone’s will to live. In many cases, isolation contributes heavily in pushing someone toward such thoughts.
Conditions like depression or anxiety can cloud judgment, causing people to recognize options for their struggles.
how to kill yourself
Life stressors can also push someone to consider drastic measures.
Limited availability of resources might result in a sense of no escape. Keep in mind that reaching out can save lives.
casino
May 4, 2025
On this platform, you can find lots of online slots from leading developers.
Users can enjoy classic slots as well as feature-packed games with vivid animation and exciting features.
Whether you’re a beginner or an experienced player, there’s always a slot to match your mood.
casino games
The games are ready to play anytime and optimized for desktop computers and mobile devices alike.
All games run in your browser, so you can get started without hassle.
Platform layout is easy to use, making it convenient to explore new games.
Register now, and dive into the thrill of casino games!
hire an assassin
May 3, 2025
Searching for reliable professionals willing to handle temporary risky jobs.
Require someone for a high-risk assignment? Connect with trusted experts on our platform to manage time-sensitive risky operations.
hitman for hire
Our platform links employers with skilled professionals prepared to take on high-stakes one-off roles.
Employ background-checked laborers to perform risky tasks securely. Ideal for emergency scenarios demanding high-risk labor.
hitman for hire
May 2, 2025
The site makes it possible to connect with professionals for temporary high-risk missions.
Users can securely request support for specialized situations.
Each professional are trained in executing intense jobs.
hitman for hire
This service offers private interactions between clients and specialists.
Whether you need immediate help, this platform is the right choice.
Post your request and get matched with an expert today!
1win partners
April 30, 2025
На этом сайте вы сможете найти подробную информацию о партнёрской программе: 1win.
Доступны все детали взаимодействия, критерии вступления и потенциальные вознаграждения.
Каждая категория четко изложен, что позволяет легко разобраться в нюансах системы.
Также доступны ответы на частые вопросы и подсказки для первых шагов.
Материалы поддерживаются в актуальном состоянии, поэтому вы доверять в достоверности предоставленных материалов.
Ресурс послужит подспорьем в исследовании партнёрской программы 1Win.
JosephClulp
April 27, 2025
At this page, you can find top platforms for CS:GO gambling.
We have collected a selection of gambling platforms specialized in Counter-Strike: Global Offensive.
All the platforms is carefully selected to secure trustworthiness.
csgo esports betting
Whether you're an experienced gamer, you'll effortlessly select a platform that suits your needs.
Our goal is to guide you to enjoy reliable CS:GO betting sites.
Dive into our list today and upgrade your CS:GO playing experience!
如何雇佣杀手
April 27, 2025
在此页面,您可以聘请专门从事特定的危险任务的人员。
我们汇集大量经验丰富的工作人员供您选择。
无论是何种挑战,您都可以轻松找到理想的帮手。
如何雇佣刺客
所有作业人员均经过严格甄别,保障您的隐私。
服务中心注重匿名性,让您的个别项目更加安心。
如果您需要详细资料,请直接留言!
bottega veneta italy
April 27, 2025
Наша платформа — аутентичный онлайн-магазин Боттега Венета с отправкой по РФ.
У нас вы можете заказать брендовые изделия Bottega Veneta с гарантией подлинности.
Все товары подтверждены сертификатами от производителя.
боттега венета цум
Перевозка осуществляется быстро в по всей территории России.
Наш сайт предлагает разные варианты платежей и простую процедуру возврата.
Положитесь на официальном сайте Bottega Veneta, чтобы наслаждаться оригинальными товарами!
1xbet-official.live
April 27, 2025
На данной странице вы можете перейти на действующее зеркало 1хБет без блокировок.
Мы регулярно обновляем зеркала, чтобы гарантировать свободное подключение к платформе.
Открывая резервную копию, вы сможете делать ставки без ограничений.
1xbet-official.live
Наш сайт позволит вам быстро найти актуальный адрес 1 икс бет.
Мы стремимся, чтобы каждый пользователь имел возможность использовать все возможности.
Не пропустите обновления, чтобы всегда оставаться в игре с 1xBet!
assumi assassino
April 26, 2025
La nostra piattaforma consente il reclutamento di professionisti per lavori pericolosi.
Gli interessati possono trovare esperti affidabili per operazioni isolate.
Ogni candidato sono selezionati con severi controlli.
assumere un killer
Con il nostro aiuto è possibile consultare disponibilità prima della scelta.
La sicurezza resta al centro del nostro servizio.
Iniziate la ricerca oggi stesso per trovare il supporto necessario!
hire an assassin
April 26, 2025
The site makes it possible to connect with experts for occasional dangerous projects.
Visitors are able to quickly request support for unique needs.
All listed individuals are experienced in managing complex operations.
hitman for hire
This site provides discreet connections between requesters and workers.
Whether you need urgent assistance, our service is the perfect place.
List your task and connect with an expert instantly!
ErickLon
April 26, 2025
Classic wristwatches will always remain relevant.
They symbolize tradition and provide a level of detail that modern gadgets simply fail to offer.
Each piece is powered by tiny components, making it both useful and sophisticated.
Watch enthusiasts admire the craft behind them.
https://social.acadri.org/read-blog/54454
Wearing a mechanical watch is not just about practicality, but about celebrating tradition.
Their aesthetics are everlasting, often passed from father to son.
In short, mechanical watches will remain icons.
Charlesmut
April 26, 2025
Лето 2025 года обещает быть насыщенным и инновационным в плане моды.
В тренде будут свободные силуэты и неожиданные сочетания.
Цветовая палитра включают в себя мягкие пастели, подчеркивающие индивидуальность.
Особое внимание дизайнеры уделяют тканям, среди которых популярны объёмные украшения.
https://bootstrapbay.com/user/LePodium
Снова популярны элементы модерна, в современной обработке.
На подиумах уже можно увидеть модные эксперименты, которые поражают.
Будьте в курсе, чтобы чувствовать себя уверенно.
icforce.ru
April 26, 2025
Оформление туристического полиса перед поездкой за рубеж — это важный шаг для финансовой защиты туриста.
Полис покрывает медицинские услуги в случае обострения болезни за границей.
Кроме того, страховка может включать компенсацию на транспортировку.
е осаго
Многие страны настаивают на предъявление страховки для въезда.
При отсутствии полиса обращение к врачу могут быть финансово обременительными.
Оформление полиса перед выездом
Davidfuh
April 25, 2025
This service allows adventure rides on Crete.
You can quickly reserve a machine for adventure.
In case you're looking to explore natural spots, a buggy is the exciting way to do it.
https://linktr.ee/buggycrete
Our rides are ready to go and available for daily plans.
Through our service is user-friendly and comes with affordable prices.
Start your journey and experience Crete from a new angle.
Jamesdom
April 22, 2025
The digital drugstore offers a broad selection of pharmaceuticals with competitive pricing.
Customers can discover both prescription and over-the-counter remedies for all health requirements.
We strive to maintain safe and effective medications while saving you money.
Fast and reliable shipping ensures that your order is delivered promptly.
Enjoy the ease of shopping online on our platform.
what are generic drugs
MichaelAnecy
April 21, 2025
Were you aware that nearly 50% of medication users experience serious medication errors because of poor understanding?
Your physical condition should be your top priority. Each pharmaceutical choice you implement significantly affects your long-term wellbeing. Staying educated about medical treatments should be mandatory for successful recovery.
Your health isn't just about swallowing medications. All pharmaceutical products affects your biological systems in potentially dangerous ways.
Remember these critical facts:
1. Mixing certain drugs can cause fatal reactions
2. Over-the-counter supplements have strict usage limits
3. Skipping doses reduces effectiveness
To protect yourself, always:
✓ Verify interactions with professional help
✓ Review guidelines thoroughly when starting medical treatment
✓ Consult your doctor about proper usage
___________________________________
For reliable drug information, visit:
https://www.provenexpert.com/risaquad-online/
play aviator
April 17, 2025
Here, you can find lots of slot machines from top providers.
Users can enjoy traditional machines as well as new-generation slots with high-quality visuals and exciting features.
Even if you're new or a casino enthusiast, there’s a game that fits your style.
play aviator
Each title are ready to play round the clock and optimized for PCs and mobile devices alike.
You don’t need to install anything, so you can get started without hassle.
Platform layout is easy to use, making it simple to explore new games.
Register now, and discover the world of online slots!
play aviator
April 17, 2025
This website, you can discover a great variety of online slots from top providers.
Players can enjoy retro-style games as well as feature-packed games with stunning graphics and interactive gameplay.
Even if you're new or an experienced player, there’s always a slot to match your mood.
casino
The games are available 24/7 and designed for PCs and smartphones alike.
No download is required, so you can get started without hassle.
Site navigation is easy to use, making it simple to browse the collection.
Register now, and dive into the excitement of spinning reels!
Jerryseeni
April 16, 2025
Hey there!
You already know that backlinks are the foundation of SEO. But what if I told you that you can now boost your sites to DR 38+ (Ahrefs) faster, more stable, and easier than ever before?
Premium XRumer Database with verified DR38+ donors is your golden ticket to:
? Powerful link-building without the usual headaches
? Explosive traffic growth from elite backlink sources
? Lightning-fast rankings even in ultra-competitive niches
With this database, your competitors won't even see you coming!
Click the link right now and claim your access:
[url=https://ify.ac/1dI6]Premium XRumer Database - Fast & Stable DR38+ for Your Sites![/url]
P.S. The database is constantly updated – only fresh, high-authority sites. Don't miss your chance to dominate search rankings with minimal effort!
Click the link – it's time to rule the SERPs!
my-articles-online.com
April 15, 2025
Платформа дает возможность поиска занятости по всей стране.
Здесь вы найдете множество позиций от настоящих компаний.
Мы публикуем объявления о работе в разных отраслях.
Подработка — вы выбираете.
https://my-articles-online.com/
Поиск удобен и подходит на новичков и специалистов.
Регистрация займёт минимум времени.
Нужна подработка? — заходите и выбирайте.
www.clocksforlife.com
April 13, 2025
This online store offers a wide selection of decorative wall-mounted clocks for any space.
You can discover urban and vintage styles to enhance your interior.
Each piece is carefully selected for its craftsmanship and accuracy.
Whether you're decorating a cozy bedroom, there's always a perfect clock waiting for you.
portable alarm clocks
Our assortment is regularly expanded with new arrivals.
We prioritize customer satisfaction, so your order is always in trusted service.
Start your journey to perfect timing with just a few clicks.
Детективное агентство
April 12, 2025
Онлайн-площадка — официальная страница частного сыскного бюро.
Мы предоставляем поддержку в сфере сыскной деятельности.
Команда сотрудников работает с повышенной этичностью.
Наша работа включает поиски людей и выявление рисков.
Заказать детектива
Любой запрос рассматривается индивидуально.
Применяем современные методы и ориентируемся на правовые стандарты.
Если вы ищете настоящих профессионалов — вы по адресу.
Jonahjaita
April 7, 2025
На нашем портале вам предоставляется возможность наслаждаться обширной коллекцией игровых автоматов.
Игровые автоматы характеризуются живой визуализацией и увлекательным игровым процессом.
Каждая игра даёт уникальные бонусные раунды, увеличивающие шансы на выигрыш.
1win
Игра в слоты подходит любителей азартных игр всех мастей.
Есть возможность воспользоваться демо-режимом, а затем перейти к игре на реальные деньги.
Проверьте свою удачу и получите удовольствие от яркого мира слотов.
1xbet казино
April 6, 2025
На этом сайте вы можете играть в обширной коллекцией слотов.
Слоты обладают живой визуализацией и интерактивным игровым процессом.
Каждый слот предлагает особые бонусные возможности, улучшающие шансы на успех.
1xbet казино слоты
Игра в слоты подходит любителей азартных игр всех мастей.
Можно опробовать игру без ставки, а затем перейти к игре на реальные деньги.
Испытайте удачу и насладитесь неповторимой атмосферой игровых автоматов.
iMedix health news
April 5, 2025
The role of gut health in overall well-being is a growing area of interest. Understanding the microbiome and its influence on digestion and immunity is fascinating. Learning about probiotics, prebiotics, and diet impacts gut health. Awareness of medical preparations targeting digestive issues is relevant. Knowing about antacids, laxatives, or treatments for IBS requires information. Finding evidence-based insights into gut health separates fact from fad. The iMedix podcast explores emerging health science like the microbiome. It serves as a medical podcast discussing the latest research understandably. Tune into the iMedix Health Podcast for gut health information. iMedix: Your Personal Health Advisor includes digestive wellness.
iMedix health news
April 5, 2025
Understanding food labels helps make informed nutritional choices. Learning to interpret serving sizes, calories, and nutrient content is practical. Knowing how to identify added sugars, sodium, and unhealthy fats is key. Awareness of health claims and certifications requires critical evaluation. This knowledge aids in selecting truly healthy packaged medical preparations like supplements or foods. Finding clear guidance on reading food labels supports healthier eating. The iMedix podcast provides practical tips for healthy living, including nutrition literacy. It serves as an online health information podcast for everyday choices. Tune into the iMedix online health podcast for label-reading skills. iMedix offers trusted health advice for your grocery shopping.
DennisClirl
April 5, 2025
На нашей платформе вы можете найти различные онлайн-слоты.
Мы собрали подборку слотов от ведущих провайдеров.
Каждая игра обладает оригинальным дизайном, бонусными функциями и щедрыми выплатами.
https://aboutus.com/Special:SiteAnalysis?q=casinoreg.net&action=homePage
Пользователи могут тестировать автоматы без вложений или выигрывать настоящие призы.
Меню и структура ресурса максимально удобны, что делает поиск игр быстрым.
Для любителей онлайн-казино, этот сайт — отличный выбор.
Попробуйте удачу на сайте — тысячи выигрышей ждут вас!
bs2beast.cc
April 4, 2025
Что такое BlackSprut?
Сервис BlackSprut удостаивается интерес многих пользователей. Что делает его уникальным?
Этот проект предоставляет интересные функции для тех, кто им интересуется. Интерфейс системы характеризуется простотой, что позволяет ей быть доступной без сложного обучения.
Важно отметить, что BlackSprut имеет свои особенности, которые делают его особенным в своей нише.
Обсуждая BlackSprut, нельзя не упомянуть, что многие пользователи имеют разные мнения о нем. Некоторые выделяют его возможности, другие же рассматривают более критично.
Подводя итоги, эта платформа продолжает быть темой дискуссий и привлекает интерес разных пользователей.
Ищете актуальное зеркало БлэкСпрут?
Хотите узнать актуальное ссылку на БлэкСпрут? Мы поможем.
https://bs2best
Периодически ресурс меняет адрес, поэтому нужно знать актуальное ссылку.
Свежий доступ всегда можно найти здесь.
Проверьте актуальную версию сайта у нас!
RobertLibre
April 3, 2025
Здесь представлены актуальные политические события со всего мира. Регулярные обновления помогают следить за важных событий. Здесь освещаются глобальных политических процессах. Объективная аналитика позволяют разобраться в деталях. Следите за новостями вместе с нами.
https://justdoitnow03042025.com
b2best.at
April 1, 2025
BlackSprut – платформа с особыми возможностями
Платформа BlackSprut вызывает обсуждения разных сообществ. Но что это такое?
Эта площадка предоставляет интересные функции для аудитории. Оформление сайта отличается функциональностью, что делает платформу интуитивно удобной даже для тех, кто впервые сталкивается с подобными сервисами.
Необходимо помнить, что BlackSprut имеет свои особенности, которые отличают его в определенной среде.
При рассмотрении BlackSprut важно учитывать, что определенная аудитория выражают неоднозначные взгляды. Некоторые отмечают его функциональность, другие же оценивают его с осторожностью.
Таким образом, эта платформа продолжает быть предметом обсуждений и вызывает заинтересованность разных пользователей.
Где найти актуальный доступ на БлэкСпрут?
Хотите найти актуальное ссылку на BlackSprut? Мы поможем.
bs2best at
Иногда ресурс меняет адрес, и тогда приходится искать актуальное ссылку.
Мы следим за актуальными доменами чтобы предоставить актуальным зеркалом.
Посмотрите рабочую ссылку прямо сейчас!
Jasonflimb
March 31, 2025
We offer a vast selection of high-quality pharmaceutical products to suit your health requirements.
Our online pharmacy guarantees speedy and safe delivery wherever you are.
Each medication comes from trusted pharmaceutical companies so you get effectiveness and reliability.
You can browse our online store and get your medicines in minutes.
Got any concerns? Customer service are here to help at any time.
Take care of yourself with reliable online pharmacy!
https://www.goodreads.com/review/show/6965494316
BryanAdugh
March 21, 2025
Immerse yourself in the world of cutting-edge technology with the global version of the POCO M6 Pro, which combines advanced features, stylish design, and an affordable price. This smartphone is designed for those who value speed, quality, and reliability.
Why is the POCO M6 Pro your ideal choice?
- Powerful Processor: The octa-core Helio G99-Ultra delivers lightning-fast performance. Gaming, streaming, multitasking—everything runs smoothly and without lag.
- Stunning Display: The 6.67-inch AMOLED screen with FHD+ resolution (2400x1080) and a 120Hz refresh rate offers incredibly sharp and vibrant visuals. With a touch sampling rate of 2160 Hz, every touch is ultra-responsive.
- More Memory, More Possibilities: Choose between the 8/256 GB or 12/512 GB configurations to store all your files, photos, videos, and apps without compromise.
- Professional Camera: The 64 MP main camera with optical image stabilization (OIS), along with additional 8 MP and 2 MP modules, allows you to capture stunning photos in any conditions. The 16 MP front camera is perfect for selfies and video calls.
- Long Battery Life, Fast Charging: The 5000 mAh battery ensures all-day usage, while the powerful 67W turbo charging brings your device back to life in just a few minutes.
- Global Version: Support for multiple languages, Google Play, and all necessary network standards (4G/3G/2G) makes this smartphone universal for use anywhere in the world.
- Convenience and Security: The built-in fingerprint sensor and AI-powered face unlock provide quick and reliable access to your device.
- Additional Features: NFC, IR blaster, dual speakers, and IP54 splash resistance—everything you need for a comfortable experience.
The POCO M6 Pro is not just a smartphone; it’s your reliable companion in the world of technology.
Hurry and grab it at a special price of just 15,000 rubles! Treat yourself to a device that impresses with its power, style, and functionality.
Take a step into the future today—purchase it on [url=https://ify.ac/1Y26]AliExpress[/url]!
Binance注册奖金
February 22, 2025
Thanks for sharing. I read many of your blog posts, cool, your blog is very good.