
Marketing
How to set up Google Analytics in WordPress

Analytics… a word that many creative types shy away from. But understanding how your website performs is not only interesting, it’s imperative to knowing if your site is being visited, who’s visiting it, what’s working, and what’s not. It can help you identify areas – either in terms of design or content – that need work, and ensure that you’re speaking to your target audience.
There are a number of tools that allow you to analyze your site’s traffic; Google Analytics is, perhaps unsurprisingly, the most well known and many would argue the best available. It offers a wealth of options to dissect information about the people visiting your site; where they found you, how long they stayed, and even demographics such as age, gender, location, and browser preference. There is a fairly steep learning curve for some of the more in-depth analysis options, but top level data is easy to access, filter, and consume.
Thankfully, setting up Google Analytics is a straightforward process for those using WordPress sites. Widely speaking, you have three main options for implementing Google Analytics in WordPress, depending on the theme and plugins you have installed. But before we look at those options, the first thing to do is set yourself up with an analytics account at www.google.com/analytics/.

The step by step process will take you through setting up your site, and by the end of it, you’ll be presented with some nifty code that needs to find its way into your site. It should look something like this:
<script>
(function(i,s,o,g,r,a,m){i['GoogleAnalyticsObject']=r;i[r]=i[r]||function(){
(i[r].q=i[r].q||[]).push(arguments)},i[r].l=1*new Date();a=s.createElement(o),
m=s.getElementsByTagName(o)[0];a.async=1;a.src=g;m.parentNode.insertBefore(a,m)
})(window,document,'script','//www.google-analytics.com/analytics.js','ga');
ga('create', 'UA-XXXXXXXX-1', 'auto');
ga('send', 'pageview');
</script>
Got it? Ok, here are the three choices for what to do next:
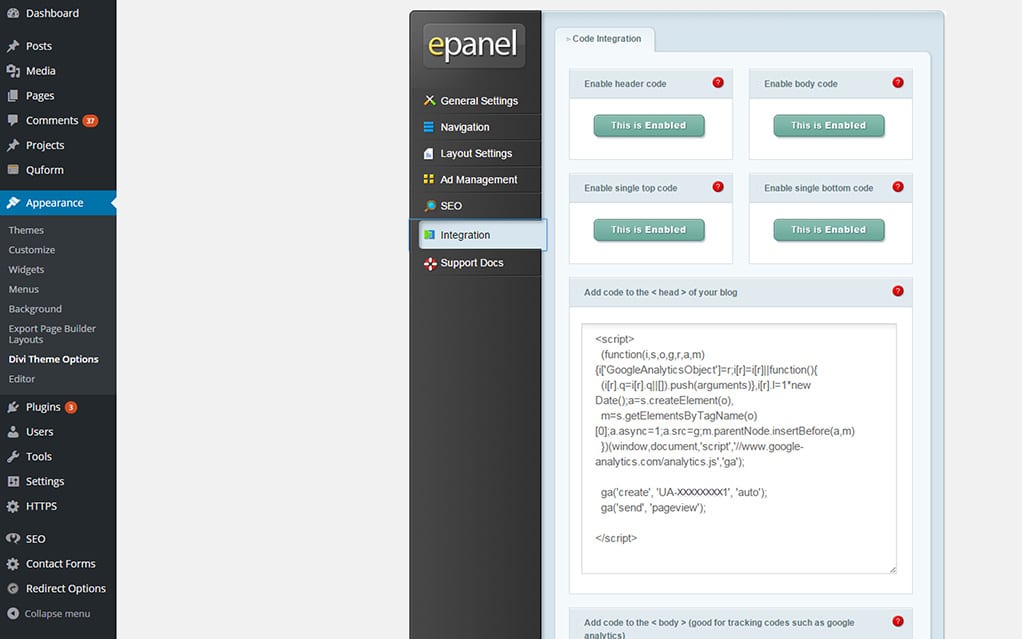
The theme route
Many recent WordPress themes (both premium and free) include an area to paste in your Google Analytics tracking code, usually found in “theme options.” Others simply offer a place to insert code into each page of your site. They may offer you the opportunity to “insert code into the HEAD section of your site,” or something similar.
Simply take the tracking code created during the Google Analytics setup process and paste it in the designated box. Hit save, and that’s that – you’re all set up. Within Google Analytics you should see that the site is now “receiving data.” If it doesn’t show this immediately, don’t worry; it can take a little time to update.
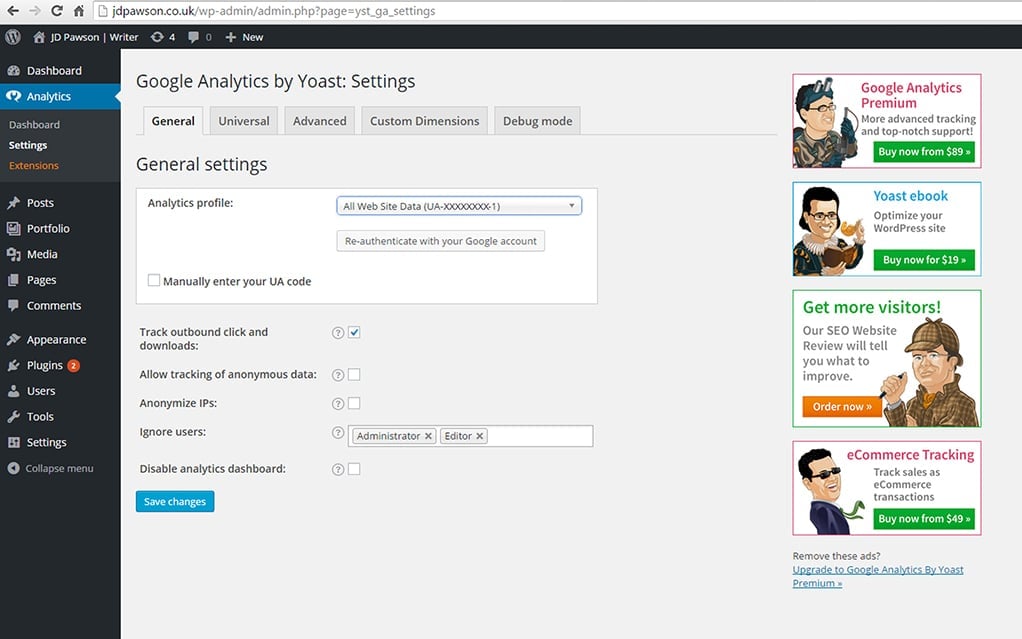
The plugin route
If your site’s theme doesn’t have this option, or if you want to keep your Google Analytics separate from your theme (for example, if you think you may change your theme in the future), then a plugin could be the easiest option for you. There are many available that will make adding Google Analytics to your site a breeze – both free and premium. From experience, there’s probably not much need to go down the premium track; from the multitude of free options available there is bound to be one that suits your requirements, as these two examples show:
- Google Analytics by Yoast: Yoast is one of the most well-known WordPress plugin companies out there; the Google Analytics plugin is just one of a suite of plugins that are available and is used by a large section of the WordPress community. As such, this plugin is well documented and is likely to be regularly updated. The plugin provides straightforward setup options and the bonus of being able to analyze your stats directly within the WordPress admin area. This is great if you want to be able to access your visitor info without having to login to a separate site. There are a few other options that may or may not be useful depending on how far you are planning to analyze your site.
- Simple Analytics: In contrast to the Yoast plugin, simple analytics is just that… simple. There are no fancy options – just a simple, lightweight plugin that provides a space to paste in your tracking code. This is potentially a better option for those worried about plugins increasing load times. Since this plugin is so simple, it shouldn’t add any extra bloat to your install. You’ll have to analyze your stats from the Google Analytics interface, but even with Yoast’s plugin you may want to visit Google Analytics to really sink your teeth into the data.
If you’re considering the plugin route, have a look through WordPress’s library of free plugins and pick a couple to test. Look for those that have been recently updated, make sure they work with your installed version of WordPress (which as far as I’m concerned should always be the latest version!), and have a look both at the number of downloads and the topics in the support section. Those that are actively supported or have a large number of downloads and an almost empty support section might be the best ones to start with. Try a few out (one at a time to avoid any conflicts), and once you’ve settled on one, delete the rest from your plugins installs.
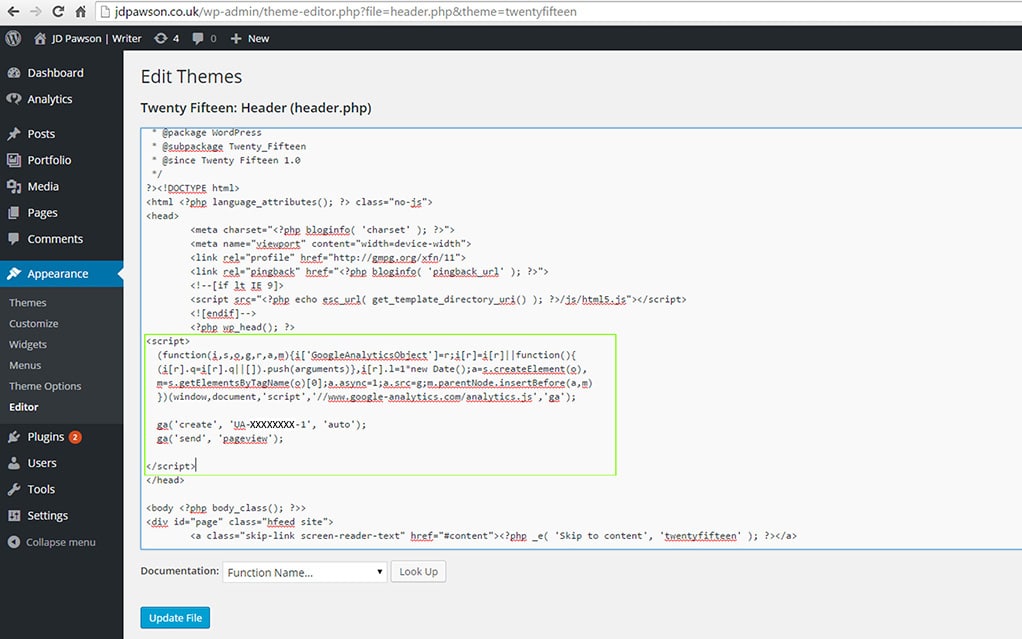
The code route
If you are a WordPress purist and hate the use of plugins (or for whatever reason are restricted on plugin installs) then the code route is a completely bloat-free way of integrating your analytics code. It does, however, require you to manually edit PHP files, so if you’d rather avoid touching the code that makes your website work, perhaps consider the alternate options above… Still with me? Ok. Let’s take a look at how to add your tracking code straight into the core files.
- Log in to your site’s admin panel and head to the appearance tab on the left hand menu. Under that you’ll see “Editor” as the last option.
- Click this and you’ll see a whole list of the behind-the-scenes PHP files that make your site work. Find “Header.php” and open it up.
- Once you’re editing this file, copy your Analytics tracking code and paste it in right before the closing </head> tag. Hit save and you’re done.
- This will mean that the tracking code will appear in the header section on every page on your site. Quick and simple (as long as you don’t mess up the underlying code!)
Any one of these three easy options makes Google Analytics accessible for everyone. It’ll cost you nothing but a little of your time, and before you know it you’ll have a thorough understanding of your site’s visitors. It can help you build a real picture of what’s working for your target audience, and empower you to make informed decisions about your digital presence!


Comments ( 293 )
hkrpbaxkq
June 7, 2025
Colour trading is an online game where you guess a colour, usually red, green, or violet and place a small bet on it. If the colour you picked gets selected by the system, you win money. It’s simple, quick, and works like a lucky draw. 2. Enter the Code in the Given Field. Tiranga Color Trading offers a new method to earn by guessing color outcomes. With fair trading, different earning choices, and a secure payment mechanism, it’s an excellent colour trading platform for online gamers and traders. Copyright © 2014-2025 APKPure All rights reserved. No, HappyMod is developed for Android only, all the ios version of HappyMod on the internet are fake. Best VPN 9AFFE88C2AE155136826A5FCDBAB4EF5 BDG Win Game is New Colour Game In India Earn 5000 Rs Daily Full Deteils In Hindi BDG Win Invite Code, Bdg Win how its work, bdg win game full deteils BDG WIN GAME Kya hai kaise isse khela or sari jaankari aaj ki is post me aapko bataunga bdg win k…
https://chemetronparts.com/exploring-the-world-of-pin-up-aviator-a-captivating-casino-game-review-for-players-from-bangladesh/
Just two cards are dealt – the Dragon and the Tiger. All you have to do is to make a bet on which card will be the highest or if there will be a tie. You must be over the legal gambling age to play this demo | 18+ Ready to Play for Real Money? Sorry, an error has occured while loading this demo. Fair Gaming Policy White Tiger Goro With impressive RTP and robust volatility, Dragon Tiger is a fantastic choice for players with a mathematical mindset. Dragon Tiger Slots - Up Down reinvents the classic card game format by intertwining the thrill of slot machine gameplay. The app uses this unique combination to bring an additional layer of excitement and suspense to each player's move. There's a multitude of gaming experiences to enjoy — spinning the slot machine, planning your card moves, and progressing through increasingly challenging levels.
Josephner
May 28, 2025
Pharm Au24: Pharm Au24 - PharmAu24
Josephner
May 28, 2025
Medications online Australia: Online drugstore Australia - Online drugstore Australia
CurtisAdurl
May 28, 2025
Online medication store Australia: Discount pharmacy Australia - Licensed online pharmacy AU
Josephner
May 28, 2025
Ero Pharm Fast: buying ed pills online - low cost ed meds online
CurtisAdurl
May 27, 2025
erectile dysfunction meds online: edmeds - buy erectile dysfunction pills
Josephner
May 27, 2025
online pharmacy australia: PharmAu24 - Online medication store Australia
Davidunlor
May 27, 2025
https://eropharmfast.shop/# Ero Pharm Fast
Josephner
May 27, 2025
Discount pharmacy Australia: PharmAu24 - Discount pharmacy Australia
Rodneysog
May 27, 2025
get antibiotics quickly [url=https://biotpharm.com/#]buy antibiotics online[/url] buy antibiotics from india
CurtisAdurl
May 27, 2025
PharmAu24: Pharm Au24 - Pharm Au24
Davidunlor
May 27, 2025
https://pharmau24.com/# Online medication store Australia
Josephner
May 27, 2025
Pharm Au 24: Licensed online pharmacy AU - pharmacy online australia
Rodneysog
May 27, 2025
over the counter antibiotics [url=http://biotpharm.com/#]buy antibiotics for uti[/url] buy antibiotics online
Charlesmub
May 27, 2025
buy antibiotics over the counter: buy antibiotics online - antibiotic without presription
FrankieLar
May 24, 2025
https://tadalaccess.com/# cialis and grapefruit enhance
Lorenhag
May 24, 2025
cialis timing: cialis online delivery overnight - where can i buy cialis
JosephTes
May 24, 2025
cialis free trial voucher 2018 [url=https://tadalaccess.com/#]cialis tadalafil 10 mg[/url] order cialis online
Lorenhag
May 23, 2025
generic cialis 20 mg from india: cialis prescription assistance program - cialis at canadian pharmacy
FrankieLar
May 23, 2025
https://tadalaccess.com/# cialis 5mg price cvs
JosephTes
May 23, 2025
cialis next day delivery [url=https://tadalaccess.com/#]Tadal Access[/url] cialis meme
FrankieLar
May 23, 2025
https://tadalaccess.com/# great white peptides tadalafil
Lorenhag
May 23, 2025
cheap generic cialis: why is cialis so expensive - vigra vs cialis
JosephTes
May 23, 2025
no presciption cialis [url=https://tadalaccess.com/#]TadalAccess[/url] when does cialis patent expire
FrankieLar
May 23, 2025
https://tadalaccess.com/# evolution peptides tadalafil
JosephTes
May 23, 2025
what is cialis for [url=https://tadalaccess.com/#]tadalafil walgreens[/url] cialis coupon walgreens
FrankieLar
May 22, 2025
https://tadalaccess.com/# cialis stopped working
JosephTes
May 22, 2025
order cialis online cheap generic [url=https://tadalaccess.com/#]Tadal Access[/url] cialis review
Lorenhag
May 22, 2025
us pharmacy prices for cialis: Tadal Access - cialis side effects with alcohol
FrankieLar
May 22, 2025
https://tadalaccess.com/# cialis review
JosephTes
May 22, 2025
cialis generic overnite [url=https://tadalaccess.com/#]Tadal Access[/url] cialis patent expiration date
Lorenhag
May 22, 2025
tadalafil cialis: cialis generic overnite shipping - buy cialis overnight shipping
JosephTes
May 22, 2025
how to buy tadalafil [url=https://tadalaccess.com/#]what is cialis prescribed for[/url] cialis for performance anxiety
Lorenhag
May 22, 2025
cialis 20mg review: tadalafil tablets 40 mg - purchase cialis on line
FrankieLar
May 22, 2025
https://tadalaccess.com/# cialis before and after photos
Scottdroca
May 21, 2025
tadalafil review forum: generic cialis tadalafil 20mg reviews - cialis one a day with dapoxetine canada
JosephTes
May 21, 2025
does cialis lower your blood pressure [url=https://tadalaccess.com/#]cialis generic 20 mg 30 pills[/url] cialis generic versus brand name
Lorenhag
May 21, 2025
buy cialis without a prescription: TadalAccess - cialis alternative
JosephTes
May 21, 2025
cialis directions [url=https://tadalaccess.com/#]tadalafil review forum[/url] typical cialis prescription strength
Scottdroca
May 21, 2025
cialis prices at walmart: viagara cialis levitra - how to get cialis without doctor
FrankieLar
May 21, 2025
https://tadalaccess.com/# cialis onset
Lorenhag
May 21, 2025
cheap cialis online overnight shipping: TadalAccess - buy cialis online free shipping
FrankieLar
May 20, 2025
https://tadalaccess.com/# vidalista tadalafil reviews
JosephTes
May 20, 2025
when will cialis be generic [url=https://tadalaccess.com/#]buying cheap cialis online[/url] cialis walgreens
Lorenhag
May 20, 2025
best time to take cialis 5mg: Tadal Access - tadalafil vs sildenafil
FrankieLar
May 20, 2025
https://tadalaccess.com/# buy voucher for cialis daily online
JosephTes
May 20, 2025
cialis alcohol [url=https://tadalaccess.com/#]Tadal Access[/url] cialis mexico
Lorenhag
May 20, 2025
buying cialis online: TadalAccess - cialis generic name
FrankieLar
May 20, 2025
https://tadalaccess.com/# cialis purchase canada
Scottdroca
May 20, 2025
buy tadalafil online canada: cialis testimonials - cialis online paypal
JosephTes
May 20, 2025
where can i buy cialis on line [url=https://tadalaccess.com/#]buy cialis no prescription australia[/url] how to get cialis prescription online
FrankieLar
May 20, 2025
https://tadalaccess.com/# what is cialis tadalafil used for
Scottdroca
May 20, 2025
cialis company: cialis online pharmacy australia - cialis at canadian pharmacy
Lorenhag
May 20, 2025
is tadalafil the same as cialis: cialis 80 mg dosage - tadalafil 5mg once a day
JosephTes
May 20, 2025
cialis daily dose [url=https://tadalaccess.com/#]online cialis prescription[/url] cialis coupon walgreens
FrankieLar
May 20, 2025
https://tadalaccess.com/# cialis experience forum
Lorenhag
May 19, 2025
cialis experience reddit: no prescription tadalafil - cialis windsor canada
JosephTes
May 19, 2025
cialis 20 mg best price [url=https://tadalaccess.com/#]cialis online reviews[/url] cialis lower blood pressure
FrankieLar
May 19, 2025
https://tadalaccess.com/# cialis company
Lorenhag
May 19, 2025
cialis walmart: Tadal Access - cialis no prescription
JosephTes
May 19, 2025
where can i get cialis [url=https://tadalaccess.com/#]when to take cialis 20mg[/url] buy cialis online in austalia
FrankieLar
May 19, 2025
https://tadalaccess.com/# difference between cialis and tadalafil
Scottdroca
May 19, 2025
cialis vs flomax for bph: when will cialis be over the counter - tadalafil ingredients
Lorenhag
May 19, 2025
buy cialis online in austalia: Tadal Access - where to buy cialis cheap
JosephTes
May 19, 2025
over the counter cialis [url=https://tadalaccess.com/#]tadalafil oral jelly[/url] tadalafil cost cvs
FrankieLar
May 19, 2025
https://tadalaccess.com/# buying cialis in mexico
Scottdroca
May 19, 2025
buy cheapest cialis: Tadal Access - active ingredient in cialis
Lorenhag
May 19, 2025
cialis 20mg side effects: TadalAccess - cialis coupon walmart
JosephTes
May 19, 2025
cialis 20 mg [url=https://tadalaccess.com/#]cialis when to take[/url] cialis cost per pill
FrankieLar
May 19, 2025
https://tadalaccess.com/# canadian pharmacy cialis 40 mg
Lorenhag
May 18, 2025
cialis for prostate: TadalAccess - cialis online without perscription
Scottdroca
May 18, 2025
tadalafil liquid review: cialis picture - cialis package insert
JosephTes
May 18, 2025
buy tadalafil online no prescription [url=https://tadalaccess.com/#]TadalAccess[/url] tadalafil liquid review
FrankieLar
May 18, 2025
https://tadalaccess.com/# cialis experience reddit
Lorenhag
May 18, 2025
cialis effects: TadalAccess - tadalafil buy online canada
FrankieLar
May 18, 2025
https://tadalaccess.com/# brand cialis with prescription
JosephTes
May 18, 2025
cialis male enhancement [url=https://tadalaccess.com/#]best time to take cialis[/url] buy tadalafil online canada
Lorenhag
May 18, 2025
where to buy cialis online: tadalafil cheapest online - cialis free trial voucher 2018
Scottdroca
May 18, 2025
is tadalafil available at cvs: walmart cialis price - generic cialis available in canada
FrankieLar
May 18, 2025
https://tadalaccess.com/# when should i take cialis
JosephTes
May 18, 2025
cialis when to take [url=https://tadalaccess.com/#]best place to buy liquid tadalafil[/url] tadalafil 40 mg with dapoxetine 60 mg
Lorenhag
May 18, 2025
online pharmacy cialis: buy cialis from canada - vidalista tadalafil reviews
Scottdroca
May 18, 2025
buy cialis/canada: when will cialis be over the counter - cialis efectos secundarios
FrankieLar
May 18, 2025
https://tadalaccess.com/# cialis store in philippines
JosephTes
May 18, 2025
us cialis online pharmacy [url=https://tadalaccess.com/#]cialis patent[/url] cialis 20 mg how long does it take to work
Scottdroca
May 17, 2025
cialis 20 mg price costco: Tadal Access - cialis windsor canada
JosephTes
May 17, 2025
what cialis [url=https://tadalaccess.com/#]cialis generic best price[/url] buy cialis online from canada
FrankieLar
May 17, 2025
https://tadalaccess.com/# does cialis shrink the prostate
JosephTes
May 17, 2025
cialis generic timeline [url=https://tadalaccess.com/#]tadalafil 20 mg directions[/url] do you need a prescription for cialis
FrankieLar
May 17, 2025
https://tadalaccess.com/# natural alternative to cialis
Scottdroca
May 17, 2025
cialis coupon rite aid: Tadal Access - when does the cialis patent expire
Lorenhag
May 17, 2025
tadalafil citrate powder: Tadal Access - cialis dapoxetine overnight shipment
JosephTes
May 17, 2025
cialis daily dose [url=https://tadalaccess.com/#]cialis 5mg how long does it take to work[/url] recreational cialis
FrankieLar
May 17, 2025
https://tadalaccess.com/# cialis going generic
Lorenhag
May 17, 2025
average dose of tadalafil: TadalAccess - cialis side effects heart
Scottdroca
May 17, 2025
can you purchase tadalafil in the us: Tadal Access - whats cialis
JosephTes
May 17, 2025
cialis super active real online store [url=https://tadalaccess.com/#]when will cialis be generic[/url] order generic cialis online 20 mg 20 pills
FrankieLar
May 16, 2025
https://tadalaccess.com/# cialis efectos secundarios
Lorenhag
May 16, 2025
online cialis: Tadal Access - cialis generic online
JosephTes
May 16, 2025
tadalafil citrate [url=https://tadalaccess.com/#]TadalAccess[/url] tadalafil citrate liquid
FrankieLar
May 16, 2025
https://tadalaccess.com/# cialis for sale brand
Lorenhag
May 16, 2025
what is cialis: buy cialis online reddit - shelf life of liquid tadalafil
Scottdroca
May 16, 2025
cialis sublingual: Tadal Access - buy cialis on line
JosephTes
May 16, 2025
is cialis covered by insurance [url=https://tadalaccess.com/#]cialis using paypal in australia[/url] which is better cialis or levitra
FrankieLar
May 16, 2025
https://tadalaccess.com/# cialis generic online
Scottdroca
May 16, 2025
cheap cialis with dapoxetine: tadalafil tablets 20 mg reviews - tadalafil 5 mg tablet
FrankieLar
May 16, 2025
https://tadalaccess.com/# tadalafil versus cialis
JosephTes
May 16, 2025
cialis pills for sale [url=https://tadalaccess.com/#]tadalafil online canadian pharmacy[/url] where to buy cialis soft tabs
Lorenhag
May 16, 2025
cialis for sale: Tadal Access - what cialis
Scottdroca
May 16, 2025
cialis generic for sale: cialis how long does it last - buy cialis online from canada
FrankieLar
May 15, 2025
https://tadalaccess.com/# cialis 5mg coupon
JosephTes
May 15, 2025
cialis 30 day free trial [url=https://tadalaccess.com/#]buy cialis canada paypal[/url] buy cialis from canada
Scottdroca
May 15, 2025
cialis 5mg daily: Tadal Access - cheap tadalafil 10mg
Lorenhag
May 15, 2025
cialis dapoxetine overnight shipment: Tadal Access - how much tadalafil to take
JosephTes
May 15, 2025
pastillas cialis [url=https://tadalaccess.com/#]Tadal Access[/url] cialis w/o perscription
Scottdroca
May 15, 2025
cialis onset: cialis coupon rite aid - cialis 20mg for sale
FrankieLar
May 15, 2025
https://tadalaccess.com/# where can i buy tadalafil online
Lorenhag
May 15, 2025
generic cialis tadalafil 20mg india: u.s. pharmacy prices for cialis - cialis active ingredient
JosephTes
May 15, 2025
ambrisentan and tadalafil combination brands [url=https://tadalaccess.com/#]TadalAccess[/url] cialis generic timeline 2018
Scottdroca
May 15, 2025
cialis what is it: TadalAccess - cialis before and after pictures
FrankieLar
May 15, 2025
https://tadalaccess.com/# cialis discount coupons
Lorenhag
May 15, 2025
cialis shelf life: Tadal Access - what does a cialis pill look like
JosephTes
May 15, 2025
cialis generic 20 mg 30 pills [url=https://tadalaccess.com/#]difference between sildenafil and tadalafil[/url] cialis super active plus
Scottdroca
May 15, 2025
cialis generic cvs: TadalAccess - cialis delivery held at customs
FrankieLar
May 15, 2025
https://tadalaccess.com/# is tadalafil peptide safe to take
Lorenhag
May 15, 2025
cialis canadian pharmacy ezzz: cheapest cialis - side effects of cialis daily
JosephTes
May 14, 2025
where can i buy cialis online in australia [url=https://tadalaccess.com/#]Tadal Access[/url] cialis generic best price that accepts mastercard
Scottdroca
May 14, 2025
generic cialis: buying cialis without a prescription - cialis strength
FrankieLar
May 14, 2025
https://tadalaccess.com/# best time to take cialis 5mg
Lorenhag
May 14, 2025
cheap t jet 60 cialis online: Tadal Access - buy cialis generic online
JosephTes
May 14, 2025
vardenafil and tadalafil [url=https://tadalaccess.com/#]TadalAccess[/url] cheap cialis free shipping
Scottdroca
May 14, 2025
cialis 20 mg from united kingdom: Tadal Access - cialis buy
FrankieLar
May 14, 2025
https://tadalaccess.com/# does cialis make you last longer in bed
Lorenhag
May 14, 2025
cialis canada pharmacy no prescription required: Tadal Access - cialis 40 mg
JosephTes
May 14, 2025
cialis 20 mg [url=https://tadalaccess.com/#]take cialis the correct way[/url] when should i take cialis
Scottdroca
May 14, 2025
cialis experience forum: TadalAccess - over the counter drug that works like cialis
FrankieLar
May 14, 2025
https://tadalaccess.com/# cialis manufacturer coupon free trial
Lorenhag
May 14, 2025
cialis not working anymore: TadalAccess - tadalafil tablets side effects
Scottdroca
May 14, 2025
cialis for daily use reviews: TadalAccess - cialis generic for sale
FrankieLar
May 14, 2025
https://tadalaccess.com/# cialis 10 mg
Lorenhag
May 14, 2025
buying cialis online: how many mg of cialis should i take - cialis tablets for sell
JosephTes
May 14, 2025
maximum dose of cialis in 24 hours [url=https://tadalaccess.com/#]too much cialis[/url] cialis when to take
Russellfeeve
May 13, 2025
can i buy cheap clomid online: where to get generic clomid without rx - where to buy generic clomid pill
Oscargef
May 13, 2025
Amo Health Care: azithromycin amoxicillin - Amo Health Care
MatthewTom
May 13, 2025
Amo Health Care [url=https://amohealthcare.store/#]Amo Health Care[/url] amoxicillin 500mg over the counter
RogerCouct
May 13, 2025
http://prednihealth.com/# PredniHealth
Russellfeeve
May 13, 2025
get generic clomid price: Clom Health - where can i get cheap clomid without insurance
Oscargef
May 13, 2025
how to get cheap clomid prices: Clom Health - where buy generic clomid tablets
MatthewTom
May 13, 2025
where to buy generic clomid [url=http://clomhealth.com/#]Clom Health[/url] clomid buy
RogerCouct
May 13, 2025
https://amohealthcare.store/# amoxicillin 500 mg online
Russellfeeve
May 13, 2025
PredniHealth: prednisone 5mg capsules - prednisone 4mg tab
RogerCouct
May 13, 2025
https://clomhealth.shop/# cost of clomid now
MatthewTom
May 13, 2025
cheap amoxicillin 500mg [url=https://amohealthcare.store/#]Amo Health Care[/url] generic amoxicillin 500mg
Russellfeeve
May 13, 2025
Amo Health Care: Amo Health Care - buy amoxicillin online with paypal
Oscargef
May 13, 2025
order amoxicillin no prescription: Amo Health Care - amoxicillin cost australia
RogerCouct
May 13, 2025
http://prednihealth.com/# buy prednisone online paypal
MatthewTom
May 12, 2025
can i order generic clomid without insurance [url=http://clomhealth.com/#]can you get clomid pills[/url] can you get clomid pills
Russellfeeve
May 12, 2025
20 mg prednisone tablet: prednisone for sale in canada - PredniHealth
JudsonZoown
May 12, 2025
buying clomid pills: cost clomid price - can i order cheap clomid
Oscargef
May 12, 2025
PredniHealth: PredniHealth - PredniHealth
RogerCouct
May 12, 2025
https://prednihealth.com/# 10 mg prednisone tablets
Russellfeeve
May 12, 2025
amoxicillin 750 mg price: Amo Health Care - purchase amoxicillin online
JudsonZoown
May 12, 2025
amoxicillin generic: where can i get amoxicillin - Amo Health Care
MatthewTom
May 12, 2025
where to get clomid prices [url=https://clomhealth.com/#]order clomid no prescription[/url] can i order clomid
Oscargef
May 12, 2025
clomid without dr prescription: Clom Health - how to buy clomid without dr prescription
RogerCouct
May 12, 2025
https://amohealthcare.store/# Amo Health Care
Russellfeeve
May 12, 2025
where can i get cheap clomid for sale: Clom Health - can i purchase generic clomid without rx
JudsonZoown
May 12, 2025
Amo Health Care: buy amoxicillin online mexico - order amoxicillin online uk
MatthewTom
May 12, 2025
Amo Health Care [url=https://amohealthcare.store/#]amoxicillin buy canada[/url] Amo Health Care
Oscargef
May 12, 2025
PredniHealth: PredniHealth - PredniHealth
RogerCouct
May 12, 2025
http://prednihealth.com/# PredniHealth
Russellfeeve
May 12, 2025
prednisone 10 mg price: PredniHealth - PredniHealth
JudsonZoown
May 12, 2025
PredniHealth: how to buy prednisone - prednisone prescription online
MatthewTom
May 12, 2025
prednisone pill 10 mg [url=https://prednihealth.shop/#]PredniHealth[/url] PredniHealth
Oscargef
May 12, 2025
Amo Health Care: amoxicillin 500 mg online - Amo Health Care
LorenzoBlize
May 12, 2025
buy generic Viagra online [url=http://maxviagramd.com/#]trusted Viagra suppliers[/url] safe online pharmacy
RobertKet
May 11, 2025
generic tadalafil: affordable ED medication - online Cialis pharmacy
LorenzoBlize
May 11, 2025
secure checkout ED drugs [url=http://zipgenericmd.com/#]generic tadalafil[/url] cheap Cialis online
Jeremyfax
May 11, 2025
order Cialis online no prescription: secure checkout ED drugs - best price Cialis tablets
LorenzoBlize
May 10, 2025
Viagra without prescription [url=https://maxviagramd.shop/#]buy generic Viagra online[/url] trusted Viagra suppliers
Jeremyfax
May 10, 2025
cheap Cialis online: cheap Cialis online - reliable online pharmacy Cialis
LorenzoBlize
May 10, 2025
no doctor visit required [url=https://maxviagramd.com/#]safe online pharmacy[/url] generic sildenafil 100mg
RonaldFOEFS
May 10, 2025
https://maxviagramd.shop/# Viagra without prescription
Jeremyfax
May 10, 2025
cheap Cialis online: order Cialis online no prescription - reliable online pharmacy Cialis
LorenzoBlize
May 10, 2025
Cialis without prescription [url=http://zipgenericmd.com/#]FDA approved generic Cialis[/url] best price Cialis tablets
Jeremyfax
May 10, 2025
secure checkout Viagra: trusted Viagra suppliers - order Viagra discreetly
Albertoseino
May 10, 2025
verified Modafinil vendors: buy modafinil online - purchase Modafinil without prescription
RobertKet
May 10, 2025
doctor-reviewed advice: legal Modafinil purchase - Modafinil for sale
LorenzoBlize
May 9, 2025
FDA approved generic Cialis [url=http://zipgenericmd.com/#]order Cialis online no prescription[/url] secure checkout ED drugs
Albertoseino
May 9, 2025
order Cialis online no prescription: cheap Cialis online - online Cialis pharmacy
Jeremyfax
May 9, 2025
modafinil 2025: modafinil 2025 - Modafinil for sale
RonaldFOEFS
May 9, 2025
https://zipgenericmd.shop/# buy generic Cialis online
RobertKet
May 9, 2025
safe modafinil purchase: verified Modafinil vendors - safe modafinil purchase
LorenzoBlize
May 9, 2025
generic tadalafil [url=https://zipgenericmd.com/#]order Cialis online no prescription[/url] reliable online pharmacy Cialis
Albertoseino
May 9, 2025
verified Modafinil vendors: modafinil 2025 - verified Modafinil vendors
RonaldFOEFS
May 9, 2025
https://modafinilmd.store/# modafinil pharmacy
RobertKet
May 9, 2025
safe modafinil purchase: modafinil 2025 - safe modafinil purchase
LorenzoBlize
May 9, 2025
Modafinil for sale [url=https://modafinilmd.store/#]doctor-reviewed advice[/url] buy modafinil online
RobertKet
May 9, 2025
order Viagra discreetly: Viagra without prescription - safe online pharmacy
RonaldFOEFS
May 9, 2025
https://maxviagramd.com/# discreet shipping
RobertKet
May 9, 2025
reliable online pharmacy Cialis: best price Cialis tablets - online Cialis pharmacy
Jeremyfax
May 9, 2025
affordable ED medication: cheap Cialis online - best price Cialis tablets
LorenzoBlize
May 9, 2025
safe online pharmacy [url=https://maxviagramd.com/#]Viagra without prescription[/url] discreet shipping
RonaldFOEFS
May 9, 2025
https://zipgenericmd.shop/# generic tadalafil
Richardmat
May 7, 2025
вавада казино [url=https://vavadavhod.tech/#]vavada casino[/url] vavada
ZackaryCaush
May 7, 2025
http://vavadavhod.tech/# вавада зеркало
Richardmat
May 6, 2025
pin up [url=https://pinupaz.top/#]pin up az[/url] pin up casino
Richardmat
May 4, 2025
pin up azerbaycan [url=http://pinupaz.top/#]pin up az[/url] pinup az
ZackaryCaush
May 3, 2025
https://pinuprus.pro/# pin up вход
ZackaryCaush
May 3, 2025
https://pinupaz.top/# pin-up
Richardmat
May 2, 2025
vavada [url=https://vavadavhod.tech/#]vavada вход[/url] вавада официальный сайт
Richardmat
May 2, 2025
pin up [url=https://pinupaz.top/#]pin-up casino giris[/url] pin-up
Richardmat
May 2, 2025
pin-up casino giris [url=https://pinupaz.top/#]pinup az[/url] pin up casino
ZackaryCaush
May 2, 2025
http://pinuprus.pro/# пинап казино
ZackaryCaush
May 2, 2025
http://vavadavhod.tech/# вавада официальный сайт
ZackaryCaush
May 1, 2025
http://pinuprus.pro/# pin up вход
ZackaryCaush
May 1, 2025
http://vavadavhod.tech/# vavada
Kennethsheby
May 1, 2025
pinup az: pinup az - pin up
ZackaryCaush
May 1, 2025
https://pinupaz.top/# pin up casino
Kennethsheby
April 30, 2025
пин ап зеркало: пин ап казино - пинап казино
Richardmat
April 30, 2025
pin-up [url=http://pinupaz.top/#]pin up casino[/url] pin-up casino giris
ZackaryCaush
April 30, 2025
http://pinuprus.pro/# пин ап казино официальный сайт
Kennethsheby
April 30, 2025
pin up azerbaycan: pin up azerbaycan - pin-up
Richardmat
April 30, 2025
вавада казино [url=http://vavadavhod.tech/#]вавада[/url] vavada
ElmerSip
April 30, 2025
pin up az: pin-up - pin up az
Richardmat
April 30, 2025
пин ап казино официальный сайт [url=http://pinuprus.pro/#]пин ап вход[/url] пин ап казино
ZackaryCaush
April 30, 2025
http://pinuprus.pro/# пинап казино
Kennethsheby
April 30, 2025
пин ап казино: пин ап казино - pin up вход
Richardmat
April 30, 2025
пин ап казино [url=https://pinuprus.pro/#]пин ап зеркало[/url] пинап казино
ElmerSip
April 30, 2025
pin up вход: pin up вход - пинап казино
ZackaryCaush
April 30, 2025
https://vavadavhod.tech/# vavada
Richardmat
April 30, 2025
пинап казино [url=https://pinuprus.pro/#]pin up вход[/url] пин ап казино
Dannysit
April 30, 2025
indian pharmacy online shopping: indian pharmacy online - п»їlegitimate online pharmacies india
MichaelFaulp
April 30, 2025
canadian pharmacy online: Express Rx Canada - canadian drug pharmacy
Stevendrype
April 30, 2025
MedicineFromIndia: indian pharmacy - Medicine From India
Dannysit
April 29, 2025
canadian online pharmacy: Canadian pharmacy shipping to USA - canada drugs online
MichaelFaulp
April 29, 2025
mexico pharmacy order online: mexico pharmacies prescription drugs - mexican online pharmacy
Dannysit
April 29, 2025
Medicine From India: top 10 pharmacies in india - Medicine From India
Stevendrype
April 29, 2025
safe reliable canadian pharmacy: Buy medicine from Canada - best canadian pharmacy online
MichaelFaulp
April 29, 2025
mexican rx online: RxExpressMexico - mexico pharmacies prescription drugs
Michaeljouch
April 29, 2025
reliable canadian pharmacy [url=http://expressrxcanada.com/#]Buy medicine from Canada[/url] canada ed drugs
Stevendrype
April 29, 2025
canadian pharmacy king: Buy medicine from Canada - the canadian pharmacy
Dannysit
April 29, 2025
indian pharmacy: Medicine From India - Medicine From India
Walterhap
April 29, 2025
https://rxexpressmexico.shop/# Rx Express Mexico
MichaelFaulp
April 29, 2025
reputable canadian pharmacy: Express Rx Canada - canada cloud pharmacy
Michaeljouch
April 29, 2025
Rx Express Mexico [url=http://rxexpressmexico.com/#]mexican rx online[/url] Rx Express Mexico
Stevendrype
April 29, 2025
mexican online pharmacy: mexican online pharmacy - RxExpressMexico
Dannysit
April 29, 2025
mexican online pharmacy: mexican rx online - mexico drug stores pharmacies
Walterhap
April 29, 2025
http://expressrxcanada.com/# canadadrugpharmacy com
Michaeljouch
April 29, 2025
mexico pharmacy order online [url=https://rxexpressmexico.com/#]mexico pharmacy order online[/url] Rx Express Mexico
Stevendrype
April 29, 2025
legit canadian pharmacy online: Canadian pharmacy shipping to USA - canada drugs
Dannysit
April 29, 2025
mexico pharmacies prescription drugs: RxExpressMexico - pharmacies in mexico that ship to usa
Walterhap
April 29, 2025
https://expressrxcanada.com/# escrow pharmacy canada
MichaelFaulp
April 28, 2025
indian pharmacy online: MedicineFromIndia - indian pharmacy online shopping
Stevendrype
April 28, 2025
mexican online pharmacies prescription drugs: mexican rx online - mexico pharmacies prescription drugs
Dannysit
April 28, 2025
indian pharmacy online: MedicineFromIndia - top 10 online pharmacy in india
Walterhap
April 28, 2025
https://medicinefromindia.com/# indian pharmacy online shopping
MichaelFaulp
April 28, 2025
canadian online drugstore: canadian compounding pharmacy - reliable canadian pharmacy reviews
Stevendrype
April 28, 2025
canada ed drugs: Buy medicine from Canada - canada pharmacy online
Michaeljouch
April 28, 2025
RxExpressMexico [url=http://rxexpressmexico.com/#]mexico drug stores pharmacies[/url] Rx Express Mexico
Dannysit
April 28, 2025
canadian neighbor pharmacy: Generic drugs from Canada - rate canadian pharmacies
Walterhap
April 28, 2025
http://rxexpressmexico.com/# RxExpressMexico
MichaelFaulp
April 28, 2025
Rx Express Mexico: mexico pharmacies prescription drugs - best online pharmacies in mexico
Stevendrype
April 28, 2025
canadian pharmacy 24: Generic drugs from Canada - safe canadian pharmacy
Dannysit
April 28, 2025
reputable mexican pharmacies online: Rx Express Mexico - Rx Express Mexico
Walterhap
April 28, 2025
https://medicinefromindia.com/# online pharmacy india
Michaeljouch
April 28, 2025
mexican rx online [url=http://rxexpressmexico.com/#]mexican rx online[/url] mexican online pharmacy
Bradleyfup
April 28, 2025
kamagra oral jelly: Kamagra pharmacie en ligne - Achetez vos kamagra medicaments
PeterUnomb
April 28, 2025
kamagra gel [url=http://kamagraprix.com/#]kamagra oral jelly[/url] Acheter Kamagra site fiable
BernardVeida
April 27, 2025
Tadalafil achat en ligne: Achat Cialis en ligne fiable - Pharmacie en ligne Cialis sans ordonnance tadalmed.shop
Bradleyfup
April 27, 2025
Pharmacie sans ordonnance: acheter mГ©dicament en ligne sans ordonnance - Pharmacie sans ordonnance pharmafst.com
BernardVeida
April 26, 2025
kamagra en ligne: Acheter Kamagra site fiable - kamagra gel
PeterUnomb
April 26, 2025
Acheter Kamagra site fiable [url=http://kamagraprix.com/#]kamagra 100mg prix[/url] kamagra pas cher
BernardVeida
April 26, 2025
kamagra en ligne: Kamagra Commander maintenant - Acheter Kamagra site fiable
BilliesniCt
April 26, 2025
п»їpharmacie en ligne france: pharmacie en ligne pas cher - Pharmacie en ligne livraison Europe pharmafst.com
PeterUnomb
April 26, 2025
pharmacie en ligne livraison europe [url=http://pharmafst.com/#]Pharmacie en ligne France[/url] trouver un mГ©dicament en pharmacie pharmafst.shop
BilliesniCt
April 25, 2025
Acheter Viagra Cialis sans ordonnance: cialis prix - Tadalafil sans ordonnance en ligne tadalmed.shop
PeterUnomb
April 25, 2025
Tadalafil achat en ligne [url=http://tadalmed.com/#]Acheter Viagra Cialis sans ordonnance[/url] Tadalafil sans ordonnance en ligne tadalmed.com
BernardVeida
April 25, 2025
pharmacie en ligne livraison europe: Livraison rapide - pharmacie en ligne avec ordonnance pharmafst.com
Bradleyfup
April 25, 2025
cialis prix: Cialis en ligne - Tadalafil 20 mg prix en pharmacie tadalmed.shop
PeterUnomb
April 25, 2025
pharmacie en ligne france fiable [url=https://pharmafst.shop/#]pharmacie en ligne[/url] pharmacie en ligne sans ordonnance pharmafst.shop
Robertmut
April 25, 2025
https://pharmafst.com/# pharmacie en ligne france livraison internationale
BilliesniCt
April 25, 2025
Tadalafil 20 mg prix sans ordonnance: Acheter Viagra Cialis sans ordonnance - Cialis generique prix tadalmed.shop
Bradleyfup
April 25, 2025
Kamagra pharmacie en ligne: Kamagra Oral Jelly pas cher - Kamagra Oral Jelly pas cher
BernardVeida
April 25, 2025
Cialis en ligne: Tadalafil 20 mg prix en pharmacie - Cialis en ligne tadalmed.shop
PeterUnomb
April 25, 2025
Tadalafil 20 mg prix en pharmacie [url=https://tadalmed.shop/#]Cialis sans ordonnance pas cher[/url] Cialis sans ordonnance 24h tadalmed.com
Robertmut
April 25, 2025
https://tadalmed.shop/# Acheter Cialis 20 mg pas cher
BernardVeida
April 25, 2025
Acheter Cialis: Tadalafil sans ordonnance en ligne - Achat Cialis en ligne fiable tadalmed.shop
DavidSaisp
April 24, 2025
Kamagra Commander maintenant: kamagra livraison 24h - kamagra livraison 24h
Edwardtoupe
April 23, 2025
olympe casino: olympe casino en ligne - casino olympe
Emmanuel chill
November 2, 2017
Many find it difficult getting to set up google analytics on their PC including me, lol........
But after going through this post, I found out it's so easy to get it running.
Thanks for giving this simple and easy steps.
Cheers!
Prosperity Kenneth
August 4, 2017
Honestly, this is an awesome piece, I never knew getting started with Google analytics is this easy. Thanks :)
Andrew McCauley
July 12, 2015
Another great option is Google Tag Manager. I use that along with DuracellTomi's Google Tag Manager for WordPress (https://wordpress.org/plugins/duracelltomi-google-tag-manager/). It's a powerful combination that offers a flexibility that including the Analytics tag in the theme, through a Google Analytics-specific plugin or hardcoding it.