
Design, Development
Transitioning from designer to developer: Here’s how to get started

Everyone’s road to becoming a web developer looks a little different. For me, as for many people, I started as a designer. WordPress makes it easy to get a fantastic-looking site up and running without knowing any code. As a designer, you can change themes, adjust settings, add plugins, and do so much to control the appearance of the site. But at the end of the day, a lot of designers want to go a step further and dictate pixel for pixel what the site looks like.
There are two ways to accomplish this: hire a developer to implement your design or acquire some development skills yourself. Even if you hire a developer, there will be times when knowing how to do some development is a great asset. Plus, when you can handle development needs for your clients, you become even more valuable to them and can increase your rate accordingly.
Making the leap from designer to developer is a big undertaking. I’m going to suggest some simple steps to take so you can get started on transitioning from someone who creates the site designs to someone who can build and implement those designs as well.
Good news, you’re in the right place
Chances are if you are here reading The Layout, you are at least a little familiar with WordPress. WordPress opens the door for someone to move from designer to developer better than any other platform on the web. One way it accomplishes this is the Editor, which can be found in the WordPress dashboard under Appearance > Editor.
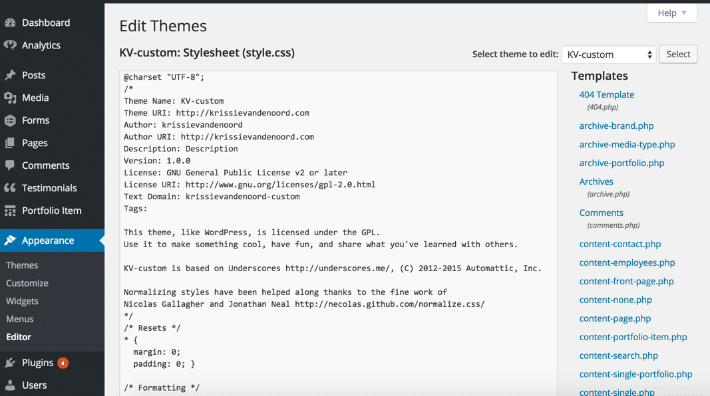
You can view all of the theme’s code right there in the WordPress Dashboard without any special tools or server access. It does provide capabilities to edit the code as well, however, I would not suggest doing that here (we’ll talk about better ways to do that later). This is a great place for you to take a peek and see what is going on. So go ahead and look under the hood of your theme and see if you can start to make sense of what’s there.
You will typically see three different kinds of files here. To simplify things, think of these files like the “body” of your website. PHP files (.php) contain HTML (the bones) and PHP (the nerves which connect everything to the brain, the database). Stylesheets (.css) are the skin of your site, determining what it looks like. JavaScript (.js) can be thought of as the muscles of the site, typically controlling the moving parts and reacting and responding to how the site is being used and interacted with. Go ahead and explore a little bit. Do you see any descriptive words that indicate what section of the site the code is for? Or words that describe some of the visual aspects of the site?
The other great way WordPress closes a gap between designer and developer is that it breaks things into pieces, allowing you to easily identify the section you want to edit and make changes to just one part of the site. WordPress separates the content from the templates from the functions of the website. It also uses consistent structure among files, so you can jump between sites and still easily be able to find the files you want to edit.
Don’t be afraid
One of the phrases I most often use when training others is, “don’t be afraid, you can’t mess this up in a way I can’t fix.” There is very little in the world that can’t be undone. Of course, you’ll want to take advantage of the tools that will make it easy for you to undo, should your edits not go as planned. Two great tools that Flywheel provides are their Staging feature and their ability to easily make a backup and restore from it. When you do decide to jump into the code, use a staging site to make edits. This way you aren’t risking your live site, and can easily reset your staging environment if needed. If you do inadvertently make a change on your live site, no fear, just restore your latest backup and in less than five minutes, you’re back on track. These tools should give you confidence to start taking some baby steps in editing some code!
Pro-tip: once you get a little more comfortable with code, I would encourage you to explore version control, either Git or SVN, as a third layer of security and the front line of tracking changes and catching glitches before your code goes live.
Where to begin?
Now that we’ve addressed some of the initial mental hurdles, where should you begin? If you are a designer, then the most natural place to start working with code would be CSS. As we mentioned before, this is the skin of our site; it controls what the site looks like and how it’s laid out. Before we can dissect CSS, we need to understand how it works with HTML. HTML has a variety of tags to differentiate the content within. Those tags can have many different attributes, which provide some additional information about the tag and its content. The two attributes we are going to look at are id and class. Here is a code snippet with three different HTML tags. You’ll notice that not every tag has an id or class. They are not required, but they help to differentiate tags on the same page from each other. Ids should only be used once on a page, whereas classes can be repeated and used multiple times.
<article id="post-1" class="inset">
	<p class="highlight">Hello, <span>world!</span></p>
</article>
So we have the tags, <article>, <p>, and <span>. Article has an id of post-1 and a class of inset. The p tag has a class of highlight and the span tag does not have an id or a class.
The CSS to go with the above HTML might look like this:
/* This is a comment, it doesn't affect the code. We can use it to make notes or write instructions */
article { /* These styles will apply to every &amp;lt;article&amp;gt; tag on the page */
background: #eaeaea; &nbsp;/* This makes the background gray using a HEX color code */
padding: 20px; /* give the article 20 pixels of space around the inside */
margin: 10px; /* give the article 10 pixels of space around the outside */
}
#post-1 { /* These styles will apply to only the tag with id of post-1 */
border: 1px solid green; /* green solid line around the container */
}
.highlight { /* These styles will apply to anything with a class of highlight */
background: yellow; /* give this text a yellow background */
}
span { /* These styles will apply to every &amp;lt;span&amp;gt; tag on the page */
font-weight: bold; /* bold this text */
text-transform: uppercase; /* make this text ALL CAPS */
}
To dig more into CSS and how it works, there are lots of fantastic resources. Some great places to start are A List Apart Books, codeschool.coma, codecademy.com, lynda.com, css-tricks.com, and wpbeginner.com. Each of these resources is a little different; some offer a general, learn the basics approach, and others focus on use cases and will give specific code snippets or tutorials on a specific task. Everyone learns in different ways, so find what’s right for you.
Look at code “In the Wild”
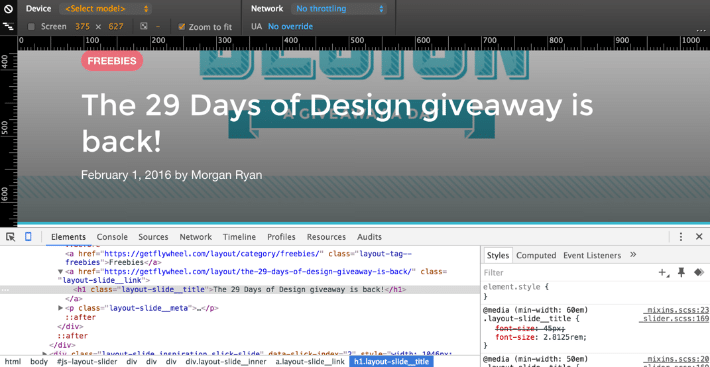
We talked earlier about one way to “peek under the hood” but another way is to use the development tools built into your browser. Most browsers will let you explore around in the code on a web page. Go ahead and right click or ctrl click on this text, and select “Inspect” or “Inspect Element.” A window will pop up that should show you the HTML tag and corresponding CSS. You can even edit the properties and see what they look like when changed.
Google is your friend
When in doubt, Google! Seriously, there are so many people writing about code, chances are someone has written about what you are trying to do. So Google and see what you find. There may even be several ways to accomplish what you are going for, and you can find the best way given your own style and circumstances.
Putting it into practice
You don’t have to build a theme from scratch to make use of some of these new found developer skills. I encourage you to start small. Try making some tweaks to an existing theme, like changing some colors or using a different font. As I noted before, there are better ways to edit a theme’s code than using the Editor. Themes offer updates, and if you have edited the theme files directly, a theme update will override your changes. One of the easiest ways to add some custom code to an existing theme is via a plugin. And the perfect plugin for CSS is Simple Custom CSS by John Regan and Danny van Kooten. This lets you add some of your own CSS to your site without messing up the theme files, and is great for making small visual changes to your WordPress site.
Formalize your workflow
Once you get more comfortable working with some smaller snippets of code through the Dashboard, you will want a more formal workflow for your development tasks. Developer’s workflows can range from very simple to extremely complex. There are good reasons for some more complex workflows, but we are going to start with the basics. The two things you must have if you want to edit code outside of the Dashboard are a code editor and an FTP program, which will allow you to put and get files from your server. Elegant Themes has a great post comparing code editors. It’s an excellent resource when trying to determine which editor is right for you. Some code editors have FTP built in, but there are also a lot of free or low-cost options out there.
Pro-tip: another great tool for a WordPress developer’s workflow is DesktopServer by ServerPress. This lets you set up and build a WordPress site on your computer locally with just a few clicks.
Try creating a child theme
Now that you have a more formal editing environment, try creating a child theme. This is a custom theme that is based on another theme. Both themes must be installed on your site for it to work, and the child theme should be the one that’s activated. The two things required for a child theme are style.css and functions.php files. The Genesis framework leverages this functionality extremely well and is a great place to jump in and start building some of your development skills. Carrie Dils has done several lynda.com courses on using child themes with Genesis. It’s a fantastic next step in your designer-to-developer journey.
Don’t get discouraged
It’s natural that as you jump into learning code, at some point you’ll get discouraged, but don’t be. Everyone has been there. Even experienced developers have days where they feel like they know nothing. Some of the best ways to get past these humps are by staying connected with others on your same journey. Twitter, Slack, and participating in the WordPress.org forums are all great ways to stay connected. Follow some blogs like the Layout, and you can cultivate relationships and learn along the way. Some of my favorite people to follow who have helped me on my development journey are Carrie Dils, Tom McFarlin, and John Regan.
Where should I go from here?
Once you feel like you have a good handle on HTML and CSS, the next logical step is JavaScript, or you can take it a step further and dig into the WordPress Codex to learn how to pull pieces of WordPress content into your code. Happy coding!


Comments ( 313 )
DavidPhich
July 8, 2025
Даже лучше, чем на фото!
букет цветов томск
CharlesLinee
July 8, 2025
Цветы будто только что срезали - такая свежесть!
доставка цветов томск
Williamcoido
July 7, 2025
Свежесть цветов - будто их только что срезали!
доставка цветов томск на дом
Williamcoido
July 6, 2025
Девушка была в экстазе - лучший подарок!
купить пионы томск
DavidPhich
July 6, 2025
С душой и теплотой - спасибо!
купить пионы томск
CharlesLinee
July 6, 2025
Пробились через пробки и доставили вовремя - герои!
букет пионов
DavidPhich
July 2, 2025
Сестра в восторге от сюрприза!
розы томск
EdwardZisee
July 2, 2025
Лучший цветочный сервис в городе!
доставка цветов
CharlesLinee
July 1, 2025
Самые свежие и красивые розы в городе!
заказ цветов томск с доставкой
EdwardZisee
June 30, 2025
Спасибо за внимание к клиентам!
заказать цветы с доставкой в томске
Williamcoido
June 30, 2025
Видно, что собирали с любовью - это чувствуется!
доставка цветов томск
DavidPhich
June 30, 2025
Свадебный букет вызвал восторг!
купить цветы в томске
CharlesLinee
June 29, 2025
Свежесть и красота в каждом лепестке!
заказать цветы с доставкой в томске
CharlesLinee
June 27, 2025
Отличное сочетание цены и качества.
заказ цветов томск с доставкой
Williamcoido
June 25, 2025
Аромат стоит на всю квартиру - божественно!
цветы томск
Williamcoido
June 24, 2025
Доставили к самому началу торжества - идеальный расчет времени!
розы томск
EdwardZisee
June 23, 2025
Заказала с доставкой в больницу – спасибо!
заказать цветы с доставкой в томске
EdwardZisee
June 22, 2025
Всегда свежие цветы, никогда не подводили!
101 роза
Williamcoido
June 22, 2025
Лучшие цветы в городе - проверено временем!
заказ цветов томск с доставкой
Thomaslon
June 22, 2025
Букет – просто мечта!
букеты томск
Williamcoido
June 19, 2025
Рекомендую всем - сервис безупречный!
101 роза
DavidPhich
June 17, 2025
Спасибо за отличный сервис!
заказать цветы томск
CharlesLinee
June 16, 2025
Доставили несмотря на ураган - настоящие герои!
букеты томск
DavidPhich
June 13, 2025
Отзывчивые менеджеры и быстрая доставка.
розы купить в томске
EdwardZisee
June 13, 2025
Заказала для начальницы – оценила!
гипсофилы цена букета
DavidPhich
June 12, 2025
Настоящий шедевр флористики!
розы томск
AaronQuelo
June 6, 2025
allegra pharmacy prices: pharmacy cost of cialis - u s pharmacy online
CurtisAdurl
May 28, 2025
Ero Pharm Fast: ed treatments online - cheapest online ed meds
Josephner
May 28, 2025
ed online prescription: low cost ed medication - ed rx online
Josephner
May 28, 2025
Pharm Au 24: Medications online Australia - Buy medicine online Australia
dsjascwec
May 28, 2025
Activate bonus in your casino account climatesciencespace.eu is an independent educational website created to provide detailed information about the game Space XY and other online gaming experiences. We do not offer gambling services, conduct real-money transactions, or function as a betting platform. Our primary goal is to help users understand how Space XY works, promote responsible gaming, and provide transparent guidance on interacting with gaming-related content online. Paulo Dornelas is a gambling expert who has dedicated his life to understanding the industry and helping others make money from it. He is also an avid traveler, and loves exploring new places. Paulo's knowledge of gambling and his passion for travel make him the perfect guide for anyone looking to make some serious profits from betting on sports or playing casino games.
http://tzcld.choq.be/?ontopresal1976
To make the experience even more rewarding, MyStake is currently offering an attractive welcome bonus of up to €500. This bonus is added to new players' first deposit, doubling their initial stake and increasing their starting balance. It is subject to a few conditions: a minimum deposit of €20, a wagering requirement of 30 times its amount, and valid once per player. It's a great incentive to explore Chicken Cross with additional funds. Generous contributions from around the world (including Japan, Australia, and the United Kingdom) have even helped establish an internationally accredited diagnostic laboratory. I watched as technologist Winifred Mwangi opened a chest freezer filled with 300 vials of blood samples, all waiting for analysis. Each one represents a child whose life depends on treatment.
Josephner
May 28, 2025
Medications online Australia: Pharm Au 24 - Pharm Au 24
Rodneysog
May 28, 2025
online pharmacy australia [url=https://pharmau24.com/#]pharmacy online australia[/url] Medications online Australia
CurtisAdurl
May 27, 2025
ed treatment online: where to buy erectile dysfunction pills - buy ed medication
Josephner
May 27, 2025
pharmacy online australia: pharmacy online australia - PharmAu24
Davidunlor
May 27, 2025
https://pharmau24.shop/# Pharm Au24
Josephner
May 27, 2025
buy antibiotics for uti: buy antibiotics online - cheapest antibiotics
CurtisAdurl
May 27, 2025
buy antibiotics for uti: buy antibiotics online - Over the counter antibiotics pills
Davidunlor
May 27, 2025
https://eropharmfast.com/# best ed pills online
Josephner
May 27, 2025
over the counter antibiotics: buy antibiotics online - get antibiotics without seeing a doctor
Rodneysog
May 27, 2025
Pharm Au24 [url=http://pharmau24.com/#]pharmacy online australia[/url] Pharm Au 24
CurtisAdurl
May 27, 2025
buy antibiotics for uti: buy antibiotics from canada - buy antibiotics online
Charlesmub
May 27, 2025
best online doctor for antibiotics: buy antibiotics online - over the counter antibiotics
FrankieLar
May 24, 2025
https://tadalaccess.com/# how long does cialis take to work
JosephTes
May 24, 2025
cialis online without perscription [url=https://tadalaccess.com/#]Tadal Access[/url] cialis super active vs regular cialis
Lorenhag
May 24, 2025
great white peptides tadalafil: Tadal Access - what cialis
Lorenhag
May 23, 2025
cialis vs flomax for bph: Tadal Access - buy cialis by paypal
FrankieLar
May 23, 2025
https://tadalaccess.com/# cialis 5mg daily how long before it works
JosephTes
May 23, 2025
cialis generic versus brand name [url=https://tadalaccess.com/#]TadalAccess[/url] cialis dopoxetine
Lorenhag
May 23, 2025
best place to buy liquid tadalafil: cialis 5mg 10mg no prescription - prices of cialis 20 mg
JosephTes
May 23, 2025
cialis mexico [url=https://tadalaccess.com/#]TadalAccess[/url] buy cialis free shipping
FrankieLar
May 23, 2025
https://tadalaccess.com/# does cialis make you last longer in bed
Lorenhag
May 23, 2025
cialis super active plus: cheap cialis pills - maximpeptide tadalafil review
FrankieLar
May 23, 2025
https://tadalaccess.com/# does tadalafil lower blood pressure
JosephTes
May 23, 2025
online tadalafil [url=https://tadalaccess.com/#]cialis 5mg side effects[/url] cialis generico
Lorenhag
May 22, 2025
cialis picture: Tadal Access - were can i buy cialis
JosephTes
May 22, 2025
cialis canada [url=https://tadalaccess.com/#]Tadal Access[/url] difference between sildenafil and tadalafil
FrankieLar
May 22, 2025
https://tadalaccess.com/# cialis generic purchase
Lorenhag
May 22, 2025
side effects of cialis daily: how long does cialis take to work 10mg - cialis prostate
FrankieLar
May 22, 2025
https://tadalaccess.com/# buy tadalafil online no prescription
Lorenhag
May 22, 2025
canadian pharmacy generic cialis: best price on generic tadalafil - cialis online paypal
Lorenhag
May 22, 2025
buy generic cialis 5mg: buy cialis online in austalia - cipla tadalafil review
Scottdroca
May 22, 2025
cialis sample pack: tadalafil tablets 20 mg reviews - cialis for daily use side effects
JosephTes
May 22, 2025
cialis buy australia online [url=https://tadalaccess.com/#]can you drink wine or liquor if you took in tadalafil[/url] п»їwhat can i take to enhance cialis
Lorenhag
May 21, 2025
cialis cost per pill: Tadal Access - where can i buy cialis online in australia
FrankieLar
May 21, 2025
https://tadalaccess.com/# buying cialis without a prescription
Scottdroca
May 21, 2025
cialis no prescription overnight delivery: sunrise remedies tadalafil - cialis no perscrtion
JosephTes
May 21, 2025
cialis best price [url=https://tadalaccess.com/#]cialis generico[/url] is there a generic equivalent for cialis
Lorenhag
May 21, 2025
cialis trial pack: Tadal Access - does cialis make you harder
Scottdroca
May 21, 2025
difference between sildenafil tadalafil and vardenafil: TadalAccess - how to get cialis for free
Lorenhag
May 21, 2025
tadalafil tablets 40 mg: cialis generic timeline 2018 - cialis generic overnite shipping
JosephTes
May 21, 2025
best time to take cialis [url=https://tadalaccess.com/#]Tadal Access[/url] cialis none prescription
FrankieLar
May 21, 2025
https://tadalaccess.com/# buying generic cialis online safe
Lorenhag
May 21, 2025
cialis coupon rite aid: Tadal Access - cialis used for
FrankieLar
May 21, 2025
https://tadalaccess.com/# cheap cialis with dapoxetine
Lorenhag
May 20, 2025
cialis online without a prescription: TadalAccess - cialis sublingual
JosephTes
May 20, 2025
buy cipla tadalafil [url=https://tadalaccess.com/#]Tadal Access[/url] what is the generic for cialis
Scottdroca
May 20, 2025
cialis without prescription: cialis super active plus reviews - purchase cialis online cheap
Lorenhag
May 20, 2025
who makes cialis: TadalAccess - cialis testimonials
JosephTes
May 20, 2025
cialis free trial offer [url=https://tadalaccess.com/#]buy cialis no prescription[/url] is tadalafil as effective as cialis
Scottdroca
May 20, 2025
where can i get cialis: TadalAccess - cheap canadian cialis
FrankieLar
May 20, 2025
https://tadalaccess.com/# tadalafil 40 mg india
JosephTes
May 20, 2025
tadalafil prescribing information [url=https://tadalaccess.com/#]Tadal Access[/url] what is the generic for cialis
Lorenhag
May 20, 2025
original cialis online: buy cialis generic online - too much cialis
Scottdroca
May 20, 2025
tadalafil hong kong: max dosage of cialis - canadian cialis no prescription
FrankieLar
May 20, 2025
https://tadalaccess.com/# tadalafil price insurance
JosephTes
May 20, 2025
cheap cialis online tadalafil [url=https://tadalaccess.com/#]cialis canadian pharmacy[/url] cialis going generic
Lorenhag
May 19, 2025
how many 5mg cialis can i take at once: cialis free trial voucher 2018 - cialis 50mg
Scottdroca
May 19, 2025
tadalafil (tadalis-ajanta): cialis erection - cialis dosage 20mg
FrankieLar
May 19, 2025
https://tadalaccess.com/# cialis free 30 day trial
JosephTes
May 19, 2025
order cialis canada [url=https://tadalaccess.com/#]cialis professional vs cialis super active[/url] buy cialis united states
Lorenhag
May 19, 2025
cialis 5mg price comparison: buy cialis without prescription - cialis effectiveness
Scottdroca
May 19, 2025
canadian cialis no prescription: where can i get cialis - cialis for daily use reviews
JosephTes
May 19, 2025
side effects of cialis tadalafil [url=https://tadalaccess.com/#]free samples of cialis[/url] cheap cialis online tadalafil
Lorenhag
May 19, 2025
buying cialis online: TadalAccess - what is the active ingredient in cialis
FrankieLar
May 19, 2025
https://tadalaccess.com/# find tadalafil
JosephTes
May 19, 2025
cialis from mexico [url=https://tadalaccess.com/#]Tadal Access[/url] purchase cialis online cheap
Lorenhag
May 19, 2025
vidalista tadalafil reviews: TadalAccess - side effects of cialis
Scottdroca
May 19, 2025
cialis sell: tadalafil tamsulosin combination - what does cialis treat
Lorenhag
May 18, 2025
cialis tadalafil 20 mg: Tadal Access - how long does cialis last in your system
JosephTes
May 18, 2025
cialis one a day with dapoxetine canada [url=https://tadalaccess.com/#]TadalAccess[/url] buy cialis with dapoxetine in canada
FrankieLar
May 18, 2025
https://tadalaccess.com/# cialis where to buy in las vegas nv
Scottdroca
May 18, 2025
cialis shelf life: Tadal Access - cialis pills
Lorenhag
May 18, 2025
buy cialis without doctor prescription: canadian online pharmacy no prescription cialis dapoxetine - cialis blood pressure
JosephTes
May 18, 2025
cialis a domicilio new jersey [url=https://tadalaccess.com/#]TadalAccess[/url] tadalafil generic reviews
FrankieLar
May 18, 2025
https://tadalaccess.com/# cialis generic best price that accepts mastercard
Scottdroca
May 18, 2025
cialis generics: Tadal Access - cialis over the counter usa
JosephTes
May 18, 2025
cialis sublingual [url=https://tadalaccess.com/#]cialis canada pharmacy no prescription required[/url] cialis coupon online
Scottdroca
May 18, 2025
mambo 36 tadalafil 20 mg reviews: TadalAccess - purchase cialis online cheap
Lorenhag
May 18, 2025
great white peptides tadalafil: Tadal Access - cialis best price
JosephTes
May 18, 2025
what is cialis [url=https://tadalaccess.com/#]canadian pharmacy online cialis[/url] cialis 20 milligram
FrankieLar
May 18, 2025
https://tadalaccess.com/# free coupon for cialis
Scottdroca
May 18, 2025
tadalafil 5 mg tablet: TadalAccess - natural alternative to cialis
Lorenhag
May 18, 2025
when will generic cialis be available in the us: cialis recreational use - cialis generic timeline 2018
JosephTes
May 17, 2025
cialis daily side effects [url=https://tadalaccess.com/#]TadalAccess[/url] cialis side effects a wife’s perspective
FrankieLar
May 17, 2025
https://tadalaccess.com/# free cialis samples
Lorenhag
May 17, 2025
cialis once a day: purchase cialis online cheap - cialis cheapest prices
Scottdroca
May 17, 2025
cialis canadian pharmacy ezzz: Tadal Access - does cialis shrink the prostate
FrankieLar
May 17, 2025
https://tadalaccess.com/# when will generic tadalafil be available
Lorenhag
May 17, 2025
over the counter drug that works like cialis: how to get cialis prescription online - tadalafil 5mg generic from us
Scottdroca
May 17, 2025
cialis overnight shipping: tadalafil 5 mg tablet - tadalafil cheapest price
JosephTes
May 17, 2025
cialis when to take [url=https://tadalaccess.com/#]Tadal Access[/url] best price cialis supper active
Lorenhag
May 17, 2025
how well does cialis work: Tadal Access - wallmart cialis
Scottdroca
May 17, 2025
cialis vs.levitra: Tadal Access - cialis sales in victoria canada
FrankieLar
May 17, 2025
https://tadalaccess.com/# cialis reviews photos
Lorenhag
May 17, 2025
peptide tadalafil reddit: TadalAccess - do you need a prescription for cialis
JosephTes
May 17, 2025
buy cialis no prescription australia [url=https://tadalaccess.com/#]centurion laboratories tadalafil review[/url] where to buy tadalafil in singapore
Scottdroca
May 17, 2025
generic cialis tadalafil 20 mg from india: cialis 40 mg - generic tadalafil canada
FrankieLar
May 16, 2025
https://tadalaccess.com/# cialis online cheap
Lorenhag
May 16, 2025
what are the side effect of cialis: sildenafil and tadalafil - canadian cialis
JosephTes
May 16, 2025
cialis price cvs [url=https://tadalaccess.com/#]TadalAccess[/url] walgreen cialis price
FrankieLar
May 16, 2025
https://tadalaccess.com/# buy cialis canada paypal
Scottdroca
May 16, 2025
tadalafil brand name: Tadal Access - pharmacy 365 cialis
Lorenhag
May 16, 2025
cialis vs flomax for bph: cialis prescription assistance program - cialis logo
JosephTes
May 16, 2025
sildenafil vs tadalafil which is better [url=https://tadalaccess.com/#]buy generic tadalafil online cheap[/url] trusted online store to buy cialis
FrankieLar
May 16, 2025
https://tadalaccess.com/# cialis blood pressure
Scottdroca
May 16, 2025
tadalafil generic cialis 20mg: cialis and cocaine - cheap tadalafil no prescription
Lorenhag
May 16, 2025
what is cialis tadalafil used for: TadalAccess - cialis 20mg side effects
JosephTes
May 16, 2025
online cialis no prescription [url=https://tadalaccess.com/#]buy cialis 20 mg online[/url] where can i buy cialis
FrankieLar
May 16, 2025
https://tadalaccess.com/# cialis difficulty ejaculating
Scottdroca
May 16, 2025
buy cialis toronto: Tadal Access - buying cialis online safe
FrankieLar
May 16, 2025
https://tadalaccess.com/# is there a generic cialis available
Lorenhag
May 15, 2025
tadalafil 5mg generic from us: order cialis soft tabs - cialis goodrx
Scottdroca
May 15, 2025
cialis soft tabs: cialis high blood pressure - cialis trial pack
JosephTes
May 15, 2025
no prescription female cialis [url=https://tadalaccess.com/#]what is the difference between cialis and tadalafil[/url] cialis generic 20 mg 30 pills
FrankieLar
May 15, 2025
https://tadalaccess.com/# cialis 20mg review
Lorenhag
May 15, 2025
cialis uses: Tadal Access - cialis going generic
Scottdroca
May 15, 2025
tadalafil buy online canada: buy cialis 20 mg online - generic tadalafil prices
JosephTes
May 15, 2025
side effects of cialis [url=https://tadalaccess.com/#]TadalAccess[/url] special sales on cialis
Scottdroca
May 15, 2025
can i take two 5mg cialis at once: levitra vs cialis - too much cialis
JosephTes
May 15, 2025
tadalafil hong kong [url=https://tadalaccess.com/#]TadalAccess[/url] cialis 100mg review
Scottdroca
May 15, 2025
sildenafil vs cialis: where can i buy cialis over the counter - overnight cialis delivery
FrankieLar
May 15, 2025
https://tadalaccess.com/# cialis for sale online in canada
Lorenhag
May 15, 2025
cialis dapoxetine: TadalAccess - cialis 20 mg duration
Scottdroca
May 14, 2025
cheap generic cialis canada: buy a kilo of tadalafil powder - cialis vs.levitra
FrankieLar
May 14, 2025
https://tadalaccess.com/# how long does it take for cialis to take effect
Lorenhag
May 14, 2025
buying generic cialis: recreational cialis - canada pharmacy cialis
JosephTes
May 14, 2025
tadalafil medication [url=https://tadalaccess.com/#]difference between tadalafil and sildenafil[/url] stendra vs cialis
Scottdroca
May 14, 2025
cialis no prescription: Tadal Access - cialis medicare
FrankieLar
May 14, 2025
https://tadalaccess.com/# cialis tadalafil & dapoxetine
Lorenhag
May 14, 2025
cialis online delivery overnight: vardenafil and tadalafil - cialis uses
JosephTes
May 14, 2025
buy cialis without a prescription [url=https://tadalaccess.com/#]what is the generic name for cialis[/url] cialis no perscrtion
Scottdroca
May 14, 2025
cialis online no prescription australia: Tadal Access - cialis generic online
FrankieLar
May 14, 2025
https://tadalaccess.com/# black cialis
Lorenhag
May 14, 2025
tadalafil price insurance: TadalAccess - buy cialis with dapoxetine in canada
Scottdroca
May 14, 2025
when is the best time to take cialis: cialis one a day with dapoxetine canada - cialis difficulty ejaculating
JosephTes
May 14, 2025
cialis for sale over the counter [url=https://tadalaccess.com/#]cipla tadalafil review[/url] cialis pills
FrankieLar
May 14, 2025
https://tadalaccess.com/# cialis online aust
Lorenhag
May 14, 2025
cialis canada pharmacy no prescription required: TadalAccess - cialis going generic
Scottdroca
May 14, 2025
cialis from canada to usa: Tadal Access - cialis and nitrates
Russellfeeve
May 13, 2025
can you get generic clomid pills: cheap clomid without rx - can you get clomid without insurance
MatthewTom
May 13, 2025
generic clomid pill [url=https://clomhealth.shop/#]Clom Health[/url] where can i buy cheap clomid without prescription
RogerCouct
May 13, 2025
http://prednihealth.com/# PredniHealth
Oscargef
May 13, 2025
can i order cheap clomid no prescription: Clom Health - can i purchase generic clomid without rx
Russellfeeve
May 13, 2025
buy cheap prednisone: PredniHealth - PredniHealth
MatthewTom
May 13, 2025
PredniHealth [url=http://prednihealth.com/#]prednisone 100 mg[/url] PredniHealth
RogerCouct
May 13, 2025
https://clomhealth.shop/# can i buy generic clomid pills
Oscargef
May 13, 2025
where can i buy clomid: can i get cheap clomid tablets - where to buy cheap clomid
Russellfeeve
May 13, 2025
prednisone in india: prednisone 20mg by mail order - prednisone 20 mg
MatthewTom
May 13, 2025
Amo Health Care [url=https://amohealthcare.store/#]Amo Health Care[/url] can you buy amoxicillin uk
Oscargef
May 13, 2025
Amo Health Care: Amo Health Care - Amo Health Care
Russellfeeve
May 13, 2025
how to get generic clomid tablets: Clom Health - buying clomid for sale
MatthewTom
May 13, 2025
can you get clomid now [url=http://clomhealth.com/#]clomid pill[/url] where can i buy clomid prices
RogerCouct
May 13, 2025
https://prednihealth.shop/# prednisone 500 mg tablet
Oscargef
May 13, 2025
cost cheap clomid no prescription: where buy clomid for sale - get cheap clomid pills
Russellfeeve
May 12, 2025
where to buy cheap clomid tablets: where can i get cheap clomid without a prescription - cost clomid tablets
MatthewTom
May 12, 2025
prednisone 10mg online [url=https://prednihealth.shop/#]PredniHealth[/url] how to buy prednisone online
RogerCouct
May 12, 2025
https://clomhealth.com/# can i order cheap clomid no prescription
Russellfeeve
May 12, 2025
prednisone daily: prednisone 1 mg for sale - PredniHealth
Oscargef
May 12, 2025
where to buy generic clomid for sale: Clom Health - get generic clomid
RogerCouct
May 12, 2025
https://prednihealth.com/# PredniHealth
MatthewTom
May 12, 2025
cost of generic clomid tablets [url=https://clomhealth.com/#]can you get clomid for sale[/url] can i purchase clomid price
Russellfeeve
May 12, 2025
buy cheap clomid without dr prescription: generic clomid no prescription - can i purchase cheap clomid without insurance
Oscargef
May 12, 2025
can i purchase cheap clomid without a prescription: cost of generic clomid no prescription - can you buy cheap clomid pill
JudsonZoown
May 12, 2025
prednisone 20 mg: PredniHealth - PredniHealth
RogerCouct
May 12, 2025
https://prednihealth.com/# PredniHealth
MatthewTom
May 12, 2025
amoxicillin script [url=https://amohealthcare.store/#]amoxicillin 500mg pill[/url] can we buy amoxcillin 500mg on ebay without prescription
Russellfeeve
May 12, 2025
prednisone 30: PredniHealth - prednisone online for sale
Oscargef
May 12, 2025
can i purchase generic clomid without rx: Clom Health - how to buy generic clomid without prescription
RogerCouct
May 12, 2025
https://amohealthcare.store/# amoxicillin 500mg capsules antibiotic
Albertoseino
May 11, 2025
modafinil pharmacy: verified Modafinil vendors - modafinil legality
Jeremyfax
May 11, 2025
modafinil pharmacy: modafinil pharmacy - doctor-reviewed advice
RonaldFOEFS
May 11, 2025
https://maxviagramd.shop/# cheap Viagra online
Albertoseino
May 11, 2025
Modafinil for sale: buy modafinil online - doctor-reviewed advice
Albertoseino
May 10, 2025
best price for Viagra: trusted Viagra suppliers - buy generic Viagra online
RonaldFOEFS
May 10, 2025
https://zipgenericmd.shop/# order Cialis online no prescription
Albertoseino
May 10, 2025
discreet shipping: fast Viagra delivery - cheap Viagra online
RobertKet
May 10, 2025
generic tadalafil: generic tadalafil - order Cialis online no prescription
LorenzoBlize
May 10, 2025
verified Modafinil vendors [url=https://modafinilmd.store/#]doctor-reviewed advice[/url] doctor-reviewed advice
Jeremyfax
May 9, 2025
buy generic Viagra online: order Viagra discreetly - order Viagra discreetly
LorenzoBlize
May 9, 2025
doctor-reviewed advice [url=https://modafinilmd.store/#]purchase Modafinil without prescription[/url] safe modafinil purchase
RobertKet
May 9, 2025
buy generic Viagra online: cheap Viagra online - discreet shipping
RonaldFOEFS
May 9, 2025
http://modafinilmd.store/# modafinil pharmacy
Jeremyfax
May 9, 2025
secure checkout ED drugs: online Cialis pharmacy - FDA approved generic Cialis
RobertKet
May 9, 2025
buy modafinil online: legal Modafinil purchase - Modafinil for sale
LorenzoBlize
May 9, 2025
fast Viagra delivery [url=https://maxviagramd.shop/#]same-day Viagra shipping[/url] discreet shipping
RonaldFOEFS
May 9, 2025
http://zipgenericmd.com/# cheap Cialis online
RobertKet
May 9, 2025
trusted Viagra suppliers: legit Viagra online - same-day Viagra shipping
Jeremyfax
May 9, 2025
buy generic Cialis online: online Cialis pharmacy - secure checkout ED drugs
LorenzoBlize
May 9, 2025
buy generic Cialis online [url=https://zipgenericmd.shop/#]order Cialis online no prescription[/url] generic tadalafil
RonaldFOEFS
May 9, 2025
http://maxviagramd.com/# Viagra without prescription
RobertKet
May 9, 2025
safe modafinil purchase: doctor-reviewed advice - doctor-reviewed advice
Jeremyfax
May 9, 2025
safe online pharmacy: legit Viagra online - trusted Viagra suppliers
ZackaryCaush
May 7, 2025
https://pinuprus.pro/# pin up вход
Richardmat
May 7, 2025
пин ап казино официальный сайт [url=https://pinuprus.pro/#]пин ап вход[/url] пин ап зеркало
Richardmat
May 6, 2025
pin up casino [url=https://pinupaz.top/#]pin up[/url] pinup az
ZackaryCaush
May 4, 2025
http://pinupaz.top/# pin up az
Richardmat
May 3, 2025
pinup az [url=http://pinupaz.top/#]pin up casino[/url] pinup az
ZackaryCaush
May 3, 2025
https://vavadavhod.tech/# vavada вход
ZackaryCaush
May 2, 2025
https://vavadavhod.tech/# вавада казино
ZackaryCaush
May 2, 2025
http://pinupaz.top/# pin up azerbaycan
Richardmat
May 2, 2025
pin-up casino giris [url=https://pinupaz.top/#]pinup az[/url] pin up azerbaycan
ZackaryCaush
May 2, 2025
https://pinuprus.pro/# пин ап вход
Kennethsheby
May 1, 2025
пинап казино: пин ап казино - пин ап казино
Richardmat
May 1, 2025
pin-up casino giris [url=http://pinupaz.top/#]pin-up[/url] pin up az
BrianCrugh
May 1, 2025
pin up azerbaycan: pin up casino - pin up
ElmerSip
April 30, 2025
пинап казино: пин ап казино - пинап казино
ElmerSip
April 30, 2025
пин ап зеркало: pin up вход - пин ап вход
ZackaryCaush
April 30, 2025
http://pinupaz.top/# pin up azerbaycan
Kennethsheby
April 30, 2025
пин ап вход: пин ап казино официальный сайт - пин ап казино
ZackaryCaush
April 30, 2025
http://pinuprus.pro/# пин ап казино официальный сайт
ElmerSip
April 30, 2025
вавада казино: vavada casino - вавада
Kennethsheby
April 30, 2025
пин ап вход: пин ап казино - пин ап казино
ZackaryCaush
April 30, 2025
https://vavadavhod.tech/# vavada
ElmerSip
April 30, 2025
pinup az: pinup az - pin up azerbaycan
Kennethsheby
April 30, 2025
пин ап казино: пинап казино - пинап казино
Richardmat
April 30, 2025
вавада официальный сайт [url=http://vavadavhod.tech/#]vavada casino[/url] vavada вход
ZackaryCaush
April 30, 2025
http://pinupaz.top/# pinup az
Dannysit
April 30, 2025
Medicine From India: Medicine From India - reputable indian online pharmacy
MichaelFaulp
April 30, 2025
MedicineFromIndia: indian pharmacy online - india pharmacy
Stevendrype
April 30, 2025
canadian pharmacies online: Express Rx Canada - buying from canadian pharmacies
Dannysit
April 29, 2025
RxExpressMexico: mexican online pharmacy - mexico drug stores pharmacies
Walterhap
April 29, 2025
https://medicinefromindia.shop/# indian pharmacy
Michaeljouch
April 29, 2025
Medicine From India [url=https://medicinefromindia.com/#]Medicine From India[/url] Medicine From India
Stevendrype
April 29, 2025
pharmacy website india: Medicine From India - medicine courier from India to USA
MichaelFaulp
April 29, 2025
the canadian pharmacy: Generic drugs from Canada - canadian pharmacy prices
Stevendrype
April 29, 2025
best canadian pharmacy to buy from: Generic drugs from Canada - onlinepharmaciescanada com
Dannysit
April 29, 2025
RxExpressMexico: Rx Express Mexico - medication from mexico pharmacy
Walterhap
April 29, 2025
http://expressrxcanada.com/# canadian pharmacy sarasota
MichaelFaulp
April 29, 2025
mexico pharmacies prescription drugs: Rx Express Mexico - Rx Express Mexico
Stevendrype
April 29, 2025
my canadian pharmacy reviews: Canadian pharmacy shipping to USA - prescription drugs canada buy online
Dannysit
April 29, 2025
Rx Express Mexico: mexican rx online - mexican rx online
Stevendrype
April 29, 2025
indian pharmacy online shopping: buy prescription drugs from india - indian pharmacy online shopping
MichaelFaulp
April 29, 2025
mexican rx online: Rx Express Mexico - RxExpressMexico
Michaeljouch
April 28, 2025
my canadian pharmacy review [url=https://expressrxcanada.shop/#]Canadian pharmacy shipping to USA[/url] buy canadian drugs
Stevendrype
April 28, 2025
MedicineFromIndia: Medicine From India - indian pharmacy online
Walterhap
April 28, 2025
https://medicinefromindia.shop/# MedicineFromIndia
MichaelFaulp
April 28, 2025
indian pharmacy: reputable indian pharmacies - Medicine From India
Dannysit
April 28, 2025
mexican online pharmacy: RxExpressMexico - mexican rx online
Michaeljouch
April 28, 2025
mexican online pharmacies prescription drugs [url=https://rxexpressmexico.shop/#]mexico pharmacies prescription drugs[/url] mexico drug stores pharmacies
Stevendrype
April 28, 2025
canadian drug pharmacy: Express Rx Canada - legitimate canadian pharmacy
Walterhap
April 28, 2025
http://rxexpressmexico.com/# mexican rx online
MichaelFaulp
April 28, 2025
best canadian online pharmacy: Canadian pharmacy shipping to USA - best rated canadian pharmacy
Dannysit
April 28, 2025
mexican online pharmacy: RxExpressMexico - Rx Express Mexico
Michaeljouch
April 28, 2025
canada drugs [url=https://expressrxcanada.shop/#]Express Rx Canada[/url] canadian pharmacy king reviews
Stevendrype
April 28, 2025
medicine courier from India to USA: Medicine From India - MedicineFromIndia
Walterhap
April 28, 2025
http://expressrxcanada.com/# canadianpharmacy com
MichaelFaulp
April 28, 2025
indian pharmacy paypal: Medicine From India - medicine courier from India to USA
Dannysit
April 28, 2025
reliable canadian pharmacy: Canadian pharmacy shipping to USA - canadapharmacyonline legit
Bradleyfup
April 28, 2025
cialis sans ordonnance: Achat Cialis en ligne fiable - Acheter Cialis tadalmed.shop
Robertmut
April 28, 2025
http://pharmafst.com/# Pharmacie sans ordonnance
BilliesniCt
April 27, 2025
kamagra livraison 24h: achat kamagra - Achetez vos kamagra medicaments
Robertmut
April 27, 2025
https://tadalmed.shop/# Cialis sans ordonnance pas cher
BernardVeida
April 27, 2025
Pharmacie en ligne livraison Europe: pharmacie en ligne pas cher - pharmacie en ligne france livraison belgique pharmafst.com
BilliesniCt
April 27, 2025
pharmacie en ligne avec ordonnance: pharmacie en ligne - pharmacie en ligne fiable pharmafst.com
PeterUnomb
April 26, 2025
Achetez vos kamagra medicaments [url=https://kamagraprix.com/#]kamagra pas cher[/url] Kamagra Commander maintenant
Robertmut
April 26, 2025
https://tadalmed.com/# Cialis generique prix
BilliesniCt
April 26, 2025
Kamagra Oral Jelly pas cher: achat kamagra - kamagra gel
PeterUnomb
April 26, 2025
pharmacie en ligne avec ordonnance [url=http://pharmafst.com/#]pharmacie en ligne sans ordonnance[/url] pharmacie en ligne pas cher pharmafst.shop
Bradleyfup
April 26, 2025
pharmacie en ligne livraison europe: Meilleure pharmacie en ligne - Achat mГ©dicament en ligne fiable pharmafst.com
Robertmut
April 26, 2025
http://tadalmed.com/# Acheter Cialis
BilliesniCt
April 26, 2025
Acheter Kamagra site fiable: Achetez vos kamagra medicaments - Acheter Kamagra site fiable
Bradleyfup
April 26, 2025
pharmacie en ligne france livraison belgique: pharmacie en ligne - Pharmacie sans ordonnance pharmafst.com
Bradleyfup
April 26, 2025
pharmacie en ligne sans ordonnance: Pharmacie en ligne France - Pharmacie en ligne livraison Europe pharmafst.com
Robertmut
April 26, 2025
http://kamagraprix.com/# achat kamagra
PeterUnomb
April 26, 2025
Pharmacie Internationale en ligne [url=http://pharmafst.com/#]pharmacie en ligne[/url] pharmacie en ligne fiable pharmafst.shop
Bradleyfup
April 25, 2025
Achat Cialis en ligne fiable: Cialis en ligne - Pharmacie en ligne Cialis sans ordonnance tadalmed.shop
Robertmut
April 25, 2025
https://pharmafst.com/# pharmacie en ligne fiable
PeterUnomb
April 25, 2025
achat kamagra [url=https://kamagraprix.shop/#]Achetez vos kamagra medicaments[/url] Kamagra Commander maintenant
BilliesniCt
April 25, 2025
Kamagra Commander maintenant: kamagra oral jelly - Achetez vos kamagra medicaments
Bradleyfup
April 25, 2025
kamagra oral jelly: achat kamagra - Kamagra Commander maintenant
Robertmut
April 25, 2025
https://pharmafst.shop/# vente de mГ©dicament en ligne
PeterUnomb
April 25, 2025
Acheter Kamagra site fiable [url=https://kamagraprix.com/#]kamagra oral jelly[/url] kamagra gel
Robertmut
April 25, 2025
https://pharmafst.com/# pharmacie en ligne france fiable
Bradleyfup
April 25, 2025
cialis sans ordonnance: Achat Cialis en ligne fiable - cialis generique tadalmed.shop
BilliesniCt
April 25, 2025
kamagra gel: Acheter Kamagra site fiable - kamagra livraison 24h
PeterUnomb
April 25, 2025
achat kamagra [url=https://kamagraprix.com/#]Kamagra Commander maintenant[/url] Acheter Kamagra site fiable
Robertmut
April 25, 2025
https://pharmafst.com/# pharmacie en ligne sans ordonnance
Bradleyfup
April 25, 2025
Cialis sans ordonnance 24h: Acheter Cialis 20 mg pas cher - Acheter Cialis 20 mg pas cher tadalmed.shop
BilliesniCt
April 25, 2025
pharmacies en ligne certifiГ©es: pharmacie en ligne pas cher - п»їpharmacie en ligne france pharmafst.com
BernardVeida
April 25, 2025
Kamagra Oral Jelly pas cher: Kamagra pharmacie en ligne - kamagra livraison 24h
DavidSaisp
April 24, 2025
kamagra en ligne: kamagra gel - kamagra 100mg prix
Edwardtoupe
April 23, 2025
olympe casino avis: olympe casino avis - olympe