Deploy to Flywheel via SSH and GitHub Actions
A common part of the WordPress® development workflow includes deploying certain parts of the site (like a custom theme or plugin) to the staging or live site on Flywheel when a developer makes a git commit and pushes it to GitHub (or another git repository).1 This article will walk you through the steps required to set this particular workflow up with GitHub and GitHub Actions.
The process looks a little like this:
- You add a main.yml file to a
/.github/workflows/directory in your repo that contains instructions for GitHub to follow once you push to your repo - Using an SSH deployment action, the YAML file outlines where to push the code via SSH and rsync and how to authenticate
- You push to a certain branch in your GitHub repo
- GitHub looks for the YAML file in the
/.github/workflows/directory in your repo - If found, GitHub Actions will run the commands outlined inside of it and deploys your code to Flywheel
Note
To deploy via SSH using Github Actions, your SSH key must be RSA. When generating a new SSH key, any instances ofed25519 should be replaced with rsa.Setting up the Action
Create the YAML config file
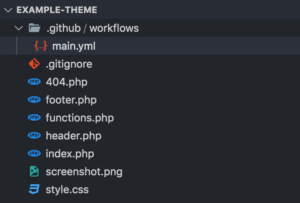
Open up your favorite code editor and create an empty .github/ directory at the root of your project (typically your custom theme or plugin). Inside of that newly created directory, create another empty workflows/ directory. Finally, inside of workflows/ directory, create a file called main.yml. The name of the YAML file really doesn’t matter as GitHub will simply look for a YAML file, but we’ll use main.yml for our example.
Fill out the YAML config file
The YAML config file must follow a certain syntax for GitHub to read it correctly. For our workflow, we just need name, on, and jobs top-level keys. Here’s the full workflow that you can copy and paste! We’ll break it down below.
name: Flywheel SSH Deploy
on:
  push:
    branches: [ main ]
jobs:
  build:
    runs-on: ubuntu-latest
    steps:
    - uses: actions/checkout@v2
    - name: Deploy to Server
      uses: easingthemes/[email protected]
      env:
        SSH_PRIVATE_KEY: ${{ secrets.SSH_PRIVATE_KEY }}
        REMOTE_HOST: ${{ secrets.REMOTE_HOST }}
        REMOTE_USER: ${{ secrets.SSH_USER }}
        ARGS: -rltgoDzvO --exclude .git --exclude .github
        TARGET: /www/wp-content/themes/
- name:
This is the name of the workflow that will show up in GitHub. You can use whatever name you’d like! - on:
This tells GitHub Actions when to run the steps listed injobs:. A full list of available values for this key can be found here, but we’ll stick to triggering the workflow when someone pushes to the branch namedmain. - jobs.build:
This is the bulk of the workflow. Workflows can contain one or more jobs, but for our example, we just need one job and we’re calling itbuild(the name of the job doesn’t matter to the workflow– it can be whatever you want, but we recommend something semantic). - jobs.build.runs-on:
This tells GitHub Actions to run our job on a machine with the latest Ubuntu installed. - jobs.build.steps:
Here are the steps that GitHub Actions will follow on the Ubuntu machine. - At this point in our example, we’re following the recommended configuration of the easingthemes/ssh-deploy Action. It’s a GitHub Action built by a third party that we’re basically extending and using as our base for our own custom Action. The keys here define a name (that can be whatever you want), which version of the
easingthemes/ssh-deployAction to use, and then the unique information for your Flywheel server that’s needed to know where to push the code to. - jobs.build.steps.env.SSH_PRIVATE_KEY:
This is your private SSH key. This should be set as a GitHub Secret in PEM format (more details below). - jobs.build.steps.env.REMOTE_HOST:
This should be your remote host’s SSH address, which for all Flywheel sites isssh.getflywheel.com. This should be stored as a GitHub Secret. - jobs.build.steps.env.REMOTE_USER:
This is the user used to authenticate tossh.getflywheel.com. More information is listed below, but it should follow this syntax:your-flywheel-username+site-slug. This should be stored as a GitHub Secret. - jobs.build.steps.env.ARGS:
This is to exclude unnecessary directories so they aren’t deployed to the Flywheel site. - jobs.build.steps.env.TARGET:
This is where GitHub Actions will deploy the code to.
Enter the SSH_PRIVATE_KEY, REMOTE_HOST and REMOTE_USER encrypted secrets into GitHub Secrets
As mentioned above, there are three variables that should be stored in the GitHub Secrets tab of your repository so that you’re not hard-coding confidential information into your repo.
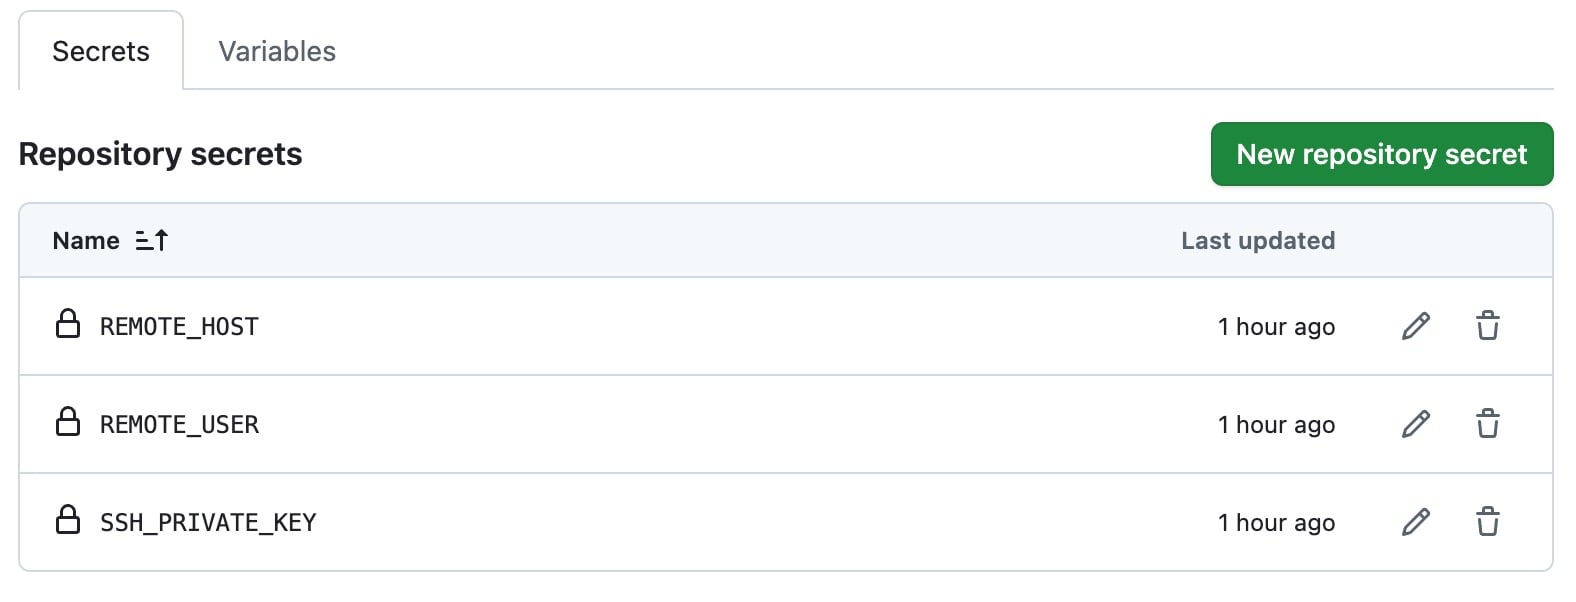
To add these secrets, head over to your GitHub repo and select the “Settings” tab on the far right, then select “Secrets” towards the bottom of the left side navigation.
SSH_PRIVATE_KEY
Add a new secret and name it SSH_PRIVATE_KEY. In the value field, you’ll want to paste the PEM format of your private SSH key. This must be the private key from the private/public key pair that you use for Flywheel SSH and must be in PEM format to work with the easingthemes/ssh-deploy Action. To convert the private key to PEM format, use this command, replacing id_rsa with your private key name if the file name is different:
openssl rsa -in ~/.ssh/id_rsa -outform pem
If you would like to automatically copy the output of that command to your clipboard, pipe the command to the appropriate platform-specific command like so:
macOS: openssl rsa -in ~/.ssh/id_rsa -outform pem | pbcopy
Windows: openssl rsa -in ~/.ssh/id_rsa -outform pem | clip
More information on generating public and private keys can be found in this article.
REMOTE_HOST
Add another new secret and name it REMOTE_HOST. The value should be ssh.getflywheel.com.
REMOTE_USER
Add another new secret and name it REMOTE_USER.
The value should be the username of the site owner + the site slug.
Example: If the site owner’s Flywheel username is igetfly, and the site slug is my-great-site, REMOTE_USER should be set as igetfly+my-great-site.
Example: If the site is owned by an Organization, the value should be team + the username of the Organization + the site slug. If the Organization username is my-fly-org and the site slug is our-agency-site, REMOTE_USER should be set as team+my-fly-org+our-agency-site.
More information on identifying the username and site slug can be found here.
Note
If you haven’t already, make sure you upload your public key to the Flywheel dashboard! This is required for the GitHub Action to authenticate to Flywheel and deploy your code.
Test it out!
You should now have everything in place and are ready to test out your workflow! You can commit your change to your local project and push to GitHub and GitHub Actions should now trigger a build. You can watch the progress of the build on the Actions tab of your repo in GitHub. If the workflow builds successfully, you should see a green checkmark next to the most recent commit.

Getting Started
New to Flywheel? Start here, we've got all the information you'll need to get started and launch your first site!
View allAccount Management
Learn all about managing your Flywheel user account, Teams and integrations.
View allFeatures
Flywheel hosting plans include a ton of great features. Learn about how to get a free SSL certificate, set up a staging site, and more!
View allPlatform Info
All the server and setting info you'll need to help you get the most out of your Flywheel hosting plan!
View allSite Management
Tips and tricks for managing your sites on Flywheel, including going live, troubleshooting issues and migrating or cloning sites.
View allGrowth Suite
Learn more about Growth Suite, our all-in-one solution for freelancers and agencies to grow more quickly and predictably.
Getting started with Growth Suite
Growth Suite: What are invoice statuses?
Growth Suite: What do client emails look like?
Managed Plugin Updates
Learn more about Managed Plugin Updates, and how you can keep your sites up to date, and extra safe.
-
Restoring Plugin and Theme Management on Flywheel
-
Managed Plugin Updates: Database upgrades
-
Managed Plugin Updates: Pause plugin updates
Local
View the Local help docs
Looking for a logo?
We can help! Check out our Brand Resources page for links to all of our brand assets.
Brand Resources