SMTP and Flywheel
SMTP stands for Simple Mail Transfer Protocol which allows you to send outgoing mail from your site via a dedicated email server.
By default, WordPress® will try to send all outgoing emails from a site via the PHP wp_mail() function.1 PHP mail does work out of the box, though it isn’t always reliable and outgoing emails can end up in spam.
To improve the deliverability and reputation of outgoing emails from your site, you might consider using a dedicated SMTP server such as SendGrid, Mailgun, or Sendinblue. You can also set up outgoing email with the plugin WP Mail SMTP and an existing email address like Gmail.
Table of Contents:
General SMTP Configuration
- Sign up for an account with your preferred third-party mail service. For transactional emails leaving your site, we recommend SendGrid, Mailgun, or Sendinblue.
- Perform any necessary domain and identity verifications to activate their services.
- Install and activate a compatible SMTP plugin. For this, we suggest WP Mail SMTP or POST SMTP Mailer if your mail service of choice doesn’t have their own independent plugin.
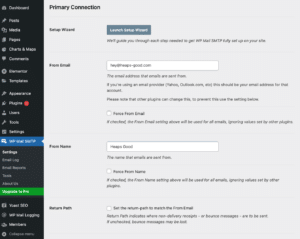
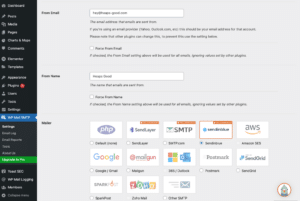
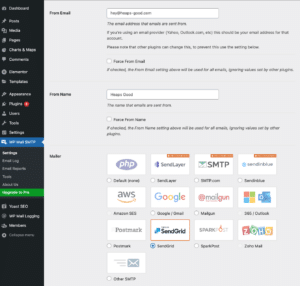
- Fill out your preferred ‘From Email’. This email will be used to send any default transactional emails sent by WordPress (e.g. password resets, comment notifications, new user signup emails, etc). If you wish to change the ‘From Email’ for things like contact form notifications or WooCommerce® emails, be sure not to check the ‘Force From Email’ option. 1
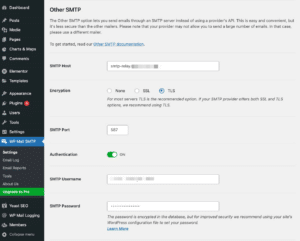
- Follow the steps in the SMTP wizard to hook up your site with your newly created SMTP account, or otherwise manually enter the host, port, encryption, and authentication details provided by your email host.
- If you’re not following the wizard for a particular mailer host, your plugin options should appear similar to the following:
- Save your settings.
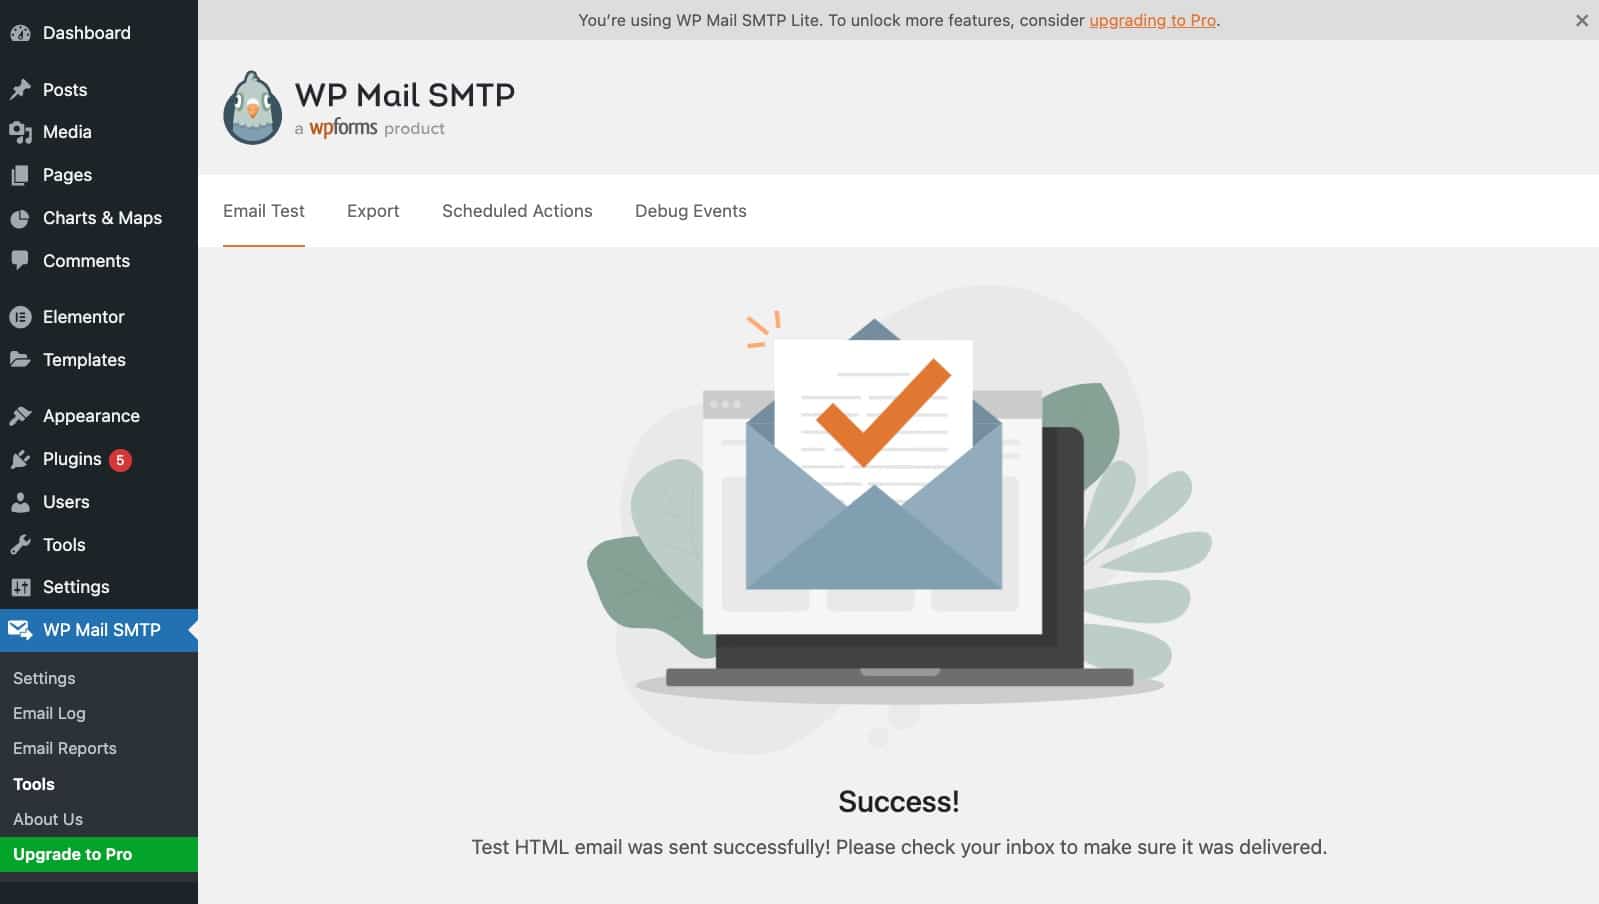
- Head to the ‘Email Test’ tab within the WP Mail SMTP plugin settings and send a test email from your site to an address of your choice.
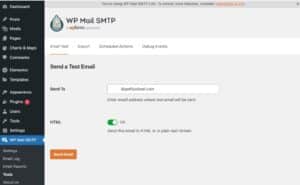
- If you receive the email, hooray! You’re all set. If you don’t receive the email and the plugin returns an error message, you’ll likely need to double-check your settings. The Debug Events tab under ‘Tools’ may help you diagnose the issue.

- After a few minutes, you should also see the outgoing email from the site logged under your SMTP account.
Configure Sendinblue SMTP
- Sign up for an account with Sendinblue. If you’re just starting out, you can use Sendinblue’s free plan to send up to 300 emails a day.
- Perform any necessary identity verifications to activate their services as prompted.
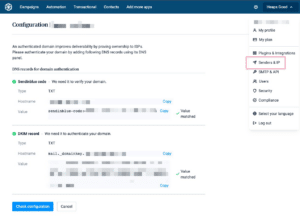
- Under “Senders & IP”, verify your sending domain by adding a TXT record to your DNS Settings, hosting a file, or by receiving a verification code to a particular email address associated with the primary domain’s extension. In most cases, the sending domain will match the primary domain for your site.
- Install an SMTP plugin of your choice on your WordPress site. In this example, we’ve chosen WP Mail SMTP.
- Fill out your preferred ‘From Email’. This email will be used to send any default transactional emails sent by WordPress (e.g. password resets, comment notifications, new user signup emails, etc). If you wish to change the ‘From Email’ for things like contact form notifications or WooCommerce emails, be sure not to check the ‘Force From Email’ option.
- Elect a ‘From Name’ for your emails.
- Select Sendinblue under the ‘Mailer’ settings.
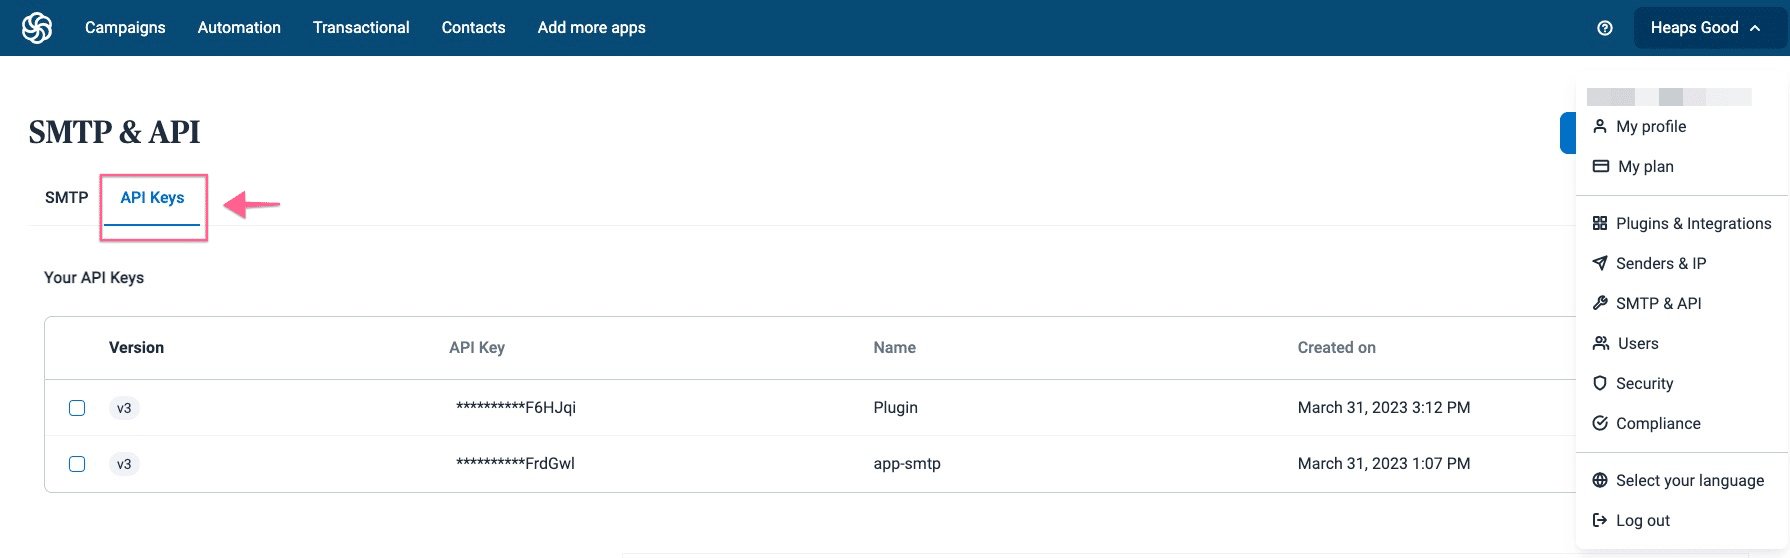
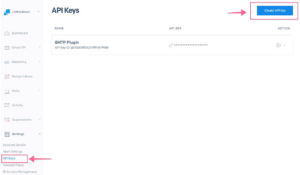
- Within your Sendinblue account under ‘SMTP & API’ settings, you’ll need to generate a new API Key and then paste it into the API Key field in the plugin settings. (Make sure you’re doing this under the API Keys tab, rather than the SMTP tab)
- Fill out the ‘Sending Domain’ field. This will need to match the domain you verified in Step 3.

- Save your settings.
- Head to the ‘Email Test’ tab within the WP Mail SMTP plugin settings and send a test email from your site to an address of your choice.
- If you receive the email, hooray! You’re all set. If you don’t receive the email and the plugin returns an error message, you’ll likely need to double-check your settings. The Debug Events tab under ‘Tools’ may help you diagnose the issue.
- After a few minutes, you should also see the outgoing email from the site logged under “Transactional > Logs” within your Sendinblue account.
Configure SendGrid SMTP
- Sign up for an account with SendGrid. If you’re just starting out, you can use SendGrid’s free plan to send up to 100 emails a day.
- Perform any necessary identity verifications to activate their services as prompted.
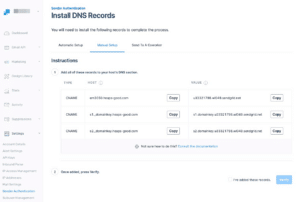
- Under “Settings > Sender Authentication”, verify your sending domain by adding some CNAME record to your DNS Settings. In most cases, the sending domain will match the primary domain for your site.
- Install an SMTP plugin of your choice on your WordPress site. In this example, we’ve chosen WP Mail SMTP.
- Fill out your preferred ‘From Email’. This email will be used to send any default transactional emails sent by WordPress (e.g. password resets, comment notifications, new user signup emails, etc). If you wish to change the ‘From Email’ for things like contact form notifications or WooCommerce emails, be sure not to check the ‘Force From Email’ option.
- Elect a ‘From Name’ for your emails.
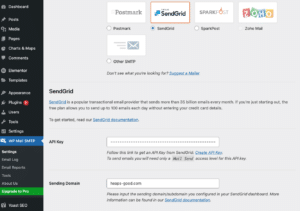
- Select SendGrid under the ‘Mailer’ settings.
- Within your SendGrid account under ‘Settings > API Keys’, you’ll need to generate a new API Key and then paste it into the API Key field in the plugin settings.
- Fill out the ‘Sending Domain’ field. This will need to match the domain you verified in Step 3.
- Save your settings.
- Head to the ‘Email Test’ tab within the WP Mail SMTP plugin settings and send a test email from your site to an address of your choice.
- If you receive the email, hooray! You’re all set. If you don’t receive the email and the plugin returns an error message, you’ll likely need to double-check your settings. The Debug Events tab under ‘Tools’ may help you diagnose the issue.
- After a few minutes, you should also see the outgoing email from the site logged under the “Activity > Show all activity” tab within your SendGrid account.
Configure Gmail SMTP
If you have a Gmail account, or a paid Google Workspace (formerly GSuite) account, you can configure Gmail’s SMTP server to send out transactional emails.
A free Gmail account will allow you to send up to 500 emails per day. If you’re a paid Google Workspace user, you’ll be able to send up to 2000 emails per day.
If you’re hoping for your site’s emails to be sent via a custom domain (e.g. [email protected]) instead of via a Gmail domain (e.g. [email protected]), you’ll need a paid Google Workspace account.
- Install an SMTP plugin of your choice on your WordPress site. In this example, we’ve gone with WP Mail SMTP.
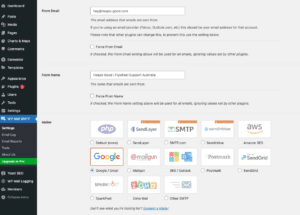
- Elect a ‘From Name’ for your emails. The ‘From Email’ will be picked up from your Google account after authorization (see step 16).
- Select Google/Gmail under the “Mailer” settings.
- Once you’ve set up your Gmail account, or have attached and verified your domain via a paid Google Workspace account, you’ll first need to register for a Gmail API to hook up to your site. Head to this link which will take you to the Google Developers Console. If you’re signed into multiple Google accounts, be sure you have the correct account selected at the top right.
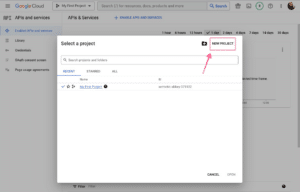
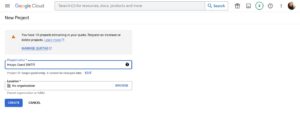
- At the top of the browser, click the project dropdown to create a new project. If you have an existing project you’d like to use, you may select that.
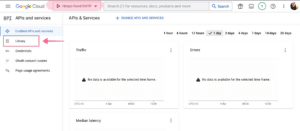
- With your new project selected at the top, head to “Library” in the left-hand navigation.
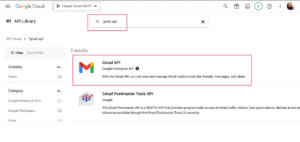
- Search for “Gmail API” within the API Library, click “Gmail API” and then “Enable.”
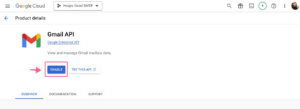
- Click “Create Credentials.”
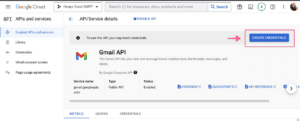
- Fill out the “Which API are you using” fields using the following information:
Select an API: Gmail API
What data will you be accessing?: User data - Fill out the OAuth consent screen questionnaire as prompted.
- Fill out Scopes if applicable (this section is optional).
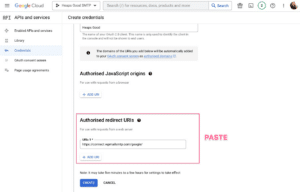
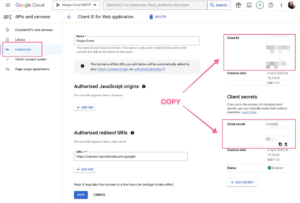
- Under OAuth Client ID, select Web application and fill out the Name field.
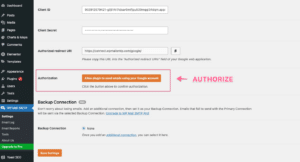
Under Authorised redirect URIs, you’ll need to copy this URL from the SMTP plugin you set up in Step 1 and paste it into the “Authorised redirect URIs” field within the Google API setup, then click “Create.”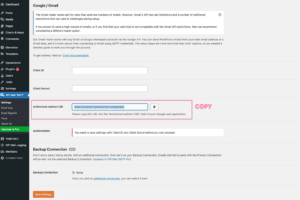
- From here, you should be able to download your credentials in JSON format. These will also be available for you on the credentials page.
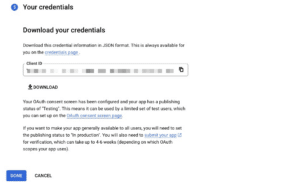
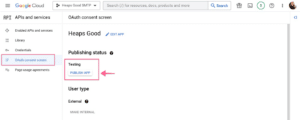
- Under the OAuth Consent Screen, change the Publishing status from Testing > In Production.
- Copy the Client ID and Secret Key from the JSON file and paste it into the SMTP plugin settings on your website. It may be easier to grab these details from the “Credentials” tab within the Google Developer Console. After you’ve copied and pasted the credentials, be sure to click save.
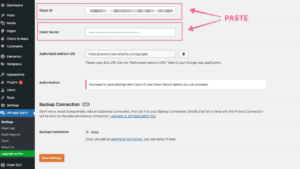
- After saving the credentials, you should be prompted to authorize the sending of mail through your Google account. If you run into any authorization errors, you may need to double-check your settings within the Google Developer Console, check the plugin’s developer documentation, or reach out to the SMTP plugin developer. If you see a “Google hasn’t verified this app” message, you may proceed through this.
- After authorizing, head to the “Email Test” tab within the WP Mail SMTP plugin settings and send a test email from your site to an address of your choice.

- If you receive the email, hooray! You’re all set. If you don’t receive the email and the plugin returns an error message, you’ll likely need to double-check your settings. The Debug Events tab under ‘Tools” may help you diagnose the issue.

Need help?
If you have any questions our Happiness Engineers are here to help!
Getting Started
New to Flywheel? Start here, we've got all the information you'll need to get started and launch your first site!
View allAccount Management
Learn all about managing your Flywheel user account, Teams and integrations.
View allFeatures
Flywheel hosting plans include a ton of great features. Learn about how to get a free SSL certificate, set up a staging site, and more!
View allPlatform Info
All the server and setting info you'll need to help you get the most out of your Flywheel hosting plan!
View allSite Management
Tips and tricks for managing your sites on Flywheel, including going live, troubleshooting issues and migrating or cloning sites.
View allGrowth Suite
Learn more about Growth Suite, our all-in-one solution for freelancers and agencies to grow more quickly and predictably.
Getting started with Growth Suite
Growth Suite: What are invoice statuses?
Growth Suite: What do client emails look like?
Managed Plugin Updates
Learn more about Managed Plugin Updates, and how you can keep your sites up to date, and extra safe.
-
Restoring Plugin and Theme Management on Flywheel
-
Managed Plugin Updates: Database upgrades
-
Managed Plugin Updates: Pause plugin updates
Local
View the Local help docs
Looking for a logo?
We can help! Check out our Brand Resources page for links to all of our brand assets.
Brand Resources