Cloudflare on Flywheel
Cloudflare is fully compatible with all Flywheel sites. If you’d like to take advantage of Cloudflare’s features, you can do so quickly and easily, thanks to their simple setup.
![]()
Warning
For security best practices, we recommend not pointing a wildcard entry directly to a Flywheel IP address, but instead to point any subdomain independently. The use of wildcard records may open your domain up to additional subdomains being created without your permission.Table of Contents:
What is Cloudflare?
Cloudflare is a third-party service that acts as a go-between from your site’s server to your users. Cloudflare adds various features related to speed, security, and performance along the way. Free and paid plans are available, but some features are restricted to paid tiers.
To use Cloudflare, you enable your domain to use their nameservers, making Cloudflare the source for your domain’s DNS records and details. This means traffic will pass through Cloudflare on its way to your site’s server. You’ll set up your DNS records in Cloudflare’s dashboard rather than through your registrar, as we otherwise recommend.
There are a few reasons you might want to use Cloudflare. Perhaps your registrar doesn’t provide nameservers for you to use, or you’re interested in an increased level of caching and/or security.
Configuring Cloudflare for Flywheel
- Don’t enable Cloudflare’s “Always Use HTTPS” setting. To restrict traffic to HTTPS, use the “Force HTTPS” option found on the Advanced tab of the Flywheel site dashboard.
- Once “Force HTTPS” is enabled on the site’s dashboard, you can enable the “Full” SSL option in the “SSL/TLS” section of the Cloudflare dashboard.
- Do not use Cloudflare’s “Flexible” setting for domains set to Primary on the Flywheel dashboard, as this can cause a redirect loop. .
- In general, we recommend using Cloudflare’s “Full” setting (not Full (strict)) for domains set to Primary on the Flywheel dashboard.
For more details on these settings, see this Cloudflare support guide.
Cloudflare Polish
If you are running a Pro or Business CloudFlare account for your site and wish to utilize the Polish feature, please reach out to Flywheel Support to update our configuration to enable the Image Optimization service to work correctly.
Caching
Cloudflare caches content pretty aggressively, which can cause delays in new content showing, so we recommend enabling their Development Mode setting when making changes to your site. It may also be helpful to install the Cloudflare plugin to manage Cloudflare’s caching of your site.
DNS checkers
Cloudflare acts as a reverse proxy. As a result, when a domain uses Cloudflare, DNS detection tools such as whatsmydns.net or dnscheck.app won’t provide accurate results.
Setup Cloudflare
Getting set up with Cloudflare on Flywheel is quick and easy! Most of the setup is done directly through Cloudflare’s dashboard, and Flywheel doesn’t require any special configurations to get going.
Create a Cloudflare account
If you haven’t yet, you’ll start by creating a Cloudflare account, which is free. You can sign up for Cloudflare at www.cloudflare.com.
Add your site to Cloudflare
Once you’ve got an account set up and you’re signed in, click the + Add Site button.
On the next page, enter your site’s domain in the text field beneath the “Accelerate and protect your site with Cloudflare” header and click “Add site”.
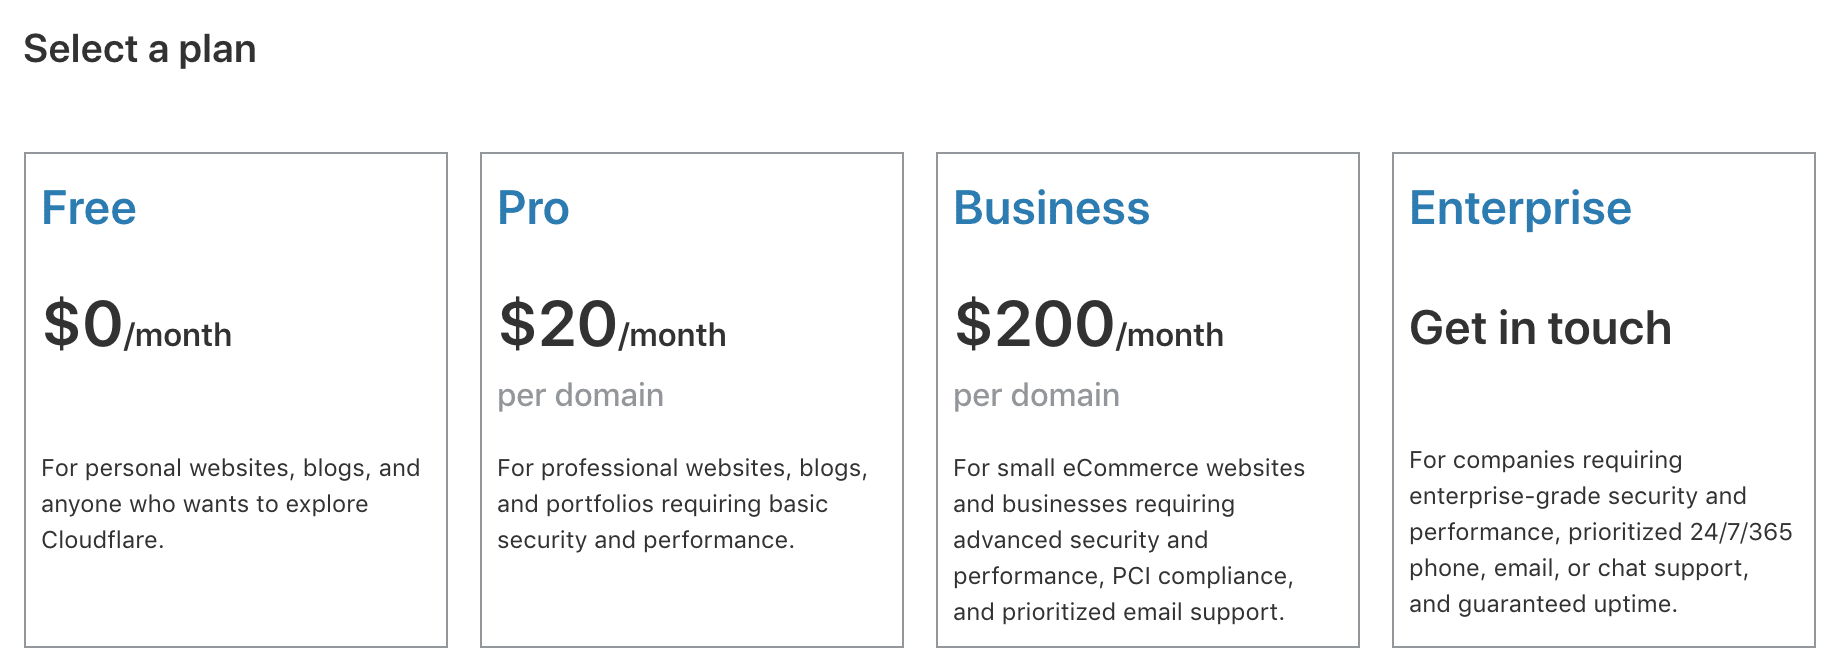
Choose a Cloudflare plan
At this point, you’ll be prompted to select a Cloudflare plan. You can use Cloudflare for free and get many of the benefits, but they do offer additional services at higher plan tiers. Click here for a list of pricing and benefits for each tier.
Import and verify your domain’s DNS records
Once you’ve chosen a plan, Cloudflare will begin scanning the domain to import any DNS records. The scan will take a minute or so, after which Cloudflare will automatically detect any existing DNS records already in place for your domain, including where the domain is currently pointed, and any email settings.
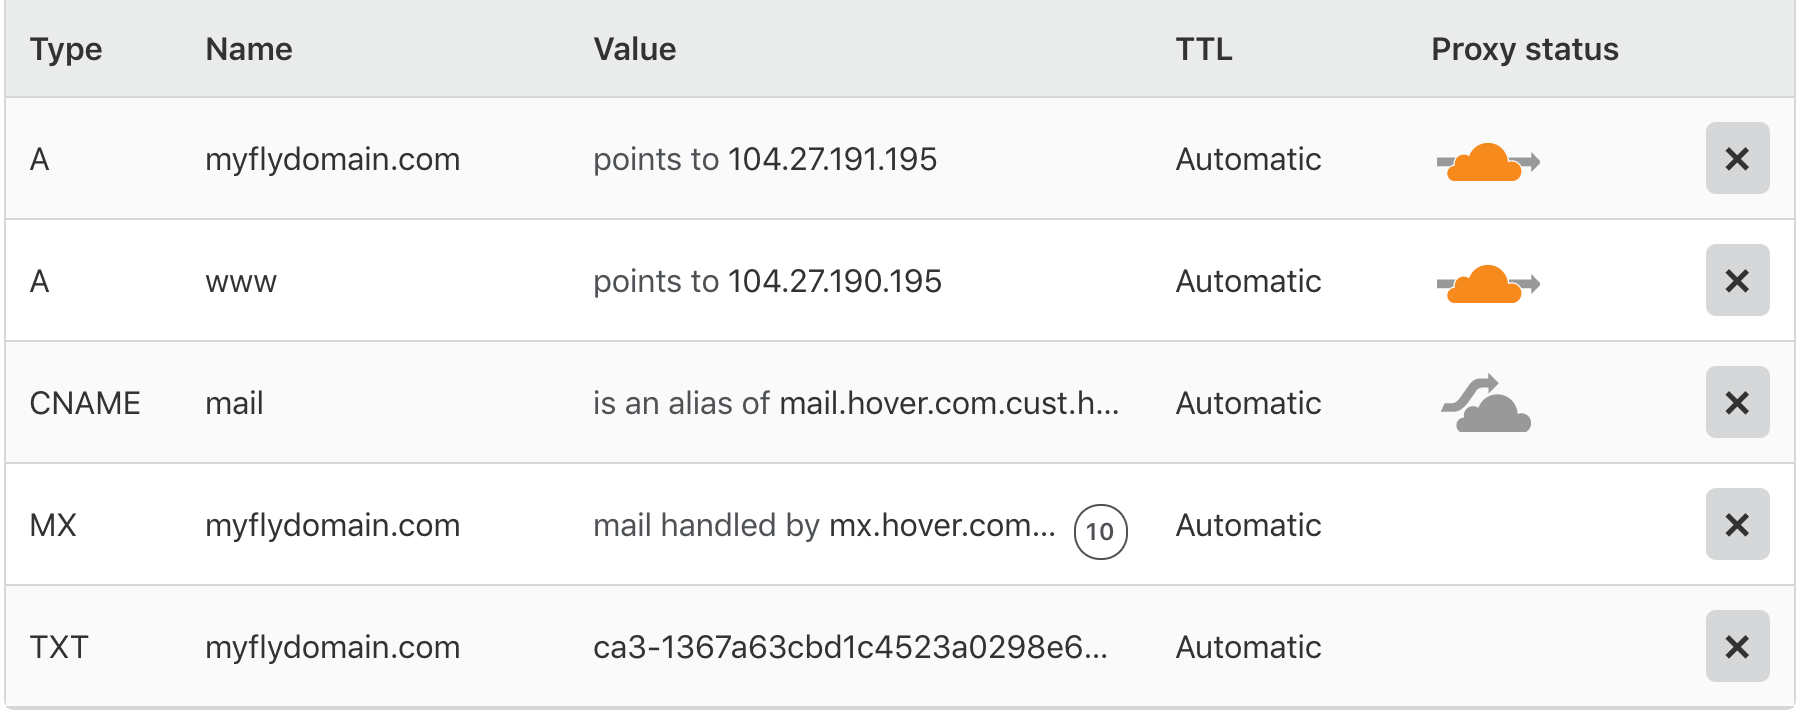
You’ll see a list of your domain’s existing DNS records once Cloudflare detects them. If you need to change any of these settings or add new DNS records, you can do so at this point, but you can most likely just leave these settings alone.
If your domain is already pointed to Flywheel, you probably don’t want to change anything here. Otherwise, you can update now, or you can do that through your Cloudflare dashboard any time after you’ve completed this setup process. (Here’s how to point your DNS records to Flywheel.)
Note that not all records will show the Cloudflare icon in the status column; only records that control actual web traffic, which usually means A records or CNAMEs that redirect to A records. The gray cloud (or none at all) will likely show in the Status for other DNS records. That’s normal. Those will still work; they just won’t be proxied by Cloudflare.
By default, Cloudflare’s auto settings set the Time to Live (TTL) to 300 seconds, so you should see your changes go live within that timeframe.
Note
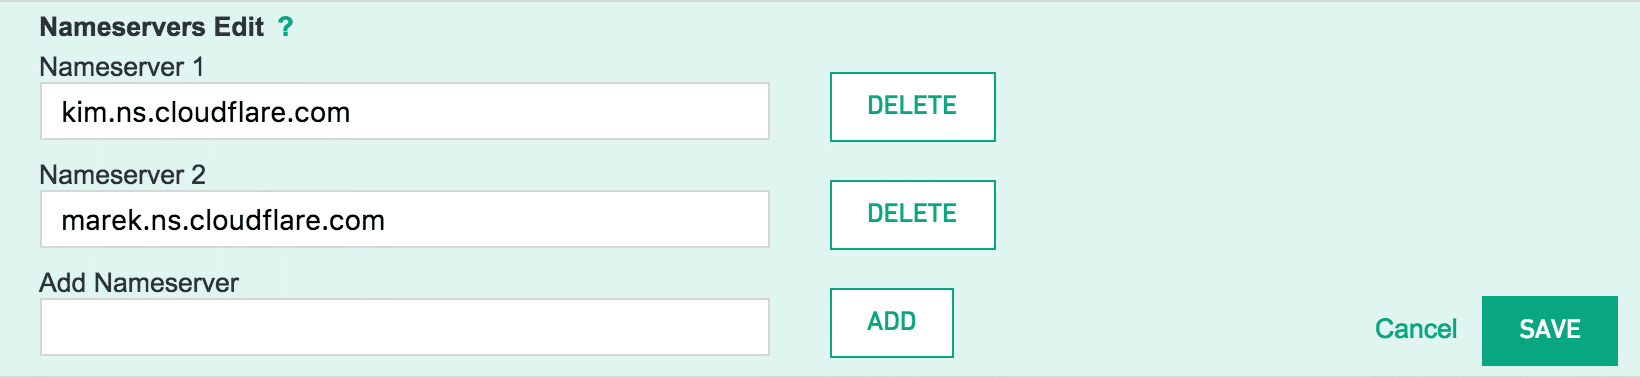
If you have email through your domain, make sure the MX records are in place correctly with Cloudflare! Cloudflare should detect the current settings and carry them over safely, but if not, email may become undeliverable until the MX records are properly updated.Copy Cloudflare’s nameserver values and put them in place with your domain registrar
You’ll be prompted to change your name servers to values provided by Cloudflare. The current nameservers will display up top, with the replacement nameservers listed below.
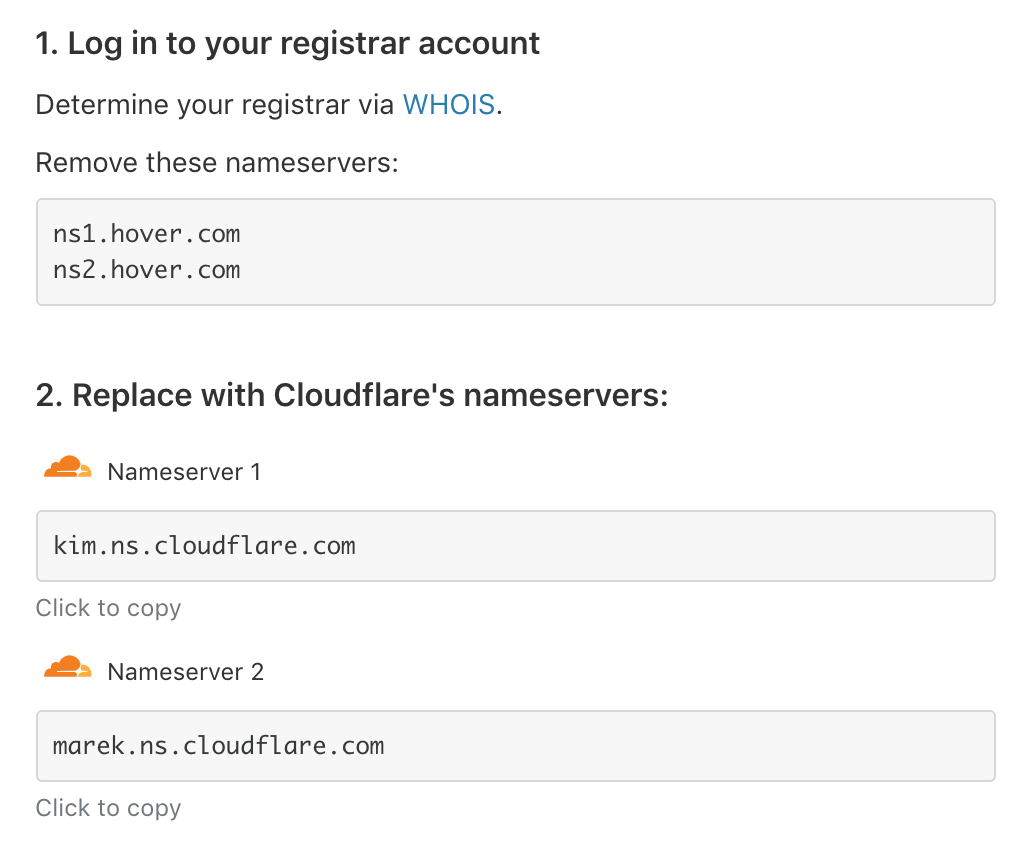
For this step, you’ll need to log into your domain registrar account, locate the nameserver values, and change them to the values provided by Cloudflare.
The specific details of this process will vary depending on your registrar. It may be necessary to check your registrar’s help documentation or reach out to your registrar’s support for assistance changing the nameserver values.
Here’s a screenshot of what changing name server values looks like with Hover, just for reference:
Allow time for propagation
Once you’ve saved the proper Cloudflare name server values in your registrar control panel, click the “Done, check nameservers” button in the Cloudflare dashboard. Most of the time, this doesn’t take more than a few minutes, but changes affecting DNS can sometimes take up to 24 hours. In any case, there won’t be any downtime during the transfer. You can always check the progress manually by clicking “Re-check now”.

Once that’s complete, you’ll get a message confirming Cloudflare has activated.
A note about DNS proxies and Flywheel’s DNS Checker
When managing DNS records using a service with a proxy, like Cloudflare or Sucuri, the Flywheel DNS checker will be able to confirm that DNS is pointed to Flywheel, and will always display a Proxied status on the site’s Domains card.
This is because all requests for the IP address of your domain will return a proxied value, e.g. a Cloudflare IP instead of a Flywheel one. This is the case for all DNS checking tools as well.
In short, this means DNS checkers are not a reliable source for determining propagation status for sites using Cloudflare. If your site isn’t pointing to Flywheel but it should be, make sure to double-check your DNS record values first.
Managing Cloudflare settings
Now that you’re set up with Cloudflare, you can now manage your domain’s DNS settings through your Cloudflare dashboard. If you’re new to Cloudflare, be sure to check out their guide with Top Tips for New Cloudflare Users.
Point Cloudflare DNS to Flywheel
Domains managed by Cloudflare can take advantage of Flywheel’s partnership with Domain Connect, which allows Flywheel to set up DNS records with Cloudflare on your behalf.
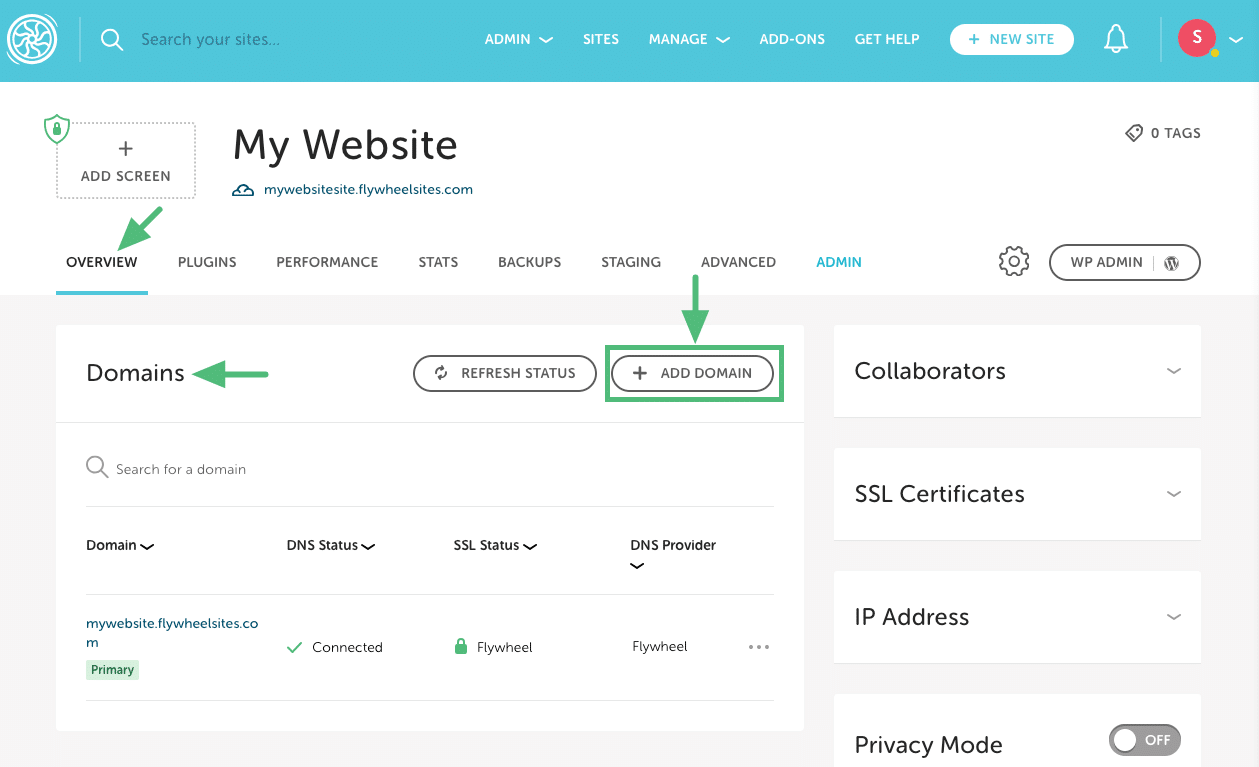
Add the domain to your Flywheel site
From the site’s Overview tab, go to the Domains section and click the + Add Domain button to add the domain you’d like to point to Flywheel.
Next, fill out the domain information as described below.
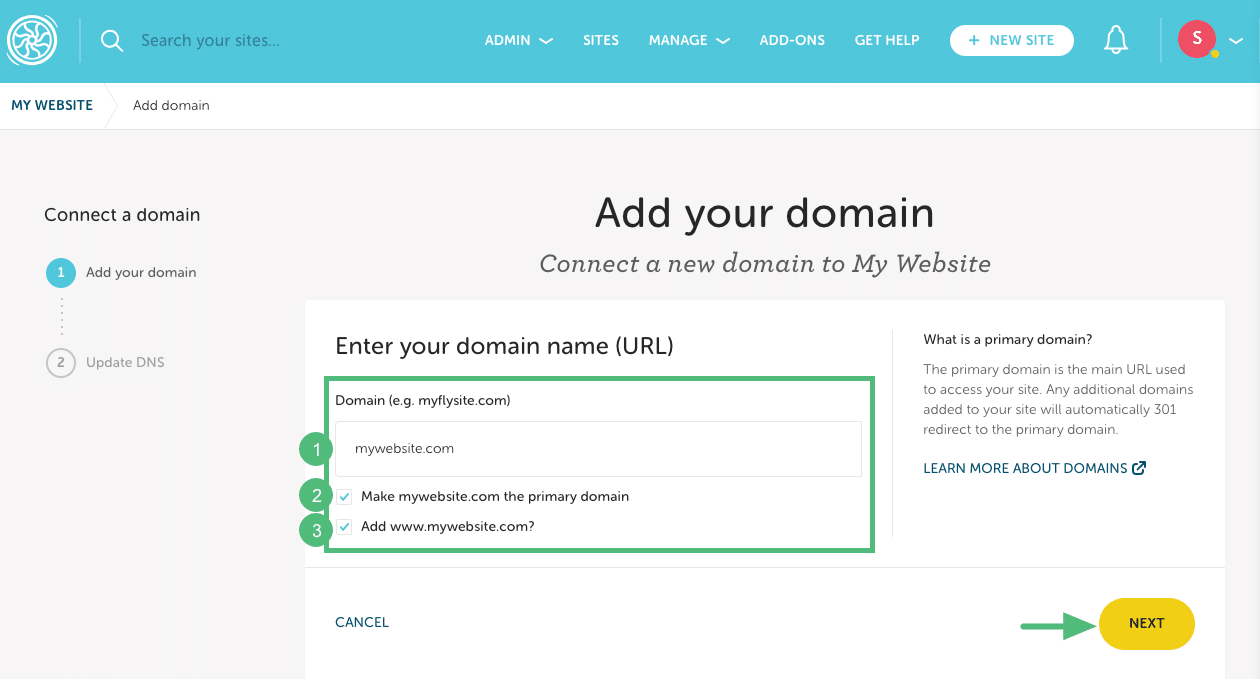
1. Domain: Enter the URL (without a prefix). Example: mywebsite.com
2. Primary domain: Check the box if you want this to be your primary domain (if this will be your site’s main URL).
3. www: By default, the www version of the domain will be added, but you can uncheck the box to skip this step if needed. Example: www.mywebsite.com.
Then click Next.
Note
In the background, our system will automatically update all appropriate URL references in the database to this new primary domain.Log in to Cloudflare and authorize changes
Click the Log in to Cloudflare button, which will take you to your Cloudflare dashboard to sign in.
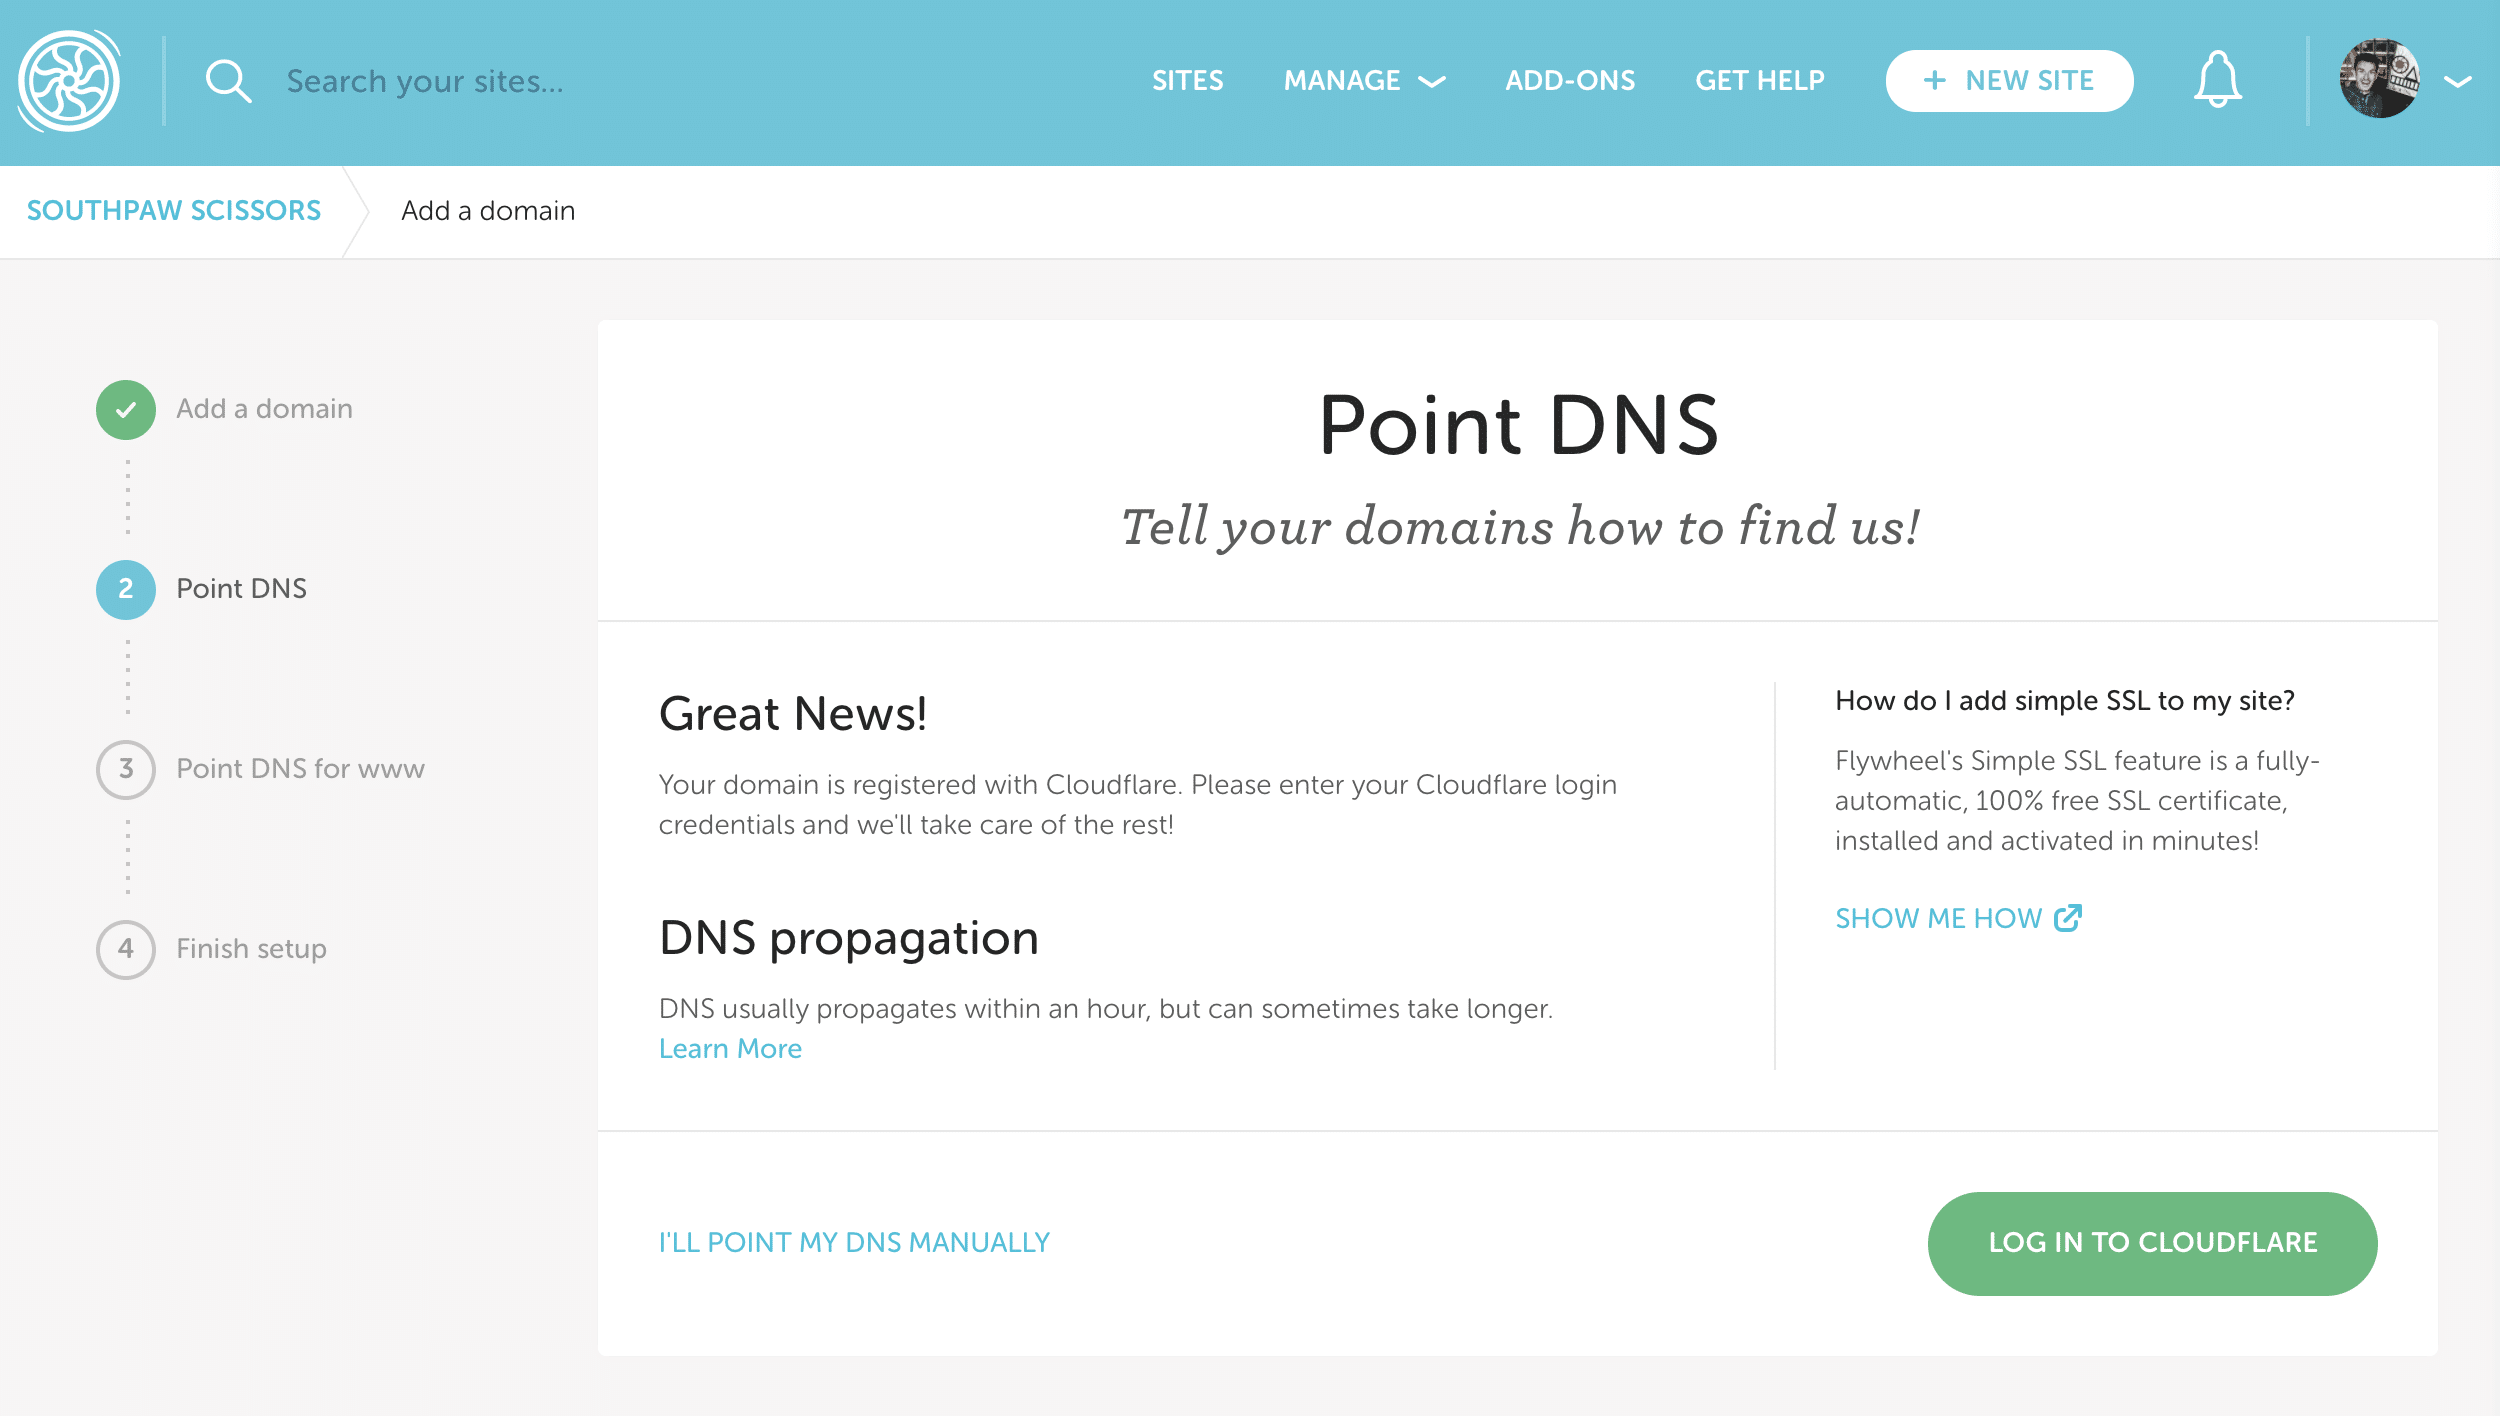
Once you’re signed in, click Authorize to allow Flywheel to make DNS changes.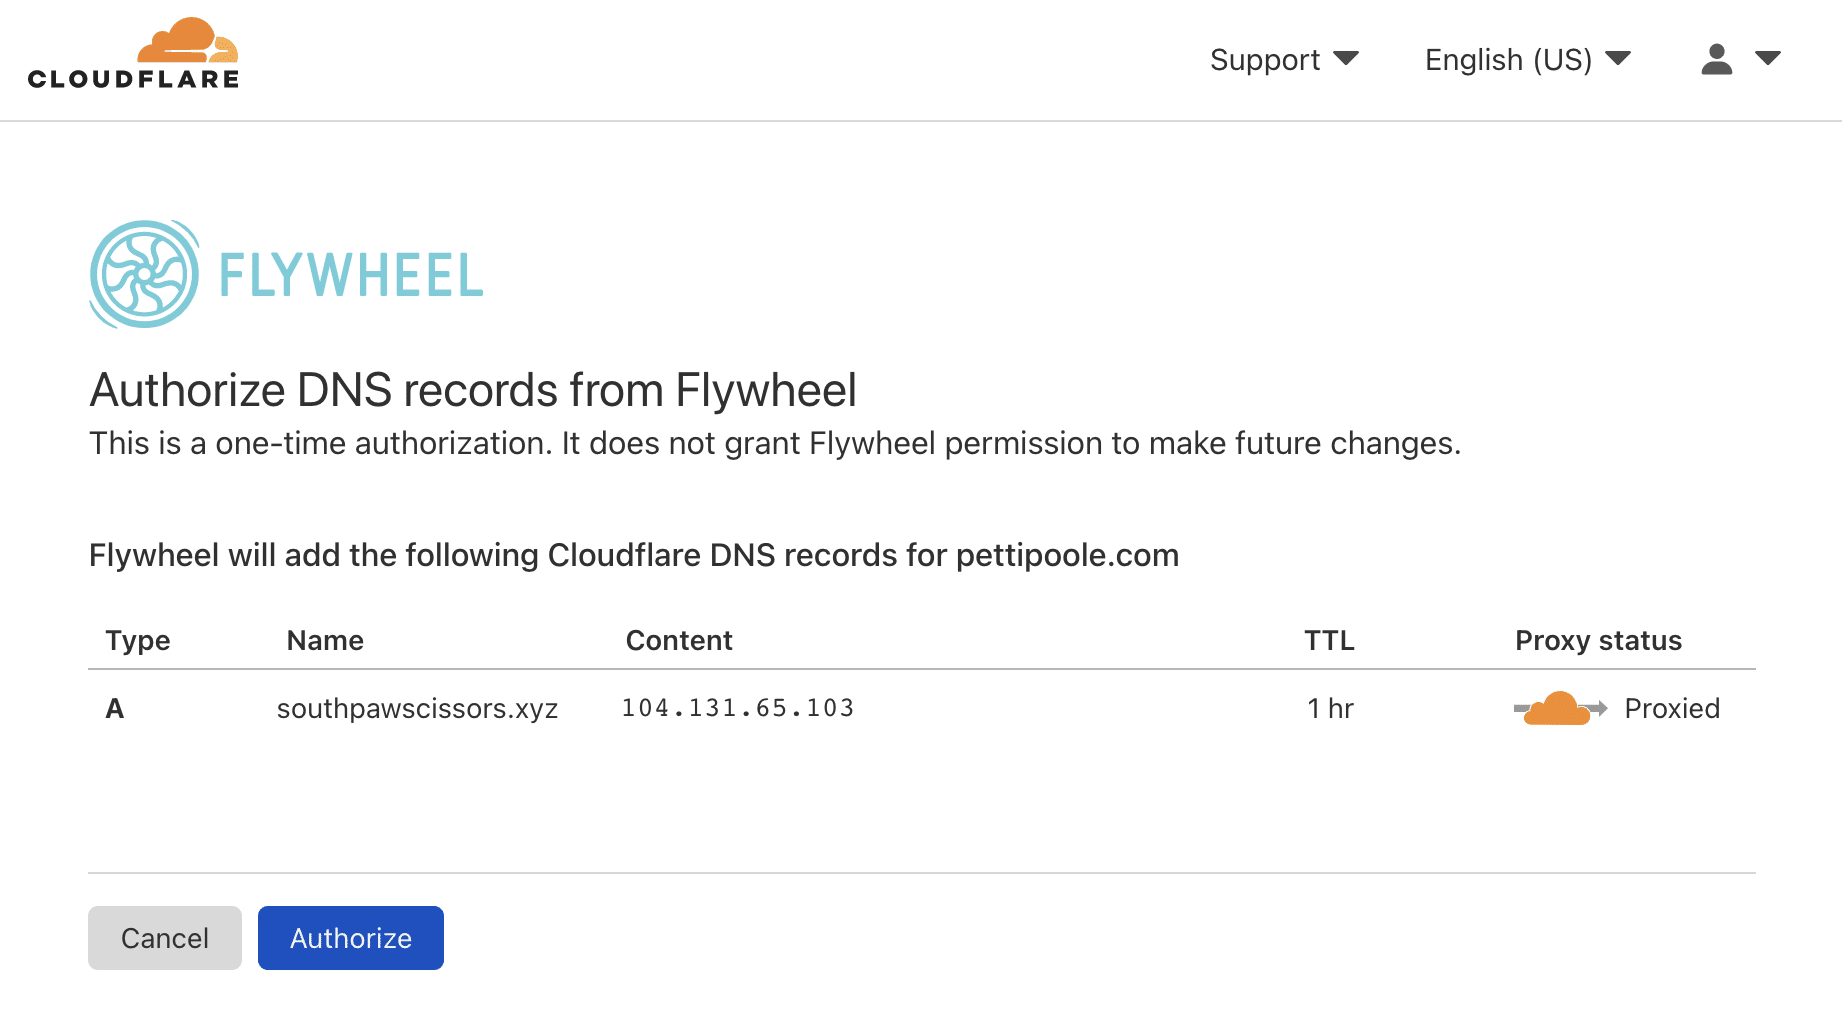
If the www version of your domain was added as well, click Point www at Cloudflare to authorize changes for this subdomain.
Complete the domain setup
Once DNS is updated at Cloudflare, you’ll be taken back to the Flywheel dashboard. Click Back to Site to return to the Overview page.
Repeat the steps above (leaving Primary unchecked) to add any secondary domains.
Verify the domain(s) are pointed
Cloudflare acts as a reverse proxy, so DNS detection tools such as whatsmydns.net or dnscheck.app are not able to provide accurate results. As a result, the Check DNS button will never switch to ✅Pointed status.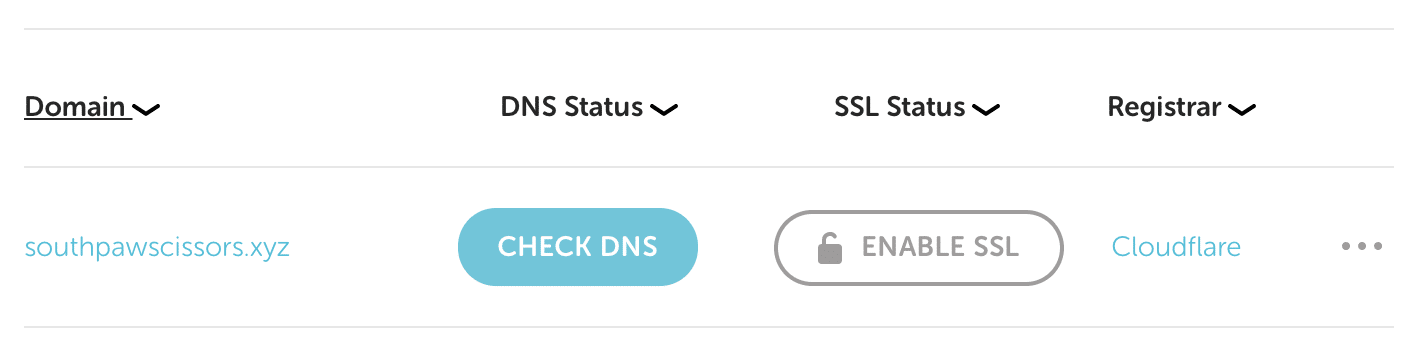
But don’t worry, your site will still resolve to Flywheel, usually after an hour or so. The best way to confirm this is to load up the domain in your browser.
FAQ
My domain is managed by Cloudflare, but Domain Connect isn’t working. What do I do?
If you run into any snags, it’s a good idea to double-check the following first:
- Make sure you complete the entire process. After you log in to Cloudflare and approve the DNS changes, you should be taken back to the Flywheel dashboard and see a “Success! Your domain is now connected to Flywheel.” message. If that doesn’t sound familiar, try adding your domain again.
- Make sure you log in to the correct Cloudflare account. If not, you’ll be unable to authorize the changes.
- Make sure your domain is using Cloudflare’s nameservers. The best way to check this is to log in to your Cloudflare account and check the nameserver settings. More details here.
I pointed my domain successfully, but my site isn’t loading in my browser. What do I need to do?
Most likely, you just need to wait a few minutes, as there is a delay between the time DNS changes are made and when they go into effect. This is known as propagation time.
DNS changes by nature can take 24-48 hours to fully update across the entire internet, though it’s generally much quicker. By default, GoDaddy sets the Time to Live (TTL) setting for each record to 1 hour, so you should see your changes go live within that timeframe. By default, Cloudflare’s auto settings set the Time to Live (TTL) to 300 seconds, so you should see your changes go live within that timeframe.
Disable Cloudflare
When troubleshooting an issue, a good first step is to disable any proxy services, such as Cloudflare, to ensure the service is not contributing to the problem. Below, we’ll outline the three ways to accomplish this.
Table of Contents:
Disable Cloudflare proxy
This method allows you to disable the proxy at the domain name level.
- Log into Cloudflare. Click on your site from the list.
- Select the DNS area.
- Under Proxy Status, click the orange cloud icon to disable Cloudflare. A grey cloud icon indicates Cloudflare is disabled for the domain.
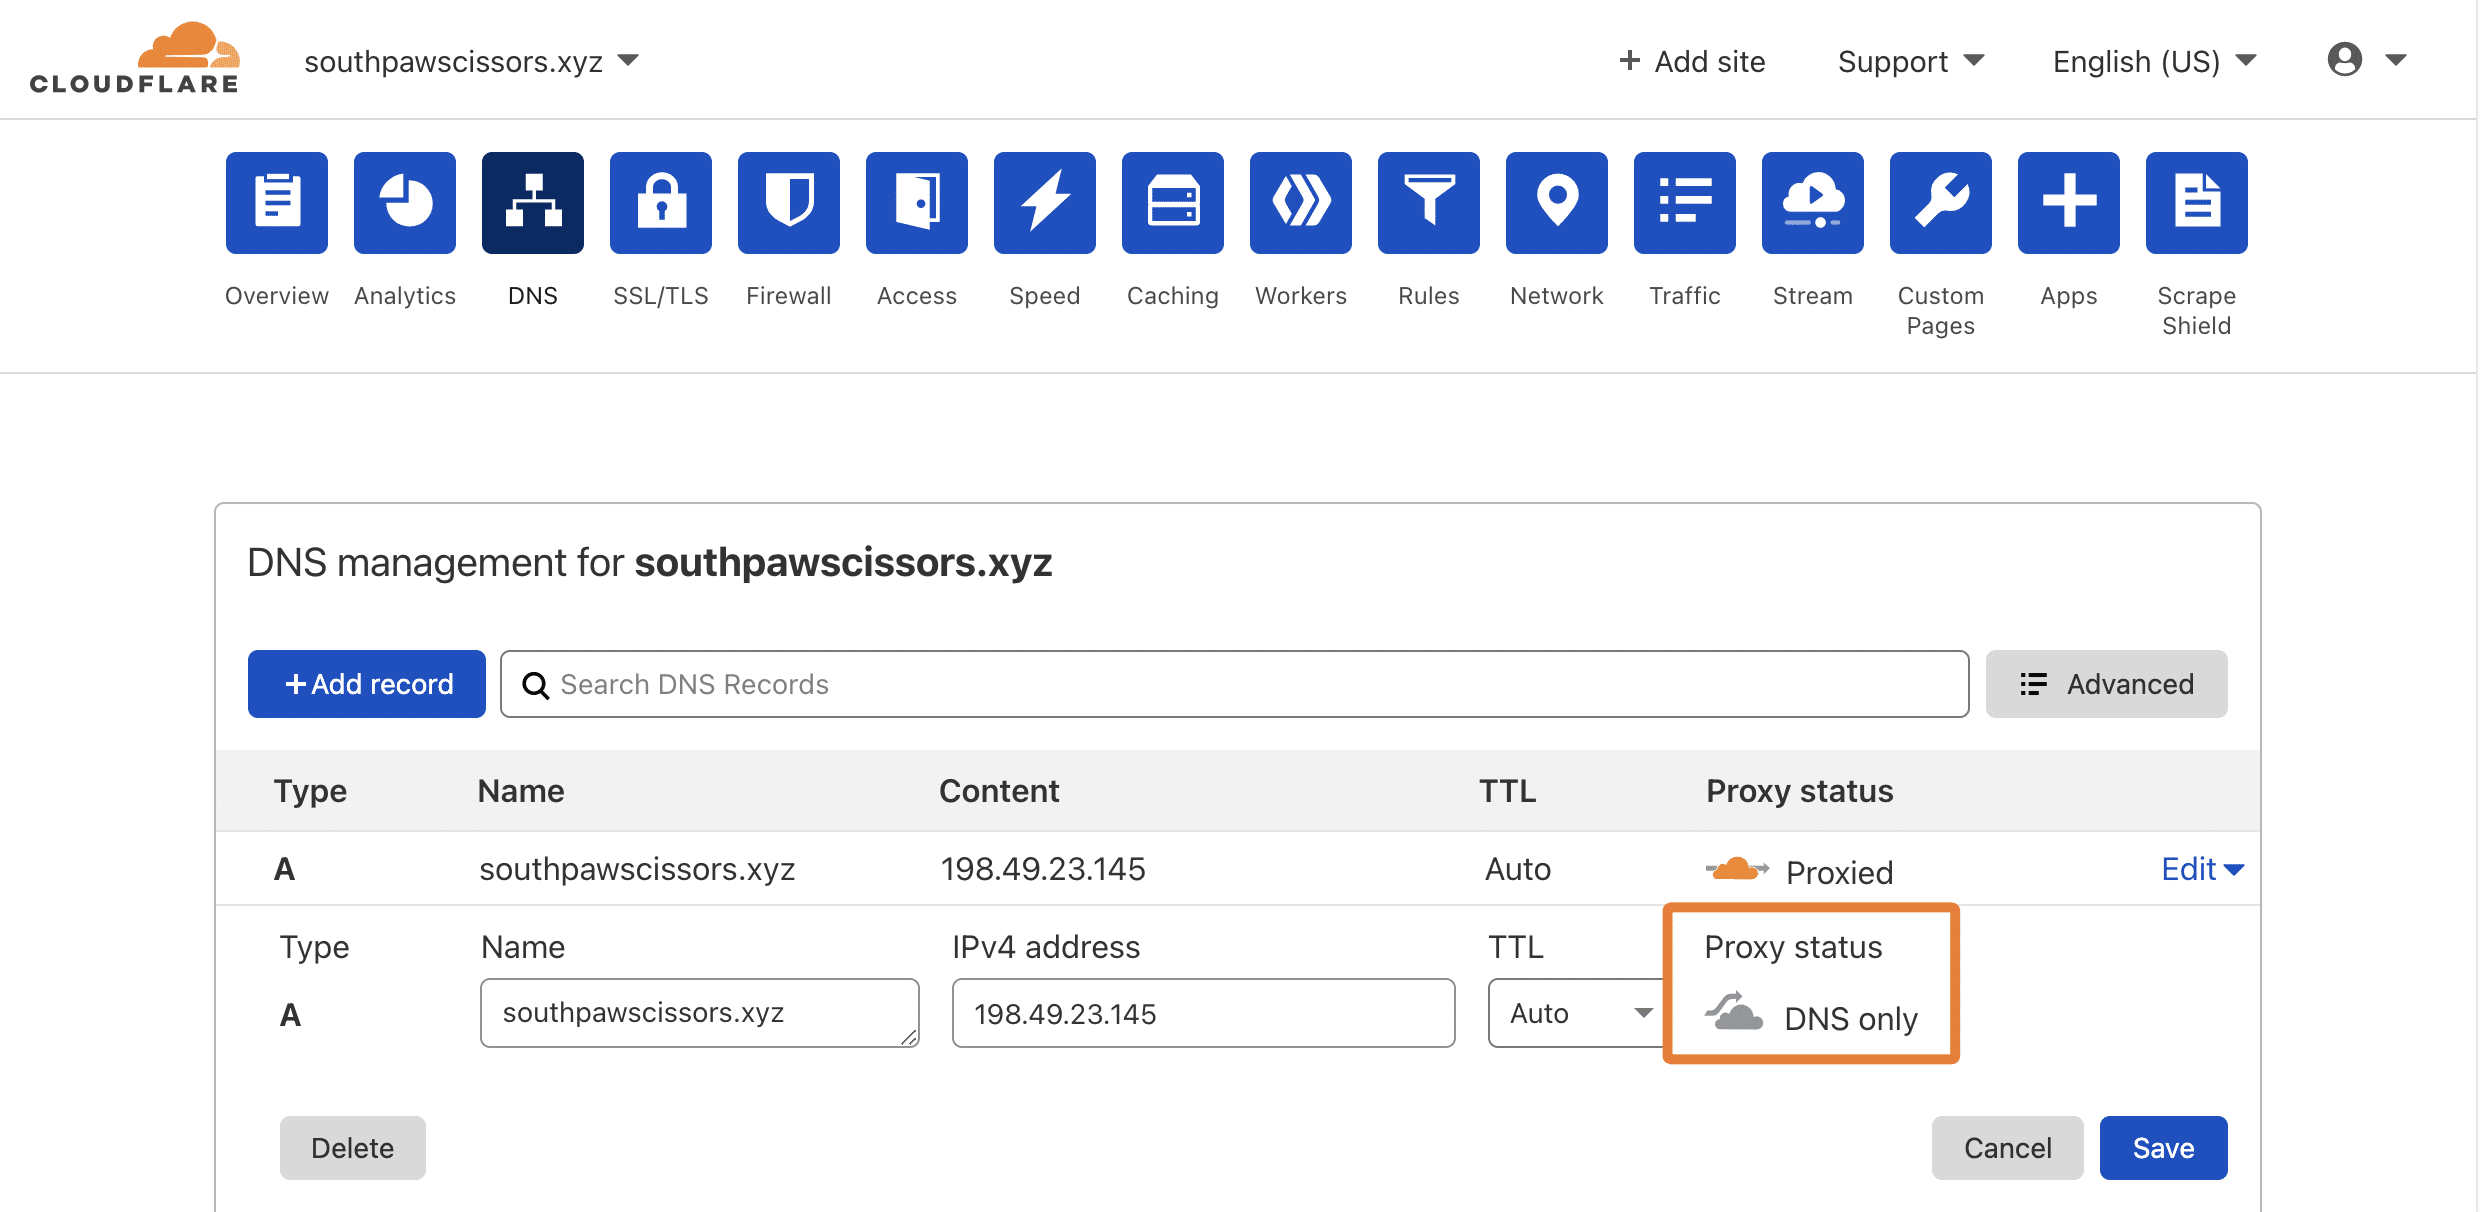
- Click Save.
Pause Cloudflare
This will disable Cloudflare for all domains on a site at once.
- Log into Cloudflare. Click on your site from the list.
- On the next page, scroll down until you find the Advanced Actions section on the right sidebar.
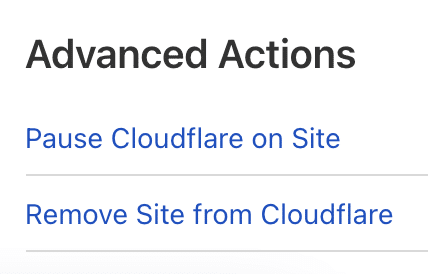
- Click Pause Cloudflare on Site.
- Click Confirm in the pop-up window.
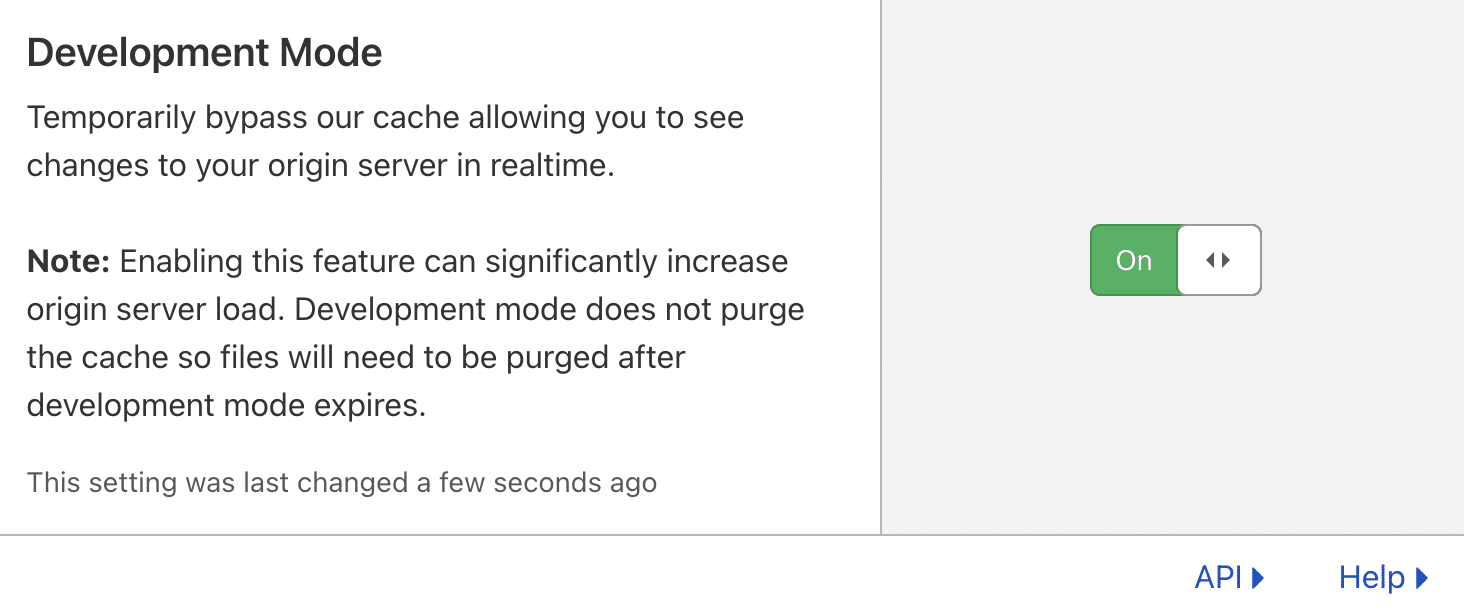
Enable Development Mode
If you’re not sure what this does, we’d suggest using one of the other methods to disable Cloudflare.
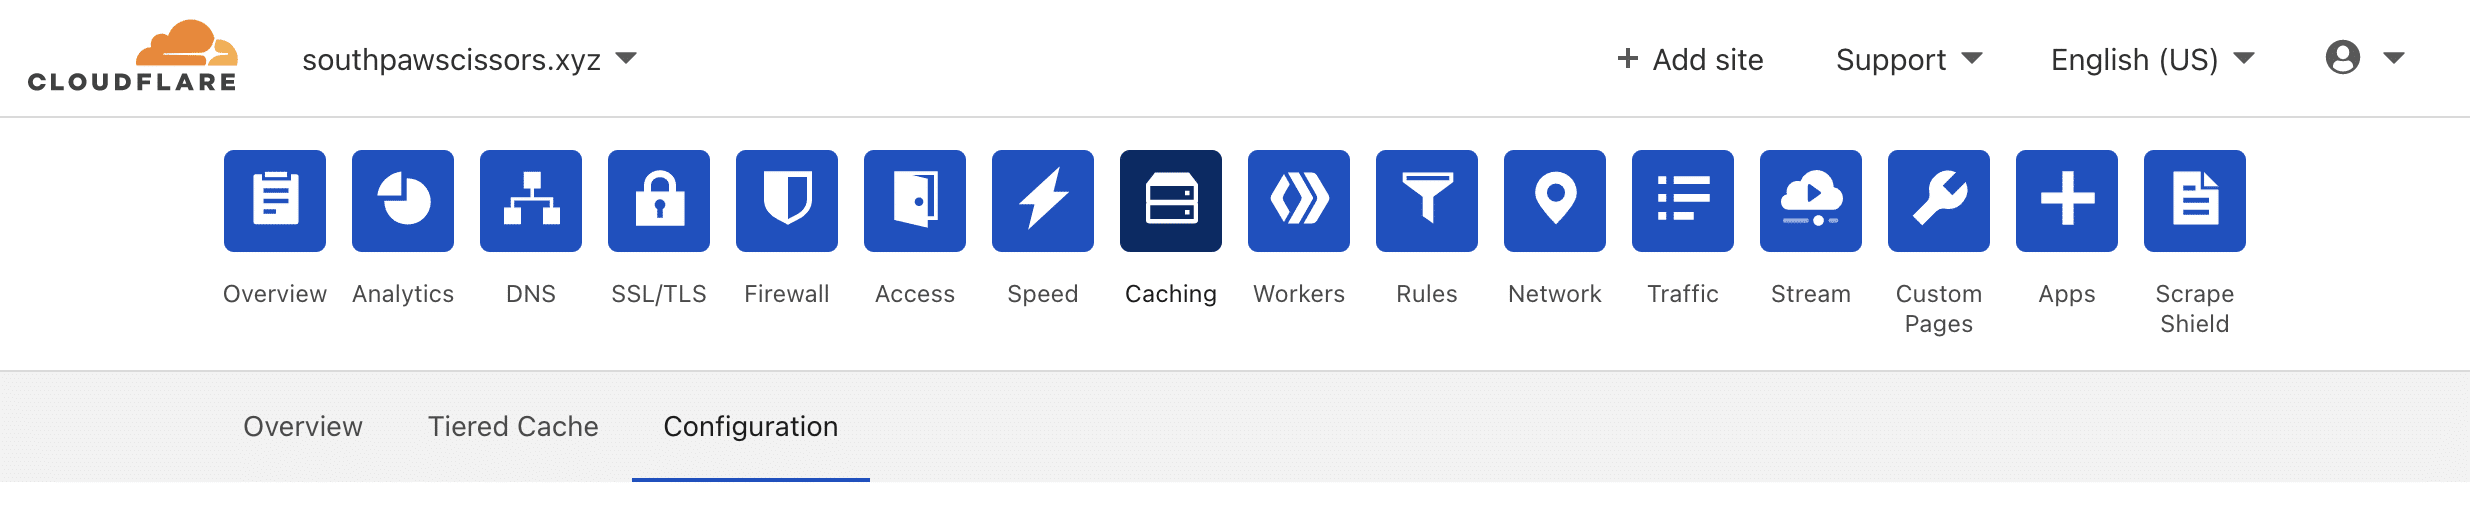
- Log into Cloudflare. Click on your site from the list.
- Click on the Caching icon, then choose the Configuration tab.
- Scroll down the page until you find Development Mode, and turn it on.
Need help?
If you have any questions our Happiness Engineers are here to help!
Getting Started
New to Flywheel? Start here, we've got all the information you'll need to get started and launch your first site!
View allAccount Management
Learn all about managing your Flywheel user account, Teams and integrations.
View allFeatures
Flywheel hosting plans include a ton of great features. Learn about how to get a free SSL certificate, set up a staging site, and more!
View allPlatform Info
All the server and setting info you'll need to help you get the most out of your Flywheel hosting plan!
View allSite Management
Tips and tricks for managing your sites on Flywheel, including going live, troubleshooting issues and migrating or cloning sites.
View allGrowth Suite
Learn more about Growth Suite, our all-in-one solution for freelancers and agencies to grow more quickly and predictably.
Getting started with Growth Suite
Growth Suite: What are invoice statuses?
Growth Suite: What do client emails look like?
Managed Plugin Updates
Learn more about Managed Plugin Updates, and how you can keep your sites up to date, and extra safe.
-
Restoring Plugin and Theme Management on Flywheel
-
Managed Plugin Updates: Database upgrades
-
Managed Plugin Updates: Pause plugin updates
Local
View the Local help docs
Looking for a logo?
We can help! Check out our Brand Resources page for links to all of our brand assets.
Brand Resources